Page actions
The 'Page Actions' section is used to create conditional actions based on specific criteria after submitting the page:
- Validation: This action is mainly used to define a custom validation based on answers given, apart from the default validation. If the validation failed, an error message is displayed and the contact is returned to the page. If the validation is ok, the contact continues the survey
- Identity: Identifying contacts based on his responses (e.g. filled out email address)
- Jump: Skipping pages using 'Jump'
- Stored Procedure: Execution of a Stored Procedure
- Webservice: Allows a call to a webservice
- Action Properties: Display the properties of the selected action.
- Delete: Removes the selected action from the list
- Up: Moves up the selected action.
- Down: Moves down the selected action.
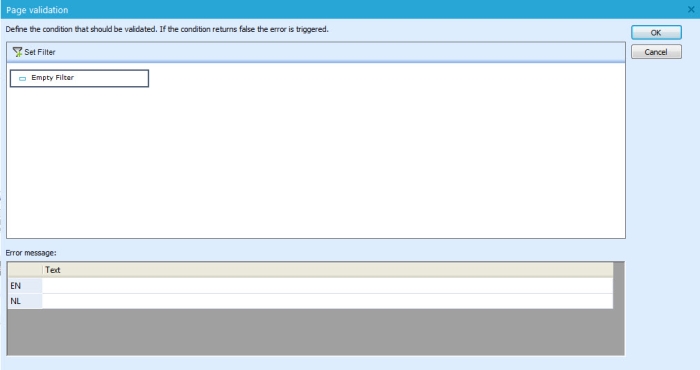
A validation is used to custom validate the content of the page. The validation can combine different criteria: form values, stored survey values, values from the audience list or one of its profile extensions or write your own sql validation filter (e.g. to check dates...). When the validation fails, the contact is returned to the page and an error message is displayed. If the validation passes, the contact can continue the form. The validation is always performed when the page is submitted but before the data is stored.
When inserting a validation , the following properties are set:
- Filter definition
- Error message configuration
Filter definition
A filter can be defined by using information from
- Form: criteria are defined based on values in the form, for instance answers to questions
- Data: criteria are based on data in the database: stored form values, audience list or profile extension values.
- A custom sql constraint
Clicking the 'Set filter' button displays the first tab of the filter definition: Form.
Error message configuration
For each language used in the form an error message can be defined. This message is then displayed when the criteria are not validated.
This works similar to the 'Lookup' component in a journey and finds the contact based on answers given in the form. The Identity lookup links the contact's answers on a form to their contact profile. We recommend that this lookup be executed at the following moments in a journey: before a page visit, before data validation, before data storing, or after a data store. Depending on the result of the verification, the event 'OnFound' or 'NotOnFound' is triggered and the associated event can be configured.
General
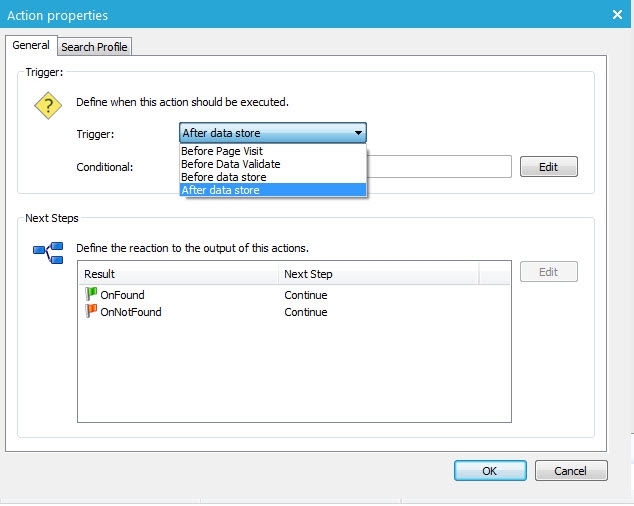
The 'General' section defines the way the action is triggered and also what has to be done after or before.
The 'Trigger' defines when the action is launched. Possible options are:
- before page visit
- before data validate
- before data store
- after date store
E.g. the contact has to fill out a customer number field. Use this to find the contact 'before the data is stored'.
In the 'Next steps' section
define the following steps to be taken after the execution of the action
and based on the outcome of the action.
Select the result (OnFound or OnNotFound) and press the 'Edit'
button:
Three possibilities are available:
- Continue: Form continues its logical execution. E.g. If you selected 'Before data store', the data is now stored and the survey continues to the next page.
- Go back to previous page: the contact is redirected to the page he came from.
- Jump to page: another page is displayed. Form skips the logical execution. E.g. If you selected 'Before data store', the data is not stored on the form jumps to the indicated page.
It’s also possible to define a custom error message in order to warn the contact that a redirection has occurred. E.g. If the contact did not fill out a valid customer number, return to the page and display an error message.
Search profile
In this section define the lookup constraint used to identify the contact in the audience list.
example: MAIL='~@MAIL~' where @MAIL is the submitted value of a text field component with field name MAIL on the form page.
When the contact has been found, it's possible to link the current form record to the contact in the Audience list. Hence, the participation to the form isn't anonymous anymore.
As the name states, the Jump action allows skipping to another page when conditions are met.
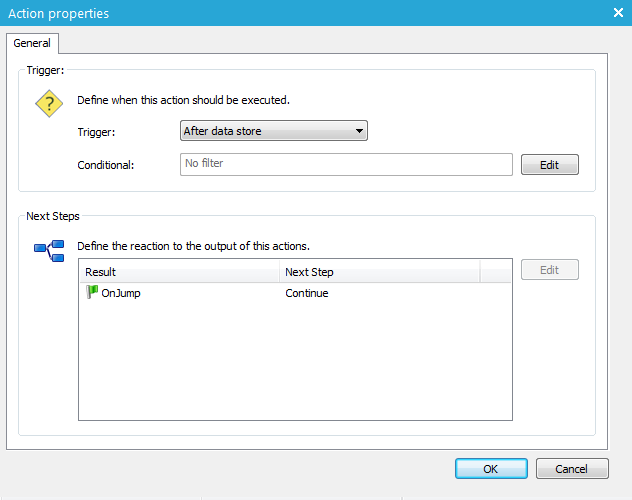
General
The 'Trigger' defines when the action is launched. Possible triggers are:
- Before page visit
- Before data is validated
- Before data is stored
- After data is stored
In the 'Next steps' section define the page to jump to.
Three possibilities are available:
- Continue: the survey continues its logical execution. E.g. If you selected 'Before data store', the data is now stored and the form continues to the next page.
- Go back to previous page: the contact is redirected to the page the came from.
- Jump to page: another page is displayed. Form skips the logical execution. E.g. If you selected 'Before data store', the data is not stored on the form jumps to the indicated page.
It’s also possible to define a custom error message in order to warn the user that a redirection has occurred.
Example:
After filling out the first page and submitting it (e.g., Account update), a jump is made to the first page again and a message is displayed (e.g., 'Your account is updated').
A Stored Procedure is executed when conditions are met. E.g. to load the contacts last purchase data to use in the form.
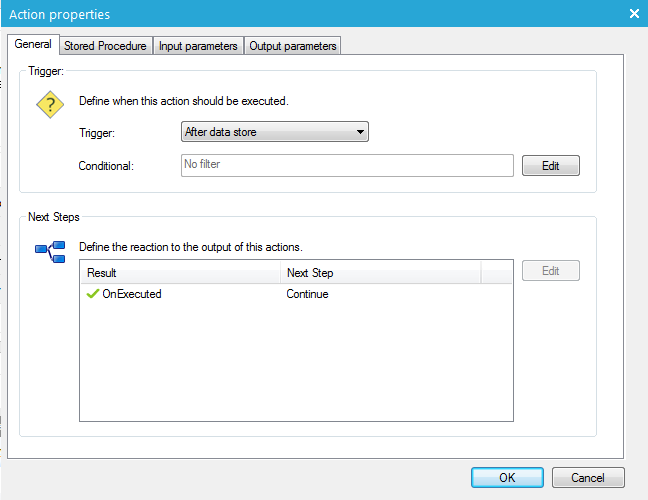
General
The 'Trigger' defines when the action is launched. Possible triggers are:
- Before page visit
- Before data validate
- Before data store
- After data store
In the 'Next steps' section define what happens shown when the event is triggered. continue, go back or jump to a page.
Stored Procedure
Input parameters
The list of input parameters is defined automatically when the Stored Procedure is loaded. Enter the values that must be assigned to the parameters. These can be text, numeric or submitted values from the survey page, e.g. ~@QUESTION1~ or stored form values, e.g. ~QUESTION1~. QUESTION1 is the component's field name or form field name respectively.
Use tildes (~) for submitted values are list values. Use single quotes for textual values.
Output parameters
The Stored Procedure's output parameters are detected automatically when the Stored Procedure is loaded. There is always at least one parameter stored in the @return_value parameter. This is a numeric value indicating the status of the Stored Procedure. In the right column, enter the values to be used in the form's next page. E.g. @PURCHASE_DATE.
A webservice is executed when the condition is met:
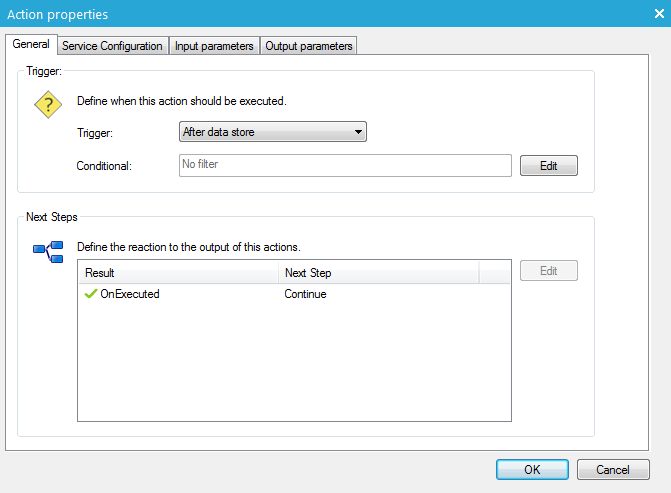
General
The 'Trigger' defines when the action is launched. Possible triggers are:
- Before page visit
- Before data validate
- Before data store
- After data store
In the 'Next steps' section define what happens shown when the event is triggered. continue, go back or jump to a page.
Service configuration
Enter the location and name of the WSDL file. Use the [..] button next to the field to browse the location of the file. (A WSDL file contains the description if the webservice.)
Press 'Load'. Loading the WSDL allows retrieving information from this file which is used further on).
The 'Operation' field now displays a list of possible operations that can be performed on the selected service. Select one. (Example Copy, Update, GetMaster, etc.)
Enter the name of the server where the service is situated.
In the 'Authentication' section a choice can be made:
- a login and password for basic authentication
- a client certificate. In this case the client certificates need to be installed.
Input parameters
Selligent detects the parameters to be passed to the service. All found parameters are displayed here.
Enter the values to be passed for each of these input parameters. These can be text, numeric or submitted values from the form page, e.g. ~@QUESTION1~ or stored form values, e.g. ~QUESTION1~. QUESTION1 is the component's field name or form field name respectively.
Use tildes (~) for submitted values are list values. Use single quotes for textual values.
Output parameters
The list of output parameters is automatically detected when the WSDL is loaded. In the right column, enter the values to be used in the form's next page. E.g. @PURCHASE_DATE.

