When creating an endpoint for the Meta Custom Audience list functionality, an access token is required. An access token is required to sync data from Selligent to Meta Apps. This part includes 3 different sections: Creating the short-lived access token to generate a long-lived access token. Once you retrieved a long-lived access token, you can create a never-expires access token.
Below you will find the description of how to obtain this Access token:
Create a Short-Lived Access Token
Currently you have the get the User Access Token from Meta’s Graph API explorer at https://developers.facebook.com/tools/explorer.
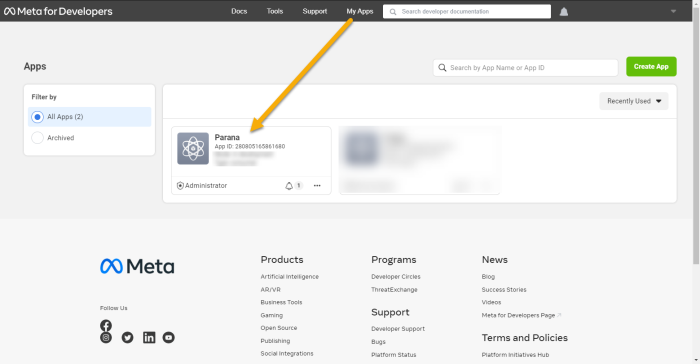
1. In the My Apps you must select an application to associate the access token with.
Note: If you don’t own any application you should create one by clicking the ‘My Apps’ drop-down and then selecting Create App
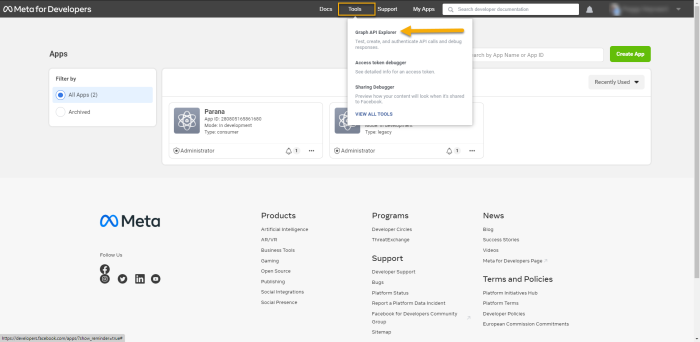
2. Next, go to Tools and select Graph API Explorer :
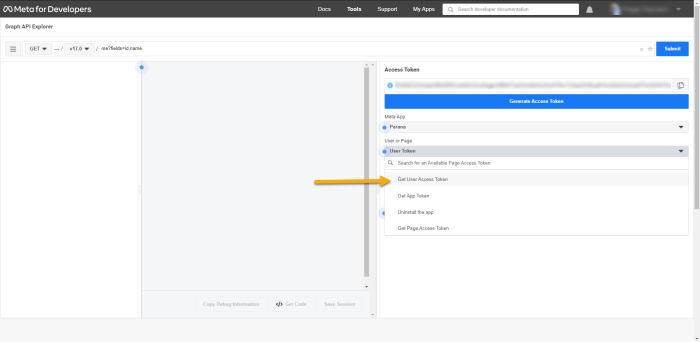
3. Next, click the User or Page drop-down and select Get User Access Token.
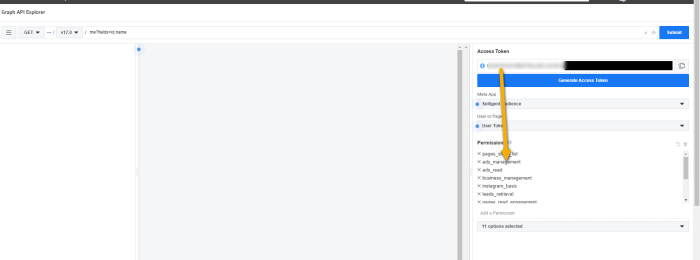
4. Make sure to select ads_management, ads_read, business_management and pages_show_list in the permissions below .
Note : You will have to confirm that you are giving your app permission to make changes to your account. Then the access token will be generated automatically in the first input field. Do not click 'generate access Token' as this will create a new blank token.
Note : This token will only last for 2 hours. However, there is a way to extend it to last for 2 months; see the steps below.
Create a Long-Lived Access Token
1. Go to https://developers.facebook.com/tools/debug/accesstoken/ and copy the access token in the text field and click debug.
2. If this is a short-lived access token (with the necessary permissions) then at the bottom of the debug page you will find the button “Extend Access Token”. Press it to extend the expiry time of the access token with 60 days.
3. Copy that Access Token and proceed to create a never expiring page access token.
Note: Not the entire access_token is shown, click debug to open a new debugger to copy the token.
Create a Never-Expiring Access Token
1. Go tohttps://developers.facebook.com/tools/explorer/.
2. Paste the long-lived access token generated in previous step inside the field “Access token”.
Note: Do not change any settings and do not click 'generate access token'.
3. Get the Access token.
At the top input bar: fill in [YourPageID]?fields=access_token (ex: 123456789?fields= access_token).
Copy the access token in the middle pane and verify this in the access token tool.
System User Access Token
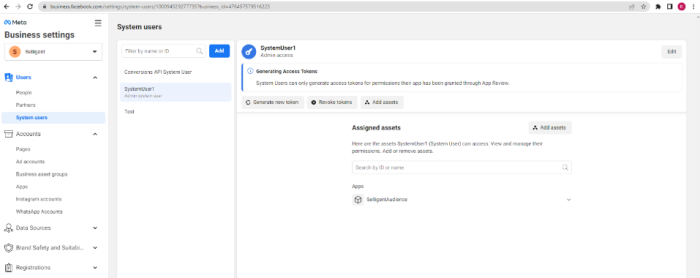
You can also use a system user (not linked to a Meta user) in your Meta business manager settings.
1. Go to https://business.facebook.com/settings (select your account - it needs to be the business manager account where your app was created.)
2. Add a System User (name, select employee or admin).
3. Add Assets (This is the app you created and add full control).
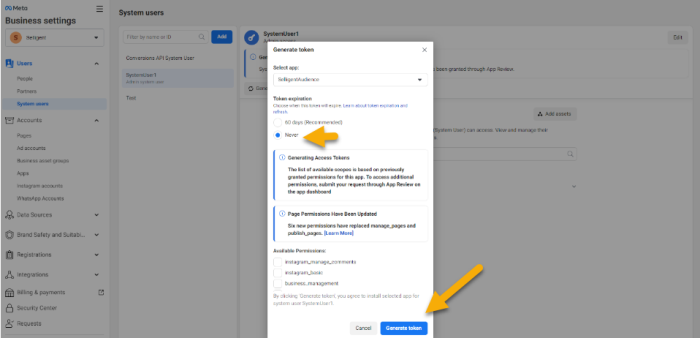
4. Click Generate token.
5. Select the app, set token expiration to never, and select the necessary permissions.
6. Below click Generate token. Copy this token and provide it to Zeta.
Check out the Troubleshooting section (only for technical admins and developers)
Please also check the following Meta documentation for more info about the Custom Audiences integration at Meta side, troubleshooting and more :
- Meta for Developers - Guides : Custom Audiences
- Meta for Business - Business Help Center : About Custom Audiences from Customer Lists
- Metaf for Developers - Tools : Access Token Debugger
