How it works
Export overview
The Export overview lists all configured exports.
The number in front of the export is the number of exported records. The export date and status is provided, as well as a description. Double-click the export to view the properties page that provides information on what is included in the export.
Use the icons in the overview to:
- Launch the export manually. One export every hour is possible.
- Access the properties of the export
Export execution
Exports can be executed automatically or manually.
- Automatically — When the export is scheduled, it is executed during the night. The execution interval is defined in the properties of the export, through the 'When?' section.
- Manually — Manual export is possible once every hour. A manual export is launched from the overview, through the 'Queue export' icon.
Create a new export
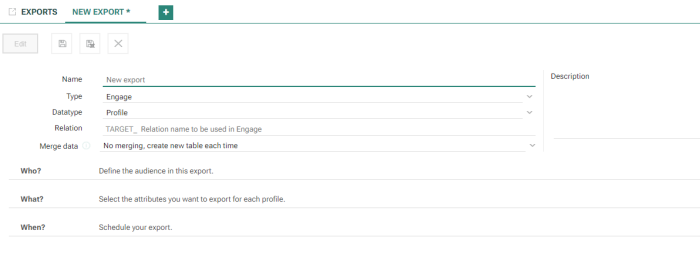
Use the  to create a new export. A new tab is added and the properties page is
displayed.
- Name and Description
- Type — Two types of export can be created: Selligent by Zeta or file.
-
- Selligent by Zeta — An export to Selligent is performed and creates one relation to the Audience list that is selected in the universe properties. This relation contains the fields selected in the export definition. Note that you can only select'Selligent by Zeta'if 'Selligent by Zeta integration' is selected in the universe properties!
- File — The data is exported to a file. the export file contains the fields selected in the export definition.
- Data type — 'Profile', 'tag' or 'offer' can be selected.Offer can only be selected when type is set to File.
In case 'Tag' is selected as data type, all values for a specific tag are exported per profile.
In case Offer is selected, (a selection of) all active offers over a certain timeframe are exported. - Relation — In case of a Selligent export this field defines the name of the relation that needs to be created and linked to the audience list. Per export one relation is created. The relation name for a Selligent export always starts with 'TARGET_'.
In case of a file export, you can enter the file name freely. It is possible to use for instance a date function in the file. A right click in the field gives access to the option 'Insert Date' and allows using the DATE function. The user can decide on the format to use for the date.
- Merge data — you can choose to either merge or not merge the data. When data is merged, new and updated records are added/updated but if records were removed from the selection these will remain available in the list. If data is not merged, the list will be removed and a new one will be created for each export.
With no merging set on the export, this is not required, as the Selligent table is recreated each time.
Who? Define the audience in this export.
Once the general properties are set, define which records must be exported by setting the audience. Click the link 'Edit audience' to access the constraint editor and define constraints and/or group of constraints.
Note: Selligent exports will only include identified profiles.
Note: For datatype Offer, the 'Who?' section is not available.
What? Select the attributes you want to export for this profile
In this section indicate what information should be exported. The way in which this is done differs for the data type selected for export.
Tag data
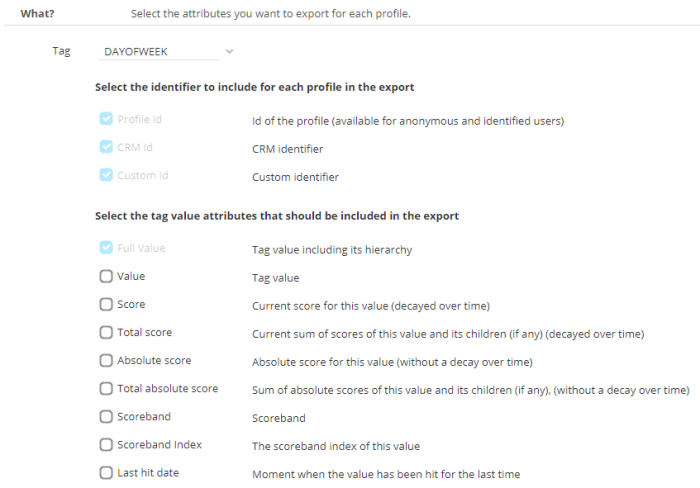
Select first the Tag for which data needs to be exported.
Next, select the values that should be included in the export:
- Identifier to include — Profile id, CRM id and/or Custom id
- Tag value attributes:
- Full value — The tag value including the hierarchy
- Value — The actual tag value
- Score — Score of the tagvalue, decayed over time. The score is calculated at the moment the value is required. The score is updated whenever a new hit is detected.
- Total score — Sum of the scores of this tagvalue and all its children, decayed over time. This score is calculated whenever it is used (see example for score)
- Absolute score — Absolute value of the tagvalue, without decay over time. This score increases with one for every hit.
- Total Absolute score — Sum of the absolute scores of the tagvalue, without decay over time.
- Scoreband — Name of the scoreband for the current profile based on its score for the tagvalue. A scoreband is the ration of the score of the current profile compared to all profiles. This allows to determine whether a certain profile is in the top x percentile of the population.
- Scoreband index— The index of the scoreband for the current profile based on its score for the tagvalue.
- Last hit date — Moment when the value has been hit for the last time
Profile data
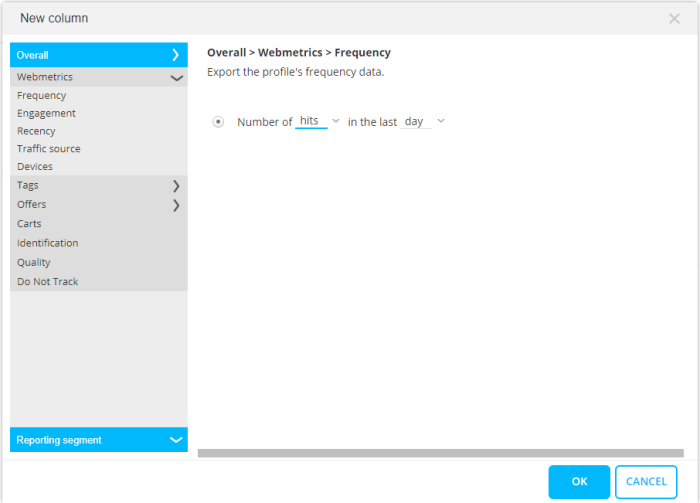
Use the button '+' to access the dialog from where attributes can be selected.
This 'New Column' dialog contains two entries: overall (profile information) and Reporting segments.
- Overall — Export of profile fields, tags and offers
-
- Webmetrics
-
- Frequency — The number of hits/visits in the last day/week/month
- Engagement — Average or total time/pages/visits per visit/day/week/month
- Recency — The first or last hit
- Traffic source — The number of times a visitor comes via a specific channel or the most important or last used traffic source
- Devices — The number of times a specific device is used, what is the most important device, the last one used or the number of different devices
- Tags
- Score — Score of the tagvalue, decayed over time. The score is calculated at the moment the value is required. The score is updated whenever a new hit is detected.
Example: +1 for every hit and 10% decay per day
Day1 12:00: first hit => score=1
Day1 13:00: evaluation of the segment in which the score is used => score= 1- (1/24*0.1)=0.9958. This value is used in the segment but the score remains 1Day1 18:00: second hit so score is calculated => score=1-(6/24*0.1)+1=1.975. This is the new score
Day1 20:00: evaluation of the segment in which the score is used => score is 1.975-(2/24*0.1975)=1.9585. This is used in the segment but the score itself remains 1.975- Absolute score — Absolute value of the tagvalue, without decay over time. This score increases with one for every hit.
- Scoreband for a tag — Name of the scoreband for the current profile based on its score for the tagvalue. A scoreband is the ration of the score of the current profile compared to all profiles. This allows to determine whether a certain profile is in the top x percentile of the population.
Example: The following scores exist for a specific tag
1.1 1.2 1.3 1.5 1.7 1.9 2.0 2.2 2.25 2.4 2.8 2.99 3.17 3.3 3.5 4.2 5.7 8.1 10.1 11
Scorebands are then calculated based on a statistical percentile calculation like this
1.1 1.2 | 1.3 1.5 | 1.7 1.9 | 2.0 2.2 | 2.25 2.4 | 2.8 2.99 | 3.17 3.3 | 3.5 4.2 | 5.7 8.1 | 10.1 11
This implies that 10% of the profiles have a score lower than 1.2
50% of the profiles has a score higher then 2.4
90% of the profiles has a score lower then 8.1
Based on these percentiles, 6 different scorebands are calculated:
Extremely low: all profiles with scores lower than the 20th percentile
Very low: all profiles with scores between the 20th and 40th percentile
Low: all profiles with scores between the 40th and 50th percentile
High: all profiles with scores between the 50th and 60th percentile
Very high: all profiles with scores between the 60th and 80th percentile
Extremely high: all profiles with scores bigger than the 80th percentile- Scoreband index — The index of the scoreband for the current profile based on its score for the tagvalue.
Based on the scorebands created earlier this is:
Extremely low=0
Very low=1
Low= 2
High=3
Very high=4
Extremely high=5- Total score — Sum of the scores of this tagvalue and all its children, decayed over time. This score is calculated whenever it is used (see example for score)
- Offers — Data on the profile's interaction with an offer. When the offer contains actions with multiple content versions (such as AB-test, or rotating content), it is possible to include the different versions in the export and whether the contact has interacted with these versions or not.
- Carts— Data on items and value in a cart, checked out and details on cart handling (last change or abandon)
- Identification — The profile's identification data; the CRM id, if the profile is CRM identified and when,
- Quality — In the case of a quality profile or an active profile.
Note: If a profile is a quality profile, it depends on the settings
at universe level regarding include/exclude criteria; The exported value
is either true or false.
If a profile is active, it depends also on the configuration at universe level.
The setting for Last activity determines if the profile is still active.
- Do not track— The do not track setting of the profile
- CRM— The value of a CRM field and if it contains data.
Note: CRM fields will NOT be exported for a Selligent export
which in a sense is logic as this CRM data came from the Selligent
environment for use in Site. Exporting it again would result in duplicate
data. When trying to select CRM fields for a Selligent export, the user
is informed that these will not be exported. The selected fields will
be displayed in red and stroke through.
-
Reporting segment — Existing Reporting segments can be used in the definition of export. Is the profile in a specific segment, when was it last time in this segment, when did it no longer belong to the segment. All segments for the profile can be exported as well.
For more details on these different elements, please check out the constraint editor topic.
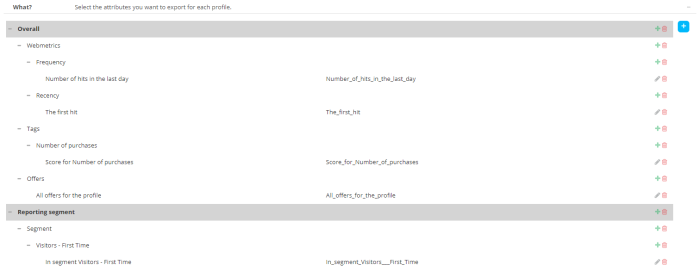
Once all fields are selected, they are displayed in a structured overview. The selected fields are listed in the order in which they were selected, grouping elements of the same type together.
Note: The export column names can be altered. Click the column name to make it editable and change the name. Note however that following names cannot be used: ID, LISTID, USERID, EXPORT_DT. These columns are by default created in the profile extension.
Selected fields can be removed from
the overview by clicking the ![]() icon.
icon.
To add new fields to an already existing category, click the + icon next to the category. The dialog is launched and automatically opens the entry corresponding to the category for which a new field is added.
Offer data
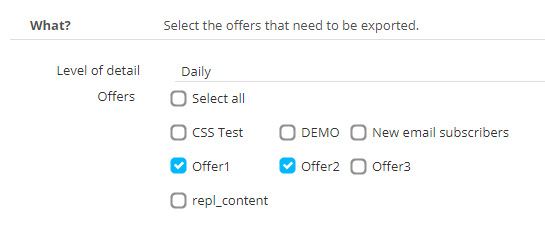
Select the offers that you want to be exported. Only active offers are available.
By default, all offers are selected.
You can select/deselect each offer by checking/unchecking its checkbox.
All offers can be selected/deselected at once by checking/unchecking the Select all/Deselect all checkbox on top.
Also the level of detail can be chosen, to determine the timeframe for which the offers need to be exported.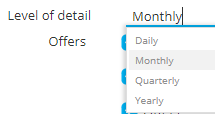
Note: The offer export will be in xls format, and contains the following info :
- The first column contains the dates (depending on the level of detail chosen in the setup).
- All selected offers are in there with the name, number of views, clicks, conversions, click rate (%) and conversion rate (%) for each offer.
- Also totals are available, which is a sum of all views, clicks, conversions, click rates (%) and conversion rates (%) for all exported offers.
Where? Define the export location (only available for file exports)
- FTP type
- FTPS
- SFTP
- FTPS implicit
- FTP server: name of the ftp server where the file must be exported to
- Port
- Login
- Password
- Destination folder: the existing folder on the ftp server in which the file will be exported
Note: when setting up the file export to an ftp server, the export is not immediately available. A validation by the Zeta systems team is required. As long as the export has not been whitelisted a notification is displayed in this section to inform the user of the status.
When? Activate automatic export and set the timing
By default no automatic export is scheduled. Tick the check box to activate the schedule and define the planning:
Planning — Define a start date for the export. When the option ' No end-date' is flagged, the export will be executed continuously. When the option is not flagged, an end-date can be set.
Scheduling— Define if the export is to be executed every day, every week or every month. A selection of the days in a week or in a month can be made.
When an export runs, a list and corresponding relation is automatically created in Selligent by Zeta.
- a profile export results in a 1:1 relation.
- a tag export results in a 1:N relation.
Example of relations in Selligent that correspond to Site exports :
Technical note: The export is always scheduled right after the universe's reporting calculation of that day. This way, the data in the export will be as up-to-date as possible. Also, exports can not overlap with the reporting calculation of the same universe.

