
Programs
The Program Builder provides you with the ability to create a flowchart-style visualization for multi-touch campaigns. Programs can be a useful tool for mapping and planning a complex marketing strategy consisting of multiple channels, campaigns, customer interactions, and decision points.
Access
The Program Builder is accessible by the following method:
-
From the Main menu, select Production > Programs.
Create a New Program
This topic describes how to create a new Program. Programs can also be created from the New Item screen (see Create a New Item: Program for more details).
To create a new Program through the Programs screen:
-
In the Tool Ribbon, click + new Program.
-
A New Item pop-up window is displayed. To select the folder where you want to save this new Program, click the folder name in the Navigation Tree on the left side of this pop-up. The Where? field is updated with the selected folder name.
-
In the Name field, enter a name for your new Program. This name must be unique within the selected folder.
-
Click save new item.
-
The Workspace is refreshed to show a blank Program canvas. This canvas is where you'll build your Program by dragging-and-dropping various items and connecting them together like a flowchart. The Add Items palette on the left-hand side of the Workspace contains all of the available items you can use in your Program, such as campaigns, data imports, and recipient interactions. See below for more details on how to build your Program.
-
Optionally, you can assign one or more tags to your Program. To assign a tag, click on the Add tag field in the Edit > Tags section of the Tool Ribbon. The system displays a pop-up menu of all the existing tags. You can select one of these tags, or type in a new one and press Enter. You can repeat this process to add more tags. To remove a tag, click the X icon next to the tag label.
-
In the Tool Ribbon, click Edit > Actions > Save.
Adding Items
To add an item to your Program, drag it from the palette and drop it onto the canvas.
Once placed on the canvas, items can be linked together into a sequence. Most items have two connection points represented by icons on the left ("input") and right ("output") sides of the object. To make a connection between two objects, click on a connection point from one object, and drag to a connection point on another object. If the connection is valid, the system draws a line between the two objects. Some objects contain more than two connection points. For example, a Response item has one input connection, and two output connections for "received response" and "did not receive response."
See below for an example of how to connect objects together.
Example Program - Connecting Items
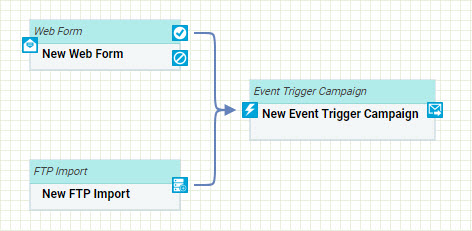
In this example, you'll create a simple Program consisting of a Web Form and an FTP Import that serve as the inputs to an Event-triggered Campaign.
-
Drag a Web Form item and drop it onto the canvas.
-
Drag an FTP Import item and drop it onto the canvas somewhere beneath the Web Form object.
-
Drag a Campaign: Event item and drop it onto the canvas somewhere to the right of the Web Form and FTP Import objects.
-
Click on the Yes connector (check mark icon) on the Web Form object, and drag a line to the input connector of the Campaign object.
-
Click on the output connector on the FTP Import object, and drag a line to the input connector of the Campaign object.
Assigning Items to Program Objects
Some types of objects on the Program canvas (Campaigns, Web Forms, and FTP Imports) can be configured to represent actual items within Cheetah Digital by Zeta. To assign a real item to an object in your Program:
-
Drag-and-drop the desired item onto the canvas (the type of item must be a Campaign, a Web Form, or an FTP Import).
-
Double-click on the object on the canvas.
Note: Not every type of object can be assigned to a real item. You'll notice that the palette is split into two section, separated by a divider line. The objects above this line offer additional configuration settings; the objects below this line do not. So, if you add an object from below this line, such as a "Web Event" for example, then double-click on this object, nothing happens because this type of item doesn't have any configuration options.
A Set Item Details dialog box is displayed with the following options:
-
Create as New Item
-
A New Item dialog box is displayed. Enter the details for the new item.
-
Click save new item.
-
The detail screen for the new item is displayed, and a new tab for the item is added within the Top Navigation Pane.
-
Within the Top Navigation Pane, click the tab for your Program. Your item now appears within the canvas with the name of your new item that you just created.
-
-
Set as an Existing Item
-
A Browse dialog box is displayed.
-
Navigate to and click on the desired item. The dialog box is closed. Your item now appears within the canvas with the name of the item that you just selected.
-
Once you've configured the object to represent a real item, if you double-click on this object again, the system will display the detail screen for that item, and open a new tab for the item in the Top Navigation Pane.
Decisions
In addition to basic items such as campaigns and imports, a Program can contain logic based around the possible ways recipients can react to these items. This functionality can be achieved by utilizing the Decision object type, which includes "yes" and "no" connection points.
Once you add a Decision object to your canvas, you can give it a more descriptive name, which helps make your Program more readable.
-
Drag-and-drop a Decision object onto the canvas.
-
Connect the Decision to other objects on the canvas as needed.
-
Double-click on the Decision object on the canvas. A Describe Decision dialog box is displayed.
-
In the Decision field, enter a description.
-
Click save decision. The dialog box is closed. Your Decision item now appears within the canvas with the description you provided.
See below for an example of how to use a Decision object.
Example Program -- Decision
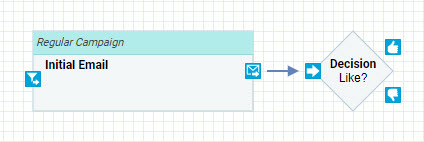
In this example, your Program will represent an initial email marketing campaign followed by a decision point. If the recipients liked what the first campaign had to offer, then they would receive a follow-up campaign. Alternatively, if recipients disliked the initial campaign, they would be sent a survey form.
-
Drag a Campaign: Regular item and drop it onto the canvas.
-
Double-click on the Campaign object in the canvas. A Set Item Details dialog box is displayed.
-
Click create as new item. A New Item dialog box is displayed.
-
To select the folder where you want to save this new Campaign, click the folder name in the Navigation Tree on the left side of this pop-up. The Where? field is updated with the selected folder name.
-
In the Name field, enter Initial Email.
-
From the Data Source drop-down menu, select the Recipient table.
-
From the Type drop-down menu, select Regular (one-time).
-
From the Channel drop-down menu, select Email.
-
Click save new item.
-
The Campaign detail screen is displayed. In the Top Navigation Pane, click the tab for your Program to return to the Program screen.
-
Drag a Decision item and drop it onto the canvas somewhere to the right of the Initial Email Campaign.
-
Double-click on the Decision object in the canvas. A Describe Decision dialog box is displayed.
-
In the Decision field, type in Like?
-
Click save decision.
-
Click on the output connector on the Campaign object, and drag a line to the input connector of the Decision object.
-
Drag a second Campaign: Regular item and drop it onto the canvas somewhere to the right of the Decision object. This Campaign represents the follow-up campaign.
-
Double-click on the Campaign object in the canvas. A Set Item Details dialog box is displayed.
-
Click create as new item. A New Item dialog box is displayed.
-
To select the folder where you want to save this new Campaign, click the folder name in the Navigation Tree on the left side of this pop-up. The Where? field is updated with the selected folder name.
-
In the Name field, enter Follow-up Email.
-
From the Data Source drop-down menu, select the Recipient table.
-
From the Type drop-down menu, select Regular (one-time).
-
From the Channel drop-down menu, select Email.
-
Click save new item.
-
The Campaign detail screen is displayed. In the Top Navigation Pane, click the tab for your Program to return to the Program screen.
-
Click on the Yes connector (thumbs up icon) on the Decision object, and drag a line to the input connector of the Follow-up Email Campaign.

-
Drag a Web Form item and drop it onto the canvas somewhere to the right of the Decision object. This Web Form represents a survey sent to recipients who didn't like the initial campaign.
-
Double-click on the Web Form object in the canvas. A Set Item Details dialog box is displayed.
-
Click create as new item. A New Item dialog box is displayed.
-
To select the folder where you want to save this new Web Form, click the folder name in the Navigation Tree on the left side of this pop-up. The Where? field is updated with the selected folder name.
-
In the Name field, enter Follow-up Survey.
-
From the Data Source drop-down menu, select the Recipient table.
-
From the Type drop-down menu, select Regular.
-
Click save new item.
-
The Web Form detail screen is displayed. In the Top Navigation Pane, click the tab for your Program to return to the Program screen.
-
Click on the No connector (thumbs down icon) on the Decision object, and drag a line to the "input" connector of the Follow-up Survey Web Form.

-
In the Tool Ribbon, click Edit > Actions > Save.
Delays
A Delay is a special type of Program object used to represent a time interval between two events. For example, you might want to sent out an initial marketing campaign, then wait a week before executing a follow-up campaign.
Once you add a Delay object to your canvas, you can define the time interval, which helps make your Program more readable.
-
Drag-and-drop a Delay object onto the canvas.
-
Connect the Delay object to other objects on the canvas as needed.
-
Double-click on the Delay object on the canvas. A Set Delay Duration dialog box is displayed.
-
In the Duration field, enter a numeric value.
-
From the Period drop-down menu, select the unit of time (such as Hours or Days for example).
-
Click save delay. The dialog box is closed. Your Delay item now appears within the canvas, labeled with the time duration you defined.
See below for an example of how to use a Delay object.
Example Program - Delay
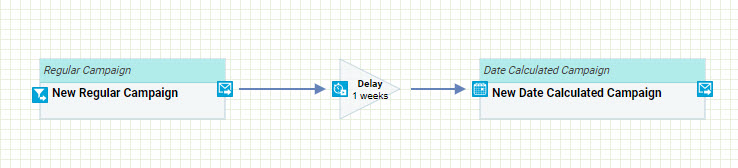
In this example, you'll create a simple Program consisting of an initial campaign, followed by a delay of a week, and then a second campaign.
-
Drag a Campaign: Regular item and drop it onto the canvas.
-
Drag a Delay item and drop it onto the canvas somewhere to the right of the campaign object.
-
Click on the output connector of the Campaign object, and drag a line to the input connector of the Delay object.
-
Double-click on the Delay object. The Set Delay Duration dialog box is displayed.
-
Set a duration of "1 week," then click save delay.
-
Drag a Campaign: Date item and drop it onto the canvas somewhere to the right of the Delay object.
-
Click on the output connector of the Delay object, and drag a line to the input connector of the second Campaign object.
Viewing Options
Beneath the palette of items is the Overview, which provides a thumbnail view of your entire Program. You can use drag the rectangle around to view different sections of the Program canvas. If you drag the "handle" on the bottom-right corner of this rectangle, you can zoom in our out on a specific section.
Magnification settings are also available within the Tool Ribbon by clicking Edit > View > Zoom In or Zoom Out. To reset back to 100% magnification, click Edit > View > Zoom 100%. To make your entire Program visible on the screen, click Edit > View > Fit to Screen.
To create a printer-friendly version of your Program, click Edit > Share > Print in the Tool Ribbon. The system open a separate browser window, with your Program automatically broken up into page-sized components, suitable for printing.
To view your entire Program in a separate browser window, click Edit > Share > Preview in the Tool Ribbon.
Working with Items
The Programs screen provides a variety of tools and commands for working with items once you've added them to your Program canvas.
An item can be moved around the canvas simply by clicking-and-dragging on it. To move multiple items, click-and-drag a rectangle around the desired items in order to select all of them, then drag them to their new location.
To delete an item or a connection line, click on it to select it, then click Edit > Commands > DeleteObject in the Tool Ribbon, or press the Delete key. If you delete an object, any connection lines drawn to this object are also deleted.
Note: Deleting an object that's been linked to an actual item in Cheetah Digital by Zeta will NOT delete that item. For example, let's say you assign a Campaign object in your Program to an actual Campaign named "Initial Email." If you delete that object from the Program canvas, the system does not delete the "Initial Email" Campaign.
The Program function offer basic cut / copy / paste functionality. To cut or copy an object, first click on it to select it, then click Edit > Commands > Copy or Cut in the Tool Ribbon. To paste an object, first cut or copy it to the clipboard, then click Edit > Commands > Paste.
If you make a mistake, click Edit > Commands > Undo to undo your last command. This action can be repeated to undo multiple commands. If you change your mind, click Edit > Commands > Redo to redo an action you just undid.
Copy a Program
To copy an existing item to use as the basis for a new item:
-
Search for the desired item (see Search for an Item for more details).
-
Click on the item name. The main item screen is displayed and populated with the details of the selected item.
-
In the Tool Ribbon, click Edit > Actions > Save as. A Save as dialog box is displayed.
-
Enter a name for the new item.
-
By default, the new item will be saved in the same folder location as the base item. Optionally, click the magnifying glass icon to browse to and select a different folder location.
-
Click save a copy. The system creates a copy of the selected item.
View or Edit a Program
To view or edit an existing Program:
-
Search for the desired Program (see Search for an Item for more details on the available search methods).
-
Click on the Program name. The Program screen is displayed and populated with the details of the selected Program.
-
Optionally, to view detailed information about the Program, click the Program tab in the Tool Ribbon. The Item Details screen is displayed, showing who created the item, who modified it last, and what the last actions taken on the item were. On this screen, click Related Items in the Function Menu to see other items in the system that reference or utilize this Program. When finished, click the Edit tab in the Tool Ribbon to return to the main edit screen.
-
Make any necessary changes to the Program (see Create New Program for more details on working with objects and building a Program).
-
Optionally, to rename the Program, click Edit > Actions > Rename. A Rename Item dialog box is displayed. Enter a new name for the Program, then click save new name.
-
Optionally, you can assign one or more tags to your Program. To assign a tag, click on the Add tag field in the Edit > Tags section of the Tool Ribbon. The system displays a pop-up menu of all the existing tags. You can select one of these tags, or type in a new one and press Enter. You can repeat this process to add more tags. To remove a tag, click the X icon next to the tag label.
-
To save your changes, click Edit > Actions > Save in the Tool Ribbon.
Delete a Program
To delete an item:
-
Search for the desired item (see Search for an Item for more details).
-
Click on the item name. The main item screen is displayed and populated with the details of the selected item.
-
In the Tool Ribbon, click Edit > Actions > Delete. A confirmation dialog box is displayed.
-
Click delete item to confirm the deletion.
Foldered items are moved to the Recycle Bin. Non-foldered items are permanently deleted.
