
Mobile Push Application Groups
The Mobile Push Application Groups screen is used to register your mobile app (or apps) within Cheetah Digital. You must register your mobile app if you intend to use the Push Notification channel to contact your customers.
Apps can be organized into "Application Groups," which simplifies the process of sending out notifications. When you create a Push Notification Campaign, the notifications are sent out to an entire Application Group at once. For example, if you have an iOS version and a Google Android version of an app, you could add both versions to the same Application Group, and send out notifications to both versions of the app at the same time.
The Mobile Push Application Groups screen is accessible by the following method:
-
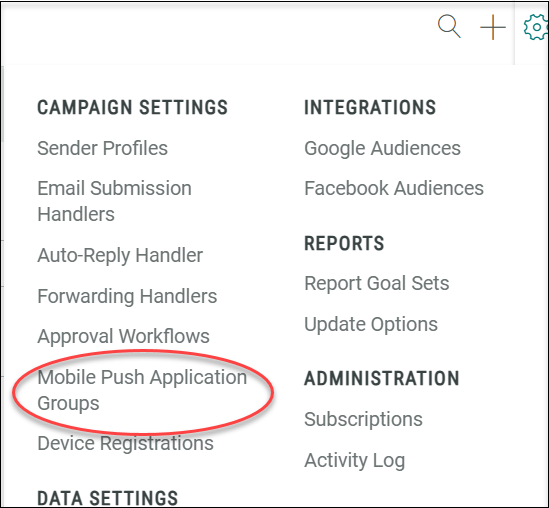
From the System Tray, select Settings > Campaign Settings > Mobile Push Application Groups.
Create a New Application Group
To create a new application group:
-
In the top menu bar, select Settings > Campaign Settings > Mobile Push Application Groups.
-
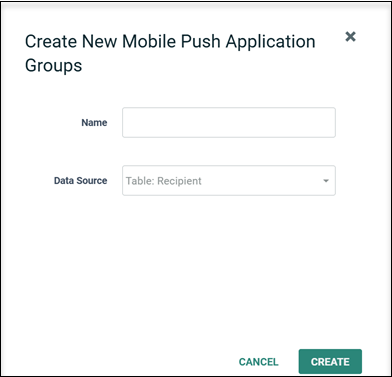
Click the new item button (plus-sign icon) above the list of existing application groups. The New Mobile Push Application Group pop-up window is displayed.
-
Enter a name for your new application group.
-
Select the primary recipient table that will be used for sending your push campaign. For cross-channel orchestration, this should be the same primary recipient table that is used for email and SMS campaigns as well. This means that email, SMS, and mobile push message can all be deployed from and associated with a single recipient record, allowing channel activities from that recipient record to be easily queried and coordinated.
-
Click Save new item. A blank Mobile Push Application Group screen appears, allowing you to add mobile apps to the group.
Add New Application
Follow these steps to add a mobile app to the application group:
-
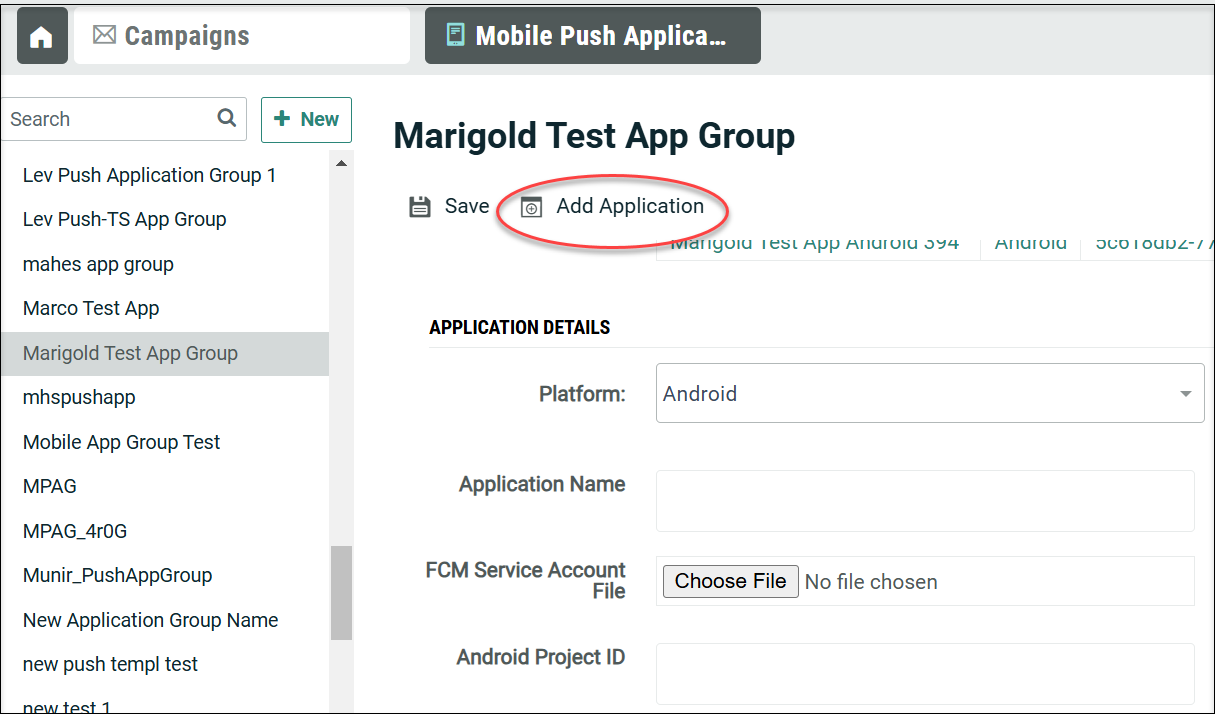
In the Mobile push application groups tab, select the required application group from the left pane.
-
Click Add Application in the tool bar. A new Application details section is displayed.
-
From the Platform drop-down menu, select the operating system for your app (Cheetah Digital supports iOS and Android).
-
iOS: Enter the name of your app and iOS Bundle ID. In the P8 Certificate File field, click Choose File to navigate and select your app's certificate file (only files with .p8 file extension is allowed). Enter theP8 key ID and team ID of the certificate file.
-
Android GCM: Enter the name of your app, upload the FCM Service Account File (JSON file) by clicking the Choose File button, to use FCM authentication, and enter the Android Project ID.
Note: The Google GCM API Key is no longer supported by Google and has been deprecated.
-
Click Save. Your app is added to the list within the Applications Belonging to this Group section. This list shows the application name, operating system or platform, and application ID. The application ID is a system-generated identifier that will be needed by the app developer.
View or Edit an Application Group
To view or edit an existing Application Group:
-
When the screen is displayed, a list of all the current Application Groups is displayed in the left-hand side of the Workspace. Optionally, you can filter this list by typing in all or part of a Group name in the Search by Name field.
-
Click on the Application Group that you want to view. The Workspace is refreshed to show the details of the selected Application Group.
-
For Cheetah Digital by Zeta (non-EDP) Application Groups, you can modify the Applications in this Application Group by clicking on the Application name. Make any necessary changes, and click Save.
Device Registration Information
When a recipient downloads and installs your mobile app, Cheetah Digital will receive and record the device's attributes. These attributes include app installation time, the mobile device's ID (the distinct combination of a recipient’s app and device), the device token, the name and platform (iOS | android) of the app, the device status and message status.

The Device Registrations tab displays all the above attributes along with the following statuses:
Device Status - indicates if the device registration status is Valid (successful) or Invalid (not currently registered)
Message Status - indicates if the audience member has elected to receive push and in-App Messages. It can be one of the following:
Unknown -The user has not yet confirmed their permissions.
Quiet - The user can receive push notifications in quiet mode - i.e. the application will not actively alert the user.
Active - The user has allowed push notifications.
Disabled - The user has blocked push notifications.
In order to send a message, the Device status must be Valid and Message status must be Active or Quiet.
Whenever the recipient signs in to your mobile app, the device and message status are sent and updated in Cheetah Digital.
The device registration information can be viewed in Cheetah Digital's Record Lookup.
-
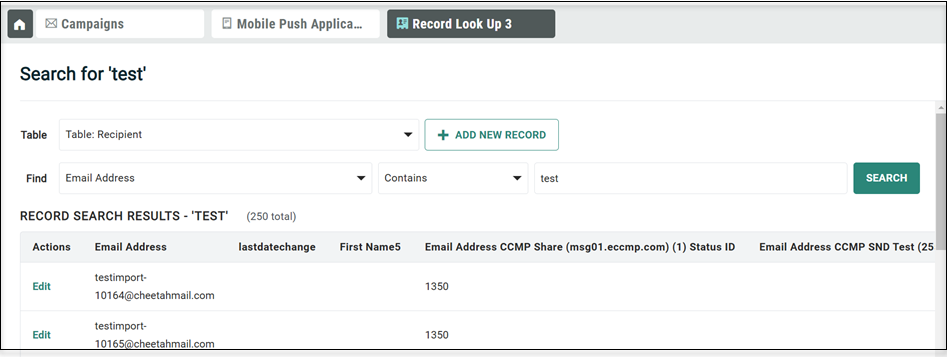
From the Main menu, select Data > Management > Record Lookup.
-
From the Table drop-down list, select the recipient table that you want to search.
-
The Find drop-down list is populated with all of the fields in the table you selected in step 1. From this menu, select the field that you want to search.
-
Select a mathematical operator from the drop-down menu, such as equal to, contains, or more than.
-
Enter the text string for which you're searching.
-
Click Search. The system displays a list of records (up to a maximum of 250) that meet your search criteria.
-
Within the search results, click Edit next to the desired record. The system opens a new Database Record tab within the Top Navigation Panel.
-
The Database Record screen displays several tabs which provide access to different information. Click Device Registrations tab.
The Device Registrations tab displays the selected device's attributes along with the notification status.
Optionally, you can apply a date filter to show only the devices that were registered within the specified date range.
