
Web Events
Web Events allow an external website to inform the Cheetah Digital by Zeta platform of specific activity that has occurred as the result of a customer clicking through to the website from a marketing Campaign. This activity is most commonly a purchase, but it could be any form of event or transaction that you need to track.
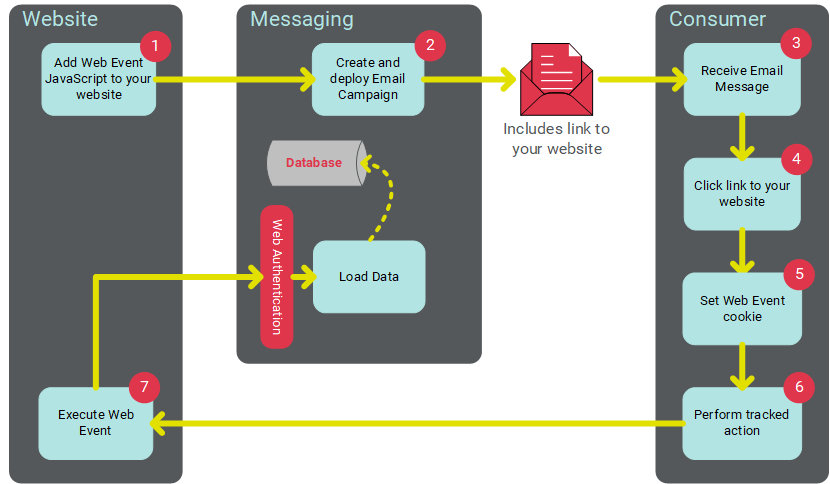
The following diagram depicts a typical process flow, from the Cheetah Digital by Zeta platform, to the consumer, to your website, and then back to Cheetah Digital by Zeta.
By using Web Events to inform the platform of your customers' actions on your website, you're able to utilize the Web Event data to support other Cheetah Digital by Zeta features, namely:
-
Campaign Reports: Because Web Events are always delivered to the platform as a result of a Campaign, the consumer action that caused the Web Event can be directly attributed to a specific Campaign. When a Web Event has been set up within the platform and your website, any consumer actions as a result of a Campaign will be shown in the Campaign Report. The Campaign Report will provide a count for the total and unique number of events that occurred as a result of the Campaign. For more information, see Campaign Reports.
-
Marketing Intelligence Reports: The platform provides a set of standardized Web Event parameters that may be used in conjunction with the Marketing Intelligence (MI) reports. These reports will allow you to view summarized data on web parameters (for example, Total Purchase Amount). For more information, see Marketing Intelligence Reports.
-
Filters: Web Event data can be used to define the business rule within a Filter. For example, you could use a Filter to create an Audience of customers who performed a specific Web Event, in order to target those customers with a follow-up Campaign message. This feature provides a number of different options and variables, such as anyone that had a Web Event within a certain time frame, or a Web Event associated with a specific Campaign. For more information, see Filters.
-
Campaign Triggers: Web Events can also be used as the trigger mechanism for deploying an Event-triggered Campaign. This feature can be particularly useful for driving near-real-time Campaigns, as an action on a website can trigger the deployment of a specific Campaign. For more information, see Event Trigger Options.
The Web Events screen is accessible via the Main menu; select Data > Integration > Web Events
Set up
To use a Web Event, you must go through some set-up steps within Cheetah Digital by Zeta, and within your website. The basic steps are as follows:
-
Create a Web Authentication. The Web Authentication is used to authorize the data being sent back to the platform and to ensure that it's attributed to the appropriate Campaign. Typically, the Web Authentication used for a Web Event should use the standard "Tracking Parameters," which consist of information like the Primary Key ID, the Campaign ID, and the Message ID.
-
Create the Web Event. The Web Event defines the data that you want to capture and store when the Web Event occurs. Please note that the data captured by the Web Event can be used for other purposes, such as in Filters, but this data can't be used for personalizing message content.
-
Add the Web Event SDK JavaScript code to every "landing" page on your website. This code is available on the JavaScript API screen. This piece of code will enable a “cookie” for customers who click through a tracked link on a Campaign message deployed by Cheetah Digital by Zeta. This cookie is populated with the client's Customer ID, the Campaign ID, and the Recipient ID. The cookie allows your website to subsequently report on the transaction if the customer completes the specified Web Event action. The cookie will remain in the recipient's browser for seven days; any Web Events activities identifies during this seven-day window will be attributed to the Campaign.
Note: If the recipient receives a subsequent Campaign during this seven-day window, and clicks on a tracked link in the new Campaign, the platform will update the cookie with the new Campaign ID, and all subsequent Web Events will be attributed to this new Campaign. The system also restarts the seven-day day window, starting with when the cookie was updated.
-
Add the Web Track JavaScript code to your website. This code must be called to send the transaction data back to your Cheetah Digital account, to allow the platform to report on the data. This code should be inserted into every page that's able to collect the necessary parameters defined in the Web Event. For example, if you're tracking purchases, you might need to insert the Web Track script into the confirmation page that's displayed after the consumer completes the purchase. This code is available on the JavaScript API screen.
-
Create your Campaign message content, and include a link (or links) to your website.
-
Append the Tracking Parameters to the links in your message content that go to the pages where you intend to do the tracking.
For more information on the above steps, including details on how to integrate the Cheetah Digital code into your website, please see either of the Integrating Web Events 1.0 or Integrating Web Events 2.0 documents.
Create a New Web Event
To create a new Web Event:
-
Click + New above the list of existing Web Events. A blank Web Events details screen is displayed.
-
In the Name field, enter a name for your new Web Event.
-
The "Match Records By" section displays all of the Web Authentications defined in your account. The Web Authentication is used to authorize the data being sent back to the platform and to ensure that it's assigned to the appropriate Campaign. Optionally, place a check mark next to one or more Web Authentications, then click Save. The "Expected Parameters" section of the screen is displayed and populated with the field (or fields) defined within the Web Authentication.
Note: In most cases, the Web Authentication used for a Web Event should use the standard "Tracking Parameters," which consist of information like the Primary Key ID, the Campaign ID, and the Message ID.
-
The Parameters section is used to define the data that you want to collect when the Web Event occurs. In the Add New Param name field, enter the parameter name.
-
From the Database Types drop-down menu, select the desired data type for this parameter.
-
Click the + button. The parameter is added to the list of parameters defined for this Web Event. Repeat steps 4-6 as needed. If you need to remove a parameter, click the X icon next to the desired parameter.
-
Click Save.
View or Edit a Web Event
To view or edit an existing Web Event:
-
When the screen is displayed, a list of all the current Web Events is displayed in the left-hand side of the Workspace. Optionally, you can filter this list by typing in all or part of a Web Event name in the Search by Name field.
-
Click on the Web Event that you want to view. The Workspace is refreshed to show the details of the selected Web Event.
-
Make any necessary changes to the Web Event:
-
To rename the Web Event, enter a new name in the Name field.
-
Check or uncheck the Web Authentications you want to use for this Web Event.
-
Modify the parameters for this Web Event by either adding new parameters, or removing existing parameters.
-
-
To save your changes, click Save.
Troubleshooting a Web Event
If your Web Event isn't processing events as expected, check the following:
-
Verify that the Web Event SDK code is present on your website.
-
Verify in the Campaign that Tracking Parameters are included, and that link tracking is enabled.
-
On your confirmation webpage, verify that the tracking code is present.
If the problem persists, please contact Global Support for further assistance.
