
Data Import Capabilities
This document describes the available options for bringing data into your Cheetah Digital database.
Messaging offers several different ways to bring data into the platform and load it into your database. The best import method should be indicated by your business requirements and marketing strategy. If you have any questions about which import method best meets your needs, please speak with your Client Services Representative.
The import options described in this document are intended for loading "demographic data," such as recipient names, email addresses, phone numbers, demographics, order details, item details, etc. Conversely, this document doesn’t describe the management of "activity data" (such as link clinks or email opens) which is collected automatically by the system, and loaded into standard back-end system tables.
Import options
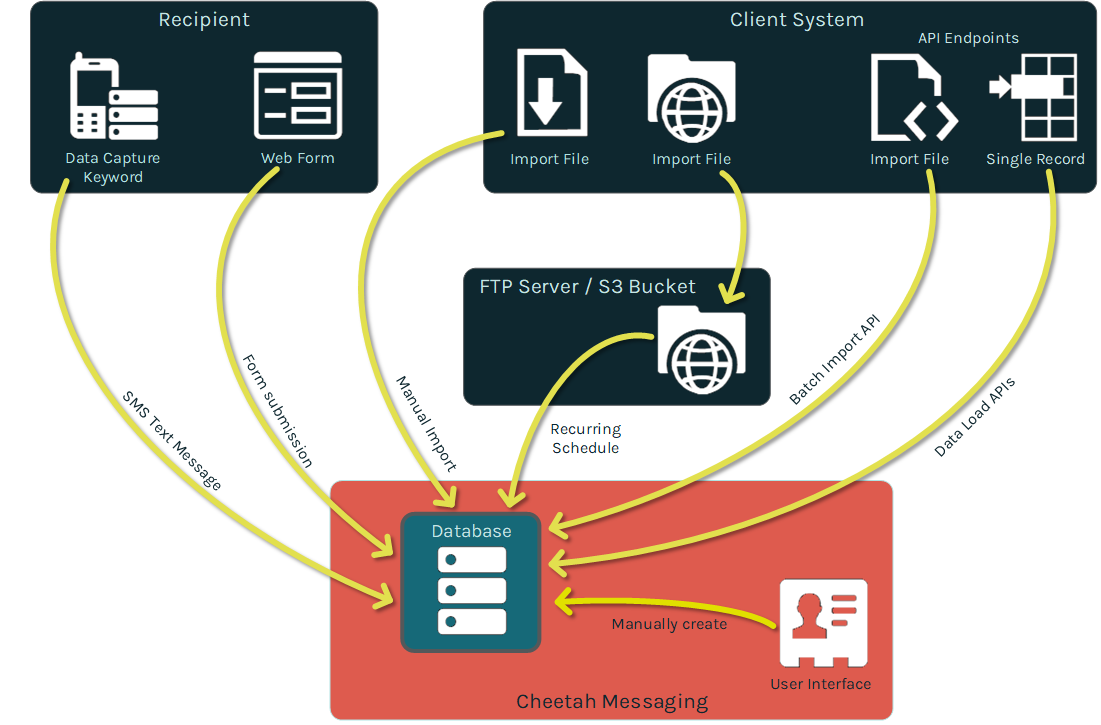
Data can be imported into Messaging from a client system through the following methods:
-
Upload a file through a manual one-off process.
-
Transmit files through a repeatable FTP automated process.
-
Manually edit or enter records through the Messaging user interface.
-
Submit data to the platform through an API message.
Data can be captured from a recipient, or a consumer, through the following methods:
-
Submit data to the platform through a Web Form.
-
Submit data to the platform through an SMS Text message.
All of these methods are described below in more detail.
Terminology concepts
This section provides explanations for various terms and important concepts that are referenced throughout this document.
Data file formats
Messaging accepts database imports as Microsoft Excel files or as text files, with the data fields being delimited using any of the following characters: tab, comma (,), semicolon (;), pipe (|), or caret (^).
The platform also supports the use of fixed-width import files.
Data maps
Data Maps are used by most import methods when bringing data into your Messaging database. A Data Map is a reusable asset that defines the sequence of the columns in the import file, and identifies the correct table and field into which each column should be loaded. Also, if the destination table is joined to other tables, the Data Map can be used to load the inbound data into the desired fields in the joined tables.
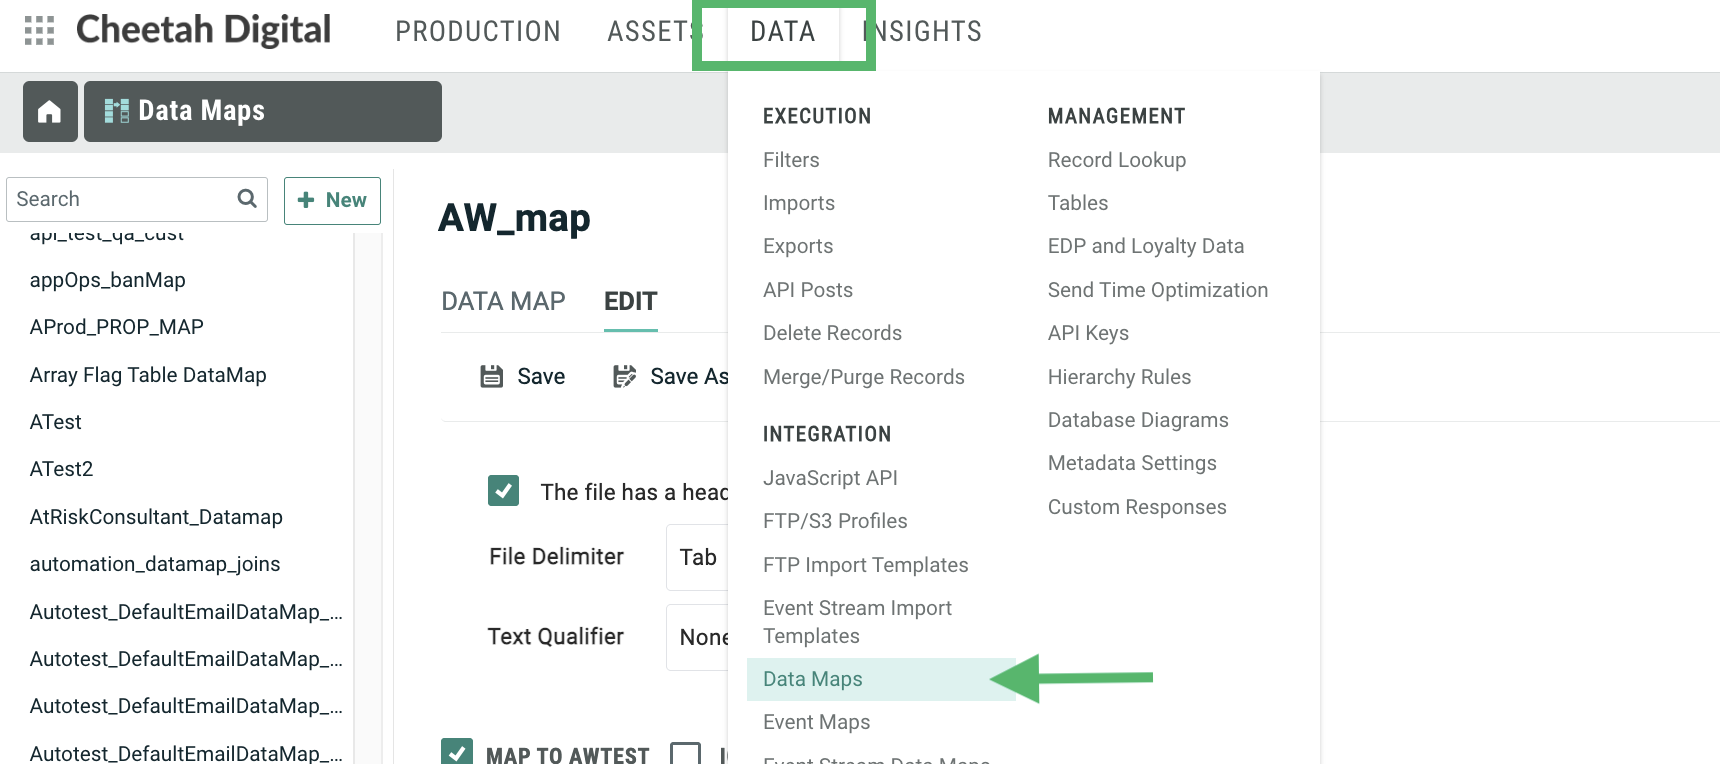
The Data Maps screen is accessible by clicking Data > Data Maps in the top navigation bar.
The Data Map controls basic file format information, such as whether the import file has a header row, a delimiter, and a text qualifier, and whether the data in the import file should be used to create new records only, update existing records only, or both.
For delimited files, you define the sequence of columns that are expected in the import file. As you add more fields to the Data Map, the system automatically increments the "Col #" value by one, but you can optionally enter a different value here, if needed. If you need to ignore a column in the import file, simply skip over that column number in the sequence. For example, if you want to ignore column #4 in your import file, the numbering sequence in your Data Map would go from Column #3 to Column #5. The important point to keep in mind is that the sequence you're defining represents the column order from the input file, and the mapped field you select is the location in the database where that data is being written.
You can also use negative values as the "Col #" in order to negatively map fields. When you negatively map a field, you're telling the system that you want to populate the specified "Map to" field in the database, but that you don't expect this value to be present in the import file itself. Instead, the value is going to come from somewhere else. For example, you could set a static default value that always gets populated in this field, or you can use SQL code to derive a value.
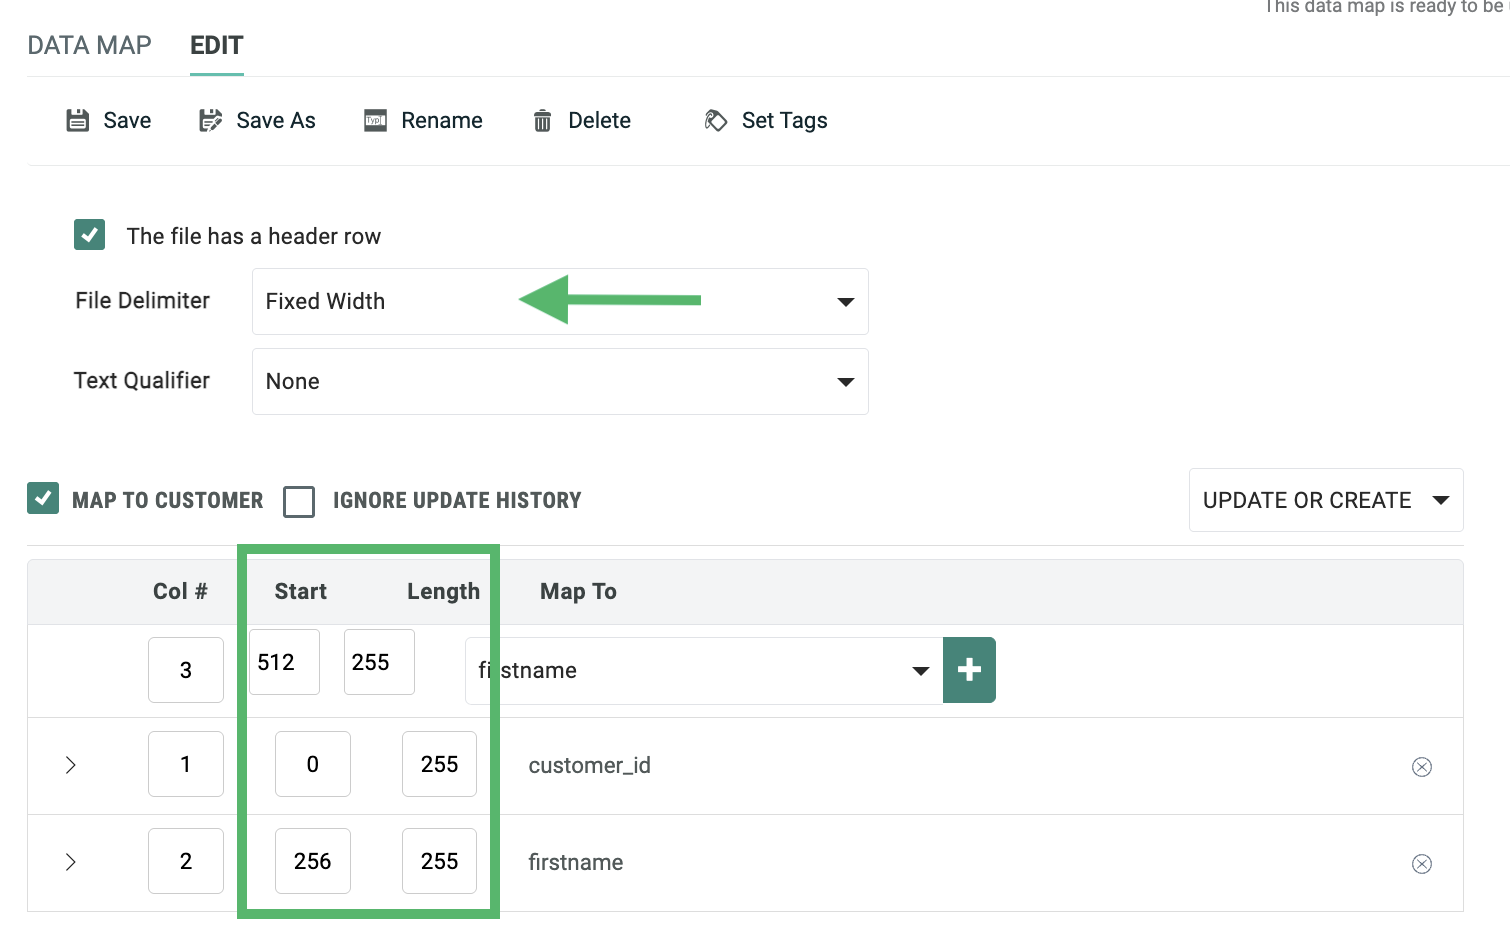
For fixed-width import files, the system adds "Start" and "Length" text fields so you can enter the starting and ending positions of each field in the import file, rather than a column sequence.
Data Maps support a variety of additional, optional advanced features that control how the data in a specific field is handled when imported into the system. For more information on these features, see Appendix B.
Data maps for APIs
When creating a Data Map to use with one of the data management API endpoints, the column name is more important than the column position. In the API payload, the fields can be arranged in any sequence; however, within the payload, you must use the correct name for each field, in order to correctly map the data in the payload to the desired field in the database. Typically, within an API payload, you need to use the "system name" for a database field, rather than the user-friendly "display name." The "system name" for a field can be found on the Tables screen.
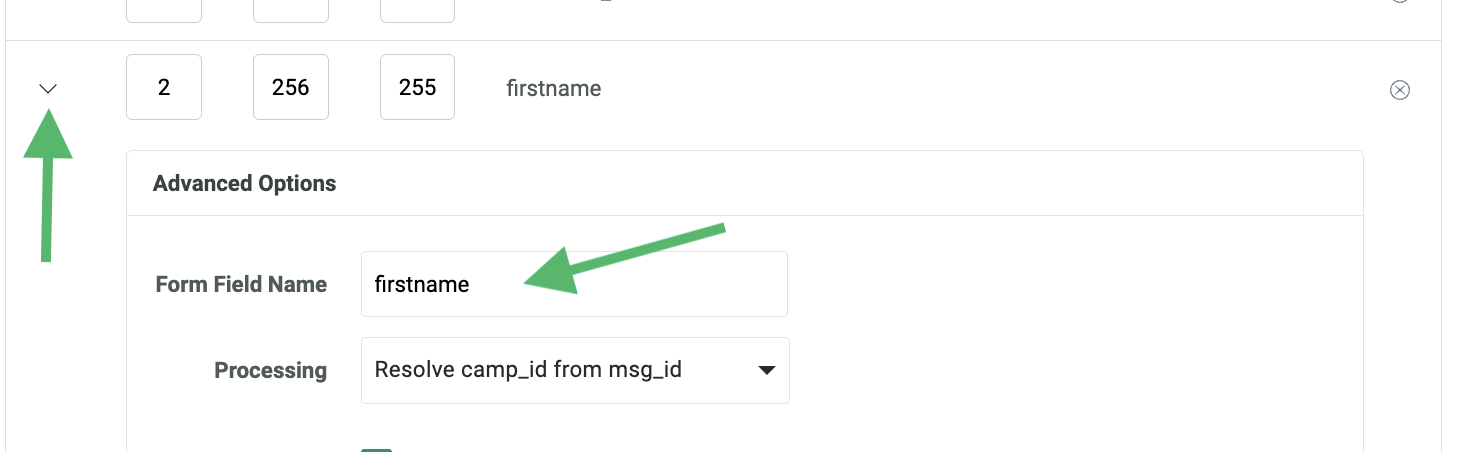
If the API payload doesn't use the system name for a field, you can instead use the "Form Field Name" option to indicate the expected field name in the payload. This option is available by clicking the down-arrow icon to the left of the field in the Data Map screen.
For example, let's say your API payload includes the recipient's first name, and the field name within the payload is "firstname," as show here:
  "data": [
    {
       "name": "email",
       "value": "john.doe@cheetahdigital.com"
    },
    {
       "name": "firstname",
       "value": "John"
    },
    {
       "name": "lastname",
       "value": "Doe"
    }
  ]
}
You want to load this value into the First Name field in your database, but in order to do so, you willneed to use the "Form Field Name" option in the Data Map screen. In this text field, enter "firstname." This option tells the platform to expect the field name in the API payload to be "firstname," and to load the corresponding value to the First Name field in the database.
Unique identifier
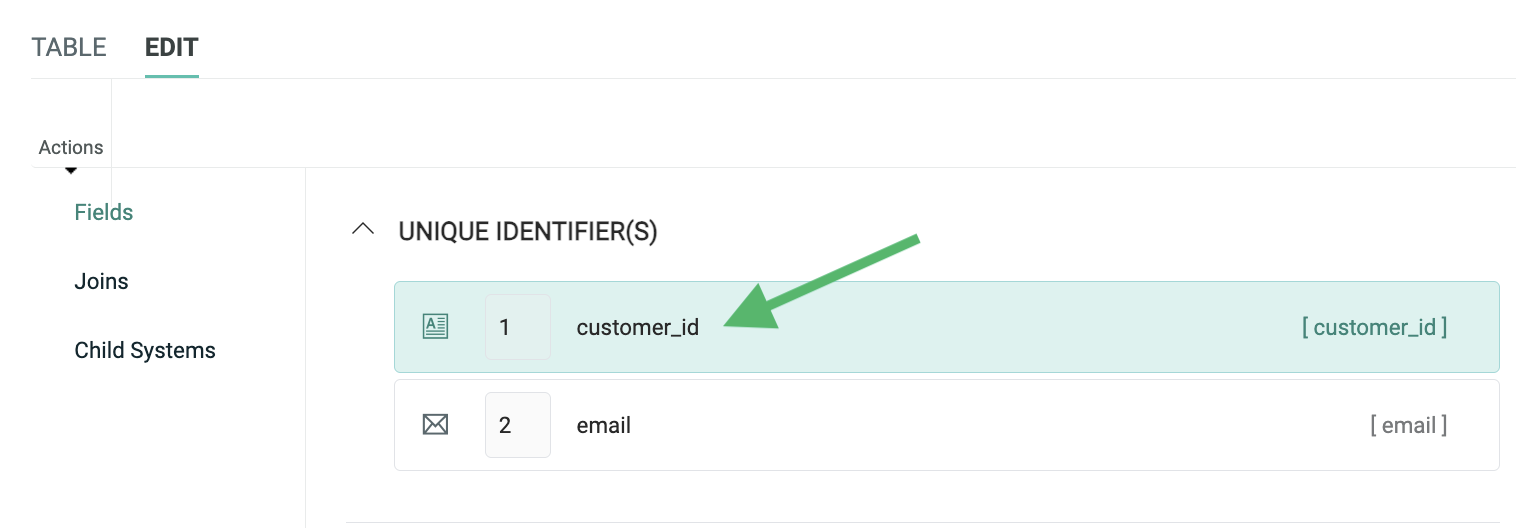
To ensure that records in a table are created and updated properly, each table can be set up with a Unique Identifier (also referred to as the "Alternate Key") that's used to uniquely identify every record in the table. For example, you could have a "Recipient" table that uses an email address field, or an account number field, as the Unique Identifier. Or, you could have an "Order" table that uses an order number field as the Unique Identifier.
The Unique Identifier can be based on a single field, or on a combination of multiple fields. For example, let's say you create a new "Customer" table to store consumer information, and you want to use a combination of your Customer ID and the recipient's Email Address as the two fields that will uniquely identify each customer. You would assign these two fields (in that order) as the Unique Identifier.
The following screenshot shows the fields defined for an "Order" table. The Unique Identifier for this table is "order_id."
Unique Identifiers are not required. If you have a table without a Unique Identifier, the system will simply utilize the "Primary Key ID" (PKID) as the table's Global Unique Identifier (GUID). The PKID is a system-generated number for every record in every table. The PKID is largely hidden from the platform's end-user, as it's not anything that you would use in a Filter or in personalizing your message content.
In summary, you can think of the Primary Key ID as the "system identifier," and the Unique Identifier as a more user-friendly identifier that's based on your business requirements and marketing strategy. These two layers of identifiers are sometimes called "surrogate IDs." The surrogate ID design accommodates the flexibility needed for something like an email address. Surrogate IDs are needed because the primary key on a record can never be changed; however, customers can, and often do, change their email address. If a recipient gets a new email address, his Unique Identifier value would change, but his Primary Key ID would not. In this manner, you keep the consumer record intact (name, purchase history, etc.), but are still able to update the email address.
Soft match
In most cases, an import file will contain the Unique Identifier for the destination table; however, it's possible to load an import file that doesn't have the Unique Identifier, through the use of a "Soft Match" instead. The Soft Match lets you match to the database using any fields with a Data Type of "Email" "Phone," "Twitter ID," and "Push Registration ID."
For example, let's say the Unique Identifier on your "Recipient" table is "Member ID," but you don't have Member ID data available in your import file. You could instead select some other field that contains unique data, such as "Email Address," and match on that instead.
If the soft-matched value in the import matches an existing value in the database, then the platform will make the update to that record in the database. If the soft-matched value doesn't already exist in the database, the platform creates a new temporary record. This temporary record can later be merged with a full record that contains the Unique Identifier.
Data parsing
The platform parses inbound data based on the Data Type to ensure that the values are clean, valid, and usable. All Data Type errors are reported on as warnings during the import process. You can create an Exception Export that contains details of the records that encountered these Data Type errors. This Exception Export includes the original values and line numbers, so you can correct any issues, and re-import these records if desired.
Additionally, fields can be set up with Field Restrictions to allow only certain, specified values into the database. As depicted in the screenshot below, you could set up Field Restrictions on a "State" field to allow only the valid U.S. Post Office two-letter state abbreviations. If any records came in which did not match this set of valid values, the value would not be loaded to the database.
The platform may adjust the import value for a field according to rules set for that type of field, as described below.
For Integer fields, the value must be a whole number or a negative whole number. Any leading zeros are stripped. Any records containing a string are rejected.
For Date / Time fields, the platform accepts any valid SQL Server date / time format. Values in other formats are rejected. If no time is specified, the system defaults the time to midnight.
For Phone fields, additional data cleansing is done in order to attempt to make the phone number a valid number to be sent SMS Text messages. As such, all non-numeric characters are removed, and if the number is then exactly ten digits long, the system will add a leading "1" to the number for texting in the U.S. This leading "1" is added only to U.S. phone numbers; any international numbers are left unchanged.
For Email fields, Messaging can perform simple validation and cleansing of the email value. Email cleansing checks the incoming email address, and modifies the data based on the cleansing rules in an attempt to convert it into a syntactically-correct email address. Email validation checks the incoming email address to confirm that it is valid against specific rules, including syntax, domain, role accounts, and some ISP rules. If the email address doesn't pass validation, the email address is rejected, and it won't be loaded to the database.
Both email cleansing and validation are optional, and must be enabled for each client account. When enabled, different levels of cleansing and validation can be selected. These options are configurable, as the regions of the world have different requirements. For more information on the different email cleansing and validation options, please see the Messaging Online Help system.
Email ban list
Messaging maintains a global, integrated Banned Email list that's utilized by every client in the platform. This global Banned Email list contains, for example: domains listed by the Federal Communications Commission that can't be mailed to; inactive or retired domains; and email addresses with prefixes commonly used by spammers.
When you import recipient email address data into your database, by default the platform checks those email addresses against the global Banned Email list, and flags matching records with the appropriate eligibility status. Email addresses with this eligibility status value will automatically be suppressed from email Campaigns.
Note: You can optionally bypass the Banned Email check through the use of the "Ignore Ban List" setting in the Data Map.
In addition to this global Banned Email list, the platform allows you to define your own custom Banned Email list that contains specific prefixes or domains that you want to suppress from your email Campaigns. For example, you may want to create a custom Banned Email list consisting of your competitors' email domains, so that you don't send them email messages.
If you define a custom Banned Email list, the platform will use both the custom and the global Banned Email lists; you can't opt to use only the custom list without the global list.
If you need to ban specific email addresses (rather than entire prefixes or domains), you should use an Exclusion List instead of a custom Banned Email list. An Exclusion List is a reusable asset that contains one or more email addresses that you don't want to contact. When you assign an Exclusion List to a Campaign, the platform automatically suppresses those addresses from the Campaign, even if those addresses were selected by the Campaign's audience Filter.
API post
Messaging supports several different API endpoints that can be used to submit and load data into your database. Several of these endpoints require the use of an "API Post." An API Post is a reusable asset within Messaging that defines all the expected fields in the request message, and provides data handling instructions and other API-related configuration settings.
An API Post is typically used in conjunction with a Data Map, which tells the system where to load the data that's received in the request message.
Priority
Several import methods within Messaging let you select a priority. The import priority determines the order in which your imports will be handled. Generally speaking, your imports with a higher priority will take precedence over your imports with a lower priority. If your imports have the same priority, they will be processed in the order in which they were added (older imports first).
A few potential exceptions exist, which may impact the processing order of your imports:
-
You have two imports queues -- small imports (less than one million rows) and large imports. Therefore, an import in one queue may process before an import with a higher priority in the other queue.
-
If an import process needs to access a table that's currently in use by another process, that import will be made to wait, potentially allowing another import with a lower priority to run first.
When the system initiates an import with a higher priority than an in-progress import, the higher priority file moves to the next in line, waits for the in-process import to finish, then begins processing.
Parent / child architecture
Multi-brand accounts may warrant the use of a "Parent / Child" database architecture. This configuration can add a great deal of complexity over a single database account. A Parent / Child architecture is designed around a single database (referred to as the "Parent") with multiple brands, or divisions, residing in that database, but separated into different views (each of which is referred to as a "Child").
The platform provides a great deal of flexibility to control which tables, fields, and values are accessible to which Child views. For example, data can potentially be loaded into the Parent (thereby making it available to one or more Child views). Or data can be loaded directly into a Child (preventing it from being accessed by the Parent, or by any sibling Child views).
For more information on the options available within a Parent / Child architecture, please see our help centre.
Tables
Importing data into Messaging requires a strong understanding of your data model, including your tables, the fields in those tables, and the joins between tables.
Your account includes a mix of back-end system tables and user-defined tables. The back-end system tables consist of standard tables used to track Campaigns, messages, and recipient activity (clicks, opens, etc.). These tables are configured by Client Services, and aren't visible through the Messaging application. Conversely, user-defined tables are fully customizable by you, contain demographic data, and are visible within the user interface.
User-defined tables can be viewed, edited, and created from the Tables screen, by selecting Data> Tables from the top navigation bar. When you select a table, the system displays the Table details screen, which shows a list of all the fields in this table, and the Unique Identifier (if one has been defined).
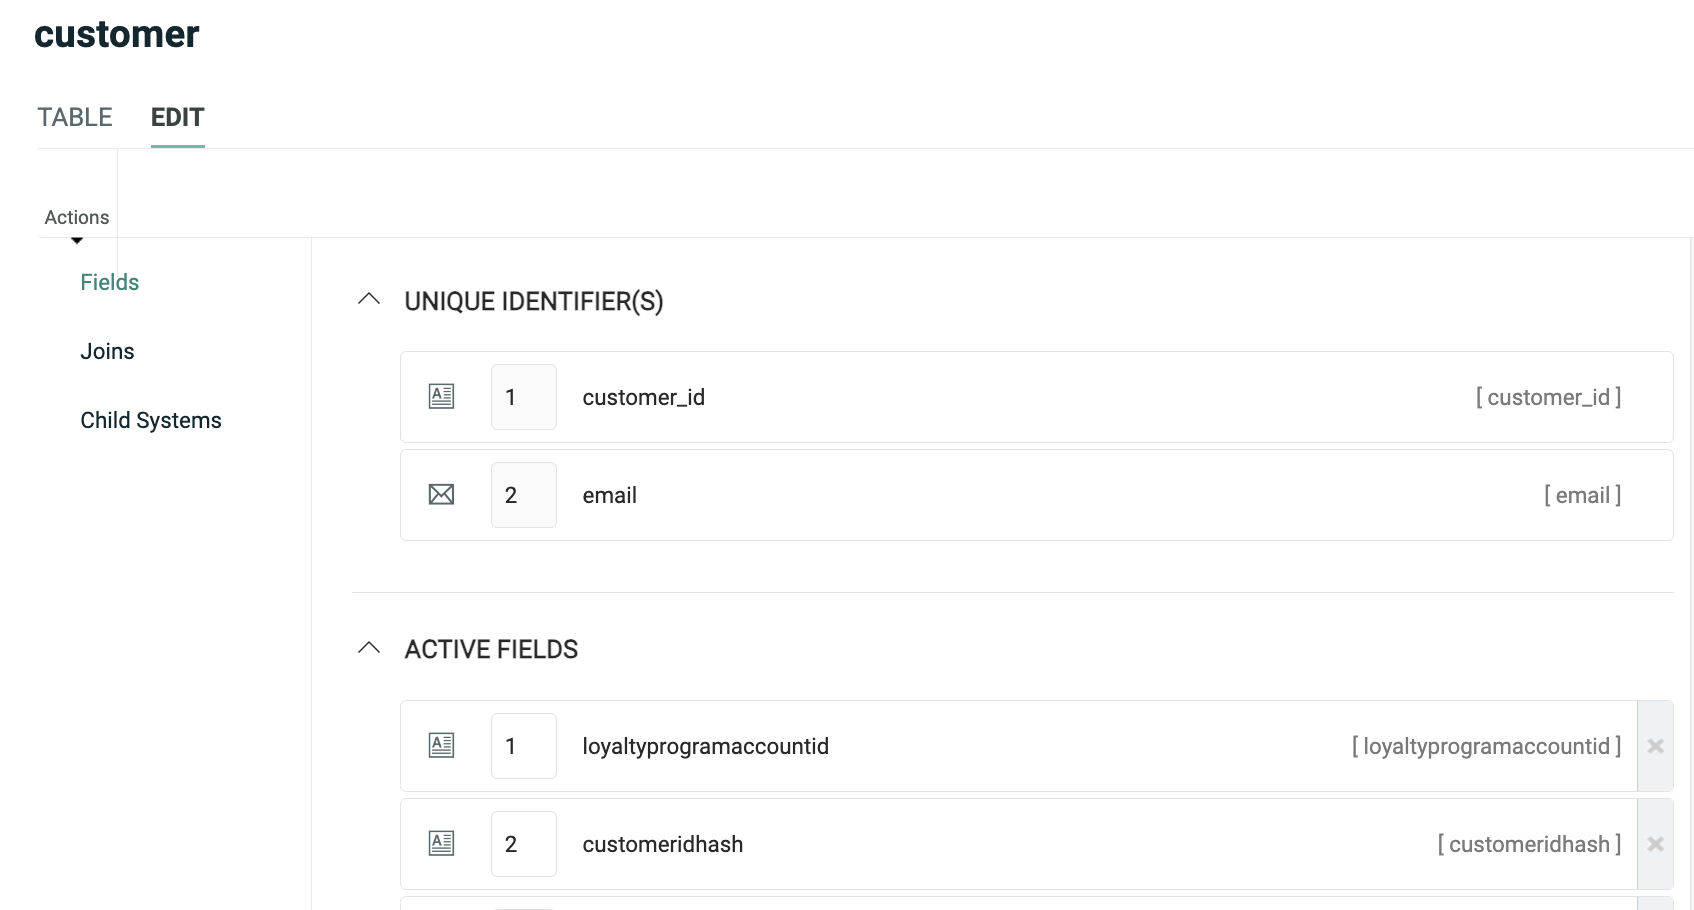
From this screen, you can view, edit, and add fields. You can also define a Calculated Field that's populated based on a derived value, optionally at a determined schedule. You can also set Field Restrictions, which define a range of valid values in a field.
To view information about joins, click "Joins" in the Function Menu. The Joins screen lists all of the joins, both to and from, this table. From this screen, you can view, edit, and add joins.
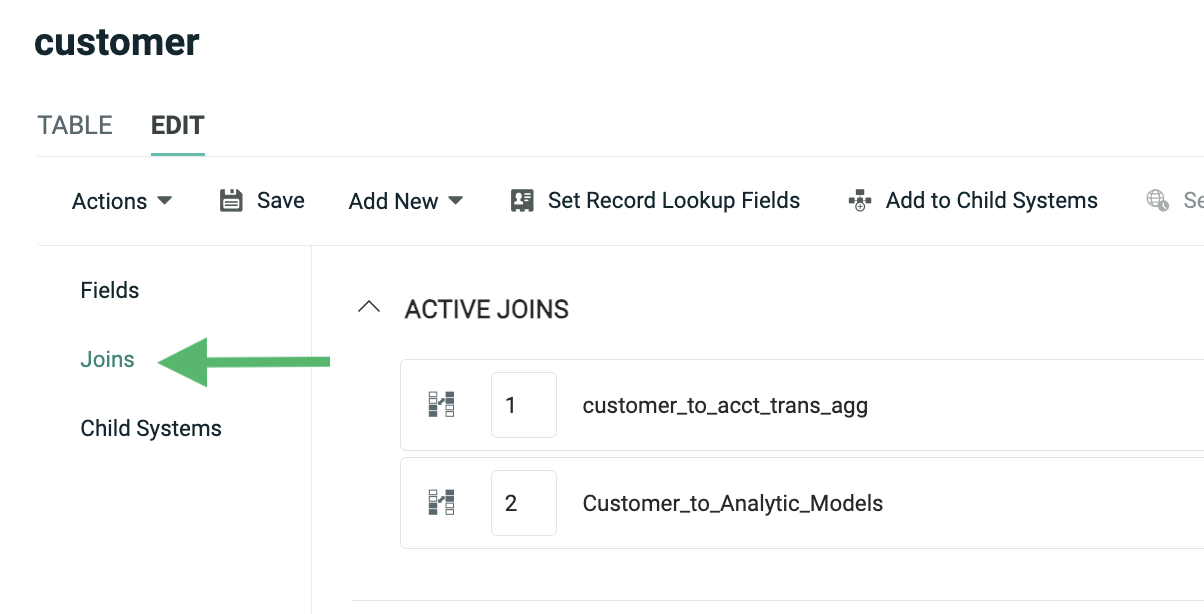
Note: When you define a new join, it must be set up in the many-to-one direction. Also, joins should be created only in one direction, not both. For example, let's say you have an Order table that you want to join to an Order Item table. A single Order (the "one" table) can join to multiple Order Items (the "many" table). To create this join, you would need to navigate to the Order Items table, and create the join from there to the Order table.
Database diagrams
The Table screen is limited to viewing a single table at a time. If you want a wider view of your database, you can use the platform's built-in Database Diagram feature. This feature lets you view multiple tables (including fields and joins) in a more graphical format similar to a data model.
To view the Database Diagram feature, select Data > Database Diagram from the top navigation bar. Navigate to and select an existing Database Diagram, or click New Database Diagram to create a new Database Diagram.
To add existing tables to the Database Diagram, click Edit > Add Existing Tables in the Tool Ribbon. Place check marks next to all the tables you want to add to the diagram, then click Add.
You can also define new tables directly from the Database Diagram screen, modify existing tables, create fields and joins, etc.
When you create or modify tables, fields, and joins through the Database Diagram screen, those changes aren't applied to your actual database until you publish, or "commit," those changes. You can easily spot unpublished changes in your diagram by looking for either the "pen" icon next to unpublished field and join names, or by looking for the grayish-blue shading in the unpublished table, field, or join name.
To publish your Database Diagram, in the Tool Ribbon, click Edit > Commit to Database. The system publishes your changes and refreshes the Database Diagram screen.
Manual import
Messaging supports the ability to set up a one-time file import process through the platform's user interface.
Prerequisites
Before proceeding to import data into the platform, the following required assets need to be created within Messaging:
-
Table: The destination table where you want to load your data should be created, and should include all the necessary fields and joins, and usually a Unique Identifier.
Note: It's possible to create new fields "on the fly" when a performing a one-time data import
-
Data Map: Data Maps identify the correct table into which the data needs to be loaded, any joins to other tables, and the fields where each column in the import file will be stored. Data Maps can be created prior to defining the import, or they can be created "on the fly."
The following optional assets are also supported by Manual Imports:
-
Custom Stored Procedures: Messaging supports the use of custom stored procedures that will execute on the inbound data. Custom procedures are typically used to perform additional data transformations. Custom stored procedures must be created by your Client Services team; please speak to your Client Services Representative for more details.
-
NCOA Process: If you want to run postal addresses through the Coding Accuracy Support System (CASS) and / or the National Change of Address (NCOA) database, you must define an NCOA Process within the platform.
-
Hierarchy Rule: If your account utilizes a Parent / Child architecture, you can select a Hierarchy Rule for the import file. Hierarchy Rules are a configuration feature set in the Parent system that determine which records from a given table a Child view can access.
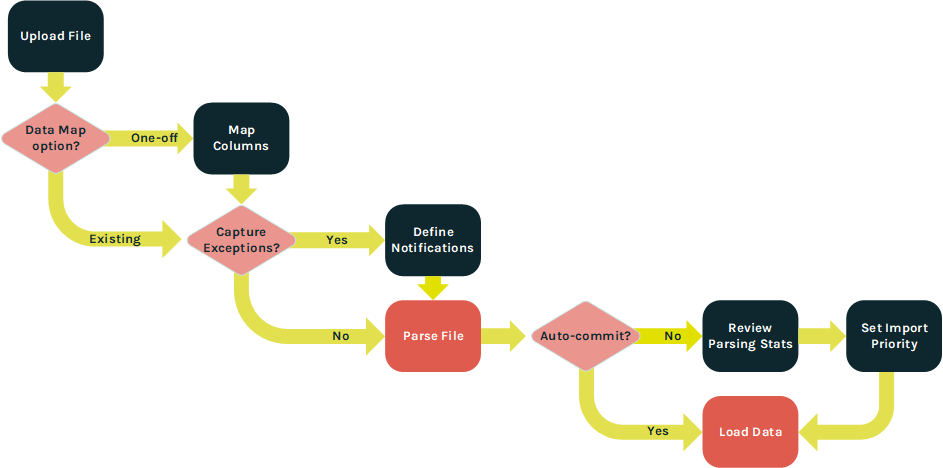
Create a manual import
To navigate to the Manual Import screen, in the System Tray, select Data > Imports.
When creating a Manual Import, the steps in the import process will vary depending on which options you select. The following flowchart depicts these different options.
Upload file
The "Upload File" section of the Manual Import screen is used to select the file that you want to import, and to define various configuration options.
Within this section, you can configure the following options:
-
Browse to and select the desired import file.
-
Select an encoding method.
-
Optionally, select a CASS / NCOA Process.
-
Optionally, select a post-update custom stored procedure.
-
Optionally, "auto-commit" the import file to the database without first viewing file parsing statistics.
-
Optionally, capture and store records that encounter import exceptions; if you use this feature, you can generate the Exception Export containing all of these records, so they can be corrected and re-imported.
Note: Storing import exceptions is an optional feature that must be enabled within your account in order to be available for selection.
-
Select a hierarchy option; this feature is typically used if your account utilizes a Parent / Child architecture. The options are:
-
Update Current Customer Only: Load the data to the Parent system only.
-
Update Current Customer and Children: Load the data to the Parent and to any Child views as well.
-
Custom Hierarchy Rule: Select a custom Hierarchy Rule.
-
-
Select a Data Map option; Data Maps are described below in more detail.
Data map options
Data Maps can be defined as either a reusable asset, or as a one-time asset that gets built "on the fly" when defining the Manual Import. For the most part, the functionality between reusable Data Maps and one-time Data Maps is the same. However, a few features aren't available when defining an "on the fly" Data Map, including deriving a Calculated Field, and importing a fixed-width file.
To use an existing Data Map in your Manual Import, click the "Select an Existing Data Map" tab, then search for and select the desired Data Map.
To define a new "on the fly" Data Map, click the "Create a New Data Map" tab. This tab allows you to define the new Data Map; you'll have the option of saving this "on the fly" Data Map as a regular, repeatable Data Map.
When creating the "on the fly" Data Map, you can configure the following options:
-
Select the source table. This table represents the main table into which data will be loaded; data can also optionally be loaded into tables that are joined to this source table.
-
Indicate if your import file contains a header row.
-
Select the delimiter character -- Tab, Comma, Semi-Colon, Pipe, or Caret.
Note: "Fixed-width" is not supported when creating a Data Map on the fly; if you're importing a fixed-width file, you'll need to create a reusable Data Map.
-
Optionally, select a text qualifier -- either Single Quote or Double Quote.
-
Select how the system handles the import records: update existing records only, create new records only, or both update and create records.
-
Optionally save this Data Map so that it can be reused; enter a name for this new Data Map.
When finished, click Edit > Save & Upload in the Tool Ribbon. The system uploads the import file, and the Map Columns section is populated.
Map columns
The Map Columns section is primarily used if you decided to create an "on the fly" Data Map in the previous step. This section is used to map the columns in the import file to the correct fields in the destination table, or to any joined tables. The system displays a few sample records from the import file to help you correctly map the contents of the import file to the corresponding database field.
Note: If you selected an existing Data Map, then this section is displayed and populated in a "read only" state. You can view a preview of the import file contents, and view the selected Data Map, but you won't be able to make any changed to the column mapping.
If your import file contains a header row, the system attempts to identify the columns in the import file by matching the values in the header row to a field in the destination table. If the system finds a match, that field be automatically be displayed within the drop-down menu in the Map to column on the screen.
For each column in your import file, map the column to a field in the source table by selecting the desired field from the Map to drop-down menu. This drop-down is populated with every field on the source table. If you want to skip a column on the import file, select Do Not Import.
Optionally, you can load a column in the import file into a new field in the source table, by selecting Add New Data Field. If adding a new field, you must also provide a name for the new field, and select a Data Type.
If the source table includes joins to other tables, each join is listed separately. Click the check mark icon next to the join name to enable that join, and display all the fields in the joined table. Then repeat the above process of mapping columns in the import file to fields on the joined table.
Messaging supports a variety of optional field-level Advanced Options when importing data. These options provide a wide range of functionality, such as data transformations and special handling for certain Data Types. To assign an Advanced Option, click the down-arrow icon to the left of the mapped field. See Appendix B for more details on the available Advanced Options.
In most cases, the Unique Identifier for the destination table should be part of the Data Map. If the Unique Identifier comprises multiple fields, then all of those fields need to be mapped in order to successfully load the data. If the Unique Identifier is not in the import file, then you'll need to use the Soft Match feature instead.
When you're finished configuring all of the above "Map Columns" options, click Edit > Save Data Mapping in the Tool Ribbon. If you're capturing Import Exceptions, the "Select Notifications" section of the screen is populated. If you're not capturing Import Exceptions, then the system begins the parsing step.
If you need to cancel the import process, click Edit > Cancel & Rollback in the Tool Ribbon.
Select notifications
If you checked the "Import Exceptions" check box in the previous section, an additional "Select Notifications" section is displayed, allowing you to define email alerts if the contents of your import file surpass certain thresholds for a selected import metric or exception type. See Appendix C for more information on the different import exception types.
To configure your email notification, first select the desired import exception type, or error condition, from the "Choose Notification Types" drop-down menu. The system displays the "Notification Settings" pop-up window, which lets you configure your email notification.
From this pop-up window, you can configure the following options:
-
Enter the desired threshold settings that will trigger the alert notification. You can enter one or both of the following rules. If you enter both rules, the notification will be triggered if at least one condition is met.
-
Percentage of file: Enter the percentage of invalid records on the import file that will trigger the notification.
-
Number of rows: Enter the quantity of invalid records on the import file that will trigger the notification.
-
-
Optionally select a previously-saved notification template (which contains the subject line, from address, and list of recipients).
-
Optionally enter a new subject line, from address, and list of recipients (you can also save this information as a template to be reused later).
-
Enter a short descriptive message.
-
Select whether you want the platform to send notifications after the parsing step and / or after the database update step.
Optionally, repeat the above process to add more notifications for different import conditions. Each selected condition is handled separately, with its own threshold settings, and will generate its own email notification message.
When finished, click Edit > Save Notifications in the Tool Ribbon. The system begins the parsing step.
If you need to cancel the import process, click Edit > Cancel & Rollback in the Tool Ribbon.
Process file
If you didn't select Auto Commit in the Upload File section, the system will present the parsing results within the Process File section, so you can review and approve the file before committing it to the database. This section shows how many records were on the file, and how many records encountered warnings or validation errors.
This section also allows you to establish the priority for your import file.
To set the import priority, select the desired value from the Priority drop-down menu (the default is "Normal"). In the Tool Ribbon, click Edit > Save Priority.
If, after reviewing the parsing statistics, you're ready to commit the import, click Edit > Actions > Approve & Commit in the Tool Ribbon.
If you need to cancel the import process, click Edit > Cancel & Rollback in the Tool Ribbon.
Import templates
Within Messaging, a file import process can be defined through the use of a repeatable template called an Import Template. This template controls the schedule of when to run the import, as well as details about the FTP server or Amazon S3 (Simple Storage Service) Bucket where the file is located, and the file handling settings.
Prerequisites
Before creating an Import Template, the following required assets need to be created within Messaging:
-
Table: The destination table where you want to load your data should be created, and should include all the necessary fields and joins, and usually a Unique Identifier.
-
Data Map: Data Maps identify the correct table into which the data needs to be loaded, any joins to other tables, and the fields where each column in the import file will be stored.
-
FTP / S3 Profile: An FTP / S3 Profile (see below for details) controls the location and login credentials for an FTP server or Amazon S3 Bucket from which import files are to be downloaded.
The following optional assets are also supported by Import Templates:
-
Custom Stored Procedures: Messaging supports the use of custom stored procedures that will execute on the inbound data. Custom procedures are typically used to perform additional data transformations on the import file. Custom stored procedures must be created by your Client Services team; please speak to your Client Services Representative for more details.
-
NCOA Process: If you want to run postal addresses through the Coding Accuracy Support System (CASS) and / or the National Change of Address (NCOA) database, you must define an NCOA Process within the platform.
-
Hierarchy Rule: If your account utilizes a Parent / Child architecture, you can select a Hierarchy Rule for the Import. Hierarchy Rules are a configuration feature set in the Parent system that determine which records from a given table a Child view can access.
Create an FTP / S3 profile
The platform allows you to set up one or more FTP / S3 Profiles that contain the necessary information for Messaging to connect to the FTP server or Amazon S3 Bucket where you intend to transmit inbound files. These Profiles are reusable, so that they can be selected when defining other Messaging assets, such as Import Templates and Export Templates.
To navigate to the FTP / S3 Profile screen, in the System Tray, select Data > FTP / S3 Profiles.
To connect to an FTP server, provide the following information:
-
The URL for the FTP Server. This URL must begin with the prefix "sftp://".
-
By default, Messaging will attempt to connect to the FTP Server in "active" mode. To instead connect in "passive" mode, place a check mark in the "Passive Mode" check box.
-
The username needed to log onto the FTP Server.
-
Define an authentication method:
-
Password: Enter the password needed to log onto the FTP server.
-
SSH Key: Browse to and select your SSH Private Key file.
-
To connect to an Amazon S3 (Simple Storage Service) Bucket, provide the following information:
-
Your Amazon Web Services access key
-
Your Amazon Web Services access secret
-
Your Amazon S3 Bucket name
-
The desired AWS Region
Note: You don't provide a name for a Profile. For an FTP Profile, the combination of the "FTP URL" and the "User Name" values serve as it's name. For an S3 Profile, the endpoint serves as it's name.
Create an import template
To navigate to the FTP / S3 Import Template screen, in the System Tray, select Data > FTP Import Templates.
Schedule
The Schedule section of the Import Template screen allows you to set a schedule for automatically looking for new inbound files, and (if found) executing the import process.
Within this section, enter or select the following options:
-
Schedule start date / time (or "start immediately")
-
Schedule recurrence frequency (daily, weekly, monthly, or yearly)
-
Schedule execution time (once a day, or several times a day)
-
Schedule end date / time (or run indefinitely)
FTP / S3 download
The FTP / S3 Download section of the Import Template screen is used to define the FTP server or S3 Bucket details, such as the expected file location and name.
Within this section, enter or select the following options:
-
FTP / S3 Profile (see above for more details on how to create an FTP / S3 Profile)
-
The file path to the location on the FTP server or S3 Bucket where the import file will be stored. The value you enter here should include both the folder path and the file name. If your import file contains a date / time stamp, use a date mask in the "File Path" field, such as {(yyyy-MM-dd)} for example.
Note: Messaging will not import a file with the same exact file name more than once.
-
A post-processing suffix value that the platform will append to the end of every inbound file name. This suffix is used to differentiate processed files from new files, and also to prevent any confusion around duplicate file names.
-
Optionally, delete the file from the FTP site or S3 Bucket after it's been downloaded.
-
Optionally, check the file's "last modified" date and time prior to importing the file; this option is intended to prevent the platform from re-importing the same data file.
-
Optionally, enable PGP encryption, and enter your encryption key.
-
Optionally, expand compressed files. If you're importing password-protected ZIP files, enter the password.
Files to import
The Files to Import section is used to define the file handling instructions.
An Import Template can optionally be used to import multiple files within the same ZIP file. You can choose to handle all of these files in the same manner, or you can select different configuration options and Data Maps for each file. Initially, this section displays a single item with the default file name (*.*), which indicates "all files."
To configure the default import file, click the pen icon. The "File to Import" pop-up window is displayed.
Within this window, enter or select the following options:
-
If you want all files handled the same way, simply leave the default file name (*.*) in the "File Name" field. If you're importing a ZIP file with multiple files, and you want to handle each file separately, then enter the specific file name in the "File Name" field.
-
Select the appropriate priority for this import -- Urgent, High, or Normal (the default is "Normal").
-
Select the table in your database where the import file is to be loaded.
-
Select a Data Map.
-
Optionally, select an NCOA Process and / or a custom stored procedure.
-
If your account utilizes a Parent / Child architecture, select one of the following hierarchy options:
-
Update Current Customer Only: Load data to the Parent system only.
-
Update Current Customer and Children: Load data to the Parent and to any Child views as well.
-
Custom Hierarchy Rule: Select a custom Hierarchy Rule.
-
-
Optionally, enable the Auto Commit feature. If you leave this feature disabled, the platform will pause the import process after the parsing step, to allow you to manually review and approve the parsing results before committing the import to the database. In most cases, the Auto-Commit option should be enabled only after a successful series of files have been processed, manually reviewed, and approved.
-
Optionally, enable import exceptions to capture and store records that encounter exceptions.
-
Optionally, enable the "update history" feature. Update history for a file means that the platform writes an update for every record that came in on the file, to denote that the record “came in on this file at this time.” This level of detail allows you to create Filters that can select all records that came in on a specific file, or in a specified timeframe. The default setting is to retain this information, in order to build an activity history for all records. If you don't need, or want, to store update history, you can turn this feature off. The advantages to not storing update history are basically storage space and performance. Ignoring update history will give you a slight performance boost on import processing, and store less data on the backend.
-
If you're keeping update history, you can optionally enable the Filter / trigger feature. This feature lets you use the import file as part of a Campaign trigger or Filter. If enabled, select a folder where you want the platform to save the import file.
-
If you're NOT keeping update history, you can optionally maintain a copy of the import file by selecting a folder where you want the platform to save the copy. This feature is primarily intended for auditing purposes, as you can use the copy of the import file to view file statistics, counts, parsing errors, etc.
When finished, click Save File Mapping. The grid in the "Files to Import" section is updated to show the file name, Data Map, table, and priority for this import file.
If you need to configure additional import files, click Add New File, then repeat the above steps as needed.
Notifications
If you checked the "Import Notifications" check box above in the "File to Import" pop-up window, an additional "Notifications" section is displayed on the screen. This section allows you to define email alerts if the contents of your import file surpass certain thresholds for a selected import metric or exception. See Appendix C for more information on the different import exception types.
To configure your email notification, first select the desired import exception type, or error condition, from the "Choose Notification Types" drop-down menu. The system displays the "Notification Settings" pop-up window, which lets you configure your email notification.
From this pop-up window, you can configure the following options:
-
Enter the desired threshold settings that will trigger the alert notification. You can enter one or both of the following rules. If you enter both rules, the notification will be triggered if at least one condition is met.
-
Percentage of file: Enter the percentage of invalid records on the import file that will trigger the notification.
-
Number of rows: Enter the quantity of invalid records on the import file that will trigger the notification.
-
-
Optionally select a previously-saved notification template (which contains the subject line, from address, and list of recipients).
-
Optionally enter a new subject line, from address, and list of recipients (you can also save this information as a template to be reused later).
-
Enter a short descriptive message.
-
Select whether you want the platform to send notifications after the parsing step and / or after the database update step.
Optionally, repeat the above process to add more notifications for different import conditions. Each selected condition is handled separately, with its own threshold settings, and will generate its own email notification message.
Review and approve an import
The platform parses import data to ensure that the values are clean, valid, and usable. When importing data via an Import Template, you have the option of automatically committing the data to the database without reviewing it, or of pausing the import process to allow for a manual review of the parsing results.
To manually review and approve the parsing results for an import file, navigate to and select the desired Import Template, then scroll down to the "Imports" section. This section shows a log of all files imported using this Import Template. The log shows the file name, current status, date / time that the import was finished, and the number of rows that were imported.
Next to the desired import file, click the stats link (magnifying glass icon). The "File Statistics" pop-up window is displayed. The "Parsing" section of this pop-up shows how many records were on the file, and how many records encountered parsing-related warnings or validation errors. The "Update <table name>" section shows how many records passed the parsing step, and how many records encountered update-related warnings or validation errors. To see detailed statistics, click on a validation sub-heading.
To approve and commit the import records to the database, click Commit Import. Or, to cancel the import, click Rollback.
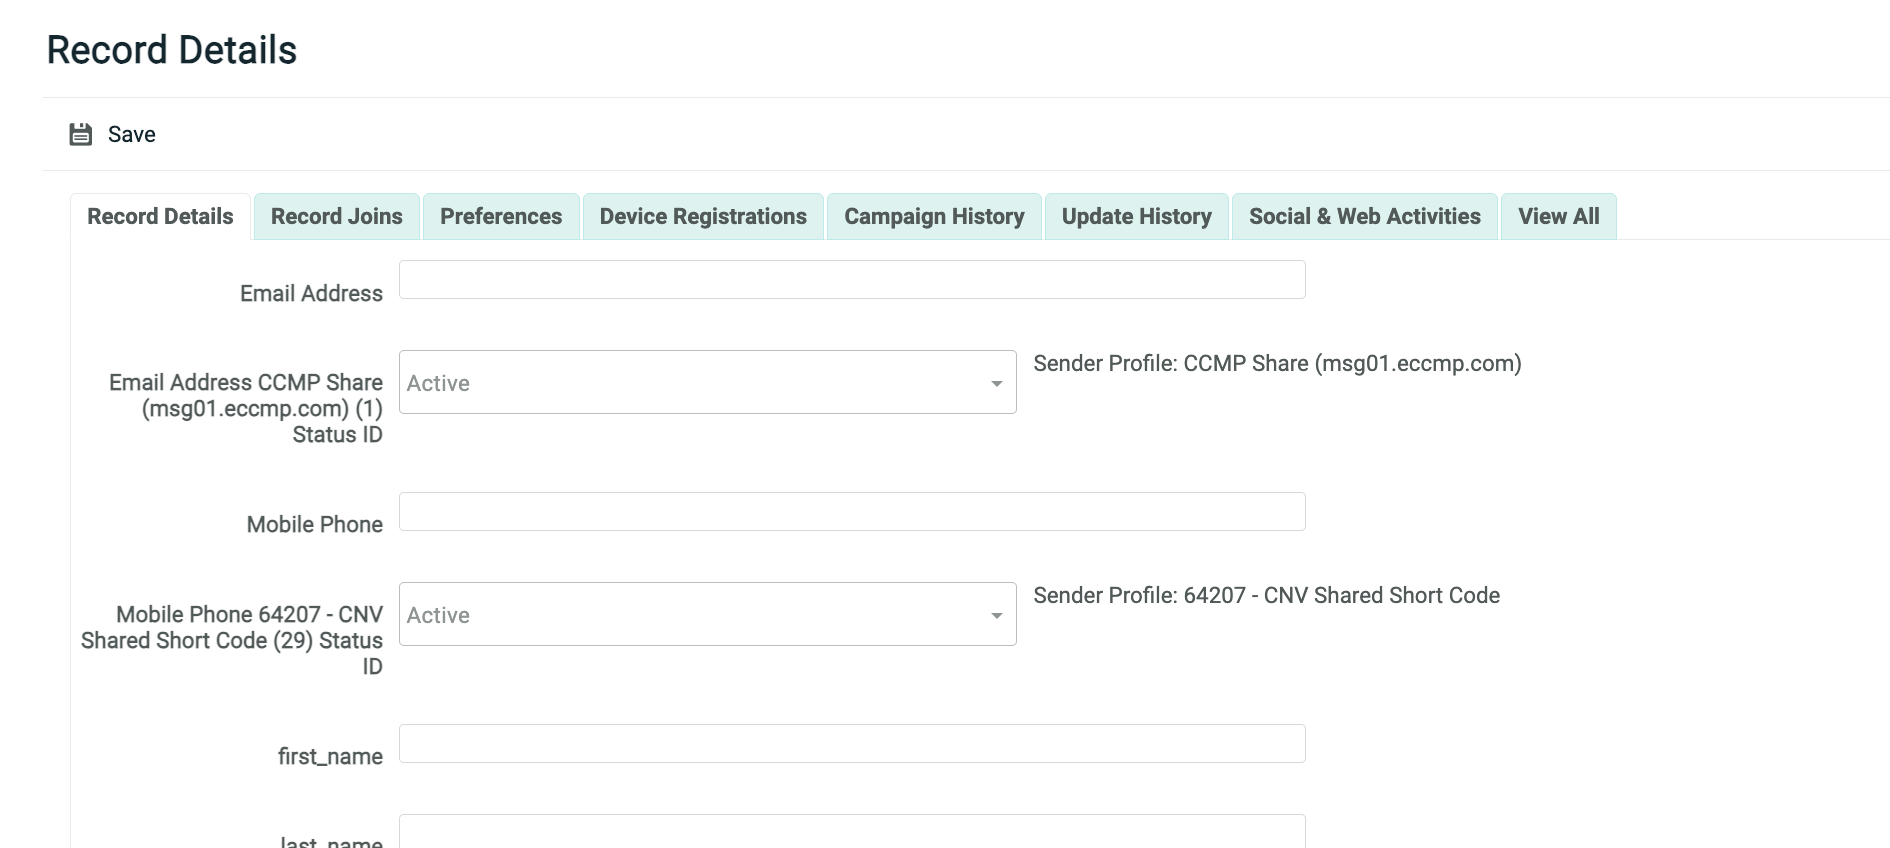
Record lookup
The Record Lookup screen in Messaging provides a simple database query tool that allows you to search a table in your database for a specified text string within a single field. From this screen, you can access detailed information about a record, including a log of all changes made to the record, the history of all activities associated with this record, and any joins between this record and a record in another table.
You can also use the Record Lookup screen as a quick data entry tool for adding new records to your database. However, please note that creating new records through Record Lookup does NOT populate joins between tables.
Create a new record
To add a new record
-
In top navigation bar, select Data >Record Lookup.
-
From the "Table" drop-down menu, select the database table into which you want to insert the new record.
-
Click Add New Record.
-
A blank Record Lookup screen is displayed, with the "Record Details" tab selected. This screen shows all of the fields in the selected table.
-
Enter or select values for the new record.
-
When finished, click Save.

Data load APIs
Messaging allows you to submit and write data to your database by means of API calls. The platform provides several different endpoints with different features, designed to meet your specific requirements.
The Messaging data management endpoints are as follows:
-
HTTP POST: This endpoint is used to submit data collected from your consumers via a Web Form (see Web Forms for more details). The Web Form can either be hosted on the Messaging platform, or hosted externally on some other site. This endpoint doesn't support authentication, and all values are submitted as query type parameters within the URL.
-
Standard Data Load: This endpoint provides the same functionality as the HTTP POST endpoint, except that it requires authentication using OAuth 2.0, and supports JSON and XML messages.
-
Sequential Data Load: This endpoint allows you to send a single API request containing multiple records to be loaded into multiple tables. All records are inserted into these tables sequentially.
-
Advanced Data Load: A single API request sent to this endpoint can be used to load data into multiple joined tables. All records are inserted into these tables simultaneously, rather than sequentially, which greatly improves performance.
-
Batch Import: Through this endpoint, you can send the Base64-encoded contents of a file within the API request.
HTTP post
The HTTP POST endpoint is used to submit data collected from your consumers via a Web Form, or to send from another system to Messaging.
Prerequisites
This endpoint requires that the following assets be defined within your Messaging account:
-
Table: The destination table where you want to load your data should be created, and should include all the necessary fields and joins, and usually a Unique Identifier.
-
Data Map: The Data Map provides data handling instructions, such as where to store the inbound data contained within the API request message, whether this data should be used to update existing records and / or create new records, and any optional formatting or special processing to perform on the inbound data.
-
API Post: The API Post defines all the expected fields in the request message.
If you're using this endpoint to send user-entered data via a Web Form, the endpoint requires that the following asset be defined within your Messaging account:
-
Web Form: The Web Form provides a user-friendly, front-end interface for your customers to enter their information. The Web Form can optionally be hosted within the Messaging platform, or within your system, or on some other third-party system.
Parameters
The input fields and their associated values are all sent as query type parameters within the URL, rather than in the body.
For example:
http://ats.eccmp.com/ats/post.aspx?cr=394&fm=2678&s_email=johndoe@cheetahdigital.com&s_name_first=John&s_name_last=Doe
This endpoint supports the following required parameters:
-
cr: Your client account number
-
fm: Form ID that identifies the desired API Post or Web Form
This endpoint supports the following optional parameters:
-
cn: Campaign ID, used to attribute the record in the post back to a specific Campaign.
-
mg: Message ID, used to attribute the record in the post back to a specific message.
-
ri: Record ID, used to attribute the record in the post back to a specific individual recipient.
Each data field that you're collecting (i.e., email address, first name, last name, etc.) can be submitted in the HTTP POST message as name / value pairs. Single-value fields must use a prefix of “s_” followed by the field's "system name." Multi-value fields must use a prefix of "m_” followed by the field's "system name."
Typically, the Unique Identifier field(s) must be submitted within the HTTP POST message, so that the platform can correctly identify if the data is an existing record to be modified, or a new record to be created.
This endpoint doesn't support authentication, nor does it support JSON or XML. The request can optionally be secured by using the HTTPS protocol. If using HTTPS, please note that the connection is encrypted, but the data being passed is not encrypted.
Standard data load
The Standard Data Load endpoint is used to submit and write data, one record at a time, to one or more joined tables, in your Messaging database. The API request can also optionally be used to trigger the deployment of an Event-triggered Campaign.
This endpoint requires authentication using OAuth 2.0, and supports JSON and XML messages.
The URLs for this endpoint are:
-
North America: https://api.eccmp.com/services2/api/Recipients
-
Europe: https://api.ccmp.eu/services2/api/Recipients
-
Japan: https://api.marketingsuite.jp/services2/Recipients
Note: The endpoint is sometimes referred to as the "Recipients" endpoint, but that name can be misleading. This endpoint can be used to load data into any table, not just into yoir "Recipient" table.
Prerequisites
This endpoint requires that the following assets be defined within your Messaging account:
-
Table: The destination table where you want to load your data should be created, and should include all the necessary fields and joins, and usually a Unique Identifier.
-
Data Map: The Data Map provides data handling instructions, such as where to store the inbound data contained within the API request message, whether this data should be used to update existing records and / or create new records, and any optional formatting or special processing to perform on the inbound data.
-
API Post: The API Post defines all the expected fields in the request message.
If you're using this endpoint to trigger the deployment of an Event-triggered Campaign, you must have the following asset defined:
-
Campaign: You must define and launch an Event-triggered Campaign that uses the above API Post as the event trigger.
Parameters
This endpoint supports the following required parameters:
-
apiPostId: Form ID that identifies the desired API Post.
-
data: Contains the data you want to write to your database. The data is sent as key / value pairs consisting of the field name as the "name" parameter, and the corresponding value in the "value" parameter.
For example:
"apiPostId": "2515",
"data":[
    {
      "name": "email",
      "value": "john.doe@cheetahdigital.com"
    },
    {
      "name": "name_first",
      "value": "John"
    },
    {
      "name": "name_last",
      "value": "Doe"
    }
]
For more information, please see the Standard Data Load API Technical Guide.
Sequential data load
The Sequential Data Load endpoint (sometimes referred to as the "XML API" or "XML POST" endpoint) allows you to send a single request message, with data to be loaded into one or more relational tables. For example, you could send a single message that contains one record to be loaded into a ‘Recipient’ table, two related records to be loaded to an ‘Order’ table, and five related records to be loaded to an ‘Order Item’ table. The system will load or update data in these tables, one table at a time, in a user-defined sequence.
Please note that if you're loading data into multiple tables, you can send only ONE record at the parent level (you can optionally write multiple records into the joined tables). Continuing the above example where you're loading data into three tables, each API call can reference only one recipient, but potentially multiple orders, and potentially multiple items per order.
The API request can also optionally be used to trigger the deployment of an Event-triggered Campaign. The platform will load or update the database prior to deploying the Campaign, which allows you to use data from your database when building your message content.
This endpoint requires authentication using OAuth 2.0, and supports only XML messages (not JSON).
The URLs for this endpoint are:
-
North America: https://ats.eccmp.com/ats/XmlPost/PostSecureAuth2
-
Europe: https://ats.ccmp.eu/ats/XmlPost/PostSecureAuth2
Prerequisites
This endpoint requires that the following assets be defined within your Messaging account:
-
Table: The destination table where you want to load your data should be created, and should include all the necessary fields and joins, and usually a Unique Identifier.
-
Data Map: The Data Map provides data handling instructions, such as where to store the inbound data contained within the API request message, whether this data should be used to update existing records and / or create new records, and any optional formatting or special processing to perform on the inbound data.
-
API Post: The API Post defines all the expected fields in the request message.
If you're writing data to multiple tables, you must have a Data Map and an API Post defined for EACH table.
If you're using this endpoint to trigger the deployment of an Event-triggered Campaign, you must have the following asset defined:
-
Campaign: You must define and launch an Event-triggered Campaign that uses an API Post as the event trigger type. If you're writing data to multiple tables, the API request message will define the sequence in which these tables are loaded / updated. Typically, you want to use the API Post for the last, final table in the sequence as the trigger mechanism for the Campaign. In this manner, you can be certain that all of the necessary data contained in the API message has been loaded into the database, prior to building and sending the email message.
Parameters
This endpoint supports the following required parameters:
-
CustId: Your client account number.
-
TableName: The name of the table to which you're writing data.
-
FormId: Form ID that identifies the desired API Post.
-
SubmissionSequence: When loading to multiple tables, identifies the sequence of which table to load first, second, third, and so on.
-
Record: A single record, or row, of data to be written to your database.
-
Field: A single field within a record, and its corresponding value.
The following sample request writes data to three different tables -- 'Recipient,' 'Order,' and 'Order item.' In this particular order, the customer has purchased two items: a Red Shirt and Blue Socks.
<ApiSubmission CustId="394">
  <Records TableName="order_item" FormId="2677" SubmissionSequence="1">
    <Record>
      <Field FieldName="order_id">12347</Field>
      <Field FieldName="order_item_id">123</Field>
      <Field FieldName="prodname">Red Shirt</Field>
    </Record>
    <Record>
      <Field FieldName="order_id">12347</Field>
      <Field FieldName="order_item_id">456</Field>
      <Field FieldName="prodname">Blue Socks</Field>
    </Record>
  </Records>
  <Records TableName="order" FormId="2676" SubmissionSequence="2">
    <Record>
      <Field FieldName="order_id">12347</Field>
      <Field FieldName="order_date">04/06/18 15:01:00</Field>
      <Field FieldName="email">johndoe@cheetahdigital.com</Field>
    </Record>
  </Records>
  <Records TableName="recipient" FormId="2674" SubmissionSequence="3">
    <Record>
      <Field FieldName="email">johndoe@cheetahdigital.com</Field>
      <Field FieldName="name_first">John</Field>
      <Field FieldName="name_last">Doe</Field>
    </Record>
  </Records>
</ApiSubmission>
For more information, please see the Sequential Data Load API Technical Guide.
Advanced data load
The Advanced Data Load endpoint allows you to use an API request message to send data to update multiple tables in your database, including relational data. Data is loaded simultaneously, rather than sequentially, as with the Sequential Data Load endpoint described above.
This endpoint requires authentication using OAuth 2.0, and supports JSON and XML messages.
The URLs for this endpoint are:
-
North America: https://api.eccmp.com/services2/api/Data
-
Europe: https://api.ccmp.eu/services2/api/Data
-
Japan: https://api.marketingsuite.jp/services2/Data
Prerquisites
This endpoint requires that the following assets be defined within your Messaging account:
-
Table: The destination table where you want to load your data should be created, and should include all the necessary fields and joins, and usually a Unique Identifier.
The Advanced Data Load endpoint doesn't use Data Maps or API Posts. Instead, the content, structure, and format of the inbound data is all defined within the payload of the request message itself.
Parameters
The Advanced Data Load request payload comprises the following main objects:
-
_data: This required object defines the table relationships for the payload, and contains the data for the relational insert.
-
_importOptions: If used, this optional object defines the import rules for tables (and fields) present in the _data section. If this object is not defined for a given table, the data will be imported according to the default behavior.
The _data object allows you to define a relational insert consisting of a "root" or source table, and optionally joins to one or more other tables. At the current time, Advanced Data Load doesn't support multiple records in the root table; you can send only ONE record at this root level (you can optionally write multiple records into the joined tables).
For example
"_data": {
    "recipient": [
        {
            "name_first": "John",
            "name_last": "Smith",
            "email": "john.smith@gmail.com",
            "recipient_to_organization":
                {                      //An upward join
                    "organization_name": "Cheetah Digital",
                    "organization_city": "Costa Mesa"
                },
            "order.order_to_recipient":
                [                      // A child join
                    {
                        "order_no": "2834737",
                        "total": "129.99",
                    },
                    {
                        "order_no": "2834738",
                        "total": "59.99",
                    }
                ]
            }
        ]
    }
}
The optional _importOptions object can be used to specify import behavior on the Advanced Data Load endpoint. This object is necessary only when you want to apply special rules when importing data.
When an inbound record matches on the Unique Identifier to an existing record in the database, the inbound record becomes an "update" instead of an "insert." Within the platform, you can use a Data Map to specify how each field should react in that case. The Advanced Data Load endpoint supports the same behavior, but using the _importOptions object instead of a Data Map. In normal operation, all such options are disabled, or "false," by default. This object, and each individual option within it, only needs to be included and specified if you need some behavior other than the default behavior.
For example:
"_importOptions":
  [
    {
    "_table": "recipient",
    "_doNotUpdateExisting": false,
    "_fieldOptions":
      [
        {
        "_applyToFields":
        [
            "name_first",
            "name_last"
        ],
            "_insertNull": true,
            "_ignoreCase": true
          },
          {
        "_applyToFields":
        [
            "create_date"
        ],
            "_preserveData": true
      }
    ]
    }
  ]
For more information, please see the Advanced Data Load API Technical Guide.
Batch import
The Batch Import endpoint allows you to send multiple Base64-encoded records to load into, or to update, your Messaging database. When the API message is received, the records are added to the import file queue, and are processed based on the priority indicated within the API request.
This endpoint requires authentication using OAuth 2.0, and supports JSON and XML messages.
The URLs for this endpoint are:
-
North America: https://api.eccmp.com/services2/api/Import
-
Europe: https://api.ccmp.eu/services2/api/Import
-
Japan: https://api.marketingsuite.jp/services2/Import
Prerequisites
This endpoint requires that the following assets be defined within your Messaging account:
-
Table: The destination table where you want to load your data should be created, and should include all the necessary fields and joins, and usually a Unique Identifier.
-
Data Map: The Data Map provides data handling instructions, such as where to store the inbound data contained within the API request message, whether this data should be used to update existing records and / or create new records, and any optional formatting or special processing to perform on the inbound data.
The following optional assets are also supported by the Batch Import endpoint:
-
NCOA Process: If you want to run postal addresses through the Coding Accuracy Support System (CASS) and / or the National Change of Address (NCOA) database, you must define an NCOA Process within the platform.
-
Hierarchy Rule: If your account utilizes a Parent / Child architecture, you can select a Hierarchy Rule for the Import. Hierarchy Rules are a configuration feature set in the Parent system that determine which records from a given table a Child view can access.
Parameters
This endpoint supports the following required parameters:
-
cust_id: Your client account number.
-
prop_map_id: Identifies the desired Data Map.
-
type_id: Identifies the import type; this value should be "FILE."
-
encoding: Instructs the system what character encoding method to use on the inbound data.
-
file: Contains your entire import file as a single Base64-encoded string.
-
task_priority: Establishes the import queue priority for your request message.
-
display_name: The name of the Manual Import, as it appears within the Messaging application.
-
parent_obj_id: The Folder ID of the folder where you want to save the new Manual Import.
For example
{
  "cust_id": "394",
  "prop_map_id": "4593",
  "type_id": "FILE",
  "encoding": "UTF8",
  "file": " RW1haWwsRmlyc3ROYW1lLExhc3ROYW1lDQpqb2huLmRvZUBjaGVldGFoZGlnaXRhbC5jb20sSm9obixEb2UNCm1hcnkuc21pdGhAY2hlZXRhaGRpZ2l0YWwuY29tLE1hcnksU21pdGgNCmhvbWVyLnNpbXBzb25AY2hlZXRhaGRpZ2l0YWwuY29tLEhvbWVyLFNpbXBzb"
  "task_priority": "700",
"Obj": {
    "display_name": "Batch Import API Test",
    "parent_obj_id": 37249
  }
}
For more information, please see the Batch Import API Technical Guide.
Web forms
Messaging allows you to build and host a consumer-facing web form that can be used for a variety of purposes, such as:
-
Collecting consumer information
-
Sharing a message
-
Managing consumer opt-out preferences
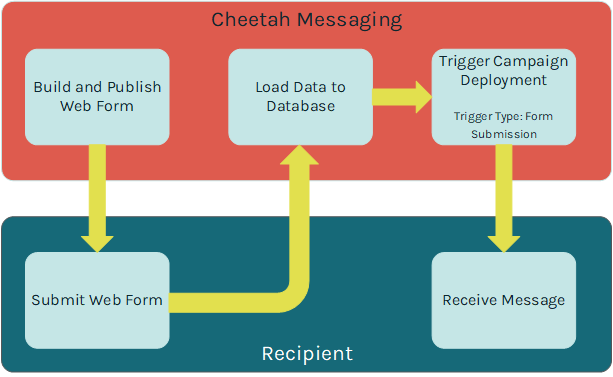
The data collected from the consumer on the Web Form is sent via an HTTP(S) request, parsed, and loaded to your database.
In addition, the submission of a Web Form can be used to trigger the deployment of an Event-triggered Campaign. For example, if a consumer uses your Web Form to subscribe to your email newsletter, you could trigger the deployment of a Campaign that sends a "Welcome" message.
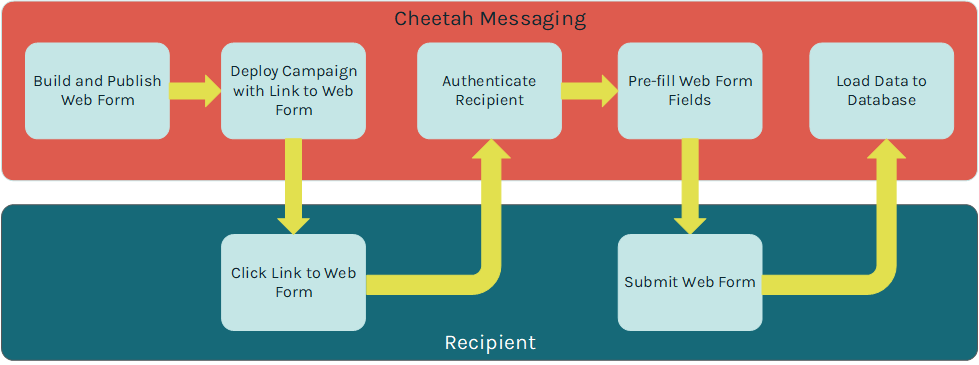
Web Forms can optionally validate the recipient's identity when he or she clicks on a link from a Messaging-deployed email message, and lands on the Web Form. Once the recipient's identify is verified, the Web Form can look that person up in the Messaging database, and pre-fill selected fields in the Form. For example, if you built a Form to gather consumer contact information, and you already have the viewer's postal address, you could pre-fill those postal address fields in the Form, thereby saving the viewer from having to re-enter that information.
Messaging also allows you to integrate Web Forms into Web Pages that you build and host in the platform. You can also host Web Forms on an external site, such as your website, or some other third party site. This document focuses on the creation of standalone Web Forms hosted within the platform.
Web Forms can optionally be used in conjunction with a Personalized URL (PURL). A PURL uses personalization values to create a unique URL for each recipient of your Campaign (for example: "www.cheetahdigital.com/JohnSmith"). PURLs add a personalized touch to your marketing strategy with the goal of being easier to remember, and garnering more attention from consumers. This document doesn't discuss PURLs in detail; for more information, please see the Messaging Online Help system.
Prerequisites
Messaging supports two different data sources for building Web Forms: a table in the Messaging database, or the Engagement Data Platform. This document focuses on Web Forms that use a Messaging table as their data source.
Before proceeding to build a hosted Web Form, the following required assets need to be created within Messaging:
-
Table: The destination table where you want to load your data should be created, and should include all the necessary fields and joins, and usually a Unique Identifier.
-
Data Map: Data Maps identify the correct table into which the data needs to be loaded, any joins to other tables, and the fields where each column in the import file will be stored.
The following optional assets are also supported by Web Forms:
-
Web Authentication: A Web Authentication is needed if you want to pre-fill the Web Form with values pulled from your Messaging database. A Web Authentication contains the field (or fields) that you want to use to uniquely identify the recipient.
-
Custom Stored Procedures: Messaging supports the use of custom stored procedures that will execute on the inbound data. Custom procedures are typically used to perform additional data transformations. Custom stored procedures must be created by your Client Services team; please speak to your Client Services Representative for more details.
-
Hierarchy Rule: If your account utilizes a Parent / Child architecture, you can select a Hierarchy Rule for the Web Form submission. Hierarchy Rules are a configuration feature set in the Parent system that determine which records from a given table a Child view can access.
Create a web form
To navigate to the Web Form screen, in the top navigation bar, select Production > Web Forms.
Data options
The Data Options section of the Web Forms screen is used to define various configuration options about your Web Form.
Enter or select the following Web Form configuration options:
-
Select the Web Form type. The platform supports the following types:
-
Regular: A common Web Form, suitable for most uses.
-
Opt-Out: Used for collecting consumer opt-out information; this Web Form will set the appropriate recipient eligibility status in the database, and include this opt-out activity in reports and Filters.
-
Share Message: Used when a consumer clicks a "forward message to a friend" link. The Web Form will allow the recipient to enter their friend's email address. The system will then send the message to that email address.
-
Device Registration Export: Used for managing Push Notification device registrations.
-
Multi-Form: Used when you want to create a series a Web Forms that span multiple web pages; the data collected in the Form isn't submitted until the consumer finishes and submits the last page in the series.
-
-
Select an encoding method.
-
Indicate if you want to attemtp to pre-fill fields in the Form based on values pulled from your Messaging database.
-
Optionally select one or more Web Authentications. The platform will check that the field(s) defined in the Web Authentication is present and valid before pre-filling the Web Form with data about the viewer.
-
When the consumer submits the Form, data is passed to Messaging via an HTTP request. Optionally, specify that you want to use SSL encryption.
Note: If using SSL encryption, you'll need to purchase an SSL certification and provide it to Cheetah Digitalso that it can be loaded on to our server. Also, you'll need to make sure that all URL paths for images and form calls are set to use HTTPS. Please speak to your Customer Service Representative for more details.
-
Optionally indicate that you want to capture and store records that encounter exceptions.
Note: Storing import exceptions is an optional feature that must be enabled within your account in order to be available for selection.
-
If your account utilizes a Parent / Child architecture, select one of the following hierarchy options:
-
Update Current Customer Only: Load data to the Parent system only.
-
Update Current Customer and Children: Load data to the Parent and to any Child views as well.
-
Custom Hierarchy Rule: Select a custom Hierarchy Rule.
-
-
Optionally, select a post-update custom stored procedure.
-
If the source table for this Web Form contains Calculated Fields, you can optionally derive and populate a value for those Calculated Fields.
Note: If you run a Calculated Field as part of a Web Form, the system derives and populates tat field only for the record in the Web Form submission.
-
Select a Data Map option; Data Maps are described below in more detail.
Data map options
When configuring the Data Options for a Web Form, you can select the fields that you expect to be provided in the Web Form submission, or you can select an existing Data Map. Data Maps provide more advanced functionality, and can be reused across multiple Web Forms.
To use an existing Data Map in your Web Form, click the "Advanced" tab, then search for and select the desired Data Map.
To instead select the expected fields in the Web Form submission, click the "Simple" tab.
Within this section, you can configure the following options:
-
Select how the system handles the import records: create new records only, update existing records only, or create and update records.
-
Define the expected fields in the Web Form submission. You can add fields to the Web Form automatically or manually:
-
Manual: Select one or more fields in the "Available Fields" list box, and click the center "Move" bar.
-
Automatic: To use this feature, you must enter the Web Form content first (see below for details). Then, in the Tool Ribbon, click Edit > Scan Content for Fields. The system parses the Web Form content for any database fields. Any fields identified within the content are automatically added to the "Mapped Fields" list box.
-
-
Once you map a field, you can determine how you want to platform to handle data that the consumer provides. Next to the field name within the "Mapped Fields" list box, click the blue button to toggle through the following options:
-
Save & Populate: The platform will pre-fill this field if possible, and will save any values that the consumer enters.
-
Save Only: The platform will not pre-fill this field, but it will save any values that the consumer enters.
-
Populate Only: The platform will pre-fill this field if possible, and will ignore any values that the consumer enters.
-
In most cases, the Unique Identifier for the destination table should be part of the Web Form submission. If the Unique Identifier comprises multiple fields, then all of those fields need to be mapped in order to successfully load the data. If the Unique Identifier is not in the import file, then you'll need to use the Soft Match feature instead.
In the Tool Ribbon, click Save.
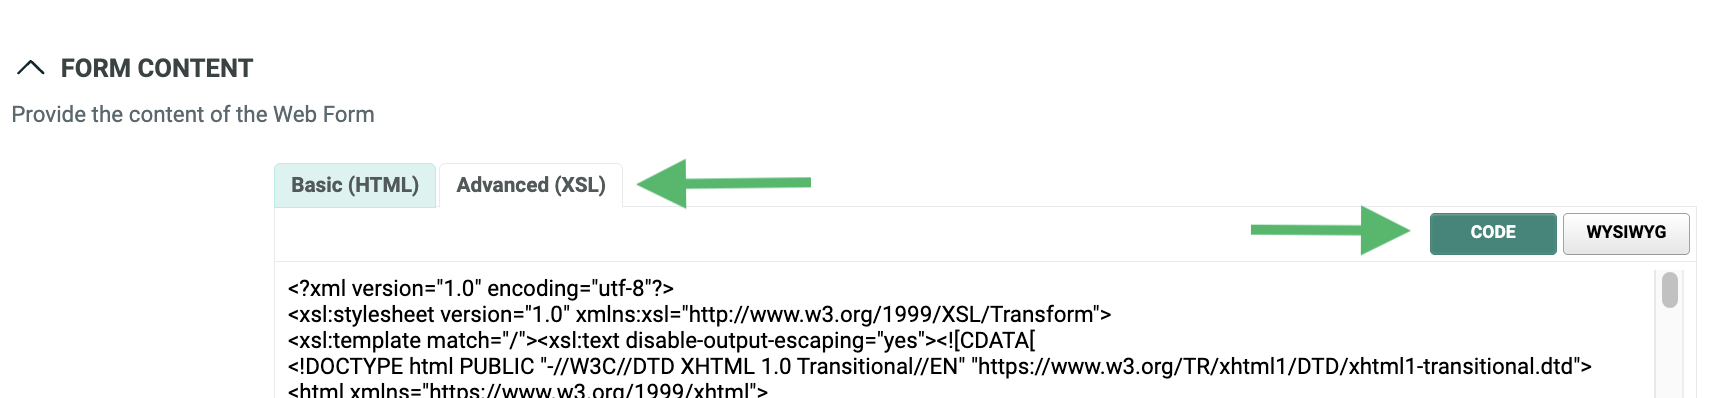
Form content
The Form Content section allows you to enter the content of your Web Form, as either HTML or XSL code. XSL provides more advanced functionality than basic HTML, such as pre-populating check boxes and radio buttons, for example.
Messaging generates sample code for each form input field that you selected above in the Data Options section, as well as all required input fields. The platform will also generate sample JavaScript validation code that can be used to validate the Web Form when a viewer submits his or her data. Toggle between the views available using the respective buttons.
When the Sample Code screen is displayed, select the desired option:
-
HTML Form (Hosted by Platform)
-
reCAPTCHA 2.0 (Hosted by Platform)
-
XSL Form (Hosted by Platform)
-
Externally hosted HTML
-
Form HTTP Post (C#)
Note: Messaging is not a full features Web Form creation tool. The sample code generated by the platform is generic code that can be used as a reference for creating the actual Web Form, or as a base when creating the Web Form in some other third-party editing software.
Enter your Web Form content as either HTML or XSL code by clicking the Basic (HTML) or Advanced (XSL) tabs.
Optionally, from the HTML editor, click WYSIWYG to access the user-friendly text editor. This text editor allows you to enter the content of the Web Form without having to know how to code in HTML. The tool bar at the top of the text editor provides access to common word processing functions, such as text formatting, tables, lists, links, and images. Click Code to toggle back to the HTML editor.
To preview your Web Form, click Preview in the Tool Ribbon. The Preview window is displayed. The pane on the right-hand side of the screen lists the mapped fields in the Web Form. Optionally, type in a value; the system refreshes the preview screen with this value inserted into the Form.
In the Tool Ribbon, click Save. If you didn't use reCAPTCHA in your Web Form content, the system will display a warning message when you save the Web Form. Cheetah Digital strongly recommends the use of reCAPTCHA for all Web Forms in order to protect from automated abuse.
Notifications
If you checked the "Import Notifications" check box above in the "Data Options" section, an additional " Notifications" section is displayed on the screen. This section allows you to define email alerts if the contents of the Web Form submission surpass certain thresholds for a selected import metric or exception. See Appendix C for more information on the different import exception types.
To configure your email notification, first select the desired import exception type, or error condition, from the "Choose Notification Types" drop-down menu. The system displays the "Notification Settings" pop-up window, which lets you configure your email notification.
From this pop-up window, you can configure the following options:
-
Enter the desired threshold settings that will trigger the alert notification. You can enter one or both of the following rules. If you enter both rules, the notification will be triggered if at least one condition is met.
-
Percentage of file: Enter the percentage of invalid records that will trigger the notification.
-
Number of rows: Enter the quantity of invalid records that will trigger the notification.
-
-
Optionally select a previously-saved notification template (which contains the subject line, from address, and list of recipients).
-
Optionally enter a new subject line, from address, and list of recipients (you can also save this information as a template to be reused later).
-
Enter a short descriptive message.
-
Select whether you want the platform to send notifications after the parsing step and / or after the database update step.
Optionally, repeat the above process to add more notifications for different import conditions. Each selected condition is handled separately, with its own threshold settings, and will generate its own email notification message.
Confirmation
The Confirmation section is used to configure the web page to which the recipient is directed once he or she has successfully submitted the Web Form.
Optionally, you can choose to NOT define a confirmation page, which allows for the ability to use JavaScript or XSL to set the confirmation page dynamically depending on user input, or on already existing data pre-filled from the database, or passed in the URL query string.
To define the confirmation page, select a confirmation page option:
-
Externally-hosted web page: Enter the URL for the confirmation page.
-
Another Web Form: Browse to and select the desired Web Form.
-
Custom content: Enter the HTML or XSL code for the confirmation page.
To preview your confirmation page, click Preview in the Tool Ribbon. The Preview window is displayed. From the Preview drop-down menu, select Confirmation Page.
In the Tool Ribbon, click Save.
Form schedule
The "Form Schedule" section provides several options for disabling, or expiring, this Web Form, either based on the number of submissions received, or based on a schedule.
Within this section, you can configure the following options:
-
The maximum number of times that a single recipient can submit this Web Form. If a recipient surpasses this threshold, the system displays an error message.
-
The maximum number of submissions allowable for this Web Form, across all recipients. If the Web Form surpasses this threshold, the system displays an error message.
-
A start date / time for the Web Form.
Note: If using the schedule feature, when you publish your Web Form, it won't yet be available to users until the schedule's start date. If a user attempts to access the Form prior to the start date, a generic error message is displayed.
-
An expiration schedule for the Web Form. If you enter an expiration date / time, the system will display the Expiration page or message (described below) if a recipient attempts to access the Web Form after it has expired.
In the Tool Ribbon, click Save.
Expiration
If you defined an end date for the Web Form in the "Form Schedule" section above, you can define the content that gets displayed to the recipient if he or she attempts to access an expired Web Form.
To define the expiration page, select an expiration page option:
-
Externally-hosted web page: Enter the URL for the expiration page.
-
Another Web Form: Browse to and select the desired Web Form.
-
Custom content: Enter the HTML or XSL code for the expiration page.
To preview your confirmation page, click Preview in the Tool Ribbon. The Preview window is displayed. From the Preview drop-down menu, select Expiration Page.
In the Tool Ribbon, click Save.
PURL set-up
Messaging provides the ability to generate Personalized URLs (PURLs) for a Web Form. PURLs can be used to make the call-to-action for any landing page or form more personalized to the viewer, and allows for the ability to pre-fill the viewer's data just by going to the PURL in his or her browser (similar in concept to a Web Authentication).
For more details on how to setup and configure a PURL Domain, please see the help center.
In the Tool Ribbon, click Save.
Publish a Web Form
If your Web Form is finished, the next step is to publish it.
To publish a Web Form, in the Tool Ribbon, click Edit > Save and Publish.
If you need the URL for the published Web Form, click "Tools > Generate URLs" in the Function Menu. Select a domain from the "Domain" drop-down menu. The "Form URL" field displays the final published URL.
After you've created and published a Web Form, you can provide the URL to the Web Form through another marketing channel, such as within an email message, for example.
To add a Web Form URL to a Campaign message:
-
Navigate to the desired Campaign.
-
Scroll down to the Message section, and click Edit. The Content Editor screen is displayed.
-
Place your cursor in the main content field. The Personalization Pane appears on the right-hand side of the screen.
-
In the Personalization Pane, click on the URLs group to expand it.
-
Within the URLs group, double-click on Web Form (PURL) (or, optionally, you can drag "Web Form (PURL)" from the Personalization Pane, and drop it into the content field). A Browse Web Forms dialog box is displayed.
-
Select the desired Web Form. A dialog box is displayed. From the Domain drop-down menu, selected the desired domain to use for this Web Form. Click OK.
The system inserts the URL for this Web Form into the message content at the current cursor location. If this Web Form uses a Web Authentication, the Web Authentication fields are included as a query string within the URL.
Keyword data capture
"Keywords" are special words or phrases that, when detected within a customer's SMS text message, can be used to trigger some event within Messaging.
Keywords can be organized into groups, which allows you to link the same triggered activity to all of the words or phrases contained within that group. By using Keyword groups, you can create a list of similar words or spelling variations.
Keywords can also be used to capture data about a customer. For example, you could ask customers to text you their email address, so they can receive future email marketing messages. Messaging will detect the presence of the email address in the customer's text message, and add that information to the customer's record in your database. The platform uses "Regular Expressions," or "Regex" for recognizing patterns in the customer's text message in order to identify and capture the correct data.
Optionally, you can also use a keyword-driven response from a customer to set that customer's contact eligibility status. Continuing the above example, you could set the appropriate status flag in the database for a customer after she texts you her email address.
Create a data capture keyword group
To navigate to the SMS Keywords screen, from the top navigation bar, select Assets > SMS Keywords.
The SMS Keywords screen is used to define two different types of keyword groups -- automated responses and data capture. This document describes only the "data capture" functionality.
SMS keywords
The "SMS Keywords" section is used to define the data capture Regular Expression.
To create a data capture keyword group, place a check mark in the Regex Capture check box.
From the Select a Value Match drop-down menu, select either:
-
Entire Keyword: This option should be used if the consumer is instructed to send ONLY the desired data to be captured, without any other keywords or information within the message.
-
Name Value Pair: This option should be used if the consumer is instructed to send some keyword, followed by the desired data to be captured. For example, "EMAIL john.smith@email.com." In this situation, the platform will recognize that the first word is the keyword, and the second word is the value that needs to be captured and stored in the database.
The platform provides a set of commonly-used Regular Expressions that can be used to capture the following: email addresses, phone numbers, dates, and dollar amounts.
For example, the Regex for email address is:
(.+\@.+\..+)
This Regex syntax tells the platform to look for a text string, followed by the @ symbol, followed by another text string, followed by a period, followed by another text string.
To use one of these built-in Regular Expressions, select it from the Common Regexes drop-down menu. The Add New Keyword field is populated with the Regular Expression syntax needed to capture this data. Click the add button (plus-sign icon). Optionally, you can enter your own custom Regex syntax in the Add New Keyword field, then click the add button (plus-sign icon).
Optionally, you can test the Regex syntax to verify that it's accurately collecting the expected data. Enter a test value in the Test Regex Capture text field, then click the Test Regex link. The system tests your value against the Regex syntax, then displays a dialog box with the test results.
Repeat the above steps as needed to define additional data capture keywords.
Click Save in the Tool Ribbon.
You'll note that when setting up a data capture Keyword Group, you don't actually assign the field in the database where the inbound data is to be stored. This assignment occurs when you add the Keyword Group to a Campaign (see below for more details).
Status fields
The "Status Fields" section of the SMS Keywords screen is used to modify a status flag based on the receipt of a response containing one of the Keywords in this group. Every mobile phone field (where the Data Type of the field is "Phone") has a corresponding, system-generated Status ID field that controls the eligibility of this consumer to be contacted. If you want to modify this Status ID field based on the receipt of a Keyword, select the phone field from the drop-down menu, then select the desired value for the Status ID Field:
-
Active: Change the Status ID field for this Phone field to "Active."
-
Inactive: Change the Status ID field for this Phone field to "Inactive."
-
Opt-Out via Reply: Change the Status ID field for this Phone field to "Opt Out Via Reply."
-
Double Opt-In: This option is designed to be used with the Double Confirm Opt-In process. If you select this option, the system will modify the "double confirm" status field, rather than the main Status ID field. This option is intended to be used only for Confirmation Keywords, where consumers are confirming their desire to receive text messages.
Optionally, if this Keyword Group is used to process opt-out requests, place a check mark in the "Opt-Out Flag" check box. Opt-out requests are captured and tracked for use in reporting and Filters.
Add a keyword group to a Campaign
To use a data capture Keyword Group in a Campaign:
-
Navigate to the desired Campaign.
-
In the Tool Ribbon, click Responses > Add SMS Data Capture. The SMS Data Capture dialog box is displayed.
-
From the Short Code drop-down menu, select the Short Code to which recipients will text their information.
-
From the Keyword drop-down menu, select the desired Keyword Group.
-
From the Match Phone Field drop-down menu, select the "Phone" field on the Campaign's source table. The system will look for a match between the recipient's mobile phone number and the field you select here, in order to identify existing recipients.
-
From the Update Field drop-down menu, select the field in your database that the system will update with the data provided by the recipient. This field is populated with all of the fields in the Campaign's source table.
-
Click Save Response.
The system adds a new section named SMS Data within the Responses section of the Campaign detail screen.
From this new section, you can see a list of all data capture Keyword Groups assigned to this Campaign. If you need to remove a Keyword Group, click the X next to the group name. If you need to edit the Keyword Group, click the edit button (pen icon) to bring up the SMS Data Capture dialog box.
Note: You can't edit the details of the Keyword Group (such as the Regular Expression syntax) directly from the Campaign screen. If you need to change the details of the Keyword Group itself, you must navigate to the SMS Keywords screen.
Appendix A - Data types
Every field in Messaging must be assigned a Data Type. This Data Type controls the type of data that can be stored within this field (numeric only, alphanumeric, etc.), and the length of the data.
In addition, certain Data Types have special handling rules within the platform. As an example, fields that have a Data Type of "Email" can be processed through the platform's email cleansing and validation rules when imported.
Data Types are split into two main groups -- basic and advanced.
Basic data types
The system supports the following data types.
| Data Type | Notes |
|---|---|
| String | Accepts all alphanumeric values, up to 255 characters in length |
| Date / Time | Accepts valid date values in valid SQL Server formats |
| Money / Decimal | Accepts numbers with decimals |
| Integer | Accepts round numbers, up to approximately 2 billion |
Advanced data types
The system supports the following advanced data types.
| Data Type | Notes |
|---|---|
| Validates that the value conforms to the standard email format; up to 255 characters in length | |
| Facebook ID | |
| Phone | Validates that the value conforms to the standard phone number format |
| Preference | A special flag is used to indicate a user preference, such as an opt-in / opt-out indicator |
| Big integer | Used for numeric values greater than 2 billion |
| Long strong | Used for long text string values, such as a comment field; up to 8000 characters i length |
| LINE Contact MID | Up to 255 characters in length |
Appendix B - Advanced options
When building a Data Map, the system provides a set of optional, advanced features that control how this data in this field is handled when imported into the system. Many of these options are also available as parameters in the Advanced Data Load API.
Data type options
Depending on the Data Type of the selected field, you may see one of the following options:
-
Country Code (for Phone fields): Select a Country Code; this country code will be prepended to the phone number value.
-
Date Time Locale (for Date fields): This option allows you to select the date / time locale formatting you want to use for this field.
-
Number Locale (for Money / Decimal, Integer, Big Integer, and Preference fields): This option allows you to select the number locale formatting you want to use for this field.
Form field name
The Form Field Name is intended for use with Web Forms. When a consumer fills out and submits a Web Form, the Form sends that data to Messaging by means of an API request message. If you want to use a different name for a field within the API message, you must enter that name in the Form Field Name, so that the platform knows where to store that data within the database.
Processing
The following special processes are available from the Processing drop-down menu:
-
Set Default Value: Allows you to define a value in this field using SQL code.
-
Resolve camp_id from msg_id: Given a Message ID on the import file, the system will attempt to identify the associated Campaign ID.
-
Resolve pk_id from msg_id: Given a Message ID on the import file, the system will attempt to identify the associated Primary Key ID for the individual.
-
Set to mixed case: Transforms a text string into mixed case (capitalize the first letter of each word).
-
Set to mixed case (Specific acronyms excluded): Transforms a text string into mixed case (capitalize the first letter of each word), except for a global list of acronyms; if the text string is one of these specific acronyms, the platform won't change the value to mixed case. For example: "CEO" instead of "Ceo."
-
Get Name Prefix: Identifies and stores only the Name Prefix value from a "Full Name" field.
-
Get First Name: Identifies and stores only the First Name value from a "Full Name" field.
-
Get Last Name: Identifies and stores only the Last Name value from a "Full Name" field.
-
Get Name Suffix: Identifies and stores only the Name Suffix value from a "Full Name" field.
-
Make positive: Changes all numeric values to positive values.
-
Make negative: Changes all numeric values to negative values.
-
Set to lower case: Transforms a text string into all lower case.
-
Set to upper case: Transforms a text string into all upper case.
-
Date Format: For a field with a data type of "Date / Time," allows you to select from a wide range of date formats, such as "MM/dd/yyyy" or "MMM dd, yyyy" for example.
Additional options
Optionally, select one or more of the following additional features:
-
Don't Re-Opt-in: (for Preference fields) Don't use the value in this field to opt-in a customer who had previously opted-out.
-
Don’t Overwrite: If data already exists in the database for this column, the import data will not overwrite the existing value.
-
Insert Null: If the column on the import file is empty, overwrite the data in the database as NULL.
-
Case-Sensitive: Use case-sensitive comparisons between any existing data in the database and the data on the file being imported.
-
Append Values: Append values from the import file onto any existing values in the database, rather than overwrite.
-
Ignore Ban List: (for Email fields) Do not run this email field through any Email Ban lists.
-
Blast Flag: Delete all existing data in the database for this column, and add any new data from this file (note: use with caution!)
Appendix C - Import metrics
When importing data into Messaging, the system can be configured to send alert email notifications based on selected exceptions or error conditions surpassing a specified threshold (count of records and / or percentage of records).
However, not every metric is relevant, or makes sense, for every import method. For example, the "Duplicates on the File" metric isn't relevant for API Posts or Web Forms, because those methods load data one record at a time, rather than via a file.
The following table lists all of the supported exceptions and error conditions, and indicates which ones are utilized by which import method. This table also indicates which exceptions are identified during the parsing step, and which are identified during the database update step.
| Import Methods | Import Step | ||||||
|---|---|---|---|---|---|---|---|
| Condition | Description | API Post | Web Form | Manual Import | FTP Template | Parsing | Update |
| File parsing statistics | |||||||
| Warnings for the file | The system identified missing, empty, or unmapped columns, but the row will be imported. |

|
|

|
|
|
|
| Missing unique ID columns | The unique identifier is missing on the row, and the row will not be imported. |
|
|
|
|
|
|
| Empty rows | No data in the row, nothing to import. |
|
|

|
|
|
|
| Email address validation | |||||||
| Cleaned emails | Email addresses were cleaned (if possible). |
|
|
|
|
|
|
| Invalid emails | Email column will not be imported. |
|
|
|
|
|
|
| Banned emails (global) | Known invalid email addresses are banned from sending. |
|
|
|
|
|
|
| Banned emails (custom) | Custom additions to the Banned Email list. |
|
|
|
|
|
|
| Hard bounces | Emails that previously had Hard Bounces and will not send in the future. |
|
|
|
|
|
|
| Soft bounces | Emails that previously had Soft Bounces and will not send in the future. |
|
|
|
|
|
|
| Known bad addresses | Emails that are known to be bad addresses; shown here to indicate list health. |
|
|
|
|
|
|
| Phone number validation | |||||||
| Cleaned phones | Phone Numbers were cleaned (if possible). |
|
|
|
|
|
|
| Invalid phones | Phone Number column will not be imported. |
|
|
|
|
|
|
| Banned phones | Mobile Carriers prevent messages being sent to this phone number. |
|
|
|
|
|
|
| Bounced phones | Phone numbers that previously bounced. |
|
|
|
|
|
|
| Unique identifier cleaning | |||||||
| Primary key not found in database | The Primary Key was imported but was not found in the database; the record will not be updated/created. |
|
|
|
|
|
|
| Unique ID incomplete | The Unique ID was missing information; the record will not be updated/created. |
|
|
|
|
|
|
| Primary key / alternate key conflict | The Primary Key was imported to change the Unique ID of the record, but new Unique ID already exists on existing record; the record will not be updated/created. |
|
|
|
|
|
|
| Duplicates on the file | The same Unique ID appeared on two or more records on the file; the first record will be updated/created, the remaining duplicate records will not be updated/created. |
|
|
|
|
|
|
| Unique identifier matching | |||||||
| Primary key duplicates | After all methods to detect unique records, primary key duplicates removed. |
|
|
|
|
|
|
