Forward-to-a-Friend Overview
This document describes how to set up the "Forward-to-a-Friend" feature within a Cheetah Digital Email Campaign.
Forward-to-a-Friend allows the recipient of an Email Campaign to forward the email message to a friend, without breaking the creative content of the message, and without the friend having to be in your Messaging database. This feature allows you to potentially reach beyond your audience of recipients, with the goal of getting your recipients' friends to also subscribe to receiving email messages from your organization.
Process flow
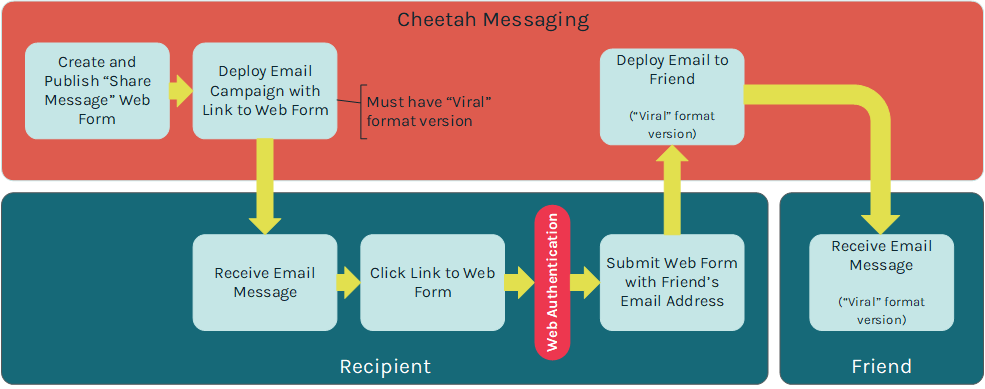
Using the Forward-to-a-Friend feature in Messaging requires the configuration of several different assets within the platform.
First, you must define a Web Authentication within the platform. Web Authentications allow you to define how the platform will uniquely identify a record.
Second, you must define a Web Form that will be used to capture the "friend's" email address. Messaging supports several different Web Form types, designed for different use cases. For the Forward-to-a-Friend feature, you need to create a "Share Message" Web Form.
Third, you must build and deploy an Email Campaign from within the platform. Within the email message content, you must include a link to the Web Form described above.
As part of the content of this Campaign, you can optionally define a "Viral" content format version. "Viral" is a special format version, designed specifically for the Forward-to-a-Friend feature. The Viral format version contains the content that you want the "friend" to receive.
The following diagram depicts the basic Forward-to-a-Friend process flow:
Configuration
This section provides additional details on how to configure the necessary Messaging assets, in order to support your Forward-to-a-Friend marketing efforts.
Web authentication
Web Authentications allow you to define how the platform will uniquely identify a record. Web Authentications are used in conjunction with other assets, such as a Web Form, a Web Page, or a Web Event.
Web Authentications can be built in either of two ways -- either by selecting a field (or fields) on a table, or by using a series of built-in fields called "Tracking Parameters."
For the purposes of a Forward-to-a-Friend Web Form, you'll want to use the Tracking Parameters option. Tracking Parameters allow you to pass a series of standard system fields -- such as a Campaign identifier, a message identifier, and so forth -- from the email to the Web Form.
To create a Web Authentication with Tracking Parameters:
-
From the System Tray, select Web > Items > Web Authentications.
-
Above the list of existing Web Authentications, click the New button. A blank Web Authentication screen is displayed.
-
In the Name field, enter a name for your new Web Authentication.
-
From the Table drop-down menu, select the sending table that you'll be using for the Email Campaign.
-
Next to Options, select the Campaign Values tab.
-
From the drop-down menu, select Tracking Parameters.
-
Click Save.
Share message web form
The Forward-to-a-Friend feature requires the use of a Web Form that's used to collect the email address of the "friend." This Web Form should be set up as a "Share Message" type.
"Share Message" is a special Web Form type designed specifically for the Forward-to-a-Friend feature. The system can optionally capture and store the friend's email address, but if you do so, the friend's email address will not be added as a separate record in your database. Instead, the friend's email address will be stored as an attribute on the original recipient's record.
Ideally, the "friend" decides to subscribe and opt-in to receive email messages from you, at which point the platform will insert the friend into the database as a separate record, with their own eligibility status indicator.
If you intend to capture the friend's email address, you need to create a field on the sending table to store this data. In the example described in this document, we're storing the friend's email address in a field named "friend_email." We're also capturing a comment from the original recipient, and storing that in a field named "friend_comment."
To create the Web Form:
-
From the System Tray, select Web > Management > Web Forms.
-
In the Tool Ribbon, click Home > New. A New Item pop-up window is displayed.
-
Select the folder where you want to save this new Web Form.
-
In the Name field, enter a name for your new Web Form.
-
From the Data Source drop-down menu, select the sending table for your Campaign.
-
From the Type drop-down menu, select Share Message, then click Create New Item. The Web Form details screen is displayed.
-
Within the Data Options section next to Web Authentication, place a check mark next to the desired Web Authentication.
-
Within the Data Options section, select the following fields in the Available Fields list box:
-
The email field to which you're sending the Email Campaign
-
friend_email
-
friend_comment
-
-
Click the add bar.
-
In the Tool Bar, click Edit > Save.
Note: Next time you save your Web Form, the platform will prompot you with a warning to add Google's reCAPTCHA API 2.0 as a validation mechanism. Cheetah Digital strongly recommends the use of reCAPTCHA for all Web Forms in order to protect against automated abuse. This document doesn't go into detail on reCAPTCHA; for more information, check our help centre.
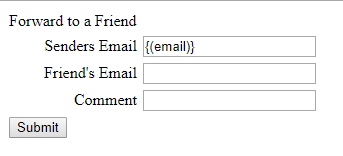
- Insert the following code into the Form Content field
The following code represents the minimum required information needed to successfully use the Forward-to-a-Friend feature. This code doesn't include any formatting, stylesheets, branding, or field validations, all of which can be added as needed.
This code creates three text fields in the Web Form:
s_friend_email -- this field will be automatically populated with the original recipient's email address
s_forward_email -- this field will be used to capture the friend's email address
s_friend_comment -- this field will be used to capture an optional comment that gets sent along with the forwarded message
Your Web Form must use these exact field names. These are system-generated fields designed specifically for the Forward-to-a-Friend feature.
Copy<html>
<head>
<title>Form</title>
</head>
<body>
<form method="post" accept-charset="utf-8" action="go.aspx">
<input type="hidden" name="cr" value="{(CustomerID)}" />
<input type="hidden" name="fm" value="{(FormID)}" />
<input type="hidden" name="sb" value="{(SubmissionID)}" />
<input type="hidden" name="ri" value="{(PkID)}" />
<input type="hidden" name="mg" value="{(MessageID)}" />
<input type="hidden" name="cn" value="{(CampaignID)}" />
<input type="hidden" name="s_email" value="{(email)}"/>
<table cellspacing="0" cellpadding="3" border="0">
<tr>
<td>Forward to a Friend</td>
</tr>
<tr>
<td align="right">Senders Email</td>
<td align="left"><input type="text" name="s_friend_email" value="{(email)}" /></td>
</tr>
<tr>
<td align="right">Friend's Email</td>
<td align="left"><input type="text" name="s_forward_email" value="" /></td>
</tr>
<tr>
<td align="right">Comment</td>
<td align="left"><input type="text" name="s_friend_comment" value="" /></td>
</tr>
<tr>
<td colspan="2"><input type="submit" value="Submit" /></td>
</tr>
</table>
</form>
</body>
</html> -
To see a preview of your Web Form, click Edit > Preview within the Tool Bar. The Preview window is displayed with a rendering of your Web Form.
-
To close the Preview window, click Edit > Edit in the Tool Bar
At this point, we've created a very simple Web Form that will display the recipient's email address in the first field. The recipient can then enter his or her friend's email address, enter a comment, and click Submit.
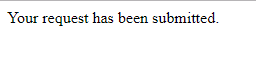
Typically, as part of the Web Form configuration, you want to also define a "confirmation" page that gets displayed after the Form is successfully submitted.
-
In the Confirmation section, select the Basic HTML tab, and enter a short message, such as "Your request has been submitted."
The Web Form screen in Messaging provides many other features that aren't described in this document, such as support for reCAPTCHA, a scheduled start date / end date, and support for Personalized URLs. And, of course, you can add whatever branding, stylesheets, or other creative content as needed in the Form. This document just describes the core functionality required to set up the Forward-to-a-Friend feature. For additional information on the Web Form screen, please see the Messaging Online Help system.
-
In the Tool Bar, click Edit > Save & Publish.
The "Data Options" section of the Web Form details screen is used to tell the platform what data fields to use in the Web Form. This document describes the minimum required fields, but you can optionally add other fields that you want to use for Personalization, such as first name, for example.

Email Campaign
The next component in setting up the Forward-to-a-Friend feature is the Email Campaign with a link to the Web Form you created above, and optionally also "Viral" content that gets deployed to the friend.
This document doesn't go into detail on how to create an entire Email Campaign. Instead, this document focuses only on the assets needed to support Forward-to-a-Friend. For additional information on how to set up an Email Campaign, please see the Messaging Online Help system.
Add the Web Form link
Your email content must contain a link to the new Web Form that you created above. When a recipient clicks this link, the platform is able to capture and track who the recipient is, and pass that information to the Web Form.
To add a link to the Web Form:
-
Create a new Email Campaign, or browse to and select an existing Campaign that hasn't yet launched.
-
Click the content chevron. The Content Editor is displayed.
-
Within the content, determine where you want the Forward-to-a-Friend link to appear, and create a "href" tag. For example:
Copy<html>
<head>
<title></title>
</head>
<body>This is the original email message.<br />
<br />
<a href="">Click here</a> to forward this email to a friend.
</body>
</html> -
Position your cursor between the double-quotes in the "href" tag.
-
Along the right-hand side of the screen, click the Personalization & Library panel to expand it.
-
Click the Library section to expand it.
-
Double-click on Web Form (PURL).
-
The Browse Web Forms pop-up window is displayed. Select the Web Form you created above. The platform inserts the URL for this Web Form at the current cursor position.
-
In the Tool Bar, click Save.
Create viral content
Most channels in Messaging allow you to define multiple format versions of the message content in order to accommodate the different devices and applications used by consumers to view your message. A common example is an Email Campaign that includes both an HTML version and a Plain Text version. If a consumer has an email application that's not configured to view HTML messages, he or she can still see the Plain Text version of your message.
Most of the format versions in Messaging are actually groups containing multiple sub-options. For example, the "HTML" group contains sub-options for "Mobile Web," "iPhone," etc. The platform allows you pull one or more of those options out of the parent version, and create a new, separate format version. This process is referred to as "promoting" a format version into a new group.
When configuring the Forward-to-a-Friend feature, you can optionally promote the "Viral" format version. Viral is a special format version type, designed specifically for the Forward-to-a-Friend feature. The Viral format version contains the content that you want the "friend" to receive." A Viral format version isn't required, but is usually recommended. If you don't define a Viral format version, the friend will receive the same "HTML - Email Message" format version as the original recipient.
To create the Viral content format version:
-
Format versions are displayed as tabs above the content editor field. To "promote" the Viral format version, click the "cog" tab.
-
Drag-and-drop the "Viral" HTML format version into a new tab.
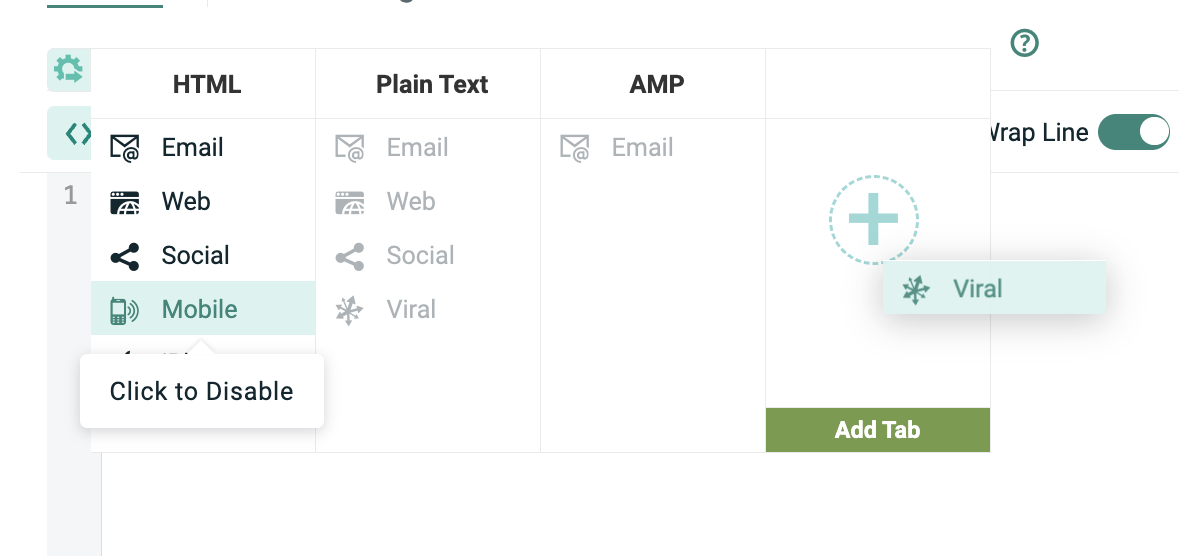
-
The platform promotes the Viral format version out of the HTML group, and displays Viral as its own tab within the Content Editor window.
-
Click the "HTML - Viral" tab, and enter the content that the friend will receive.
-
In the Tool Bar, click Save.
-
Configure the remaining Campaign details (Filter, Sender Profile, schedule, link tracking, etc.) then launch the Campaign.

Result
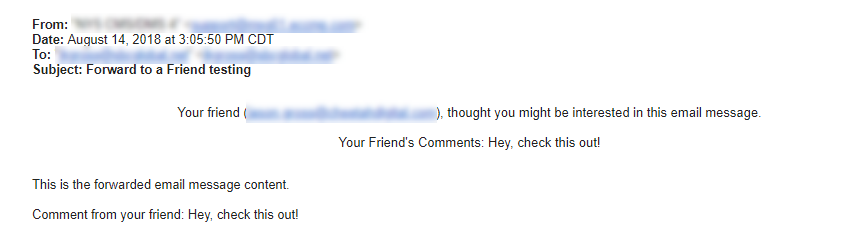
The result of the above configuration steps is an email message sent to the recipients within the Campaign's audience Filter. Within this message is a link to a Web Form.
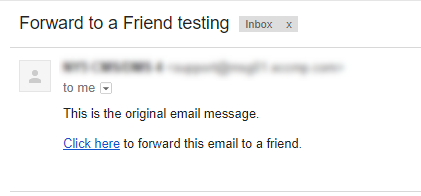
When the recipient clicks on the link in this message, the recipient is taken to a Web Form, with his or her email address pre-populated in the Form.
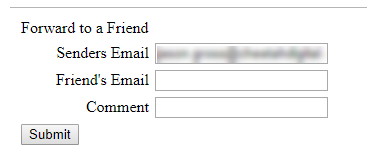
The recipient enters the friend's email address, and also a comment, then clicks Submit. The confirmation page is displayed.
The platform deploys an email message to the friend's email address, containing the Viral format version. The platform uses a special template for this forwarded message that consists of a statement at the top of the message content with the original recipient's email address, and his or her comment.