
Integrating Web Events 2.0
This purpose of this document is to provide Cheetah Digital clients with a basic understanding of Version 2.0 of the Web Event feature within Cheetah Digital, as well as guidance on how to integrate Web Events with external websites.
Web Events allow an external website to inform the Messaging platform of specific activity that has occurred as the result of a customer clicking through to the website from a marketing Campaign. This activity is most commonly a purchase, but it could be any form of event or transaction that you need to track.
By using Web Events to inform the platform of your customers' actions on your website, you're able to utilize the Web Event data in four places – Campaign Reports, Marketing Intelligence Reports, Filters, and Campaign Triggers.
Overview
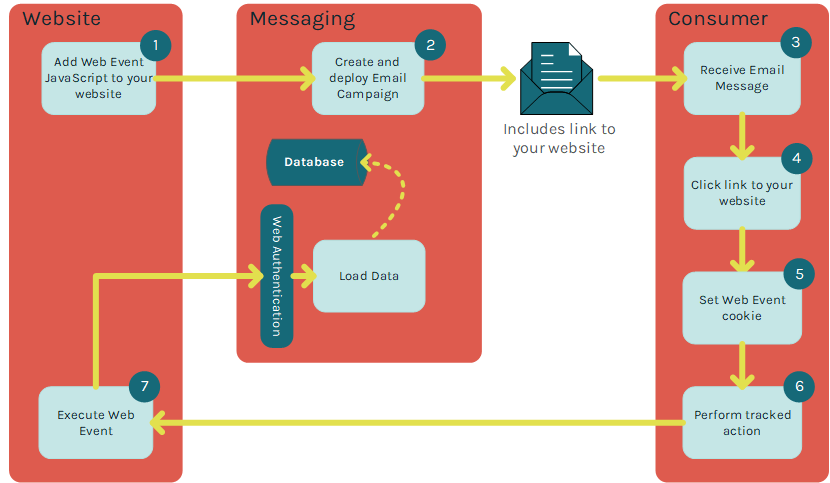
The following diagram depicts a typical process flow -- from the Messaging platform, to the consumer, to your website, and then back to Messaging.
Campaign reports
Because Web Events are always delivered to the platform as a result of a Campaign, the consumer action that caused the Web Event can be directly attributed to a specific Campaign. When a Web Event has been set up within the platform and your website, any consumer actions as a result of a Campaign will be shown in that Campaign’s Report.
The Campaign Report will provide a count for the total and unique number of events that occurred as a result of the Campaign. This Report allows you to measure and track the effectiveness of your marketing message in driving customers to your website, and performing the desired action (such as making a purchase).
Currently, no other data (for example, Order Value or Amount) is available within the Operational Campaign Reports, even if specified in the Web Event. However, the platform provides a set of standardized Web Event parameters that may be used in conjunction with the Marketing Intelligence (MI) reports. These reports will allow you to view summarized data on web parameters (for example, Total Purchase Amount).
Marketing intelligence reports
Standard Web Event data can be reviewed directly from your Marketing Intelligence reports. Please refer to the Web Event Function section for information on the standard parameters and how to set up the code for data capture.
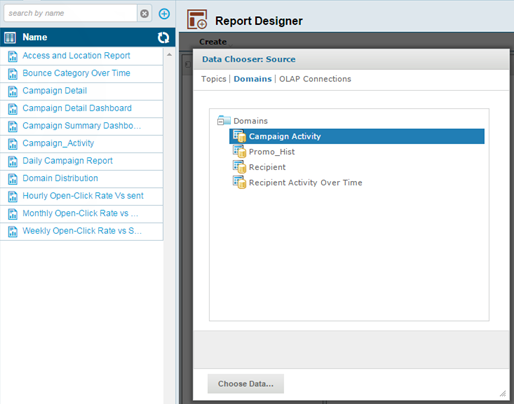
Once the respective parameters have been implemented, reports can be generated in Messaging by choosing to create a new report, clicking "Domains," and selecting on one of the available Domains.
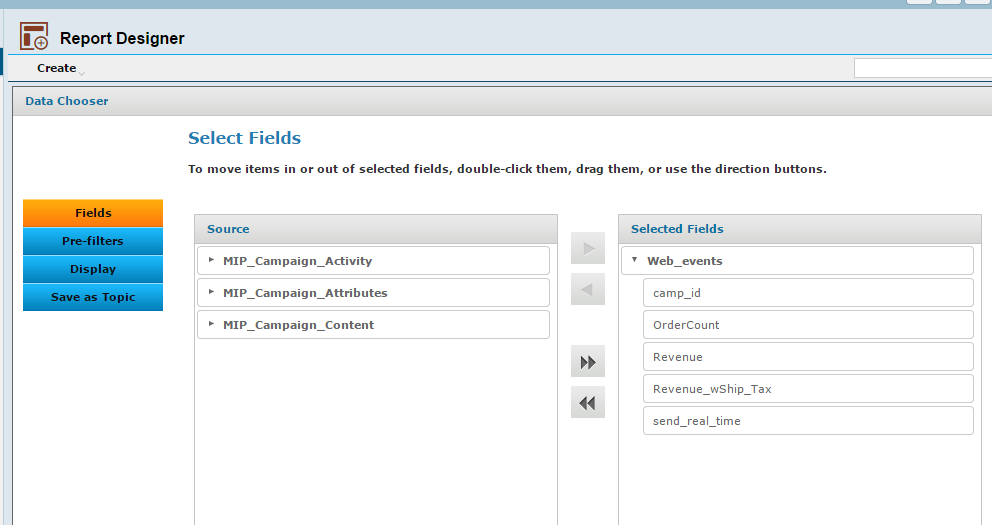
After selecting the Domain, you next choose the desired fields from the Report Designer, then generate the report.
Filters
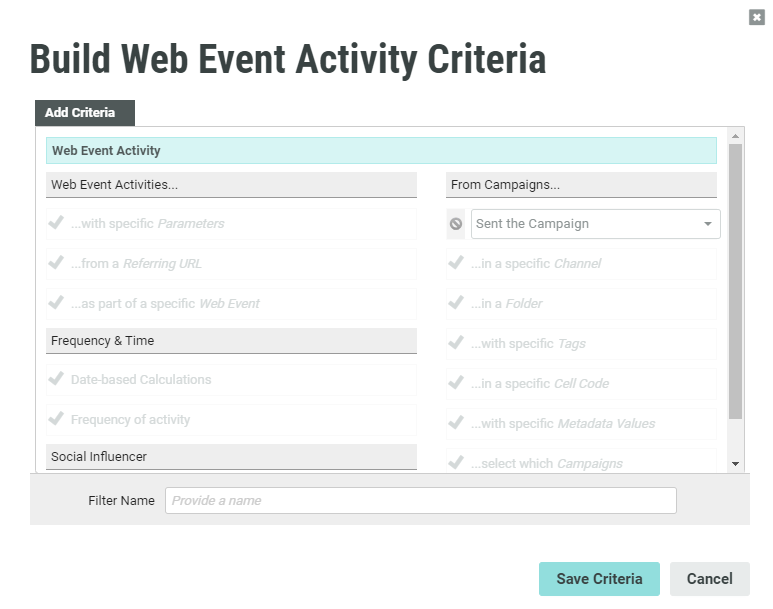
Web Event data can also be utilized in Filters. For example, you could use a Filter to create an Audience of customers who performed a specific Web Event, in order to target those customers with a follow-up Campaign message.
When creating the business rules and criteria for a Filter, the “Activities & Items” section offers an option called “Web Events." This feature provides a number of different options and variables, such as anyone that had a Web Event within a certain time frame, or a Web Event associated with a specific Campaign. You can also set custom parameters such as a "Total," then filter based on these (for example, anyone that had a Web Event in the last 10 days, with a "Total" value over 100).
Campaign triggers
Web Events can also be used as the trigger mechanism for an Event-Triggered Campaign. This feature can be particularly useful for driving near-real-time Campaigns, as an action on a website (or Mobile App.) can trigger the send of a specific Campaign.
When defining the Web Event trigger, the platform offers several options and variables, such as from a specific URL or a specific Web Event.
Note: If you're passing multiple values in a parameter and want to query against a single value, you must use a set of percent signs ("%") around the value (e.g. category_code = %cars%).
Implementing Web Events
This section describes in more detail how to implement Web Events, and what the responsibilities are for Cheetah Digital Client Services and for you.
Cheetah Digital's role
The Implementation and Account teams at Cheetah Digital Client Services will discuss the requirements that the Web Event feature will fulfill within the system. Based on the results of this analysis, the teams will create two objects within Messaging:
-
Web authentication
-
Web event
The Web Authentication object is used to authorize the data being sent back to the platform and to ensure that it's assigned to the appropriate Campaign.
The Web Event is the object that enables data to be collected by the platform, and determines what custom data is accepted (for use in Filters).
The Cheetah Digital Client Services team will then supply you with the necessary code (described below) to be added to your goal / confirmation page.
Your role
Web Events are implemented by adding code to your website that sets a cookie when recipients open your message or click on a link within the message. This code must be added to your goal / confirmation web page.
The typical process flow is as follows:
-
A Campaign recipient opens your message, or clicks through your Campaign message and lands on site.
-
A cookie is set by the redirect server.
-
The customer performs the specified action on your website.
-
When the action is complete, the “goal” page contains the Web Event function which fires off the pixel.
Integrating with your website
This section provides technical details on how to integrate the Web Event code into your website
Javascript SDK
The SDK code should be implemented on the goal or confirmation page on your web site. It will carry through any Messaging-specific data values that are required for the Web
The code below is sample code and should not be used on your site.
<script type="text/javascript">
function WebEvent() {
var webEventId = x;
var paramObj = {};
paramObj.OrderDate = "value";
paramObj.OrderID = "value";
paramObj.OrderTotalPrice = "value";
paramObj.ProductCategoryName = "value";
paramObj.ProductID = "value";
paramObj.ProductPrice = "value";
paramObj.ProductQuanity = "value";
paramObj.ProductsCount = "value";
paramObj.Variable1 = "value";
paramObj.Variable2 = "value";
Cnv.PostWebEvent(paramObj, webEventId);
}
  //Conversen SDK
window.cnvAsyncInit = function () {
Cnv.init({
custId: 'x',
entityId: 'x',
restLink: 'sts.eccmp.com',
enableFacebook: false,
enableSocialEvents: false,
success: WebEvent
} );
};
(function () {
var cnv = document.createElement('script');
cnv.async = true;
var cnvJsHost = (("https:" == document.location.protocol) ?
"https://sts.eccmp.com" : "http://sts.eccmp.com");
cnv.src = cnvJsHost + '/sts/scripts/conversen-SDK.js';
document.getElementsByTagName('body')[0].appendChild(cnv);
} ());
</script>
Web Event function
Messaging offers two options for implementing the Web Event function -- Aggregate Order Level and Product Level Information.
Note: When creating the Web Event in the platform, the parameters entered are the ones under the “Parameter Name” column.
-
Option 1: Aggregate order level
With this implementation option, a single Web Event is executed from your goal page (such as an order confirmation page). The Marketing Intelligence tool will report on the overall metrics, like total order value. The following table lists the expected values and data types.
Parameter Name Input Parameter Type Description Example OrderId Campaigns_Orders_OrderID String (4000) Your order ID 1 OrderDate Campaigns_Order_Date Date Order confirmation date 1/1/2026 23:59
OrderProducts Campaigns_Orders_Products Integer Total number of products 5 OrdersTotalPrice Campaigns_Orders_Totalprice Money Total price of the order 499.99 OrderSource Campaign_Order_Source String Source of Order Desktop, mobile, etc. Variable1 Variable1 String Additional param if needed Variable2 Variable2 String Additional param if needed The code below is example code and should not be used on your site.
Copyfunction WebEvent() {
var webEventId = x;
var paramObj = {};
paramObj.Campaigns_Orders_OrderID = "value";
paramObj.Campaigns_Orders_Date = "value";
paramObj.Campaigns_Orders_Products = "value";
paramObj.Campaigns_Orders_Totalprice = "value";
paramObj.Campaigns_Orders_Source = "value";
paramObj.Variable1 = "value";
paramObj.Variable2 = "value";
Cnv.PostWebEvent(paramObj, webEventId);
} -
Option 2: Product level information
Reporting may be desired at a product level instead of an aggregate level. In that case, the Web Event function can be implemented in an iterative fashion. An alternate set of fieldswill also be required, as described below:
Parameter Name Input Parameter Type Description Example OrderId Campaigns_Orders_OrderID String (4000) Your generated order ID 1 OrderDate Campaigns_Order_Date Date (YYYY-MM-DD HH:MM:SS) Order confirmation date 1/1/2026 23:59
ProductId Campaigns_Orders_ProductsID String The product unique identifier from your catalogue XYZ123 ProductName Campaigns_Orders_ProductsName String The product name Laptop X123456 Product Description Campaigns_Orders_ProductsDescription String The product description A really powerful, lightweight laptop ProductQuantity Campaigns_Orders_ProductQuantity Integer The product quantity 5 ProductPrice Campaigns_Orders_ProductsPrice Decimal The product unit price 499.99 ProductCategoryId Campaigns_Orders_ProductsCategoryId String The product category unique identifier 123456789 ProductCategoryName Campaigns_Orders_ProductsCategoryName String The product category name Computers & Laptops OrderSource Campaign_Order Source String Source of order Desktop, mobile, etc. OrderTotalPrice Campaigns_Orders_Totalprice Money Total price of the order 899.99 Variable1 Variable1 String Additional param if needed Variable2 Variable2 String Additional param if needed The code below is example code and should not be used on your site:
Copyfunction WebEvent() {
var webEventId = x;
var paramObj = {};
paramObj.Campaigns_Orders_OrderID = "value";
paramObj.Campaigns_Orders_Date = "value";
paramObj.Campaigns_Orders_ProductsID = "value";
paramObj.Campaigns_Orders_ProductsName = "value";
paramObj.Campaigns_Orders_ProductsDescription = "value";
paramObj.Campaigns_Orders_ProductsQuantity = "value";
paramObj.Campaigns_Orders_ProductsPrice = "value";
paramObj.Campaigns_Orders_CategoryID = "value";
paramObj.Campaigns_Orders_CategoryName = "value";
paramObj.Campaigns_Order_Source = "value";
paramObj.Campaigns_Orders_Totalprice = "value";
paramObj.Variable1 = "value";
paramObj.Variable2 = "value";
Cnv.PostWebEvent(paramObj, webEventId);
}Note: In the above example, the code would be output a number of times, which would be determined by the number of products purchased. If a customer purchased three items, then the code would need to be generated three times.
Implementing Web Events without Tag Managers
For clients who don't use a tag manager, below is an example of code that will run on success of the SDK downloading, and will execute a Web Event for each item in the order:
<script type="text/javascript">
function WebEvent() {
var webEventId = 1 ;
const orderitems = [
    {
        Campaigns_Orders_OrderID: "VALUE",
        Campaigns_Orders_Date: "VALUE",
        Campaigns_Orders_ProductsID: "VALUE",
        Campaigns_Orders_ProductsName: "VALUE",
        Campaigns_Orders_ProductsDescription: "VALUE",
        Campaigns_Orders_ProductsQuantity: "VALUE",
        Campaigns_Orders_ProductsPrice: "VALUE",
        Campaigns_Orders_CategoryID: "VALUE",
        Campaigns_Orders_CategoryName: "VALUE",
        Campaigns_Order_Source: "VALUE",
        Campaigns_Orders_Totalprice: "VALUE"
    },
    {
        Campaigns_Orders_OrderID: "VALUE",
        Campaigns_Orders_Date: "VALUE",
        Campaigns_Orders_ProductsID: "VALUE",
        Campaigns_Orders_ProductsName: "VALUE",
        Campaigns_Orders_ProductsDescription: "VALUE",
        Campaigns_Orders_ProductsQuantity: "VALUE",
        Campaigns_Orders_ProductsPrice: "VALUE",
        Campaigns_Orders_CategoryID: "VALUE",
        Campaigns_Orders_CategoryName: "VALUE",
        Campaigns_Order_Source: "VALUE",
        Campaigns_Orders_Totalprice: "VALUE"
    }
];
for (var i=0; i<orderitems.length; i++){
    var paramObj = orderitems[i];
    Cnv.PostWebEvent(paramObj, webEventId);
}
}
//Conversen SDK
window.cnvAsyncInit = function () {
Cnv.init({
custId: 'xxxx',
entityId: 'xxxx',
restLink: 'sts.eccmp.com',
enableFacebook: false,
enableSocialEvents: false,
success: WebEvent
} );
};
(function () {
var cnv = document.createElement('script');
cnv.async = true;
var cnvJsHost = (("https:" == document.location.protocol) ?
"https://sts.eccmp.com" : "http://sts.eccmp.com");
cnv.src = cnvJsHost + '/sts/scripts/conversen-SDK.js';
document.getElementsByTagName('body')[0].appendChild(cnv);
} ());
</script>
Multiple customer IDs
Clients with multiple brands will often be configured within Messaging in separate accounts, with separate Customer IDs, but these multiple brands may share a common checkout page. Web Events support the use of multiple Customer IDs so that the Web Event activity gets attributed to the correct Customer ID.
To support this use case, Messaging uses a Web Event group code that indicates which Customer IDs need to be evaluated together. This code uses the naming convention group_<custid>_<custid>. For example, if Customers 100 and 101 were sharing a checkout page, you would define the group code as: "group_100_101." You can optionally string together as many Customer IDs as needed, up to a maximum of fifty characters.
In addition, the platform uses a cookie prefix that contains a text string used to identify a brand.
If the Web Event group code is enabled for a client, the platform will create the xyz_trk_we_grp_<code> cookie. When a Web Event is submitted that has a group code, the SDK will look for the xyz_trk_we_grp_<code> cookie and get the tracking parameters for the recipient's last-clicked Campaign. The platform can then attribute the Web Event to the correct Customer ID based on these tracking parameters.
The Web Event code on the checkout page must include the Web Event group code:
<script type="text/javascript">
    function WebEvent() {
        var webEventId = x;
        var paramObj = {};
        paramObj.OrderDate = "value";
        paramObj.OrderID = "value";
        paramObj.OrderTotalPrice = "value";
        paramObj.ProductCategoryName = "value";
        paramObj.ProductID = "value";
        paramObj.ProductPrice = "value";
        paramObj.ProductQuanity = "value";
        paramObj.ProductsCount = "value";
        paramObj.Variable1 = "value";
        paramObj.Variable2 = "value";
        Cnv.PostWebEvent(paramObj, webEventId);
    }
    //Conversen SDK
    //webEventGroupCode should only be used if you have multiple custIds sending campaigns to the same checkout page
    window.cnvAsyncInit = function () {
        Cnv.init(
        {
            custId: 'x',
            entityId: 'x',
            webEventGroupCode: 'value',
            restLink: 'sts.eccmp.com',
            enableFacebook: false,
            enableSocialEvents: false,
            success: WebEvent
        });
    };
    (function () {
        var cnv = document.createElement('script');
        cnv.async = true;
        var cnvJsHost = (("https:" == document.location.protocol) ?
        "https://sts.eccmp.com" : "http://sts.eccmp.com");
        cnv.src = cnvJsHost + '/sts/scripts/conversen-SDK.js';
        document.getElementsByTagName('body')[0].appendChild(cnv);
    } () );
</script>
Upgrading from Web Events 1.0
If your Messaging solution current uses the 1.0 version of Web Events, you can upgrade to version 2.0 in order to gain the benefits and enhancements available in version 2.0.
To upgrade:
-
Check the existing JavaScript code on the client's website, and verify that the "restlink" value is "sts.eccmp.com."
-
Enable cookie tracking for the client within the Messaging Administration system (this step is performed by the Cheetah Digital Client Services team).
-
Optionally, the client can remove all JavaScript SDK code from any web pages that they DON'T want to trigger the Web Event.
-
Within Campaigns, the client can optionally remove appending Tracking Parameters to every link.
-
If you need to support multiple Customer IDs on the same checkout page, you have to add webEventGroupCode to your Javascript SDK. You also need to verify with your account team that a Web Event group code has been defined for you.
window.cnvAsyncInit = function () {
    Cnv.init(
    {
        custId: 'x',
        entityId: 'x',
        webEventGroupCode: 'value',
        restLink: 'sts.eccmp.com',
        enableFacebook: false,
        enableSocialEvents: false,
        success: WebEvent
    });
};