Ad Audience Campaigns
Ad Audience Channel
The Ad Audience channel allows you to build an audience in Cheetah Digital via a Filter, then send those individuals to an external ad platform for campaigning purposes. The ad platform compares those individuals against a list of platform users and constructs a list of users that match against the records that you sent.
Cheetah Digital supports integration with Facebook and Google ad platforms.
The use of the term "Audience" can be confusing because the same term is used to refer to two different concepts:
- Within Cheetah Digital, an audience refers to a set of individuals selected by a Filter when the Filter logic is executed.
- Within the ad platform, an Audience refers to a set of individuals who represent the targets of an ad campaign.
In summary, an Ad Audience Campaign is used to create an "Audience" within Cheetah Digital by means of a Filter, then to transmit that collection of individuals to the ad platform to populate the "Audience" within the ad platform.
Note: The Ad Audience channel is an optional feature that must be enabled in your account. Please speak to your Client Services Representative for more details.
Register Ad Account
Before you can use the Ad Audience channel in Cheetah Digital, you must register your existing ad account (or accounts) within the platform.
Register Facebook Ad account
Before proceeding with these steps, ensure that you are logged out of Facebook. You may have to navigate to facebook.com and log out of your user session.
Note: Facebook imposes a maximum limit of twenty ad accounts when retrieving account information. You can actually have more than twenty Facebook ad accounts, but only twenty will appear with the Cheetah Digital application.
1. From the Cheetah Digital Settings wheel in the upper-right, select Integrations > Facebook Audiences.
2. Click Authenticate with Facebook. A Facebook login prompt is displayed within a pop-up window.
3. Enter the credentials of a user who has access to the desired Facebook Ad Account.
4. Click Log In.
5. Click Continue.
6. A Facebook prompt is displayed, asking you to confirm that the Cheetah Messaging application has permission to manage aspects of this user. Click Ok.
7. Once the authentication is complete, the Facebook Ad Accounts pop-up window is displayed and populated with all Facebook Ad Accounts to which this user has access. Check the desired Adthat you want to register within Messaging. Click Ok.
8. A success message is displayed. Click Ok.
9. The selected Ad Account (or Accounts) is displayed.

Register Google Ad account
Before proceeding with these steps, ensure that you are logged out of Google. You may have to navigate to google.com and log out of your user session.
Note: Google imposes a maximum limit of twenty-five ad accounts for their ad platform.
1. From the Cheetah Digital Settings wheel in the upper-right, select Integrations > Google Audiences.
2. Click Sign In with Google. A Google login prompt is displayed within a pop-up window.
3. Enter the credentials of a user who has access to the desired Google Ad Account.
4. Click Log In.
5. A Google prompt is displayed, asking you to confirm that the Cheetah Digital application has permission to manage aspects of this user. Click Allow.
6. Once the authentication is complete, the Google Ad Accounts pop-up window is displayed and populated with all Google Ad Accounts to which this user has access. Check the desired Ad Accounts that you want to register within Messaging. Click Ok.
7. A success message is displayed. Click Ok.
8. The selected Ad Account (or Accounts) is displayed on the Google Audiences screen.

Campaign Creation
Create a New Campaign
Once you've registered one or more ad accounts with Messaging, and you've created the Filter to select the desired audience, you can create the Campaign.
1. In the Top Navigation bar, select Production > Campaigns.
2. In the Tool Bar, click New Campaign.
3. Fill out the Campaign details:
- What — Enter Campaign.
- Where — Select the folder for the Campaign
- Name — Enter a unique descriptive name for the Campaign.
- Product — Ensure that Cheetah Digital is selected.
- Data Source — Select the Campaign's source table.
- Type — Select the Campaign type (see below for details).
- Channel — Select Ad Account.
4. Click Create
Messaging supports two types of Ad Audience Campaigns:
- Regular One-off Campaign — This Campaign launches and deploys once, and then the Campaign status is set to "Done."
- Recurring (Sync) Campaign — This Campaign uses a recurrence schedule that controls when, and how frequently, the Campaign deploys. A Recurring Campaign allows you to keep the audience in the external ad platform up-to-date and synchronized with your Messaging database. When a Recurring Campaign deploys, Cheetah Digital runs a "change detect" on the current execution of the Filter versus the previous execution of the Filter. Cheetah Digital then sends ONLY the changes (new records / deleted records) to the ad platform. In this manner, the audience within the ad platform stays synchronized with your Messaging database.
The Campaign screen is split into multiple sections accessible via a series of buttons across the top of the screen. The first button, Setup, is where you configure high-level information about the Campaign.
Identify the campaign audience
In an Ad Audience Campaign, a Filter is used to select the universe of recipients that you're sending to the external ad platform.
1. Click the Setup button.
2. Within the Audience section, use the Search tool on the Filter field to browse for an existing Filter; or use the New tool (plus sign) to create a new Filter.
Select the ad platform
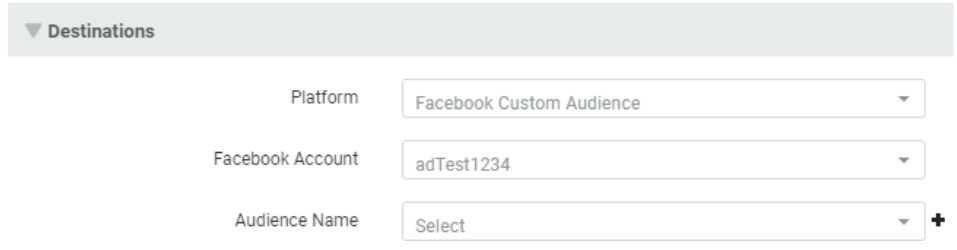
1. Within the Destinations section, from the Platform drop-down menu\elect either Facebook Custom Audience or Google Customer Match.
2. From the Account drop-down menu, select the desired ad account.
3. The Audience Name drop-down menu is populated with the existing Audiences for the selected ad account.
Note: Facebook imposes a maximum of one hundred Audiences to display in this drop-down menu. If you have more than one hundred Audiences, Facebook will return the one hundred most recent Audiences. Google does not impose a limit.
4. Select an Audience option:
- Select an existing Audience. For Facebook, the platform displays the Audience description and estimated count.
- Click the New button (plus-sign icon) to define a new Audience. The New Audience pop-up window is displayed. Enter a name and description for the new Audience. For Facebook, from the Customer Data Source drop-down menu, select the source of the data. Click Create.
Note: When you create a new Audience, Cheetah Digital immediately creates the new Audience within the ad platform. Even if you never launch and deploy the Campaign, the new Audience will still be created (although it will be empty).
For the Google ad platform, you must select the information you intend to send to Google that Google will then use to identify ad recipients.
5. Next to Match based on, select a match option: Email, Phone, or Mailing Address.
Map data fields
In the Data section of the Campaign screen, you select which field, or fields, in your Campaign source table you want to send to the ad platform. These fields represent the identifiers that the ad platform will use to uniquely identify an individual. In addition, you must map the selected fields in your table to the standard fields that the ad platform expects. The process varies slightly between Facebook and Google ad platforms.
For Facebook:
1. Click the Data button.
2. Click Add New Column. The Data File Column pop-up window is displayed.
3. From the Data Source drop-down menu, select a field on the Campaign's source table, or select a join to another table.
4. From the Facebook Mapped Field drop-down menu, select the ad platform field to which you want to map the data provided. This drop-down menu contains all the standard fields supported by Facebook.
5. Click OK. The system adds a new row to the Data section.

6. Repeat the above as needed to map additional fields.
7. In the Tool Bar, click Save.
Hint: Optionally, you can map multiple fields on the source table into the same Facebook field. For example, let's say you have a "home email" and a "work email" field in your Campaign source table. You could map both of those fields into the same "Email Address" field in Facebook.
For Google:
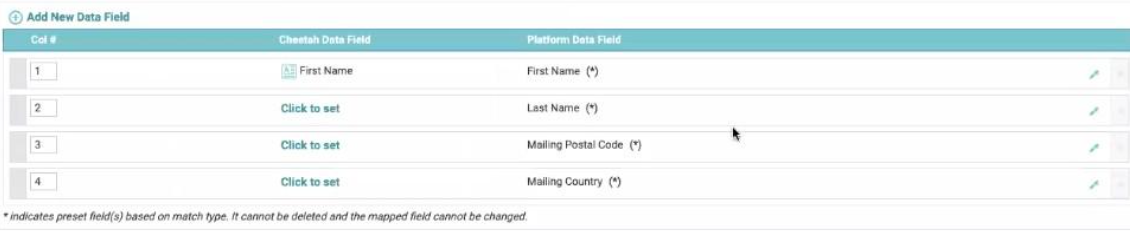
Cheetah Digital will automatically populate the Data section with the identifiers that Google is expecting, depending on the Match Based On option you selected above. You simply have to map these identifiers to the corresponding fields in your source table.
8. Click the Data button. The system lists all of the required identifiers based on the selected match type.
9. Within the Cheetah Digital Data Field column, click Click to Set. The Ad Audience Field Mapping pop-up window is displayed.
10. From the Cheetah Digital Data Field drop-down menu, select the field on the Campaign's source table that maps to this ad platform field.
11. Click OK.
12. Repeat the above as needed to map any remaining fields.
13. In the Tool Bar, click Save.
Note: You must map all of the identifiers that Google is expecting.
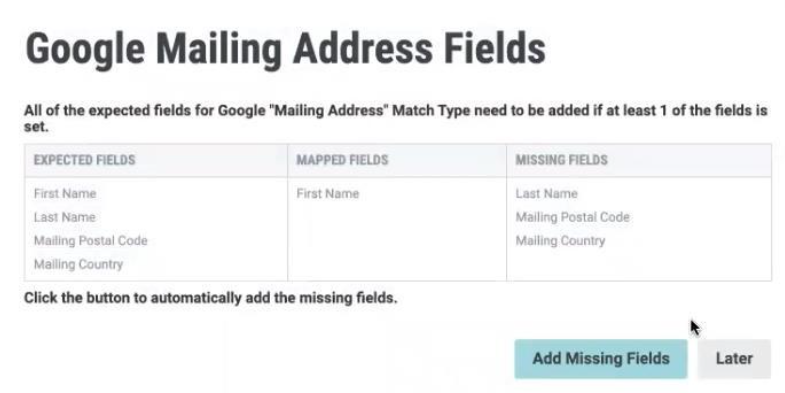
Optionally, you can add more fields beyond the required minimum set of fields. Please note that if you do add additional fields, the platform will impose the same restriction about mapping all expected fields.
For example, let's say you select Email as the match type, then decide to manually add a "First Name" field. Because "First Name" is part of the Mailing Address match type, the platform will require you to also add all of the other Mailing Address required fields. You'll be prompted with a dialog box, telling you what fields are missing.