Proof and Audit an Email Campaign (Engage+)
Proofing
Proofing refers to the process of sending test versions, called "proofs," of the email message to a designated recipient or set of recipients. Proofs are used to check for accuracy in grammar, content, format, and appearance, and to verify that personalization and Dynamic Content is correctly populated.
Messaging supports two types of proofs:
- Standard Proofs: Define a reusable Proofing Group containing one or more proof recipients.
- Quick Proofs: Allows you to either manually enter an ad-hoc list of intended proof recipients, or to define a reusable Quick Proofing Group containing one or more proof recipients.
Standard Proofs
To send Standard Proofs, you must first define a Proofing Group composed of the recipients who are responsible for the final Quality Assurance of the Campaign content.
1. Send standard proofs
Once you've created a Proofing Group, you can select it from within the Campaign to send proofs to the Proofing Group recipients.
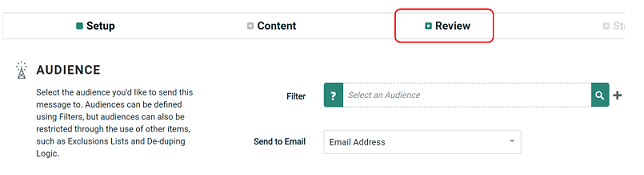
- Navigate to the Campaign.
- Click the Review tab.
-
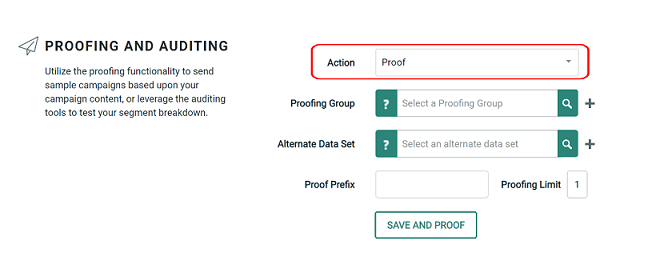
Within the Proofing and Auditing section, from the Action drop-down menu, select Proof.
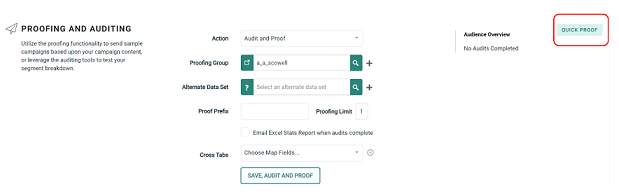
Note: Optionally, you can send Proofs and run audit counts at the same time by selecting Audit and Proof from the Action drop-down menu.
4. In the Proofing Group field, begin typing in the Proofing Group name, or use the search tool to browse for it.
Note: Optionally, you can use a Filter to designate an alternate audience from which to select the records used for generating proofs. This feature is typically used to validate specific Dynamic Content variants.
5. Optionally, in the Alternate Data Set field, begin typing in the Filter name, or use the search tool to search for it.
6. In the Proof Prefix field, enter a text string. This value will be inserted in front of the subject line of the proof message.
7. Optionally, limit the number of proofs each recipient receives by typing in a number in the Proofing Limit field.
8. Click Save and Proof.
Note: The Statistics History section displays a log of all proofs sent out for this Campaign.
Quick Proofs
The Quick Proof function provides a more flexible proofing method than Standard Proofs. Quick Proofing offers the following advantages:
- Send ad-hoc proofs to email addresses that may not be in a Proofing Group.
- Select only the Personalization values and /or Dynamic Content variant(s) that you want to test.
The Quick Proof feature is accessible from two different places in the Campaign screen: the Review button and the Preview window. The functionality is largely the same between the two, with a few notable differences, described below:
1. Send Quick Proofs (Review button)
1. Navigate to the Campaign.
2. Click the Review button.
3. Within the Proofing and Auditing section, click Send Quick Proofs. The Quick Proof pop-up window is displayed.
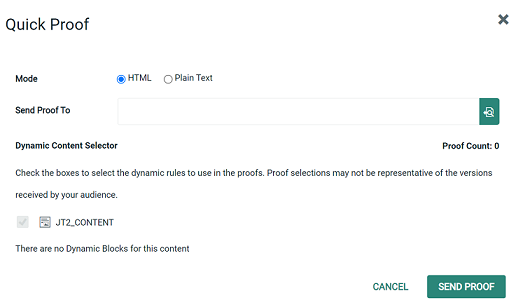
4. Select the desired format version: HTML or Plain Text.
5. In the Send Proof To field, either:
- Enter one or more email addresses, or
- Click the browse icon to pick a Quick Proofing Group.
6. The Dynamic Content Selector is populated with a tree diagram showing all of the Dynamic Blocks and rules. Place a check mark next to the Dynamic Content variants that you want to test.
Note: The Proof Count field indicates how many proofs will be sent to each recipient. The system imposes a hard limit of 250 proofs to each recipient. If you surpass this threshold, you must reduce the number of selected Dynamic Content variants in order to decrease the Proof Count.
7. Click Send Proof.
2. Send Quick Proofs (Preview window)
1. Navigate to the Campaign.
2. Click Preview in the Tool Bar.
3. Optionally select the Personalization tab. Either:
- Enter the desired personalization values that you want to include in the proof message.
- Or, enter an email address in the Email Record Lookup field; the platform will populate any Personalization Fields using values pulled from this record.
Note: The ability to specify personalization values is unique to the Quick Proof method available in the Preview window.
4. Optionally select the Dynamic Content tab. Check the Dynamic Content variant(s) that you want to use in the proof message.
5. Select the Review tab.
6. In your Email field, either:
- Enter one or more email addresses.
- Or, click Add emails from Proof group to pick a Quick Proofing Group.
7. In the Subject Prefix field, enter a text string. This value will be inserted in front of the subject line of the proof message.
8. Click Send Proof.
Auditing
Audits are used to verify the number of recipients in the Campaign audience, after factoring in blank or invalid email addresses, opt-outs, etc. If you have Dynamic Content in the Campaign, the audit results will break out the number of recipients who will receive each Dynamic Content variant.
1. Run pre-launch audits
1. Navigate to the Campaign.
2. Click the Review button.
3. Within the Proofing and Auditing section, from the Action drop-down menu, select Audit.
Note: Optionally, you can send proofs and run audit counts at the same time by selecting Audit and Proof from the Action drop-down menu.
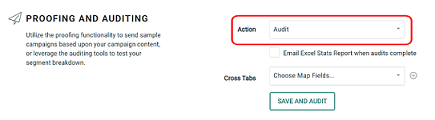
4. To have the system email you the pre-launch auditing statistics, place a check mark in the Email Excel Stats Report when complete check box.
You can optionally define custom Cross Tab reports to see detailed statistics on your Campaign Audience. A Cross Tab report displays the count and distribution of values within a specified field.
Note: You can run Cross Tab reports on any field (or fields) in the Campaign's source table.
5. From the Cross Tabs drop-down menu, select the desired field and click the add button. The field is added to the Map Fields section. Repeat this step as needed to define additional Cross Tab fields.
6. Click Save and Audit, then Run Audit.
2. Review audit results
Each audit execution is displayed as a row within the Statistics History section in the Review button.
1. Expand the row for the desired audit execution.
2. Review the following sections:
| Audit Processing | Audience record quantities, such as invalid records, unsubscribes, etc. |
| Message Processing | Start and end timestamps, and the record quantity, for each step in the audit process. |
| Message Versions | The number of Dynamic Content variations within your message, and how many recipients will receive each variation. |
| Content Breakdown | Breakdown of the various assets utilized within your message, such as Content Blocks, Dynamic Blocks, etc. |
| Cross Tab (if defined) |
Select Cross Tab from the menu icon. The Pre-Launch Audit Cross Tab Results pop-up window shows the counts for every value contained in each field you selected. |
3. Optionally, to download the Cross Tab reports, select Download from the menu icon.
