Marigold ID Administration Guide
Overview
There are two types of client admin roles in Marigold ID (CID):
-
Organization Admin: Admin of an organization who can manage access to all the business units (BU)
-
Business Unit Admin (BU Admin): Admin of one or more business units
The users with these admin permissions are provided access to the Marigold ID Administration workspace .
User Group for Non-SSO Organization
User Group was introduced in Marigold ID to support more robust relationships between users and permissions, allowing the admin to quickly grant application access to new users.
1. Create a User Group and Define Group Application Access in Marigold ID
Pre-requisite: The User Group Feature must be enabled by your Marigold representative to utilize this functionality.
Create a User Group
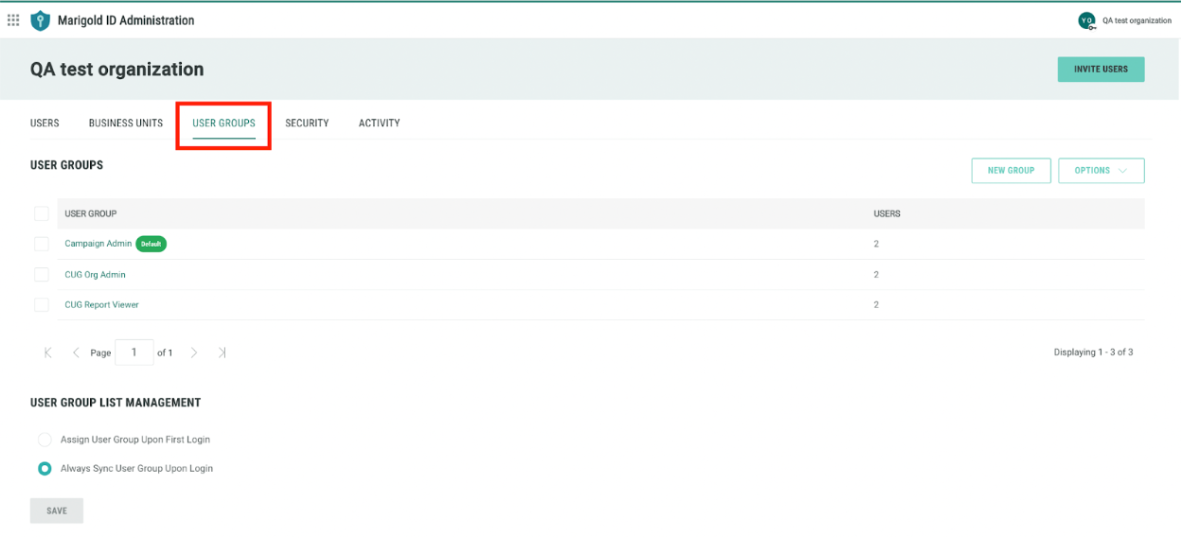
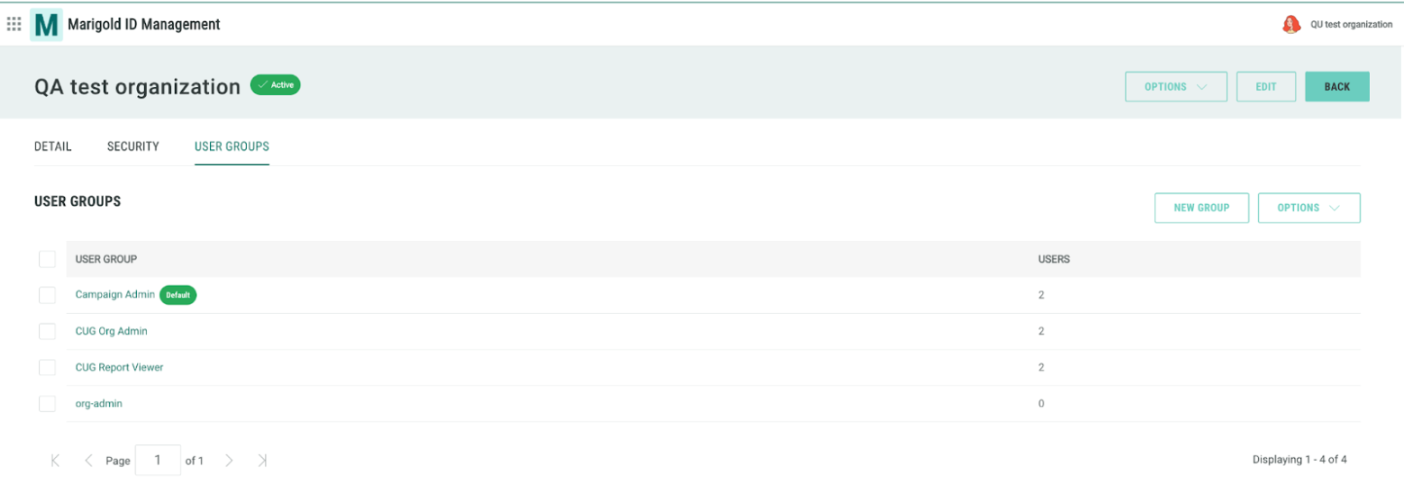
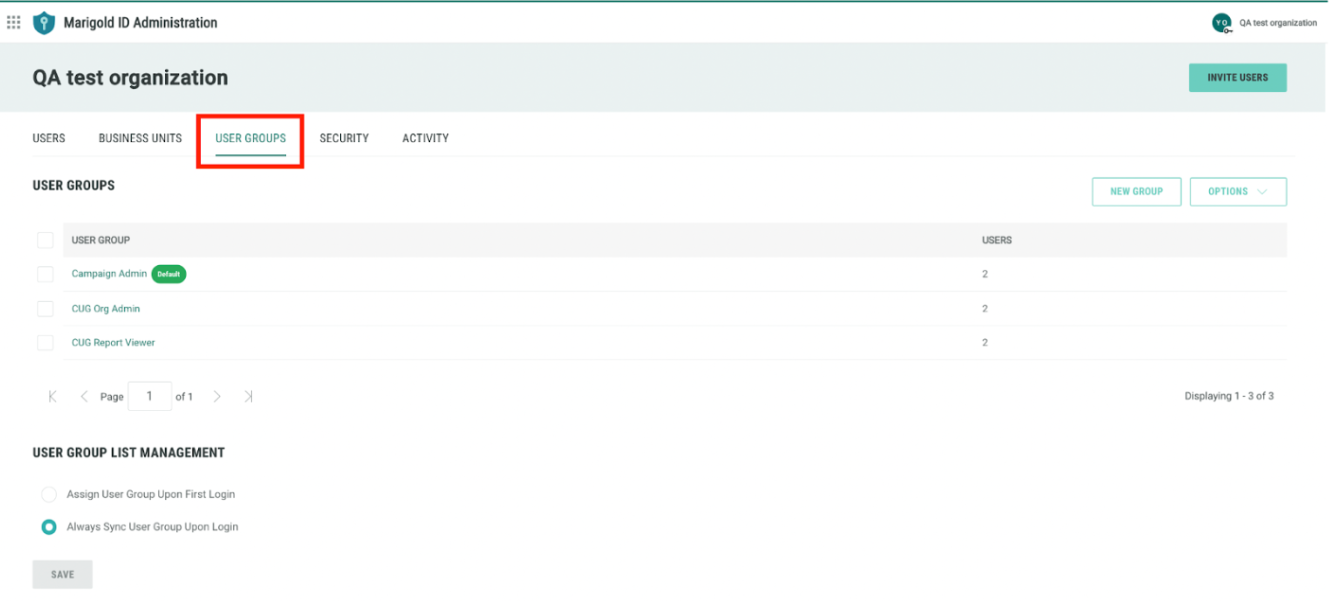
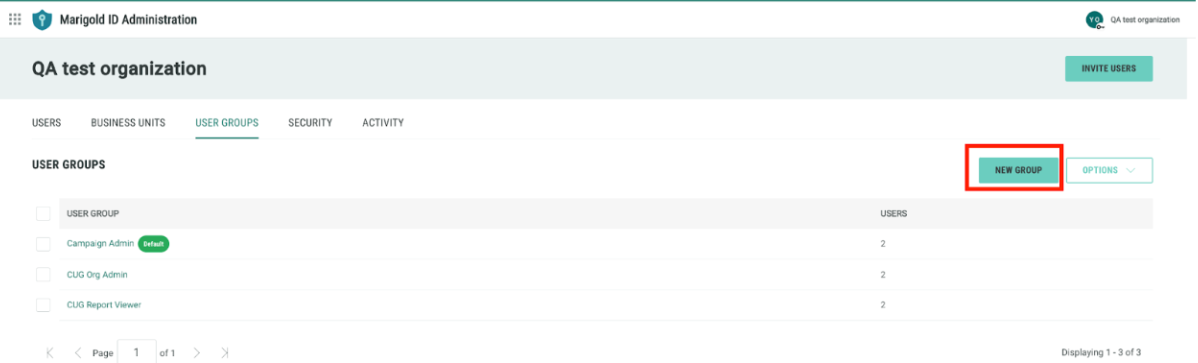
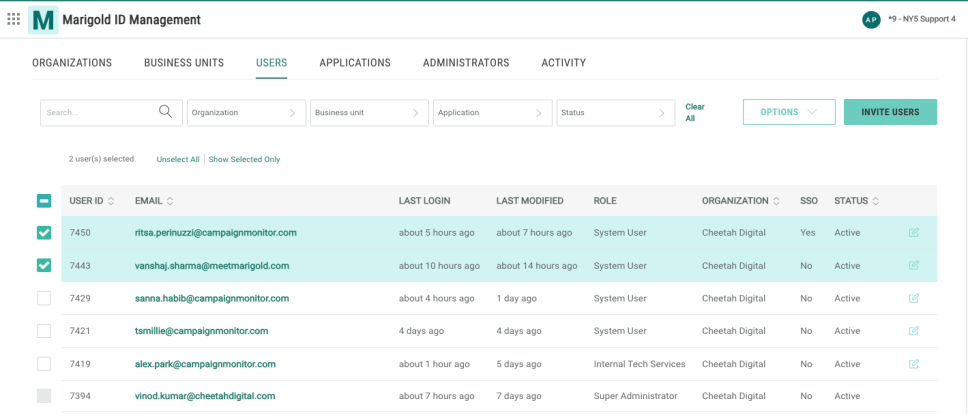
1. Go to Marigold ID Administration (only available for Org and BU admins), then User Groups. This page lists all user groups created for your organization.
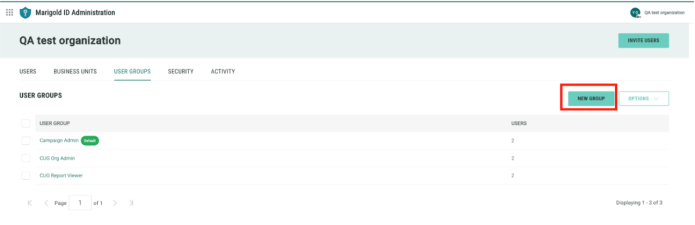
2. Click “New Group” and the modal below will be displayed.
3. Fill in a Group Name and click “Save Group”.
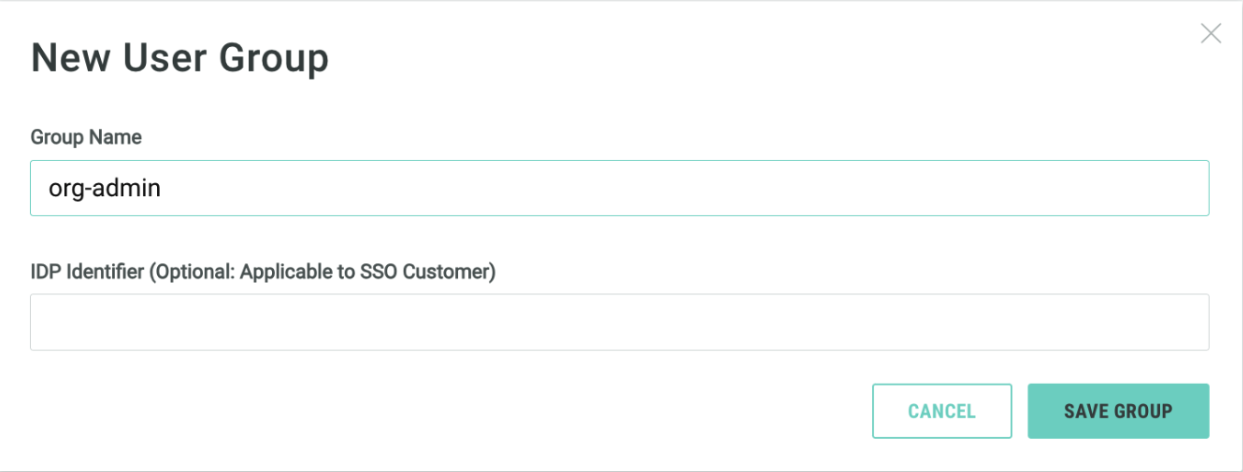
Note: Please leave the “IDP Identified” field empty.
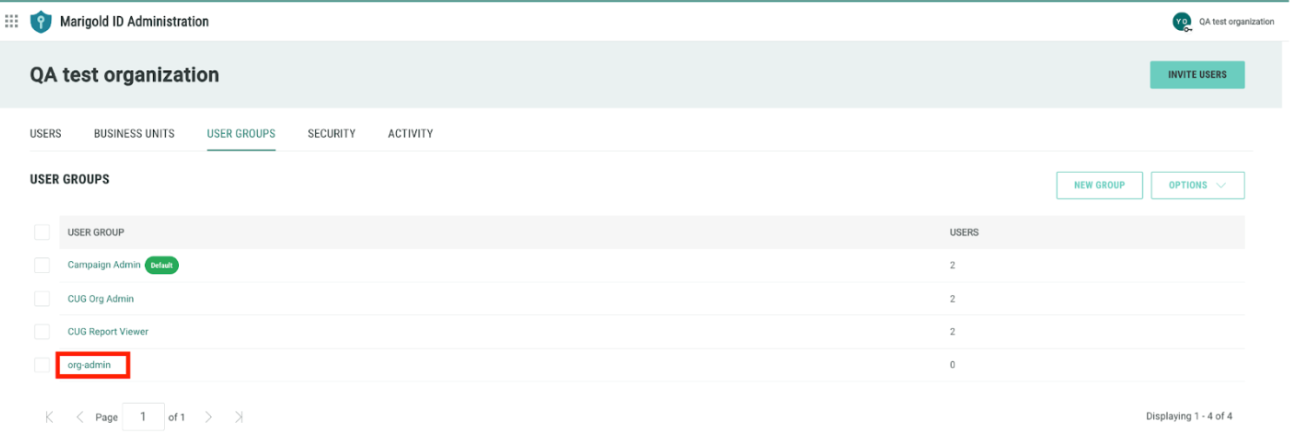
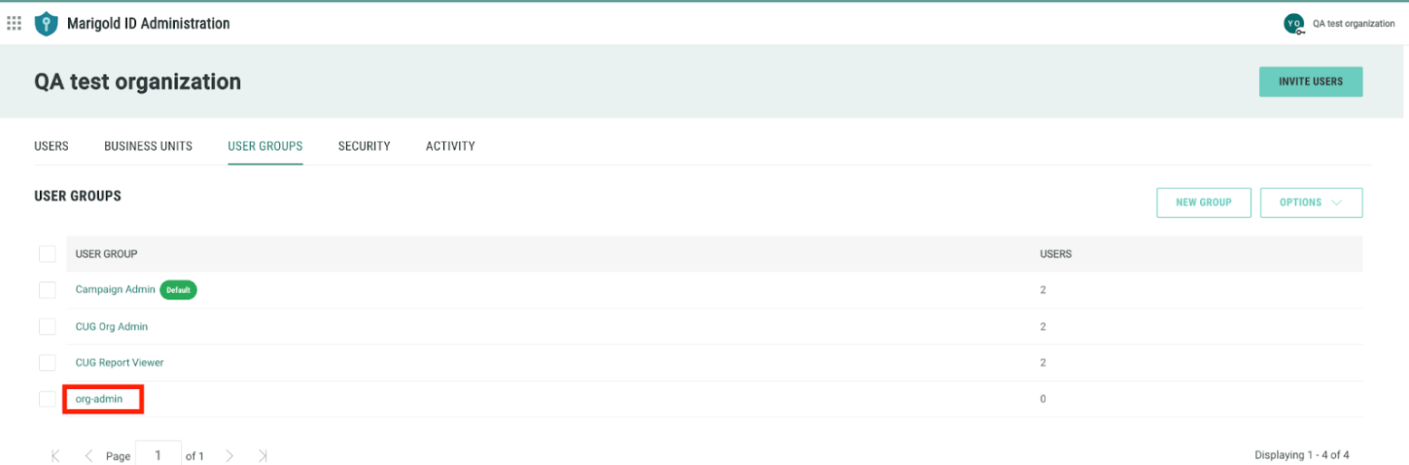
4. The newly created user group will be listed on the listing page. Click on the user group created above to define the user group access.
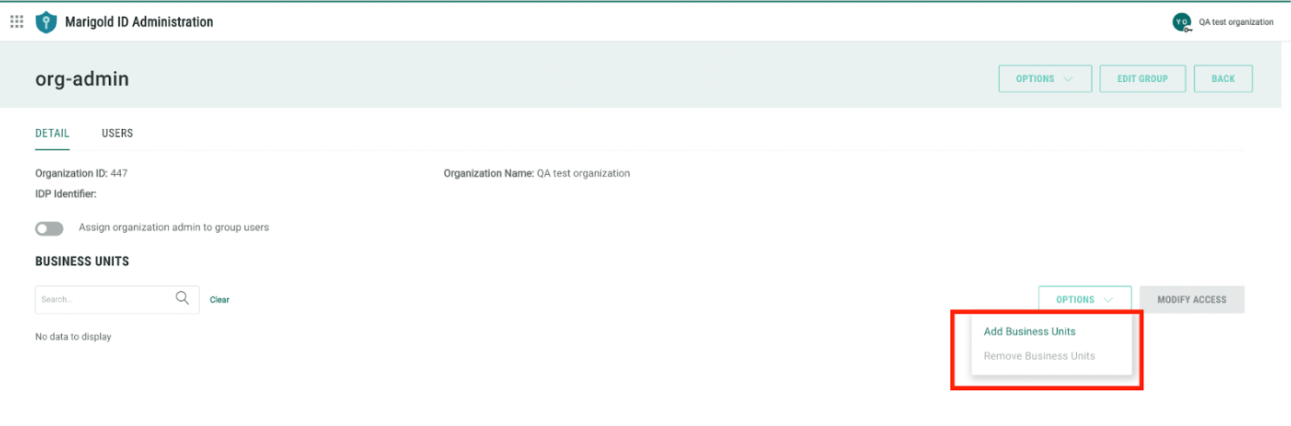
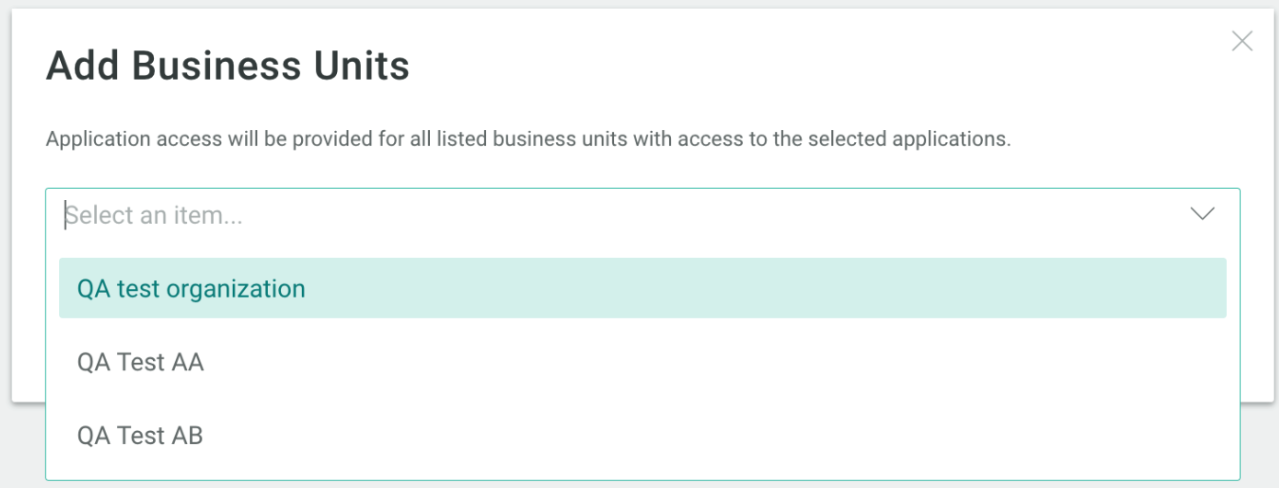
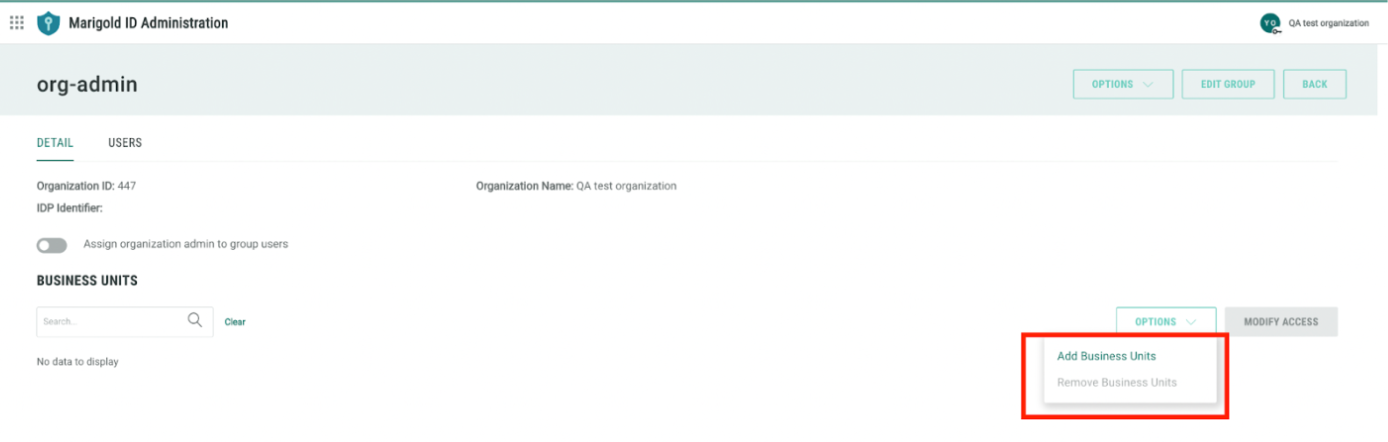
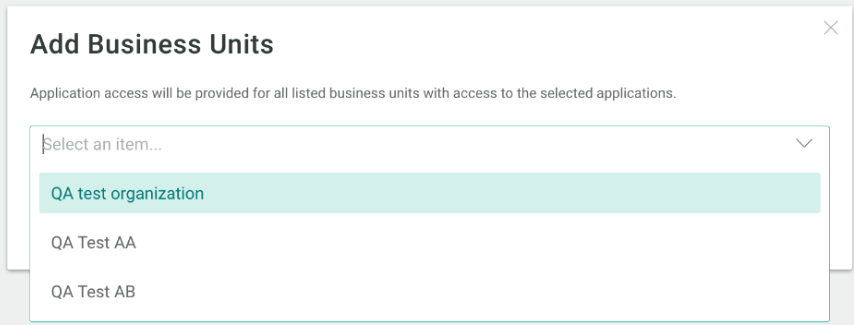
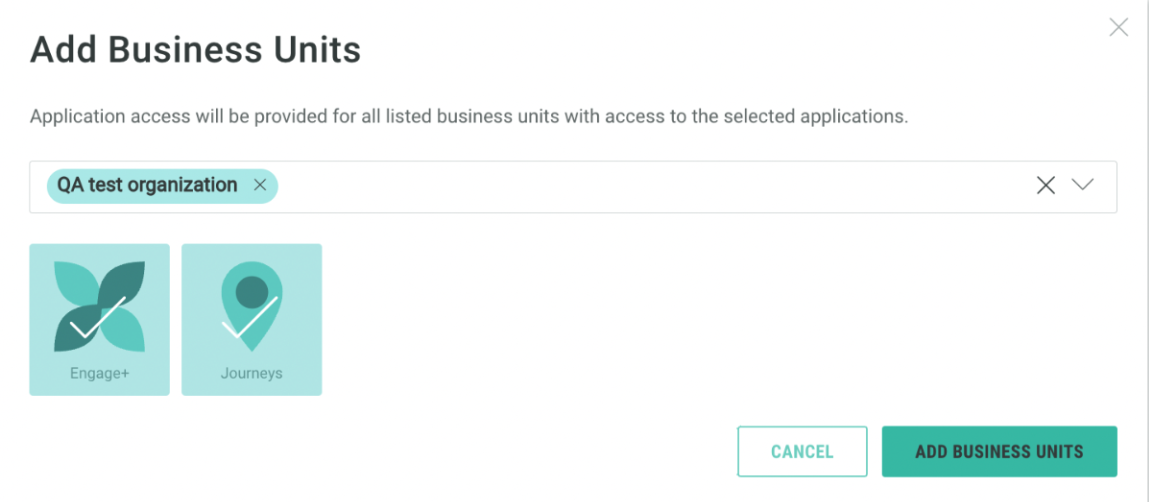
5. Click “Add Business Units” and select the desired business unit for the user group.
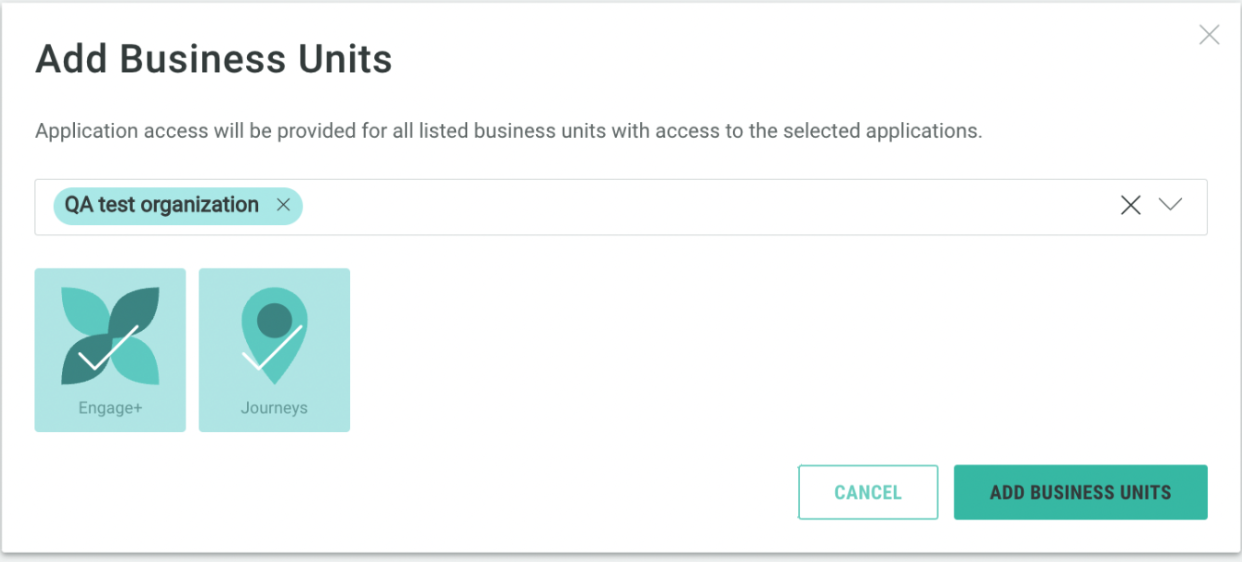
6. Then, select the application to assign to the user group and click “Add Business Units” to save.
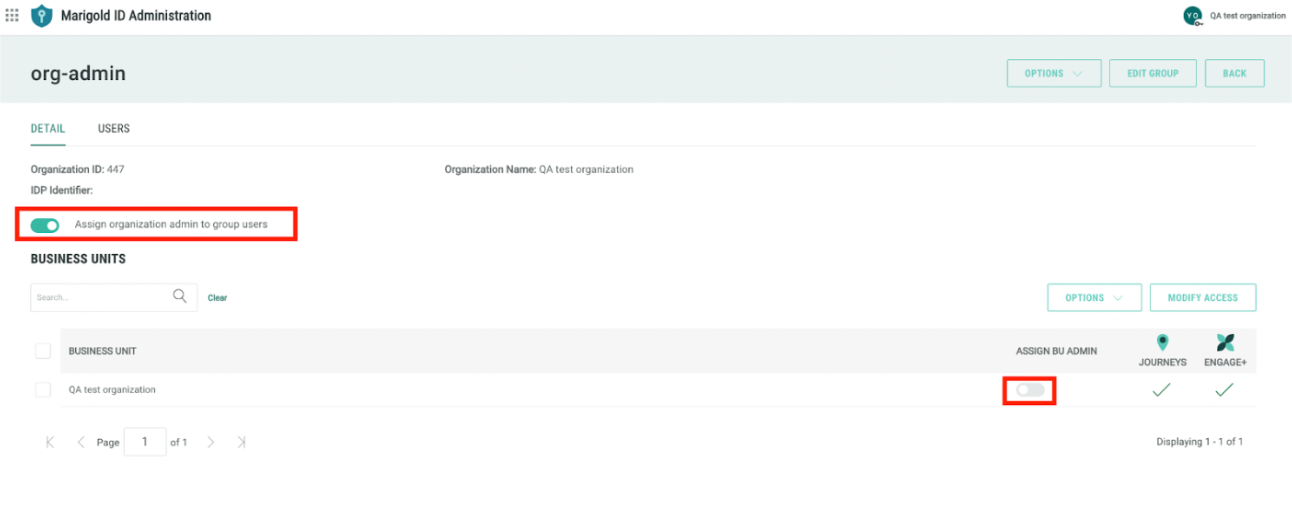
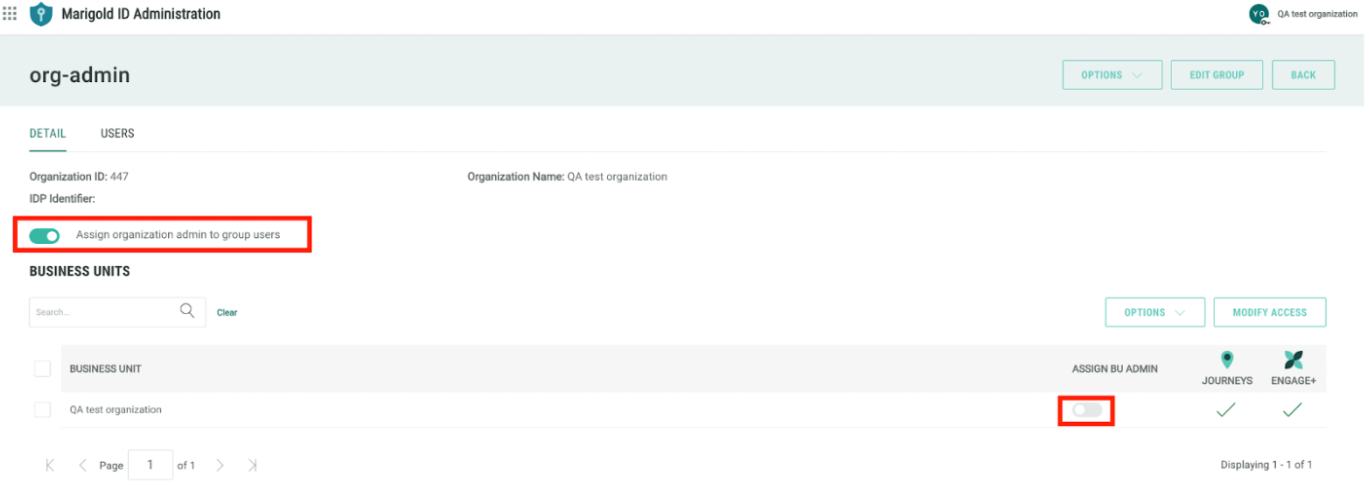
7. Optional Step:
a) To add Organization Admin access, toggle on “Assign organization admin to group users.
b) To add BU Admin access, toggle on “Assign BU admin at the BU listing table.
Note: Upon completion of the above steps, any users added to this user group will be granted access to the selected application as defined above.
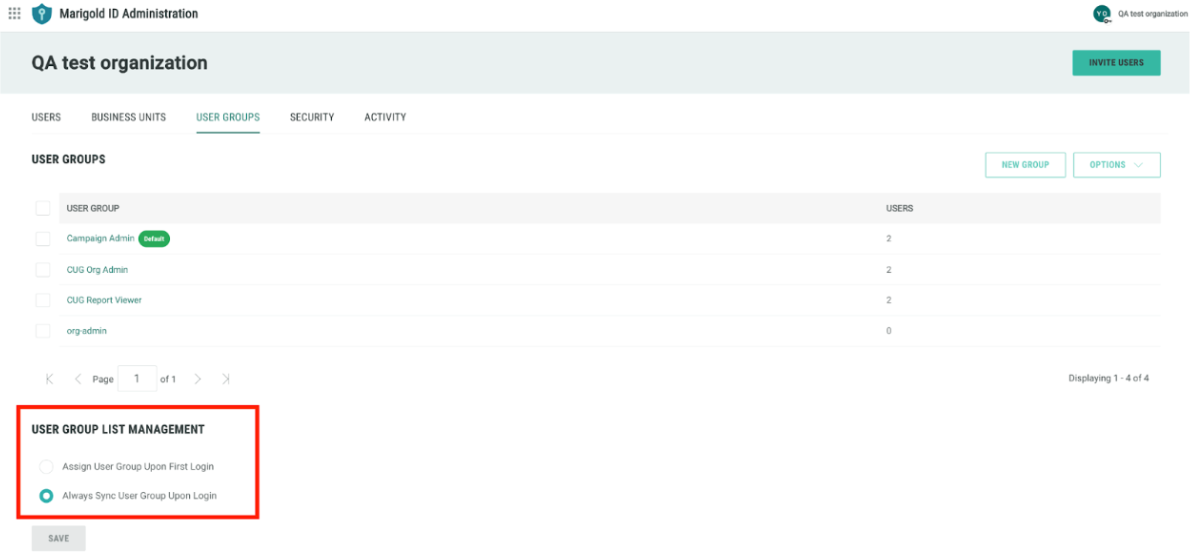
Other Settings
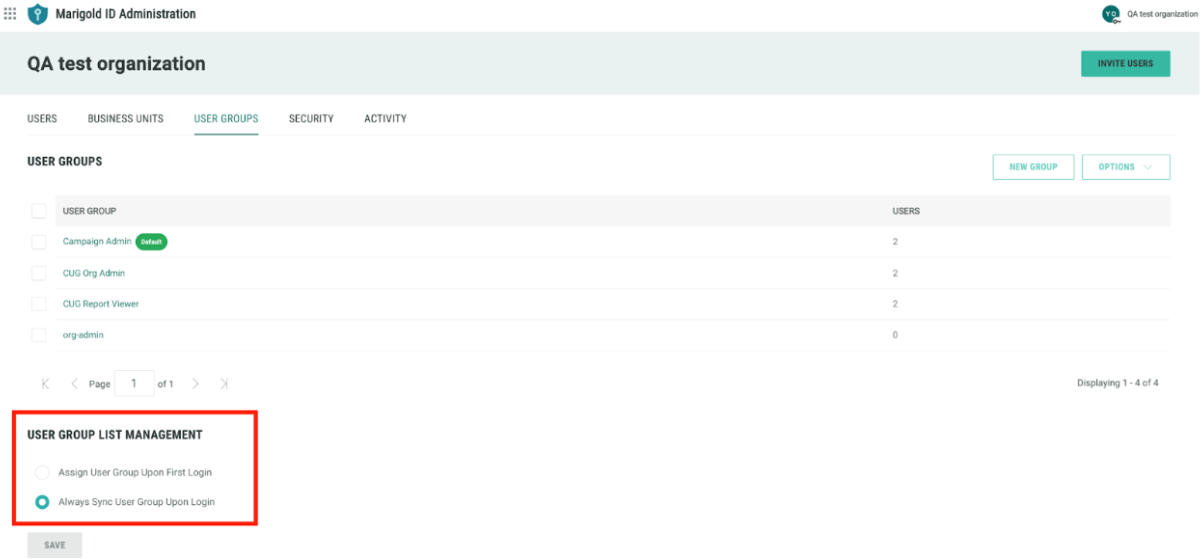
User Group List Management:
-
By default, all organization will be set to “Assign User Group upon first login”.
-
Org admin can update it to “Always Sync User Group upon login”.
Note:
The setting above applies to Organization that uses SSO. Please disregard this if your organization is not using SSO.
-
Assign User Group upon First Login: User groups will be assigned to SSO users whose organizations have enabled the user group feature, based on customGroups, during their first login (user creation).
-
Always Sync User Group upon Login: User groups will be synchronized for SSO users whose organizations have enabled the user group feature, based on customGroups, during each SSO login.
2. Add Users to User Group
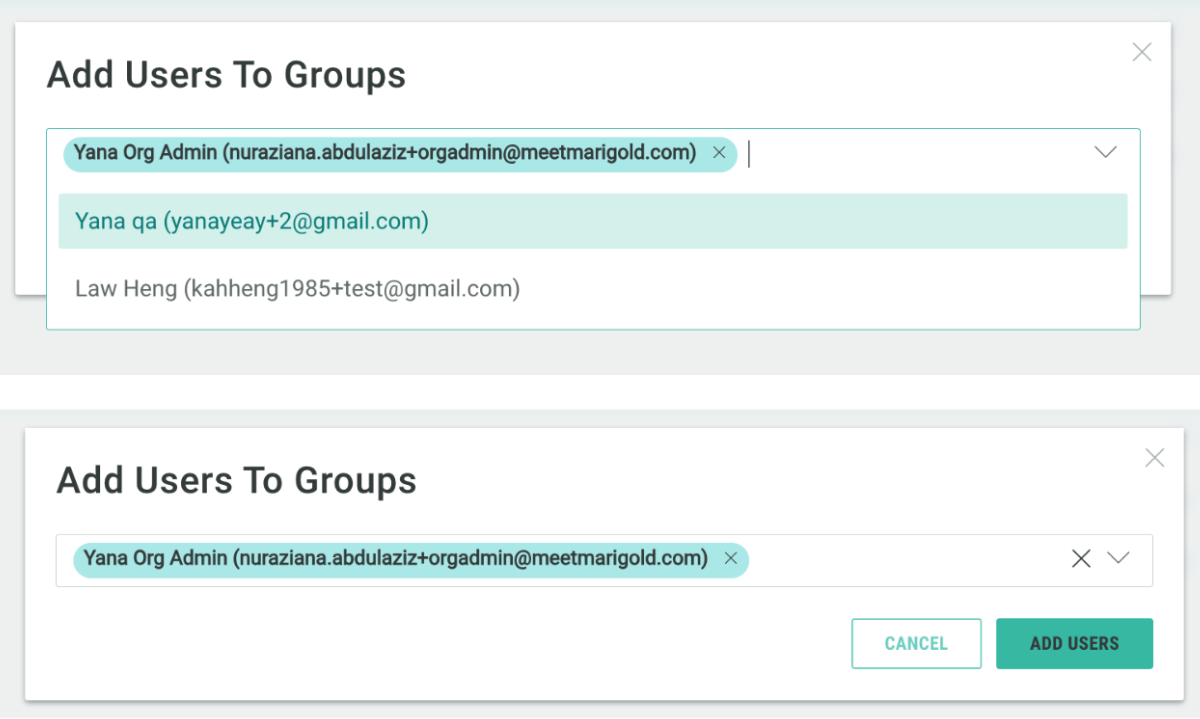
On the User Group List, select a user group and click “Options > Add Users”.
Select user(s) to add to the user group, then click “Add Users”
3. View Users in a User Group
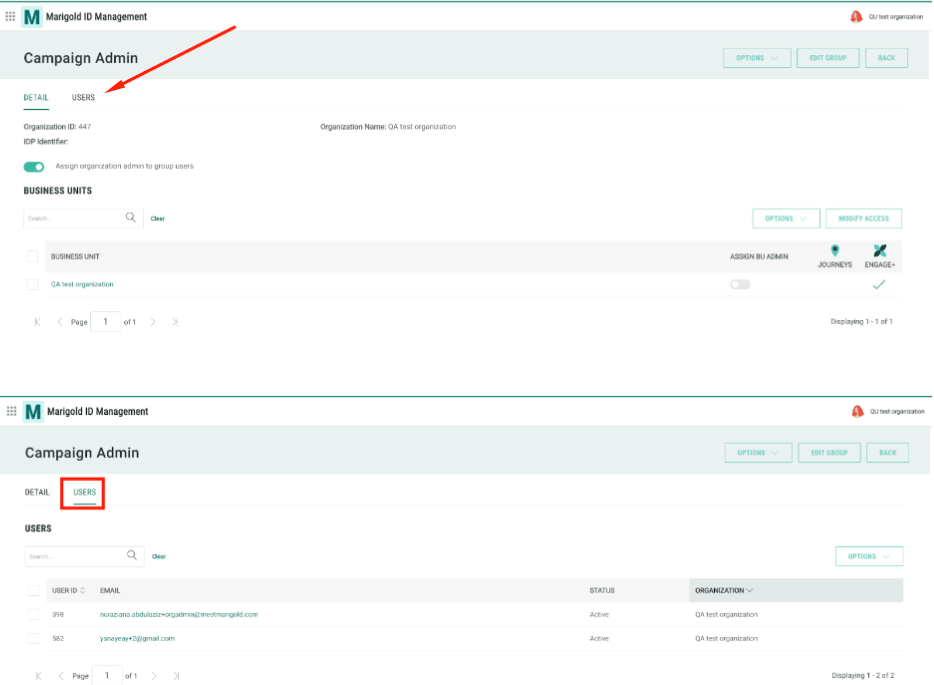
To view users in a user group, on the user group list, click a user group, (for example “Campaign Admin” as shown below).
When the user group is opened, click Users to see the user list.
4. Other Settings
4.1 Delete a User Group
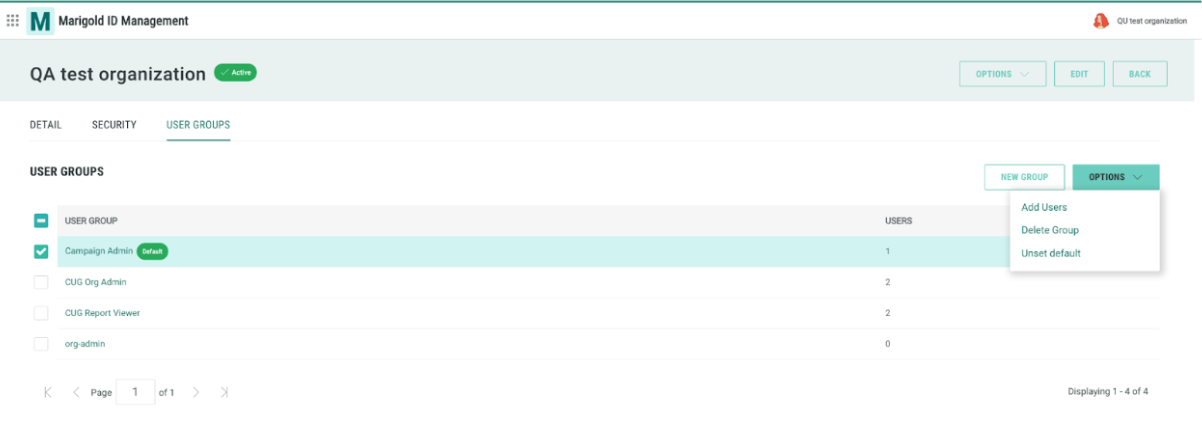
To delete a user group, on the User Group Listing page, select the user groups to delete, then click “Options > Delete Group”.
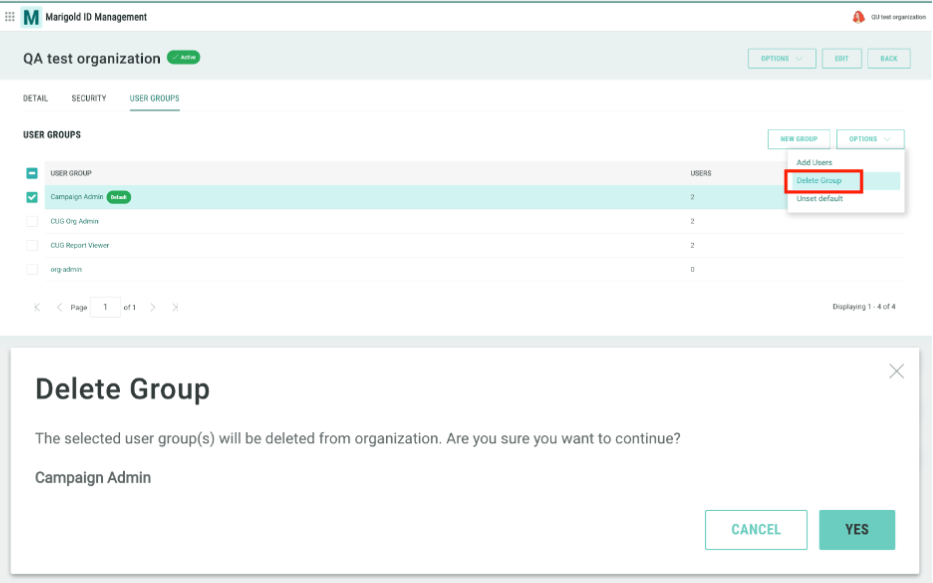
Note: When a user group is deleted, all users and access associated with that user group will be removed.
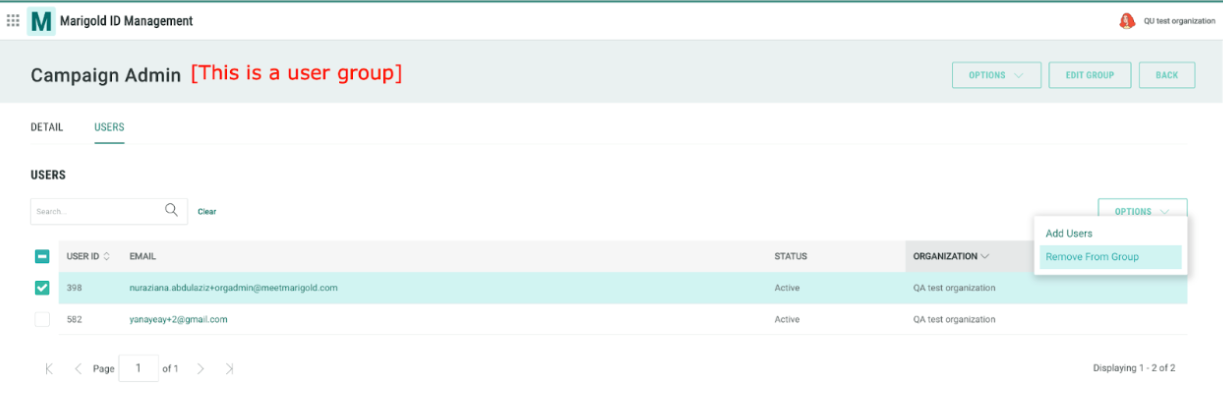
4.2 Delete a user from a User Group
To delete a user from a user group, go to the user group (see section 3), and select the users to be removed from the group, then click “Options > Remove From Group”.
5. Product Specific User Group Mapping
Engage+ and Loyalty support user group mapping from Marigold ID, enabling admins to quickly set up new users with a set of Engage+ and Loyalty permissions.
5.1 Engage+
When a user group is created in Marigold ID for an organization and its business units and is assigned the Engage+ application, the user group can then be mapped to an Engage+ access group.
To add user group mapping in Engage+, please follow the steps below.
|
|
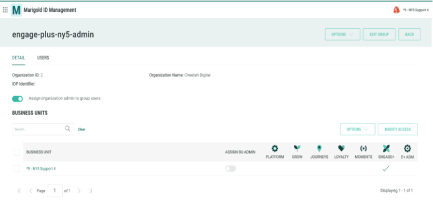
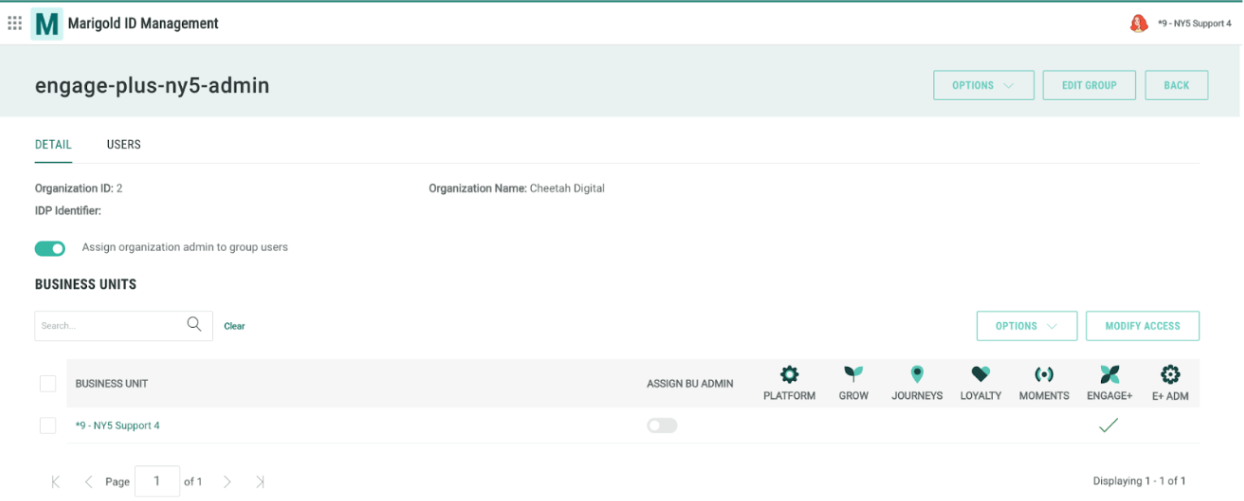
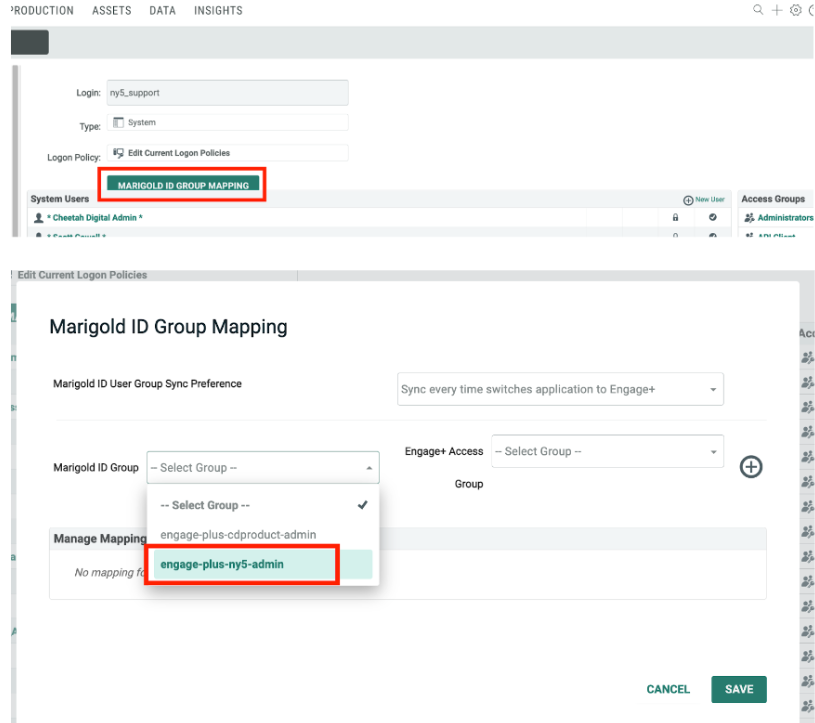
See the example and steps to map a Marigold ID user group to an Engage+ access. Pre-condition: A user group is created in Marigold ID and the user group is assigned to a BU with Engage+ Application in Marigold ID. Scenario: A user group called “engage-plus-ny5-admin” was created with the following settings. We want to map this user group to the “Administrator User Group” in Engage+ so that users can be granted administrator access in Engage+.
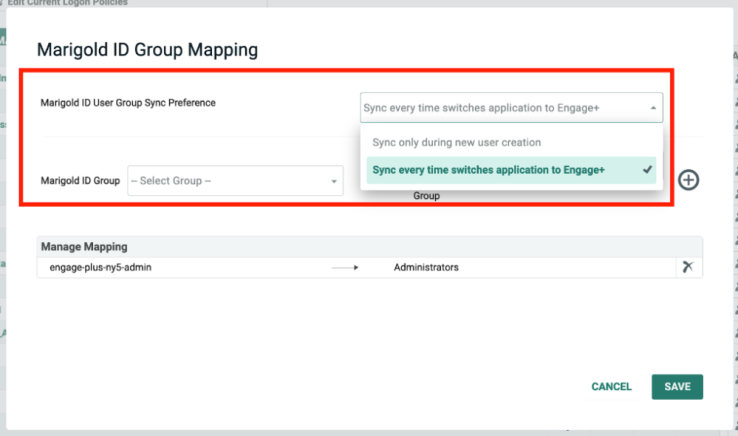
In Engage+, go to “Account Security”, and click “Marigold ID Group Mapping” to open the Group Mapping modal.
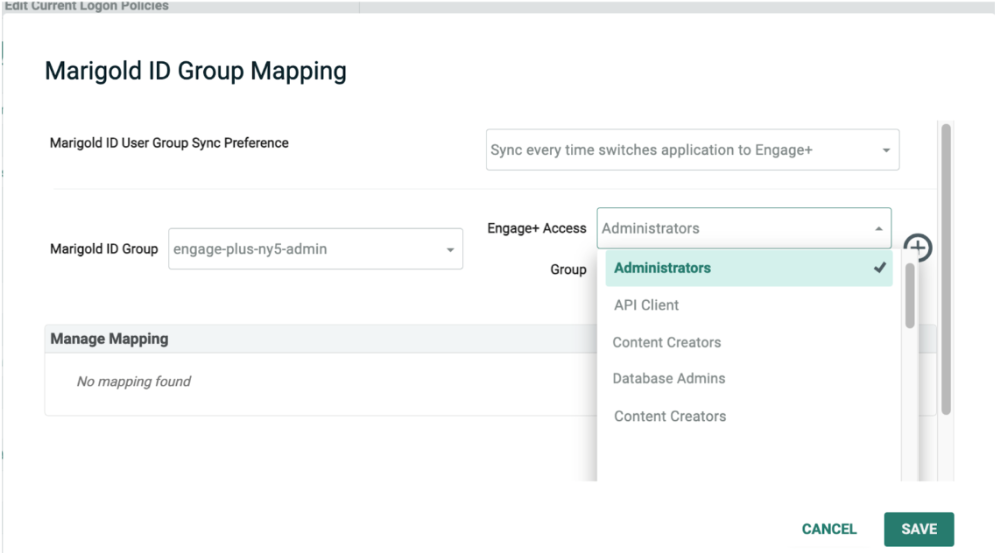
Select the Marigold ID user group, then an Engage+ Access Group.
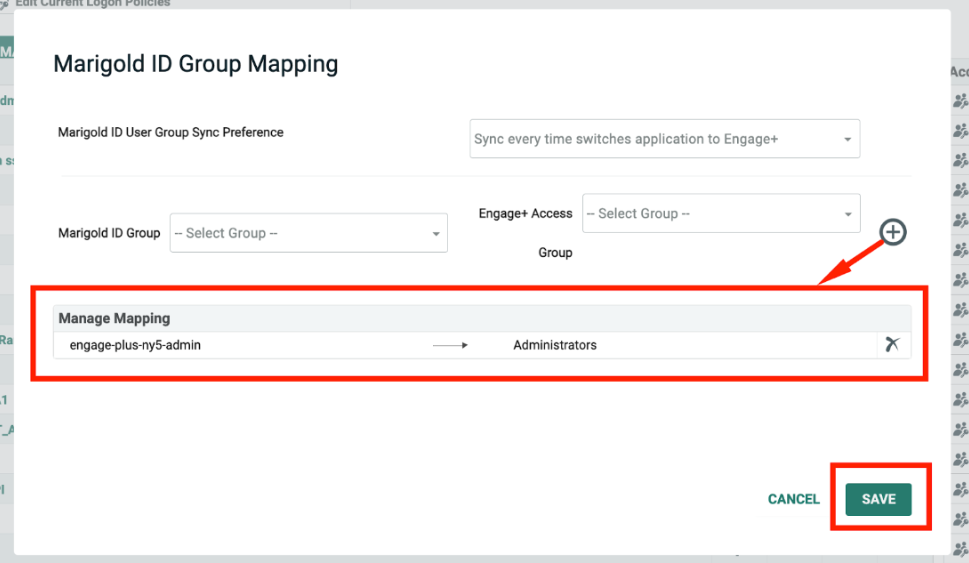
Click “ + ” to add, and Save to save the mapping.
Note. If there are multiple user groups created in Marigold ID, they can be mapped following the steps above, on the same modal. When the configurations above are saved in the modal, a user added from Marigold ID and assigned to this user group through the Marigold ID app will automatically be granted administrator access in Engage+ in the BU. Please see the User Group Sync Preference below to learn how the role sync works.
Sync only during new user creation:
|
5.2 Loyalty
The configuration and steps will be updated and published soon.
User Group and SSO Custom Group Mapping for Azure
SSO Custom Groups Mapping to User Group
SSO Custom Group is a feature that enables client to assign groups to users from their own IDP/Portal and then relay this group to Marigold ID. From Marigold ID, the matching group will be used for the equivalent assignment to grant certain accesses based on the configuration.
[Client’s IDP] Configuring Custom Group in Azure IDP
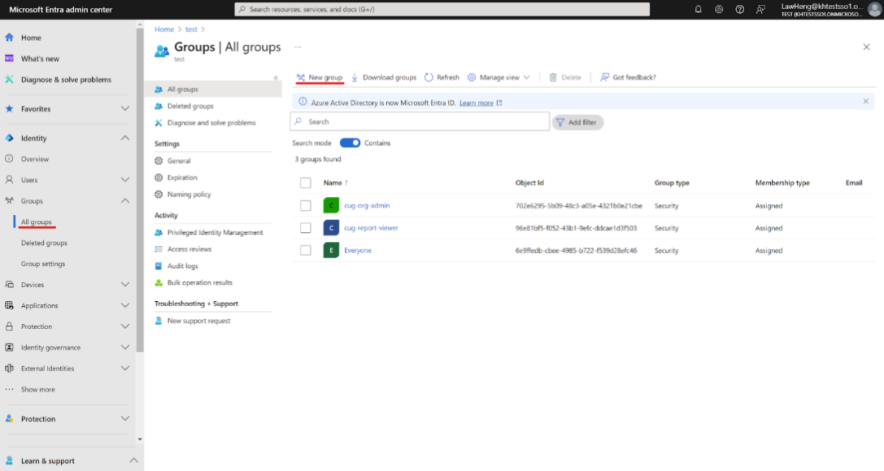
Navigate to Azure Groups and click create group.
2. Criteria for Group name creation
-
Lower Case.
-
Replace space with dash(“-”).
-
For Example:
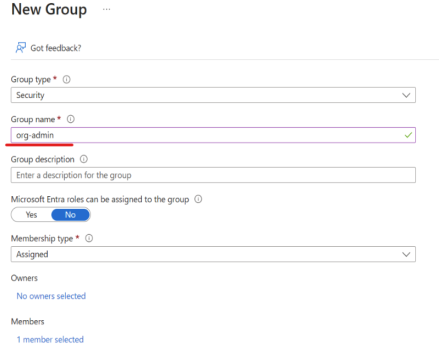
group name should be "org-admin"
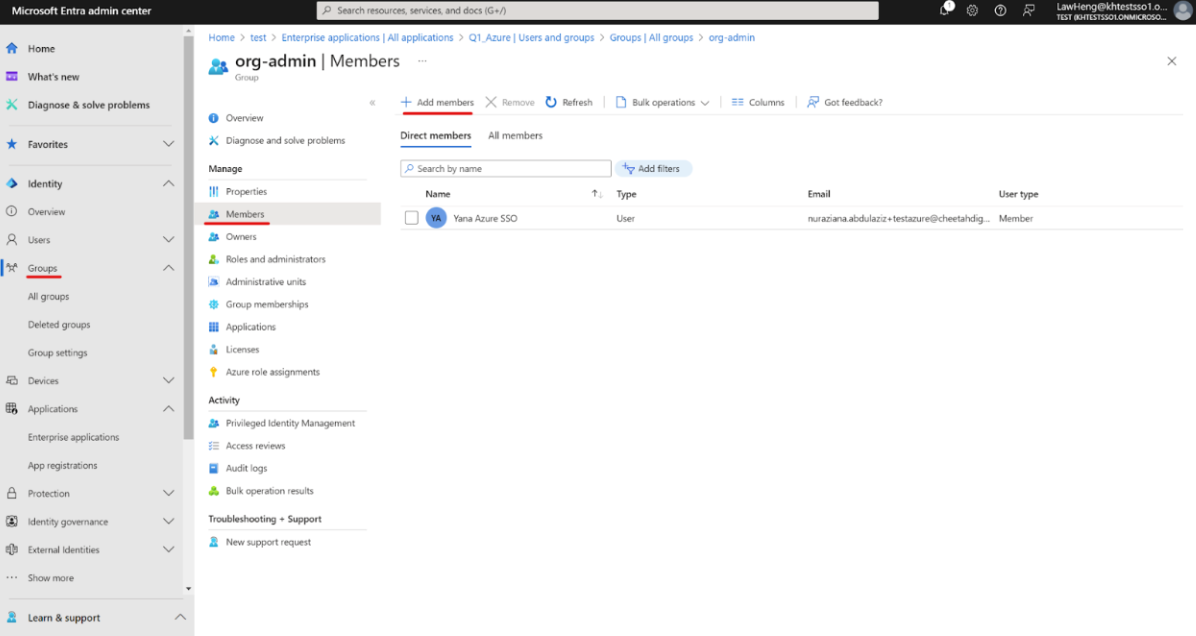
Assign user to group created above
3. Assign group created to the Enterprise Application
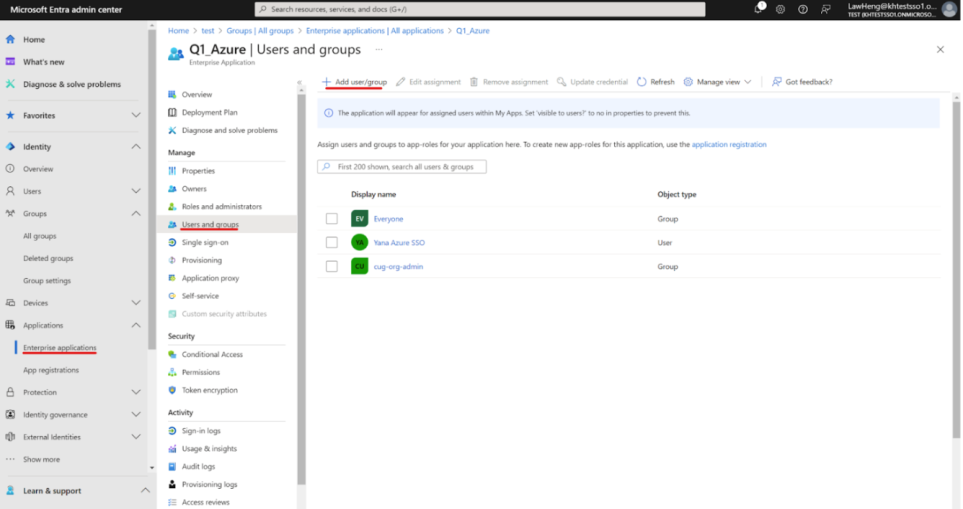
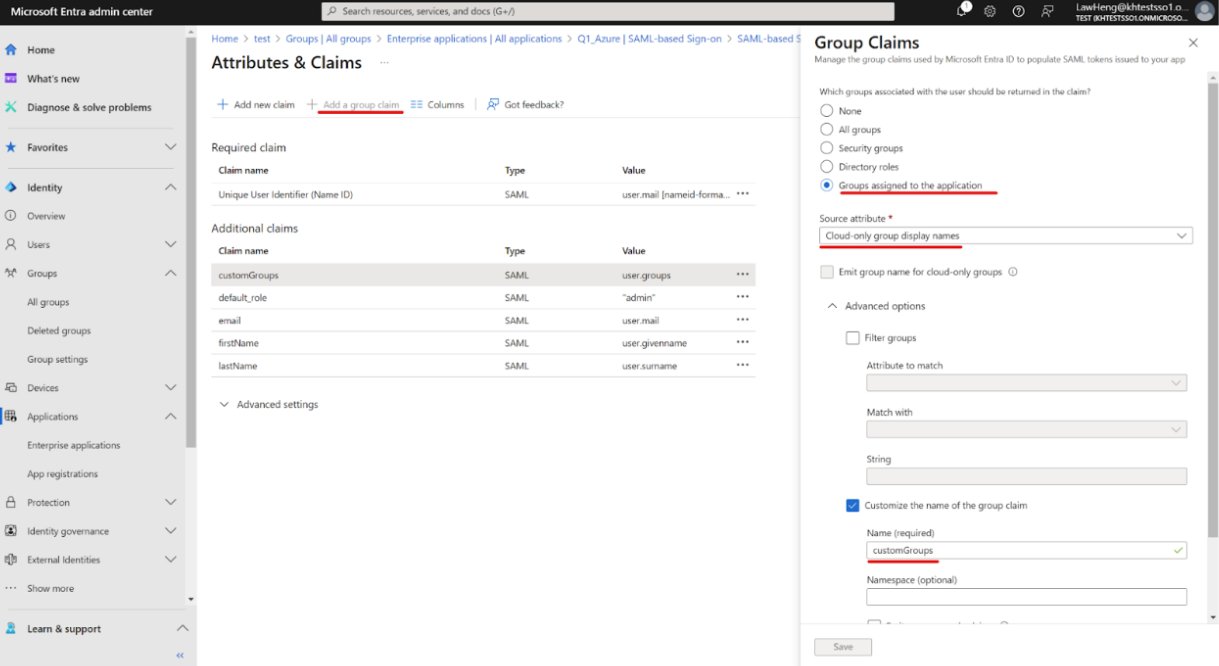
4. Create the Custom Group claim
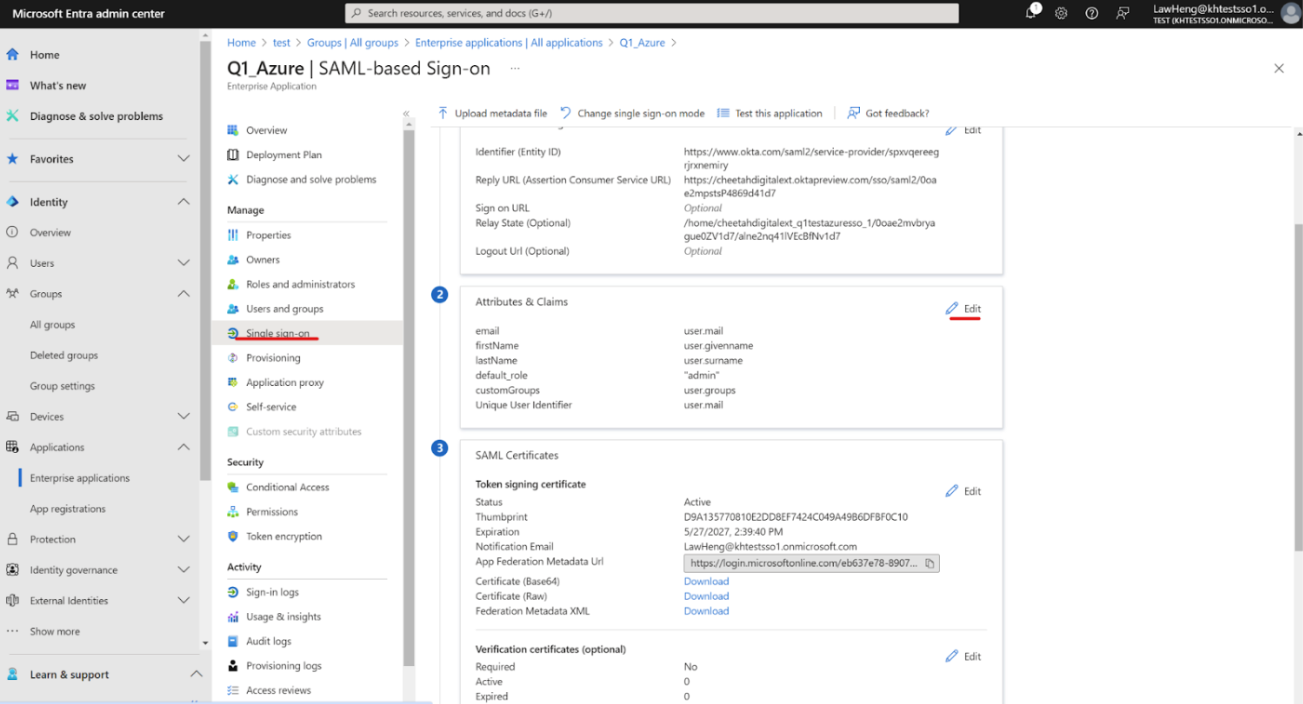
Claims Required (on top of existing group)
-
firstName → user.givenname
-
lastName → user.surname
-
email → user.mail
-
Unique User Identifier → user.userprincipalname
-
customGroups (group claims)
Claims Requirements
1. please remove the namespace for the claims

CustomGroups Claims Requirements
-
“Group associated” select Groups assigned to the application
-
“Source attribute” select Cloud-only group display names
-
“Name” should be customGroups
[Marigold ID] Configuring Custom Group according to Client IDP in Marigold ID
Pre-requisite:
-
The User Group Feature must be enabled by your Marigold representative to utilize this functionality.
-
When the feature is enabled, an Organization Admin will be able to perform the steps below in setting up user groups and defining user group mapping between Marigold ID and other products.
Create a User Group
1. Go to Marigold ID Administration (only available for Org and BU admins), then User Groups. This page lists all user groups created for your organization.
2. Click “New Group” and the modal below will be displayed.
3. Fill in a Group Name and click “Save Group”.

Note:
-
The MID Group Name must match the group name in your IdP.
-
Please leave the “IDP Identified” field empty.
4. The newly created user group will be listed on the listing page. Click on the user group created above to define the user group access.
5. Click “Add Business Units” and select the desired business unit for the user group.
6. Then, select the application to assign to the user group and click “Add Business Units” to save.
7. Optional Step:
a) To add Organization Admin access, toggle on “Assign organization admin to group users”.
b) To add BU Admin access, toggle on “Assign BU admin” at the BU listing table.
Note: Upon completion of the above steps, any users added to this user group will be granted access to the selected application as defined above.
Other Setting: User Group List Management
Assign User Group upon First Login: User groups will be assigned to SSO users whose organizations have enabled the user group feature, based on customGroups, during their first login (user creation).
Always Sync User Group upon Login: User groups will be synchronized for SSO users whose organizations have enabled the user group feature, based on customGroups, during each SSO login.
The default setting is "Assign User Group upon first login." However, we recommend setting it to "Always Sync User Group upon login" to ensure user access is always updated in Marigold ID each time they log in.
Product Specific User Group Mapping
Engage+ and Loyalty support user group mapping from Marigold ID, enabling admins to quickly set up new users with a set of Engage+ and Loyalty permissions.
Engage+
When a user group is created in Marigold ID for an organization, and its business unit is assigned the Engage+ application, the user group can then be mapped to an Engage+ access group.
See the example and steps to map a Marigold ID user group to an Engage+ access.
Pre-condition: A user group is created in Marigold ID and the user group is assigned to a BU with Engage+ Application in Marigold ID.
Scenario: A user group called “engage-plus-ny5-admin” was created with the following settings. We want to map this user group to the “Administrator User Group” in Engage+ so that users can be granted administrator access in Engage+.
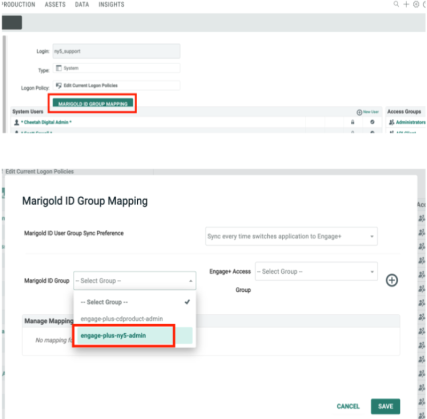
In Engage+, go to “Account Security”, and click “Marigold ID Group Mapping” to open the Group Mapping modal.
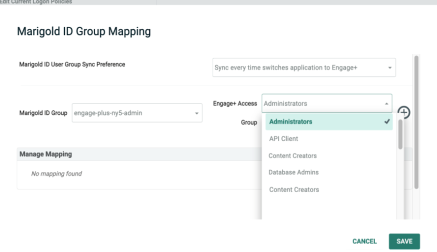
Select the Marigold ID user group, then an Engage+ Access Group.
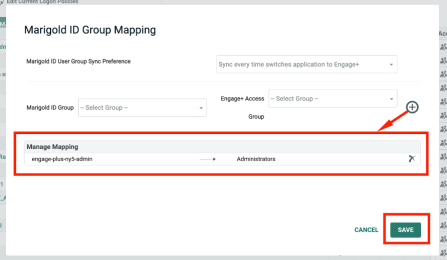
Click “ + ” to add, and Save to save the mapping.
Note. If there are multiple user groups created in Marigold ID, they can be mapped following the steps above, on the same modal.
When the configurations above are saved in the modal, a user added from Marigold ID and assigned to this user group through the Marigold ID app will automatically be granted administrator access in Engage+ in the BU.
Please see the User Group Sync Preference below to learn how the role sync works.

Sync only during new user creation:
-
Marigold ID user groups assigned to new users (invited from Marigold ID) will be synced to Engage+ when the users switch applications from Marigold ID to Engage+.
-
Existing users' Marigold ID group(s) will not be synced.
Sync every time switches application to Engage+
-
This is the default setting.
-
Marigold ID user groups assigned to new and existing users will be synced to Engage+ every time the users switch applications from Marigold ID to Engage+.
-
The group sync for existing users will not overwrite their existing access in Engage+; however, any new access groups added will be appended.
Loyalty
The configuration and steps will be updated and published soon.
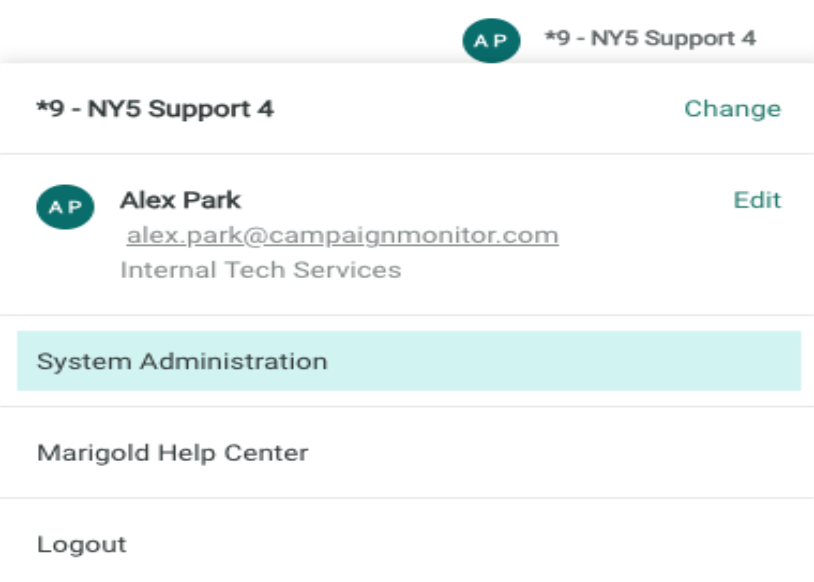
Switching to Marigold ID Administration Workspace
Users with admin permissions can access the Marigold Administration workspace directly or by clicking on the System Administration option available in the drop-down box from the user icon at the right side of the User Workspace.
Client Administrator Workspace (Marigold ID Administration)
The Marigold ID administration workspace allows administrators to review and manage their organization users, their business units, and the application access in each business unit. The administrators can invite new users, modify existing user accounts and review recent login sessions and activities.
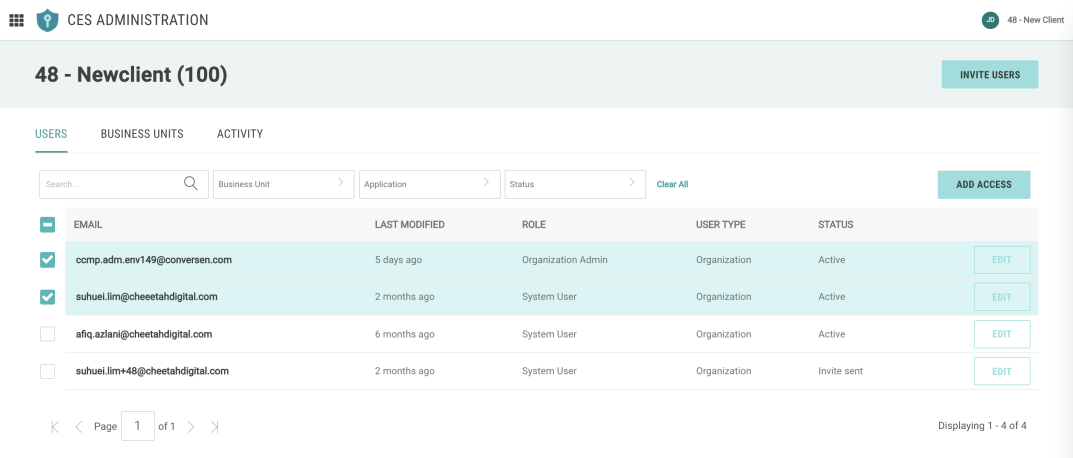
From the Marigold ID Administration workspace you can perform the following operations, based on your permissions in the system:
-
User management
-
View Business units
-
View activity log
User Management
The Users tab shows all the users of the organization or the business units, based on your Marigold ID role and permission. The various tasks that can be performed by the organization and business unit admins in this tab are given below.
| Role | Permitted Actions |
|
Organization Admin |
|
|
Business Unit Admin (BU Admin) |
|
From the Users tab, you can perform the following tasks based on your permissions in the system:
-
View users in the organization/BU
-
Edit users in the organization/BU
-
Manage Organization Admin Permissions for an user
-
Make an user a BU admin
-
Invite new user to an organization/BU
-
Resend welcome email to an inactive user
-
Suspend or unsuspend an user
-
Send email to an user to reset their password
-
Modify application access of an user
View Users (Organization & BU admins)
Navigate to the Users tab to view all the users in the organization or the business units you administer.
Edit Users (Organization Admin)
-
Navigate to the Users tab and click on Edit corresponding to the user you want to edit the details. The Profile tab of the user is displayed.
-
Edit the required details of the user.
-
Click Save, to confirm the changes.
Invite New User to Organization/BU (Organization & BU admins)
An organization admin will be able to add users to any business unit in the organization and BU admin to the Business units they manage. To invite an user:
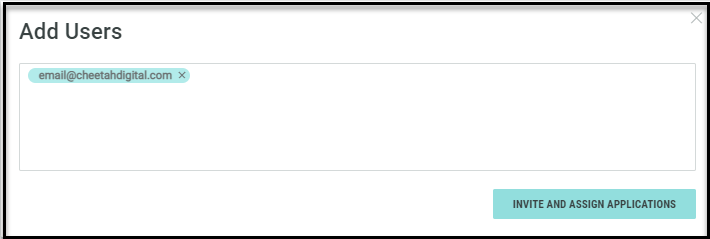
1. Click Invite Users in the top menu.

2. Enter the email address of the new user in the Add Users window and press Enter.
3. Click Invite and Assign Applications.
4. Select the business units in the Add Business Unit to Users window and click Next.
5. Select the applications business units in the Add Business Unit to Users window and click Done.
6. Click OK in the success window displayed. An invitation email will be sent to the new user.
Add Business Unit and Application Access to Existing User (Organization Admin)
1. Navigate to the Users tab and select the user you want to add the business units and applications to. The Profile tab of the user is displayed.
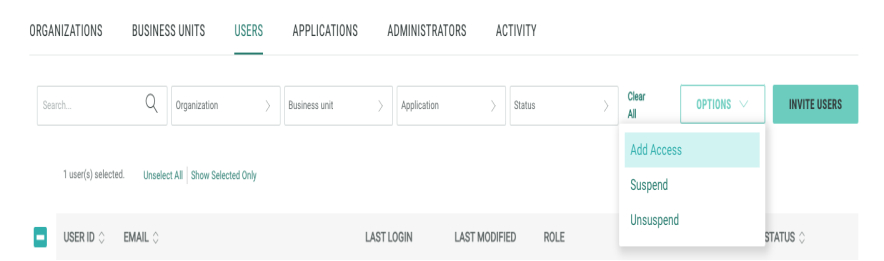
2. Select the required user from the list and click Options > Add Access. The Add Business Units to Users window is displayed.
3. Select the business units you want to add and click Next. The Add Application to Users window is displayed.
4. Click on applications that you want to assign to the user from the list displayed.
5. Click Done to confirm the changes.
6. Click OK in the results window to return to the Users tab.
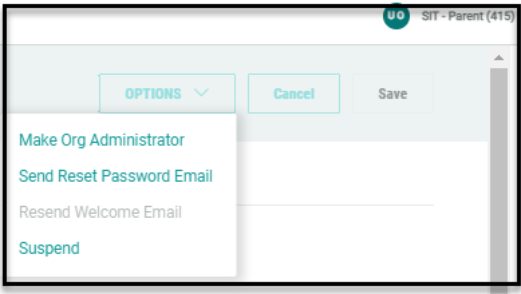
Manage Organization Admin Permissions for an Existing User (Organization Admin)
1. Navigate to the Users tab and click on Edit corresponding to the user you want to edit the details. The Profile tab of the user is displayed.
2. Click Options. A drop-down menu is displayed.
3. Click Make Org Administrator to make the user an organization admin. The user will be assigned organization admin role. Conversely, to remove the organization admin permissions for an existing admin user, click Remove Org Administrator from the Options drop-down menu.
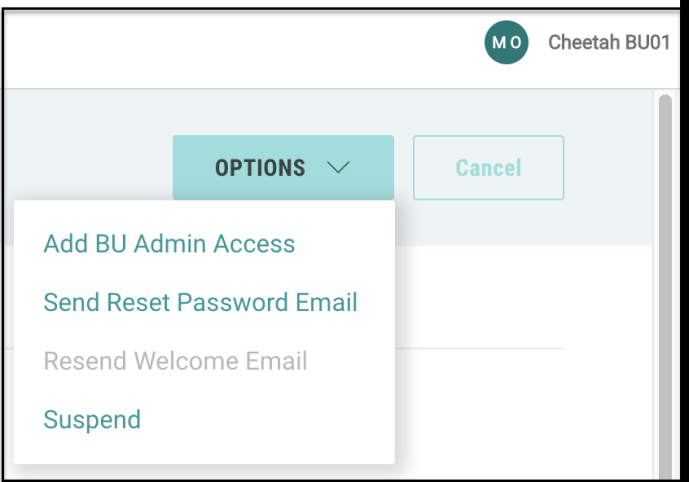
Make a User a BU Admin (Organization Admin)
1. Navigate to the Users tab and click on Edit corresponding to the user you want to edit. The Profile tab of the user is displayed.
2. Select App Access tab.
3. Select the required business unit from the displayed list. If you are unable to find the required BU, the user must be assigned to the BU first. Refer Add Business Unit and Application Access to Existing User.
4. Click Options. From the displayed drop-down menu, click Add BU Admin Access. The user will be assigned admin access to the BU.
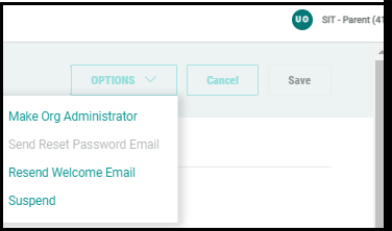
Resend Welcome Email to an Inactive User (Organization & BU admins)
1. Navigate to the Users tab and click on Edit corresponding to the inactive user. The Profile tab of the user is displayed.
2. Click Options. A drop-down menu is displayed.
3. Click Resend Welcome Email. The Welcome email will be sent to the user.
Suspend or Unsuspend an User (Organization admin)
1. Navigate to the Users tab and click on Edit corresponding to the user you want to suspend/ unsuspend the access. The Profile tab of the user is displayed.
2. Click Options. A drop-down menu is displayed.
3. Click Suspend. The users access to Marigold ID will be suspended. To unsuspend an user, Click Unsuspend.
Note: To maintain security, limit data retention, and protect the privacy of our users, Marigold ID will deactivate a user account 120 days after the account was suspended.
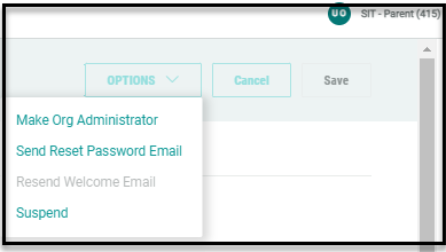
Send Reset Password Email to an Existing User (Organization & BU admins)
1. Navigate to the Users tab and click on Edit corresponding to the user you want to edit the details. The Profile tab of the user is displayed.
2. Click Options. A drop-down menu is displayed.
3. Click Send Reset Password Email. The email will be sent to the user.
Modify BU and Applications Assigned to an User (Organization & BU admins)
1. Navigate to the Users tab and click on Edit corresponding to the user you want to edit the details. The Profile tab of the user is displayed.
2. Select App Access tab and click Modify Access.
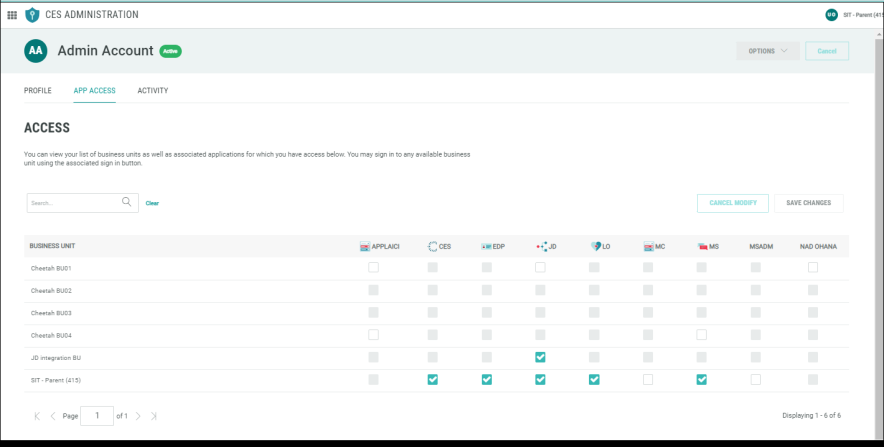
3. Select or unselect the applications that you want modify corresponding to the business units and click Save Changes.
Allowed Organizations
Feature Overview
The Marigold ID system provides functionality for an organization to designate another organization as an "allowed organization," thereby granting users from the designated organization access to its account. Furthermore, users from the allowed organization can be assigned as administrators for their own organization.
Besides allowing organizations to delegate administrative responsibilities to users from the allowed organization, the feature also enables organizations with entities in different regions or locations to access each other's systems.
This feature can be configured only by a Marigold ID Super Admin.
Add Allowed Organization To a Client Organization
Scenario:
SB is an organization in Europe and it has the setup as follows:
-
SB EMEA: This is their organization in Europe managing all businessnes in EU except France, Germany and Switzerland.
-
SB FR: This is their organization managing businesses ONLY in France, Germany and Switzerland.
Use Case:
-
Users from “SB EMEA” need access to “SB FR”. In this case, “SB EMEA” needs to be added as an allowed organzation for “SB FR”,
-
User from “SB FR” must be prevented from accessing “SB EMEA”
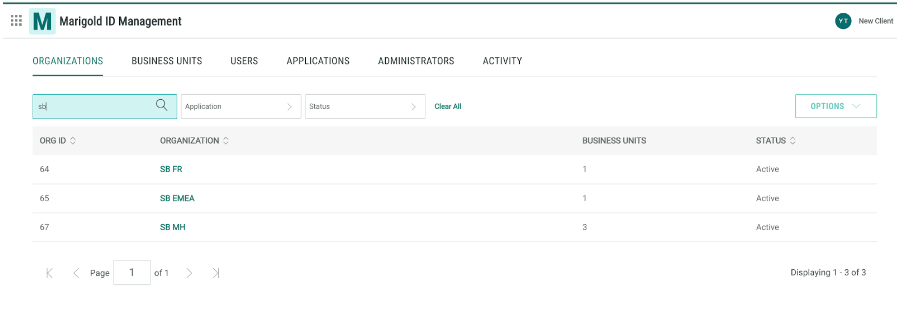
Below is their setup in Marigold ID:
Below are the steps to add “SB EMEA” as an allowed organization for “SB FR”.
Note: The steps below can be completed only by a Marigold ID Super Admin.
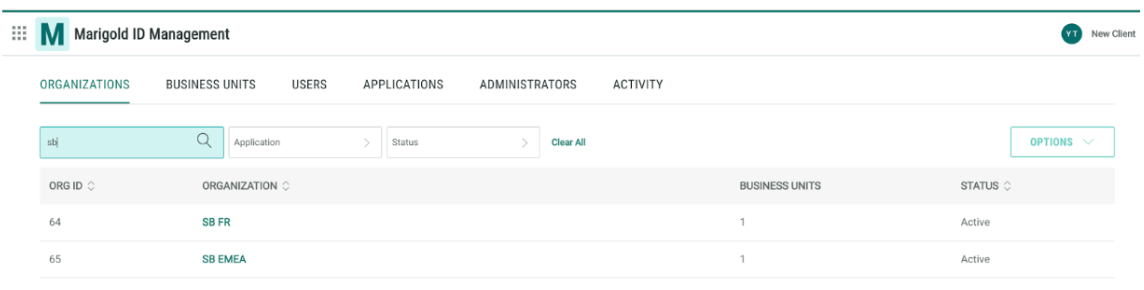
1. On the Organization Listing Page, search “SB FR”.
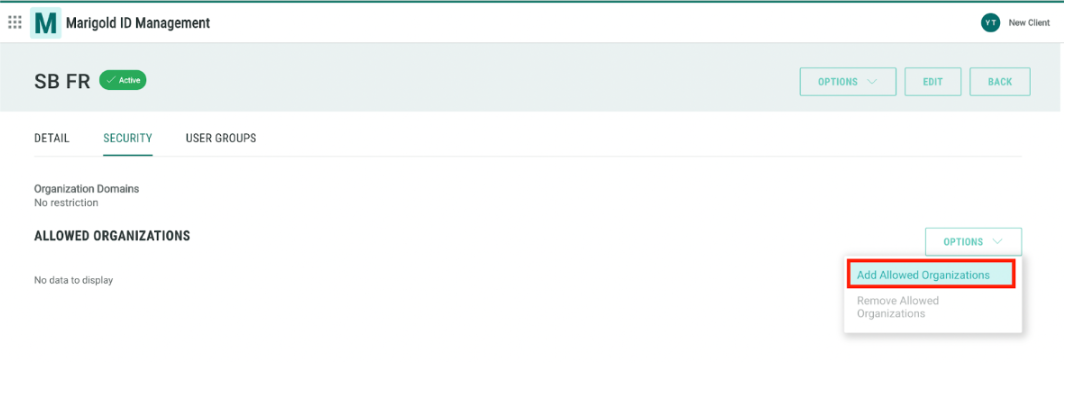
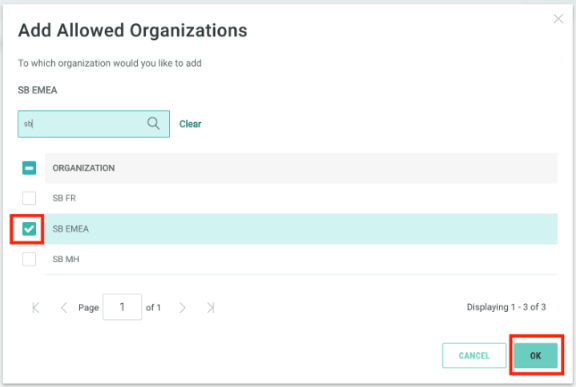
2. When the organization is loaded, click “Options”, then “Add Allowed Organizations”.
3. When the modal below is opened, search “SB EMEA”, select it by checking the checkbox and click “OK”.
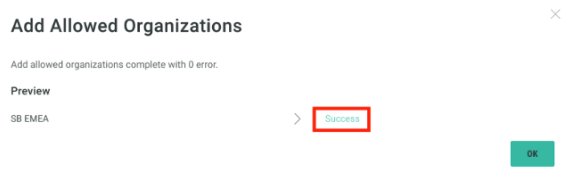
A confirmation modal will be displayed below, indicating the status of the action. Click ‘OK’ to close the modal.
-
The message below shows the allowed organization was added successfully without any error.
When the modal is closed, you can see “SB EMEA” listed on the Allowed Organizations as follows:
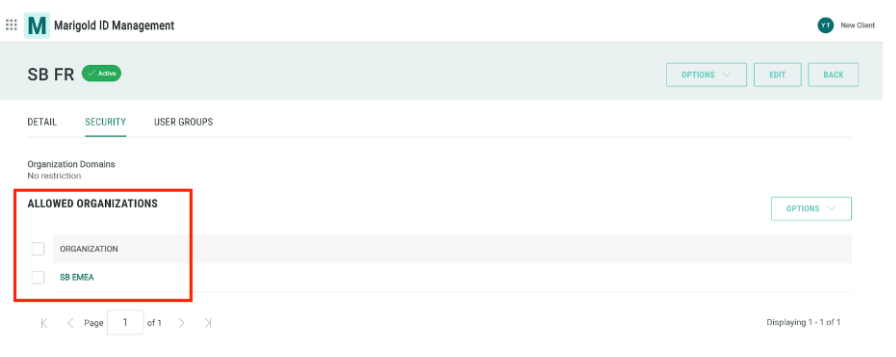
When the setup is completed, users from the allowed organization - SB_FMEA can be invited to and assigned BUs and application access to SB_FR.
Invite/ Add User Workflow from The Allowed Organization
Note: The steps below can be done by both Marigold ID Internal Admin (in Marigold ID Management) and Organization Admin (through Marigold ID Administration).
From the settings above, with SB FR adding SB EMEA as an allowed organization, users from SB EMEA can be assigned BU access to SB FR as standard users (system users) or as organization admins. The organization admin of the allowed organization, SB EMEA, can also add users to both SB FR and SB EMEA.
1. In Marigold ID Administration, go to the allowed organization - “SB EMEA”.
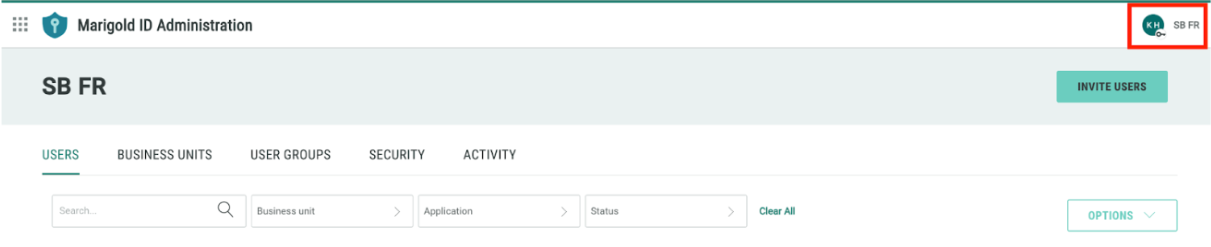
2. Click “Users” to open the User Listing Page, then click “Invite Users”.
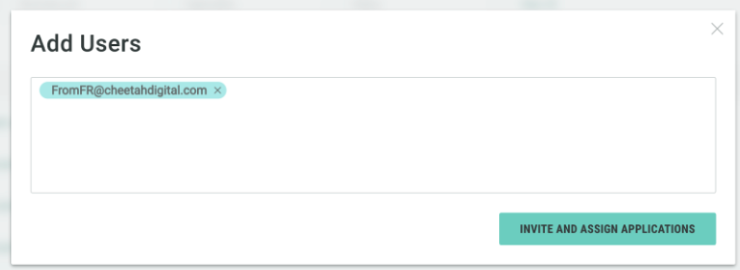
3. Enter the user email address and click “Invite and Assign Application”.
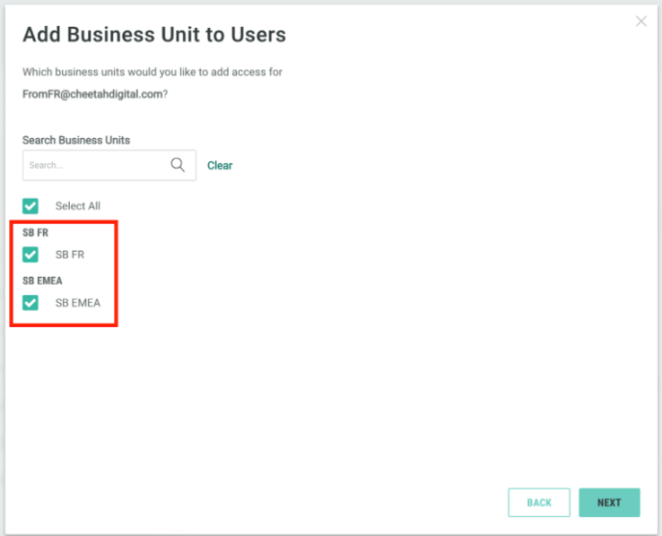
4. Select Business Unit(s).
On this screen, BUs of both SB FR and SB EMEA will be shown.
5. Select the application(s) to assign to the user and click Done.
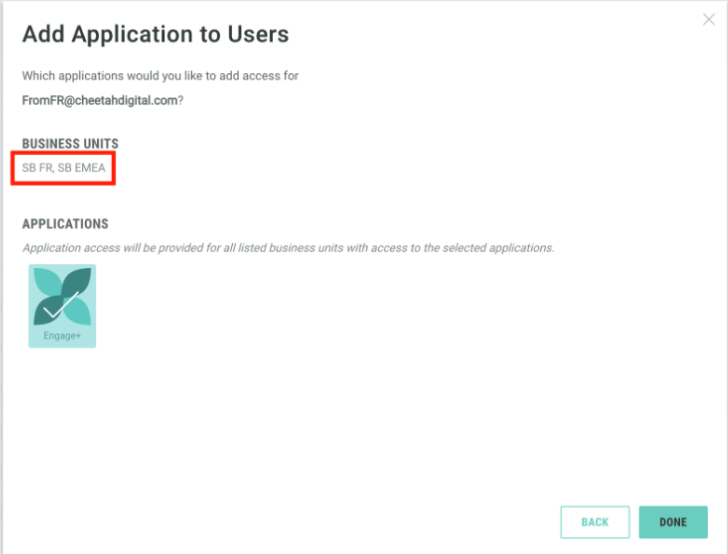
6. From the example in #5, on success, the user will be granted access to Engage+ for both SB FR and SB EMEA.
Allowed Organizations
Feature Overview
The Marigold ID system provides functionality for an organization to designate another organization as an "allowed organization," thereby granting users from the designated organization access to its account. Furthermore, users from the allowed organization can be assigned as administrators for their own organization.
Besides allowing organizations to delegate administrative responsibilities to users from the allowed organization, the feature also enables organizations with entities in different regions or locations to access each other's systems.
This feature can be configured only by a Marigold ID Super Admin.
Add Allowed Organization To a Client Organization
Scenario:
SB is an organization in Europe and it has the setup as follows:
-
SB EMEA: This is their organization in Europe managing all businessnes in EU except France, Germany and Switzerland.
-
SB FR: This is their organization managing businesses ONLY in France, Germany and Switzerland.
Use Case:
-
Users from “SB EMEA” need access to “SB FR”. In this case, “SB EMEA” needs to be added as an allowed organzation for “SB FR”,
-
User from “SB FR” must be prevented from accessing “SB EMEA”
Below is their setup in Marigold ID:
Below are the steps to add “SB EMEA” as an allowed organization for “SB FR”.
Note: The steps below can be completed only by a Marigold ID Super Admin.
1. On the Organization Listing Page, search “SB FR”.
2. When the organization is loaded, click “Options”, then “Add Allowed Organizations”.
3. When the modal below is opened, search “SB EMEA”, select it by checking the checkbox and click “OK”.
A confirmation modal will be displayed below, indicating the status of the action. Click ‘OK’ to close the modal.
-
The message below shows the allowed organization was added successfully without any error.
When the modal is closed, you can see “SB EMEA” listed on the Allowed Organizations as follows:
When the setup is completed, users from the allowed organization - SB_FMEA can be invited to and assigned BUs and application access to SB_FR.
Invite/ Add User Workflow from The Allowed Organization
Note: The steps below can be done by both Marigold ID Internal Admin (in Marigold ID Management) and Organization Admin (through Marigold ID Administration).
From the settings above, with SB FR adding SB EMEA as an allowed organization, users from SB EMEA can be assigned BU access to SB FR as standard users (system users) or as organization admins. The organization admin of the allowed organization, SB EMEA, can also add users to both SB FR and SB EMEA.
1. In Marigold ID Administration, go to the allowed organization - “SB EMEA”.
2. Click “Users” to open the User Listing Page, then click “Invite Users”.
3. Enter the user email address and click “Invite and Assign Application”.
4. Select Business Unit(s).
On this screen, BUs of both SB FR and SB EMEA will be shown.
5. Select the application(s) to assign to the user and click Done.
6. From the example in #5, on success, the user will be granted access to Engage+ for both SB FR and SB EMEA.
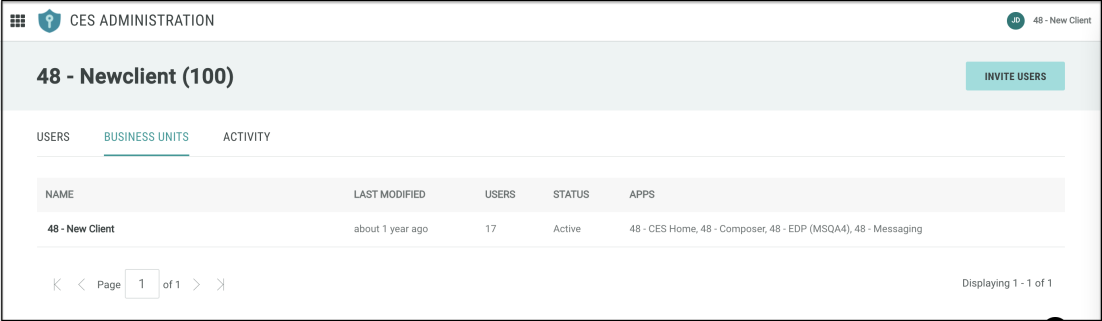
Business Unit Management
The Business Units tab shows all the business units of the current organization to the organization admin and the allocated business units to the business admins.
| Role | Permitted Actions |
| Organization Admin | can view all the BUs belonging to the organization |
| Business Unit Admin (BU Admin) | can view the BUs they administer |
Activity Log View
The Activity tab lists the activities of all the organization users to the organization admin and the activities of the users belonging to the allocated business units to the business admins.