Schedule an Event-Triggered Campaign
Scheduling Options
Event-triggered Campaigns send messages to recipients based on an occurrence of an event, or a recipient action.
An Event-triggered Campaign goes through two separate phases when it executes: building messages and sending messages. Each of these phases is controlled by its own dedicated schedule that defines when to start the schedule for that phase.
The Queue Schedule controls the message building phase. By default, the Queue Schedule is set to go "live" immediately when the Campaign is launched. The Queue Frequency controls how often the platform builds messages; it defaults to running every day, immediately when the triggering event occurs.
The Send Schedule controls the message sending phase. By default, the Send Schedule is set to go "live" immediately when the Campaign is launched. It defaults to running every day, all day long.
1. Delay both schedules
You can delay the Queue and Send Schedules to go "live" at some point in the future, after the Campaign is launched. In this scenario, the system won't do anything if a triggering event occurs, until the start dates / times are reached, and the Queue and Send Schedules go "live."
1. Navigate to the Campaign.
2. Click the Review tab.
3. Within the Campaign Schedule section, to define when you want the Send Schedule to go "live," click Start on and enter the appropriate date and time.
4. Within the Advanced Queue Schedule section,to define when you want the Queue Schedule to go "live," click Begin on and enter the appropriate date and time.
Note: The Queue Schedule start date / time must be before the Send Schedule start date / time.
2. Set a Queue Frequency
The default Queue Frequency is configured to build messages every day, immediately when the trigger event occurs. You can define a custom Queue Frequency:
-
Navigate to the Campaign.
-
Click the Review tab.
-
Within the Advanced Queue Schedule section, select the frequency unit of time – Daily, Weekly, Monthly, or Yearly.
-
Define the frequency interval.
-
Define the time of day when the Campaign should build messages:
-
Once a Day: Select a time.
-
Several Times a Day: Define an interval in minutes or hours.
Note: Between executions, the platform will "batch up" all of the event occurrences, then create all of the messages when the Queue Frequency next executes.
3. Define a Sending Window
You can define a daily Sending Window. The platform will send messages only during this Sending Window.
1. Navigate to the Campaign.
2. Click the Review tab.
3. In the Campaign Schedule section, expand Advanced Options.
4. Select the Send Only Between tab.
5. Enter the start and end times of the Sending Window.
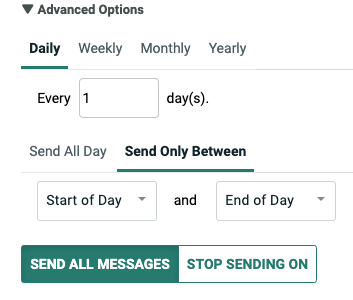
Note: If the Campaign doesn't complete the sending process during the Sending Window, the remaining recipients will stay held in the queue until the next window.
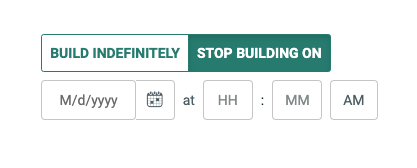
4. Stop a Queue and / or Send Schedule
By default, an Event-triggered Campaign will run indefinitely. You can define a date / time to stop the Queue Schedule and / or the Send Schedule.
To set a stop date for the Send Schedule:
-
Navigate to the Campaign.
-
Click the Review tab.
-
In the Campaign Schedule section, expand Advanced Options.
-
Click Stop Sending On.
-
Enter the date / time.
To set a stop date for the Queue Schedule:
-
Navigate to the Campaign.
-
Click the Review tab.
-
In the Advanced Queue Schedule section, click Stop Building On.
-
Enter the date / time.