
Configure a Place
The Definition tab of the Place Details screen contains a variety of different features and options, organized into sections. These sections are described below in more detail.
To edit the options within a specific section:
-
Select Admin from the top navigation bar, then select Locations > Places from the side navigation menu. The Places screen is displayed, with List View selected by default.
-
Search for and select the desired Place ( see
-
Click Edit (being sure to click the edit button within the desired section that you want to modify). The Edit Place pop-up window is displayed.
-
Enter the desired configuration options.
-
Click Save.
See below for more information on the options available in each section.
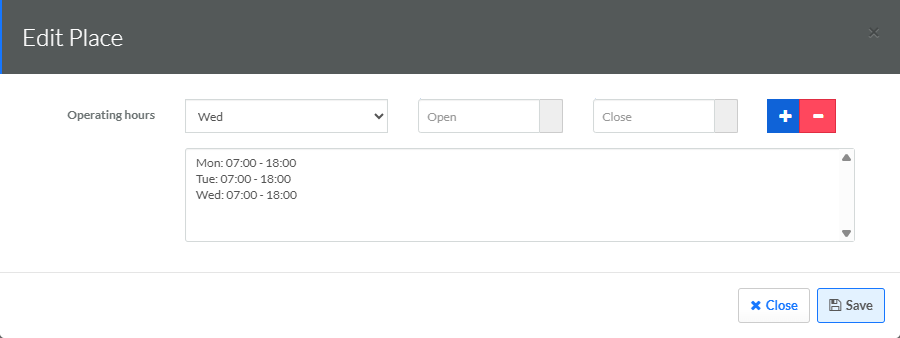
Operating Hours Section
The Operating Hours section lets you define the hours that this location is open for business. This information can then be displayed within your loyalty program app.
To define the operating hours for this Place:
-
Click Edit within the Operating Hours section. The Edit Place pop-up window is displayed.
-
From the Operating Hours drop-down menu, select a day of the week.
-
In the Open field, enter the time when the location opens.
-
In the Close field, enter the time when the location closes.
Note: Both the Open and Close times use a 24-hour clock. For example, "14:00" represents 2:00 PM.
-
Click the Add icon. The system adds the day and the times to the text window.
-
Repeat the above steps as needed to define the opening and closing times for other days of the week.
-
Optionally, to remove a day, select it in the text window, then click the Remove icon.
-
Click Save.
Dwell Time Section
The Dwell Time section is used for location-based targeting, such as geofencing with a Wallet Pass (see the Wallet Pass iOS Geofencing Guide for more information). The Dwell Time indicates how long a Member must be within a geofence perimeter before the platform triggers a notification.
To define a Dwell Time for this Place:
-
Click Edit within the Dwell Time section. The Edit Place pop-up window is displayed.
-
Together, the Dwell Time and Dwell Unit fields define the time period, such as "10 Minutes" for example. Enter the following:
-
In the Dwell Time field, enter a value.
-
From the Dwell Unit drop-down menu, select a time interval (Seconds or Minutes).
-
-
Click Save.
Radius Section
The Radius section is used for location-based targeting, such as geofencing with a Wallet Pass (see the Wallet Pass iOS Geofencing Guide for more information). The Radius indicates the size of the geofence perimeter around this location.
To define the Radius for this Place:
-
Click Edit within the Radius section. The Edit Place pop-up window is displayed.
-
Together, the Radius and Radius Unit fields define the size of the perimeter, such as "200 Feet" for example. Enter the following:
-
In the Radius field, enter a value.
-
From the Radius Unit drop-down menu, select a unit of measurement (Meters, Kilometers, Miles, or Feet).
-
-
Click Save.
Other Properties
This section is used to define contact information for this location, as well as the content of the geofencing notification.
To define these additional properties:
-
Click Edit within the Other Properties section. The Edit Place pop-up window is displayed.
-
Optionally, enter the following:
-
Phone: Optionally, enter the phone number for this location.
-
Owner: Optionally, enter the name of the location owner.
-
Email: Optionally, enter the email address for this location.
-
URL: Optionally, enter the website URL for this location.
-
Notes: Optionally, enter the text of the geofencing notification. When a Member (with your Wallet Pass installed on their mobile device) enters the location's geofencing perimeter, this text appears as a notification on their device lock screen.
-
-
Click Save.
Extra Info
This section displays any custom JSON used to extend the standard Place API payload. Note that you can't actually add or edit the JSON from this section. Instead, you must enter the desired JSON code in the Extra Info field within the Edit Place pop-up window. See
Links
This section is used to define various links for this location. You can then display these links with your loyalty program app.
To define these links:
-
Click Edit within the Links section. The Edit Place pop-up window is displayed.
-
Optionally, enter the following links:
-
Home Page
-
Facebook
-
Instagram
-
Twitter
-
Beverage Menu
-
Food Menu
-
Grubhub
-
Postmates
-
DoorDash
-
-
Click Save.
