

The EDP Execution Type is primarily intended for use cases where you need to calculate all the individuals that belong in a particular Segment. For Segments of type EDP, the platform supports several authoring methods: Simple, Advanced, and Traditional. This article focuses on the Simple authoring method.
Segment Rules define the criteria for Members to be selected by this Segment. For the Simple authoring method, the Rules tab provides a user-friendly interface for defining these Segment Rules. This authoring method presents you with a menu of standard Data Categories that organize many of the different Loyalty Attributes into easy to understand groupings, such as "Demographics" and "Preferences." You simply select a Data Category, select an Attribute, and define the logical condition.
While working with the Attributes within a Data Category, you can define multiple Rules, and then select the logical operator (AND or OR) that connects the Rules.
Optionally, you can then select a different Data Category, and define one or more Rules within that Data Category. The Rules within one Data Category will always be connected with an AND operator to the Rules within another Data Category. The best practice recommendation is to define all the desired Rules within the first Data Category, save the Segment, then move on to the next Data Category.
This article assumes that you have already created the Segment, and configured its properties as follows (for more information, see
-
Execution Type: EDP
-
Authoring Tool: Simple
Define the Segment Rules
To define the Segment Rules in an EDP Segment using the Simple authoring tool:
-
Select Members from the top navigation bar, then select Segments from the side navigation menu. The Segments screen is displayed.
-
Search for and select the desired Segment (see
-
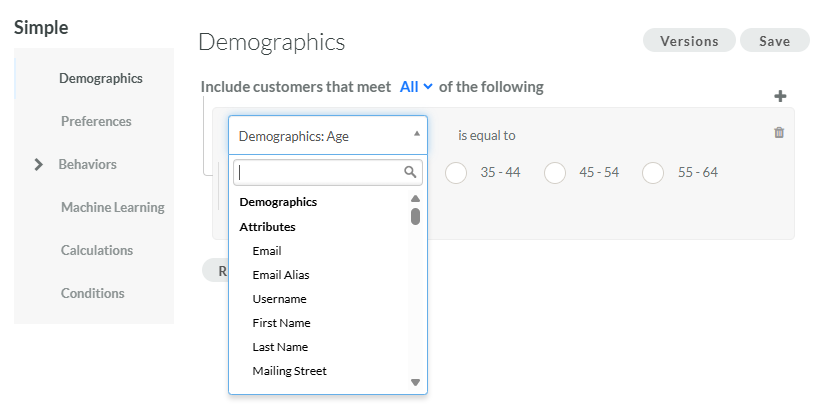
From the menu of Data Categories on the left-hand side of the screen, select one of the following:
-
Demographics: Define a Rule using either a standard demographic field, or a Member Attribute.
-
Preference: Define a Rule using a Member Preference.
-
Behavior: Define a Rule using one of the following Member behaviors:
-
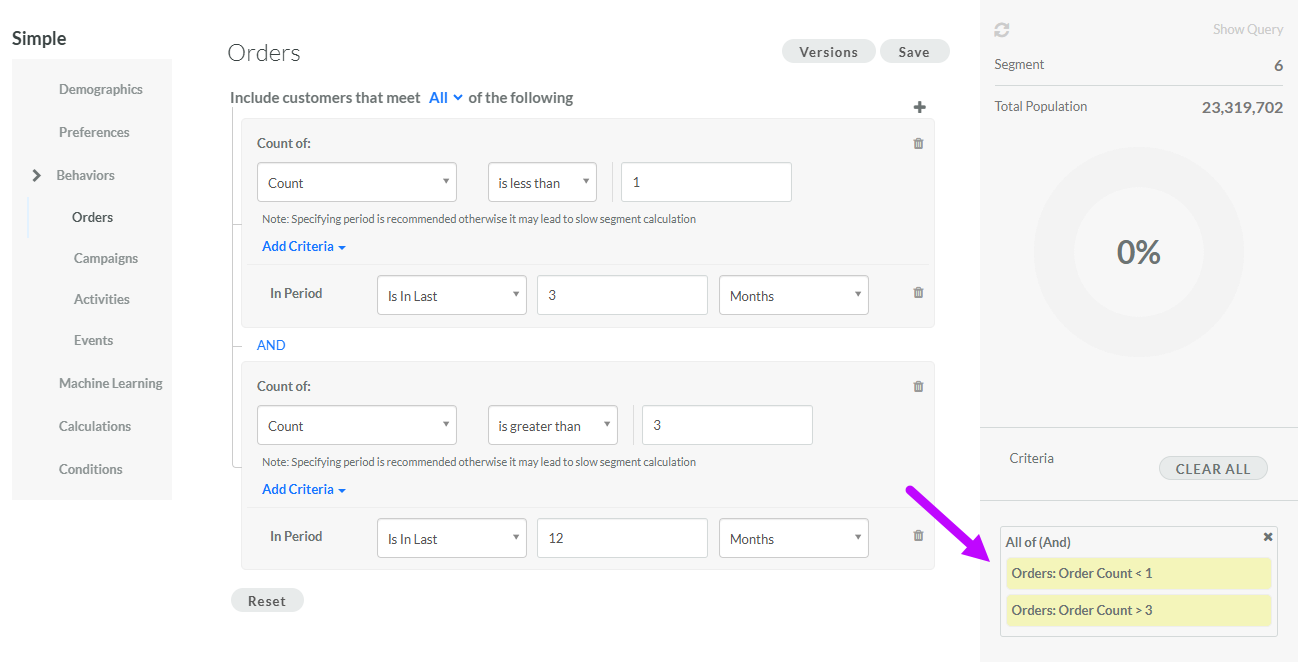
Orders: Define a Rule based on purchase count, recency, or total amount.
-
Campaigns: Define a Rule based on a Member's response to an email campaign (send, open, or click).
-
Activity: Define a Rule using an Activity Type.
-
Event: Define a Rule using an Event Type.
-
-
Machine Learning: Define a Rule using a Machine Learning Attribute.
-
Calculations: Define a Rule using a Calculated Attribute.
-
Conditions: Define more sophisticated Segment logic than what is supported by the other Data Categories defined above. See Working with Conditions below for more information on using this Data Category.
-
-
The platform adds a new blank Rule. The first drop-down menu is populated with the relevant object types based on the Data Category you selected above. From this drop-down menu, select one of these object types to expand it, then select the desired object.
-
Select a mathematical operator.
-
Select or enter a value.
-
Optionally, to define another Rule within the same Data Category, click the Add icon, then select Add Rule. The platform adds a new blank row.
-
Repeat the above steps as needed to define more Rules. Optionally, to delete a Rule, click the Delete icon next to it.
-
Once you define more than one Rule, select the logical operator from the Include customers that meet drop-down menu:
-
All of the following: Use an 'AND' operator such that all Rules must be true for a record to be selected.
-
Some of the following: Use an 'OR' operator such that at least one of the Rules must be true for a record to be selected.
-
-
Optionally, you can also organize Rules into Rule Groups. A Rule Group allows you to build more complex selection criteria. To create a Rule Group, click the Add icon, then select Add Rule Group. The platform creates a Group, which is represented visually as a nested box with its own operator and Add icon. Within this Group box, click the Add icon to define the Rule (or Rules) using the same process as described above. Use the toggle within the Group box to define the logical operator for the Rules within the Group. To delete an entire Rule Group, click the Delete icon just above the nested box representing the Group.
Note: By clicking the Group button inside the Group box, you can create "nested" groups.
-
Optionally, to delete all Rules in the currently selected Data Category, click Reset.
-
When you are done working with this Data Category, click Save. The platform refreshes the audit chart on the right, which indicates the number of selected Members out of the total population of your database. The Rule logic is displayed beneath the audit chart.
-
To define another Rule (or Rules) in a different Data Category, repeat the above steps starting with selecting the desired Data Category. Click Save when finished. The platform adds the new Rule logic to the audit chart, and refreshes the count. By default, Rules across Data Categories are joined by an AND operator, meaning that all displayed Rules, across all Data Categories, must be satisfied for a Member to be selected by the Segment. See Working with Conditions below for details on how to use an OR operator instead.
Note: At any time, you can click the Refresh icon within the audit chart to update the selected Member count.
-
Optionally, to view the code behind the Segment Rules, click Show Query above the audit chart. .
-
Optionally, to remove all the Rules from a single Data Category, click the "x" icon next to the Rule description beneath the audit chart. Optionally, click Clear All to remove all Rules from all Data Categories.
Working with Conditions
The Conditions Data Category allows you to define more sophisticated Segment logic than what is supported by the other Data Categories. This option gives you access to all Attributes, across all Data Categories.
-
From the menu of Data Categories on the left-hand side of the screen, select Conditions. The platform adds a blank row for defining a Rule.
-
The first drop-down menu is populated with all of the different object types in Loyalty that are available for use. From this drop-down menu, select one of the following object types to expand it and see the available options:
This option allows you to define a logical statement based on a value in a demographic field.
-
From the menu, select the desired demographic field.
-
Some demographic fields allows you to pick a value from among a range of pre-defined values. For these types of demographic fields, select the radio button for the desired value.
-
Other demographic fields present you with a drop-down menu, from which you can select a mathematical operator. Then enter or select a value.
This option allows you to define a logical statement based on a value in a Member Preference.
-
From the menu, select the desired Member Preference.
-
Select a mathematical operator.
-
Enter or select a value.
This option allows you to define a logical statement using a Member's response to receiving a marketing campaign.
-
From the menu, select the desired Member response: Clicked a Campaign, Opened a Campaign, or Sent a Campaign.
-
Select a mathematical operator.
-
Enter or select a value.
-
Optionally, define a time period based on when the campaign was sent, such as "Is In Last 3 Months."
-
Optionally, define a time period based on when the Member action occurred.
Note: The use of a time period is optional, but recommended to improve system performance.
This option allows you to define a logical statement using a selected Event Type.
-
From the menu, select the desired Event Type.
-
Select a mathematical operator.
-
Enter or select a value.
-
Optionally, define a time period based on when the campaign was sent, such as "Is In Last 3 Months."
Note: The use of a time period is optional, but recommended to improve system performance.
This option allows you to define a logical statement by performing a mathematical calculation on Members' purchase history.
-
From the menu, select the desired calculation method: Count, Recency , or Total Amount.
-
Select a mathematical operator.
-
Enter or select a value.
-
For Count or Total Amount, optionally define a time period, such as "Is In Last 3 Months."
Note: The use of a time period is optional, but recommended to improve system performance.
This option allows you to define a logical statement based on a Member's inclusion in a Segment (or exclusion from a Segment).
-
From the menu, select Member.
-
Select a mathematical operator - either In (inclusion) or Not In (exclusion).
-
Search for and select a published Segment.
This option allows you to define a logical statement by counting the occurrences of a selected Activity Type.
-
From the menu, select the desired Activity Type.
-
Select a mathematical operator.
-
Enter or select a value.
-
Optionally, define a time period, such as "Is In Last 3 Months." The use of a time period is optional, but recommended to improve system performance.
This option allows you to define a logical statement using a Member's history of Metric usage.
-
From the menu, select the desired usage type: Balance, Earn, Expire, or Redeem.
-
From the second drop-down menu, select the desired Metric.
-
Select a mathematical operator.
-
Enter or select a value.
-
For the Earn, Expire, and Redeem Metric usage types, define a time period, such as "Is In Last 3 Months." The use of a time period is optional, but recommended to improve system performance.
This option allows you to define a logical statement by referencing either a Lookup table or a Member Function.
-
From the menu, select either Lookup or Function.
-
From the second drop-down menu, select the desired Lookup table or Member Function.
-
Select a mathematical operator.
-
Enter or select a value.
-
If you selected a Lookup table and it has Parameters defined, select the Attribute on which to match.
-
If you selected a Member Function and it has Arguments defined, select the Attribute on which to match.
This option allows you to define a logical statement based on a value in a Machine Learning (ML) Attribute.
-
From the menu, select the desired ML Attribute.
-
Select a mathematical operator; the available operators will vary based on the Data Type of the item you selected above.
-
Enter or select a value.
This option allows you to define a logical statement based on a value in a Calculated Attribute.
-
From the menu, select the desired Calculated Attribute.
-
Select a mathematical operator; the available operators will vary based on the Data Type of the item you selected above.
-
Enter or select a value.
This option allows you to define a logical statement based on a value in a Member Attribute.
-
From the menu, select the desired Member Attribute.
-
Select a mathematical operator; the available operators will vary based on the Data Type of the item you selected above.
-
Enter or select a value.
This option allows you to define a logical statement by referencing a Custom Object.
-
From the menu, select either the desired Custom Object.
-
Select a mathematical operator.
-
Enter or select a value.
-
Optionally, define a Condition that limits what records from the Custom Object are included.
This option allows you to define a logical statement using a Groovy expression.
-
From the menu, select Advanced Expression.
-
In the code editor field, enter the desired Groovy expression.
-
Repeat the above steps as needed to define more Rules. Optionally, to delete a Rule, click the Delete icon next to it.
-
Once you define more than one Rule, select the logical operator from the Include customers that meet drop-down menu:
-
All of the following: Use an 'AND' operator such that all Rules must be true for a record to be selected.
-
Some of the following: Use an 'OR' operator such that at least one of the Rules must be true for a record to be selected.
-
-
Optionally, you can also organize Rules into Rule Groups. A Rule Group allows you to build more complex selection criteria. To create a Rule Group, click the Add icon, then select Add Rule Group. The platform creates a Group, which is represented visually as a nested box with its own operator and Add icon. Within this Group box, click the Add icon to define the Rule (or Rules) using the same process as described above. Use the toggle within the Group box to define the logical operator for the Rules within the Group. To delete an entire Rule Group, click the Delete icon just above the nested box representing the Group.
Note: By clicking the Group button inside the Group box, you can create "nested" groups.
-
Click Save.
-
Optionally, to delete all previously defined Rules in this Date Category, click Reset.
Load a Past Version
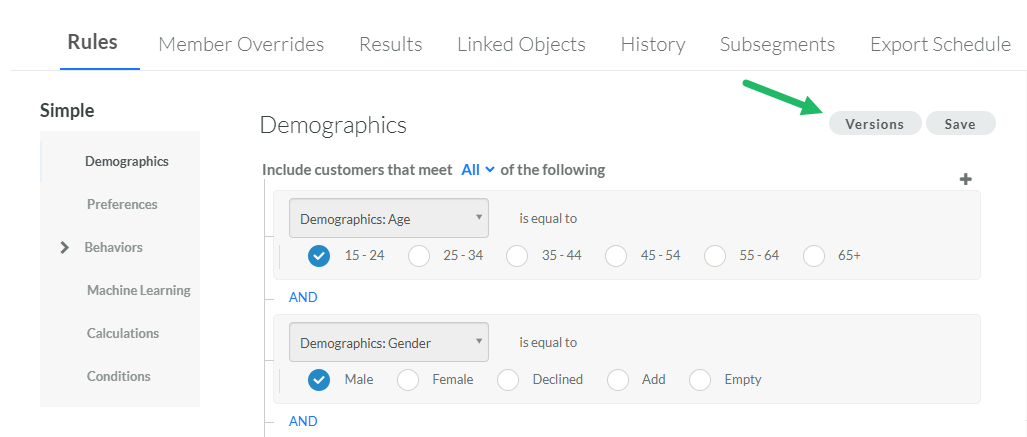
When working in the Simple authoring tool within EDP-type Segments, the platform maintains a version log of all past iterations of the Segment Rules. Each time you click Save, the platform saves a new version. At any point, you can load a past version.
To load a past version of a Segment's Rules:
-
Near the top of the Rules tab, click Versions. The Version List pop-up window is displayed, showing a log of all past versions. Each version lists the author's name and the date the version was created.
-
Click the desired version.
-
Click Load Version.
