
![]() The Recurring
Batch Component is typically used in a journey that needs to be
executed automatically at predefined time intervals.
The Recurring
Batch Component is typically used in a journey that needs to be
executed automatically at predefined time intervals.
Note: The icon, when used
in the journey, indicates the time interval that is applied.![]() = custom /
= custom / ![]() = hourly /
= hourly / ![]() = daily /
= daily / ![]() = weekly /
= weekly / ![]() = monthly
= monthly
Example:
Use the Recurring Batch Component to launch a campaign every week at the
same time, to remind people to place their order for the week.
Please keep in mind following rules
- Only one Recurring Batch Component can be used in a journey.
- Only one link can be made from this component to the next.
- A journey with a Recurring Batch Component must end in an outbound content (email, sms, push). When these outbound content components are used in a Recurring Batch, a small icon is added to the component, indicating this is a scheduled element.
Properties
Configuration tab
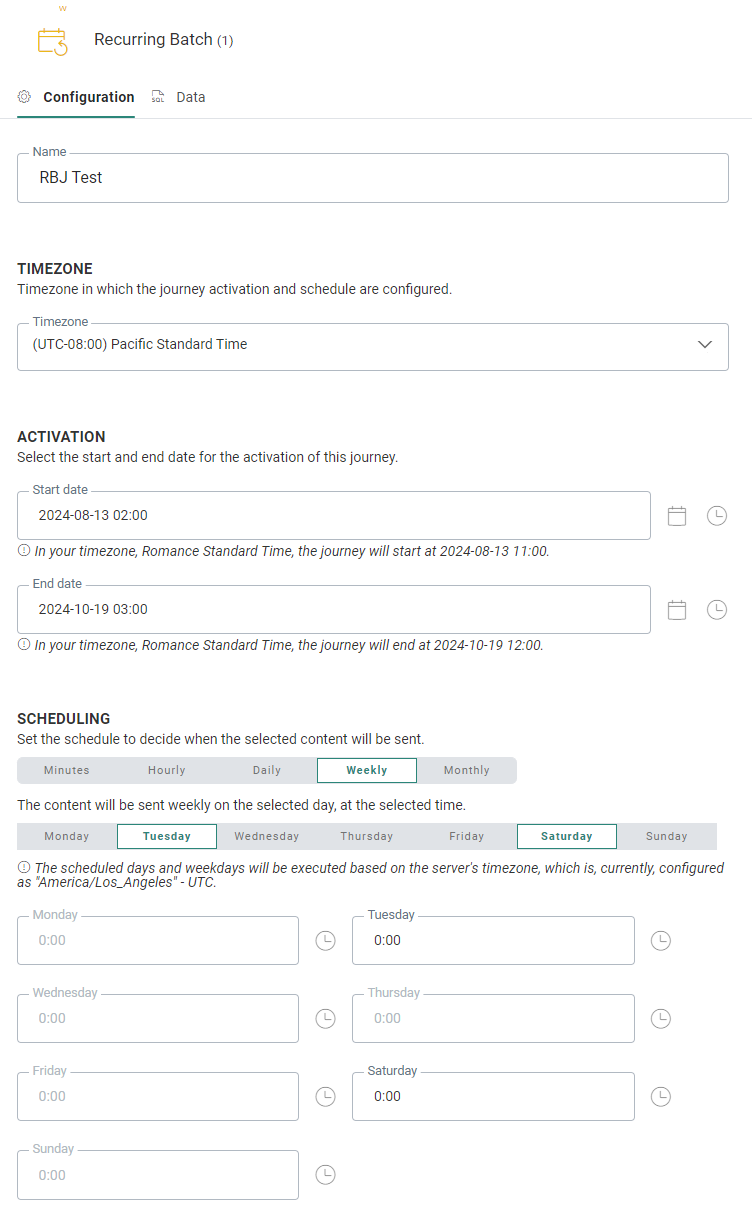
Timezone — The time zone in which the journey activation and scheduling are configured.
Activation — specifies the work window when the journey is considered active. Select a start date/time and end date/time. Click the calendar icon to set a date and the clock to set a time.
Note:
- If the start date/time is omitted, the journey becomes primed to send at the next occurrence defined by Scheduling.
- If the end date/time is omitted, the journey will continue to run indefinitely until paused or stopped.
Note: When a user defines an activation start date/time (and/or end date/time), it takes the time zone set above into account. Underneath the start date/time (and end date/time), the date and time are converted to your user's time zone (also taking Daylight Saving Time into account when applicable for the conversion).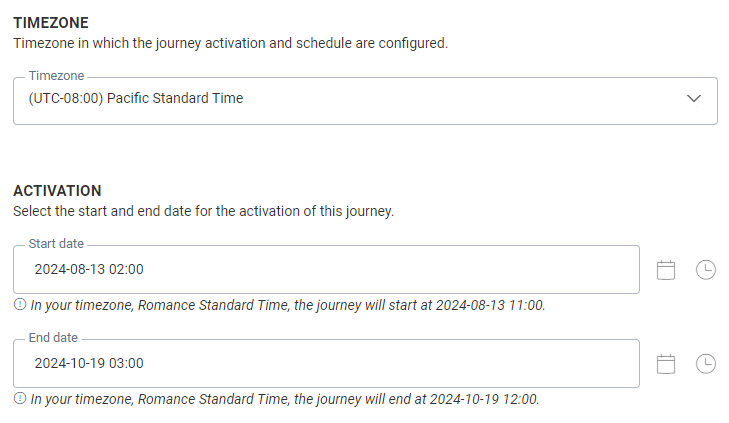
Internally, the system uses a universal time zone, to make it possible to translate times to localized versions for every user. This means that updates by one user will be correctly represented in the local time zones of all other users.
Example:
The time zone set for the journey activation and scheduling is UTC -8 (Pacific Standard Time).
The activation start date is set to 2024-08-13 02:00.
The activation end date is set to 2024-10-19 03:00.
User A has a user time zone that is set to UTC -5 (Eastern Standard Time).
This means that their local time has a 3 hour difference compared to the time zone set in the journey.
User A sees the following translated values:
- Start date: "In your timezone, Eastern Standard Time, the journey will start at 2024-08-13 05:00."
- End date: "In your timezone, Eastern Standard Time, the journey will end at 2024-10-19 06:00."
User B has a user time zone that is set to UTC +1 (Romance Standard Time).
This means that their local time has a 9 hour difference compared to the time zone set in the journey.
User B sees the following translated values:
- Start date: "In your timezone, Romance Standard Time, the journey will start at 2024-08-13 11:00."
- End date: "In your timezone, Romance Standard Time, the journey will end at 2024-10-19 12:00."
Scheduling — determines the frequency at which the journey is (re)triggered. At each iteration, the Audience List is scanned for contacts meeting the target group.
Note:
- If Send the same message multiple times is toggled on, contacts that already received the message are targeted again for communication (same email but possibly different content for that particular day/week/etc).
- If Send the same message multiple times is toggled off, contacts that already received the message are not part of the next batch of recipients, i.e.: the journey will only target new contacts.
The following scheduling options are available:
- Minutes — The message is sent every time the set number of minutes has elapsed. Use the Custom time frame option to define the start and end time in between which this rule needs to be executed. For example, send the message every 30 minutes between 09h00 and 17h00.
- Hourly — The journey is executed every hour. Note that the sending of the first batch will happen immediately, when the journey is launched.
- Daily — The journey is executed once a day. A specific time in the day must be selected. This is the default recurrence.
- Weekly — The journey is executed on one or more selected days of the week. The time at which the execution can take place can be different per selected day. At a given day of the week and a given time of the day. Only one day of the week can be selected. For example, send the message every Tuesday at 12h00 and every Thursday at 17h00.
- Monthly — For the monthly execution, there are 2 different ways of selecting the days. Use the toggle Specific days to select your preferred option.
When the toggle Specific days is off, you can select the days of the month and the time of the day. For example, the 5th, 15th and 25th at 09h00.
When the toggle is on, you can select the weekday and the time on that day the message should be sent. More than one weekday can be selected. To indicate which weekday of the month , options are available to choose the first, second, third, fourth or last one of the month. Select the days of the month on which the journey should run. You can also select the time of the day at which the journey should start Example, the first and third Monday at 09h00, and first and third Wednesday at 17h.00 .
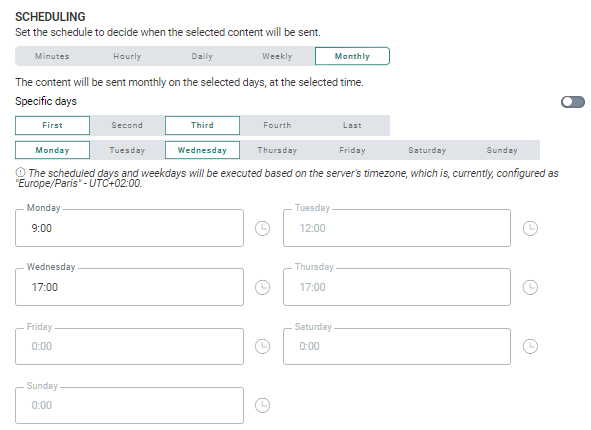
Note: The scheduled days and weekdays will be executed based on the server's time zone.
Data tab
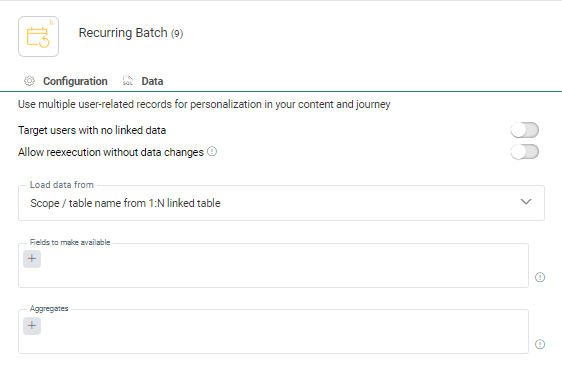
This section allows you to indicate if and what data from a 1:N and 1:N:1 Linked List should be made available for personalization in this journey. Once the below configuration is finished, the 1:N and 1:N:1 Linked List fields will be available in the Personalization Dialog and the Visibility Constraint in any message created in this journey.
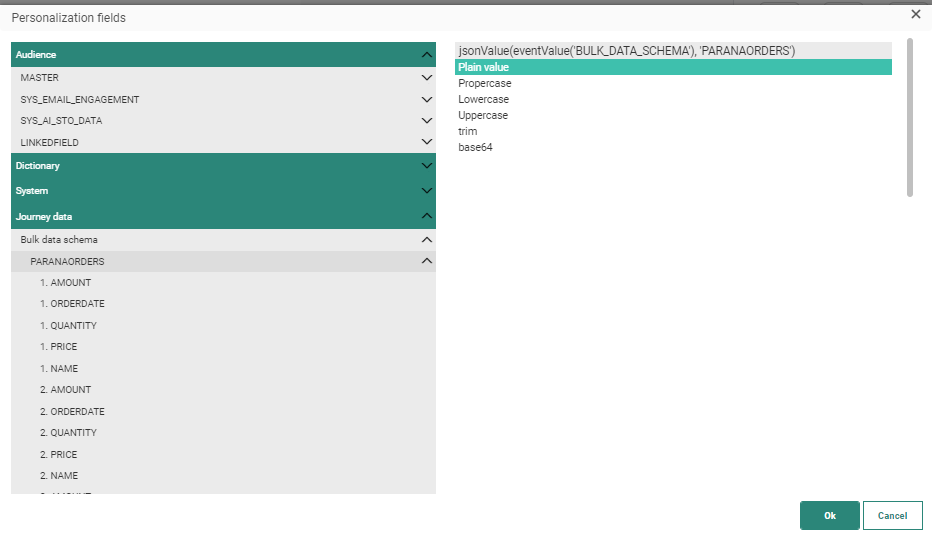
Note: Fields from the 1:N:1 linked lists are available in the Personalization Dialog to personalize message content but can also be added to the message using the following function:
JsonValue(eventValue('BULK_DATA_SCHEMA'), 'contracts[0].contract_details.id')
where:
- contracts is the 1:N linked list
- [0] refers to the first record in the 1:N linked list, [1] is the second record and so on
- contracts_details is the 1:N:1 linked list
- id is the field of that 1:N:1 linked list
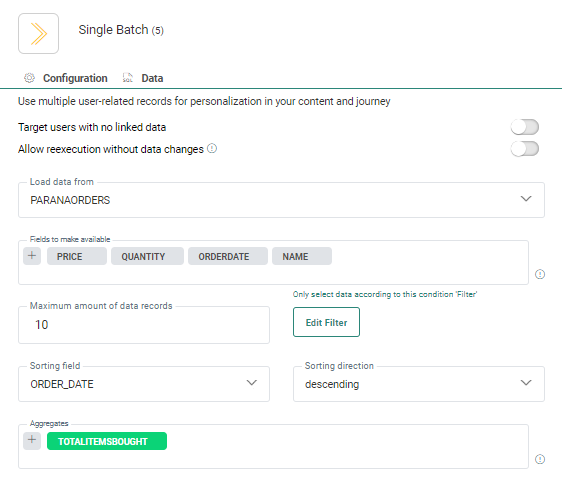
Before starting the configuration of the linked lists and fields, there are 2 options that allow you to define what needs to happen when no 1:N data is available or no changes have been made to the data:
-
Target users with no linked data — Select the option if you want to send the message regardless of 1:N data being available or not.
Example: Add information about the contact’s next appointment to an email; and when there are no appointments planned, ask the contact to schedule one. By using Visibility Constraints on the content of the message, you can show the next appointment, or a Schedule button.
-
Allow reexecution without data changes — Select the option if you want to send the message even if the 1:N data has not changed since the previous execution of the journey.
Example: Automatically include 2 unique vouchers in a section in a monthly newsletter, stored in a 1:N related list. The following month, even if the vouchers are still the same (for example they haven’t been used yet by the contact) the newsletter will be sent out with the same voucher information.
1. First, select the 1:N Linked List from the drop-down. Only lists linked to the selected Audience List are shown.
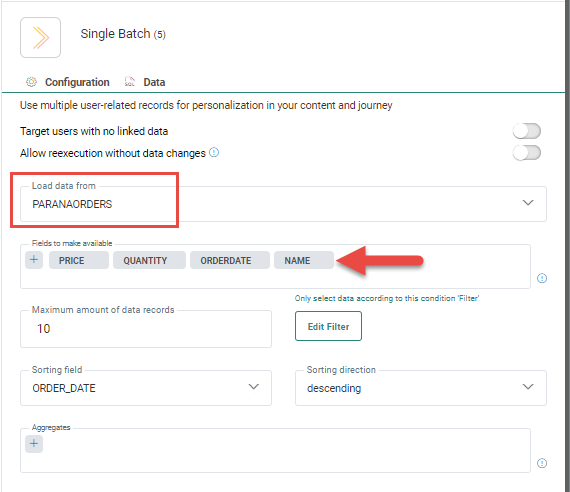
2. Next, select the fields in that list which should be available to personalize a message or journey. A drop-down is available listing all the available fields from the selected 1:N list and from 1:N:1 Linked Lists.
Note: A maximum of 50 fields can be selected.
3. Records from the selected Linked List can be sorted, filtered and limited to a maximum number.
- Maximum amount of data records - Limit the number of records returned by the selection. By default, a maximum of 100 records can be loaded.
- Edit filter - Define the filter that limits the records returned to only those complying with the filter. Any of the fields in the selected 1:N Linked List can be used to filter on
- Sorting field and sorting direction - Sort the fields based on a value in one of the 1:N list fields. This will determine which records will be retained
Example: Return only records of this year, sort the records by order date, with the most recent ones at the top and limit the number of records to only 10. This will result in the 10 most recent orders of this year.
Note: This option is used in combination with data settings in the properties of the message. More details can also be found in this topic: Personalization Dialog.
In addition to the standard fields, aggregate fields can be created and used in the personalization of the content. An aggregate is a field that is calculated based on the values of a field in the 1:N list (eg. Sum of all order amounts).
Moreover, you can filter, limit and sort the data used for the aggregate. (E.g. sum of the last 10 most expensive purchases).
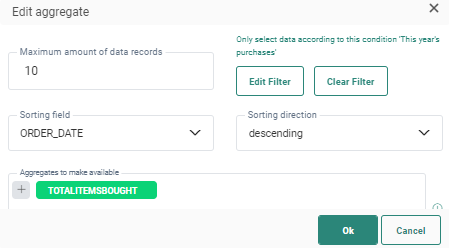
1. To create a new aggregate field, click the + icon in the Aggregates field. A dialog is displayed where a filter, sorting and limitation can be defined. (This is done in the same way as for the normal fields. See explanation above.)
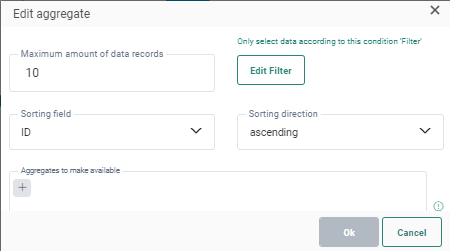
Note: The filters defined in this dialog will apply to all aggregates added in this dialog. If you want to create aggregates with different filter options you will have to repeat this procedure for those aggregates and redefine a new filter and link the aggregates.
Example: 10 most recent purchases of this year. 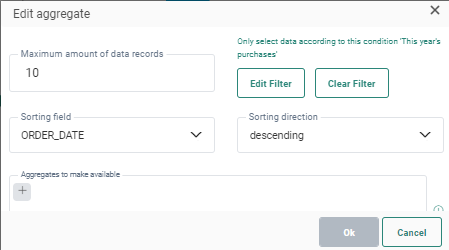
This means that all aggregates defined in here will only take into account the 10 most recent purchases of this year.
2. To create a new aggregate within this filter, click the + and define a name, an operator and a field.

Example: The number of items bought. The result is based on the 10 most recent purchases of this year.
3. Click Add to save the aggregate in the filter.
Note: If you want to define another aggregate within this filter, repeat the process by clicking the + icon again.
4. When done, click OK to save the configuration. The aggregates are added to the properties panel of the component.
Events
- recurrence — The event starting from the Recurring Component contains the recurrence of the journey eg. Every 2 hours.
Note: When no start date is set for the activation of the journey, activating it will cause the content to be sent from the moment it's activated, with the scheduled time (hourly, daily, weekly, monthly, custom) still taken into account.
For example :
A Recurring Batch Journey without start date set, is scheduled to run daily at 1 pm (13:00).
- If this journey is launched (activated) today at 10 am (10:00), then the first execution will be today at 1 pm (13:00), as scheduled.
- If this journey is launched (activated) today at 2 pm (14:00), then the first execution will be tomorrow at 1 pm (13:00), as the scheduled time for today has already passed.
