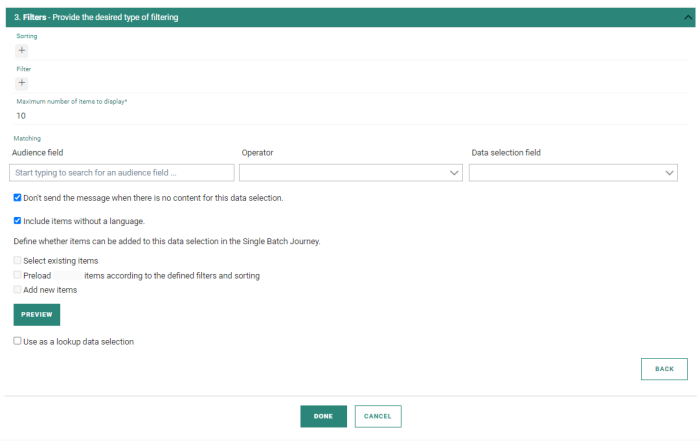
Note: In a data selection, approximately 5000 articles can be loaded without affecting performance. When working with big data selection lists, it is recommended to narrow down the number of articles by using filters.
The Filter section allows the user to filter the data selection using the following controls:
- Sorting — Selects criteria for sorting the items in the list.
- Filter — Applies a filter based on a field value.
- Maximum number of items to display — Only shows the top number of items in the list.
- Matching — Only shows items that match the contact's profile.
Sorting the items
You can sort the data selection based on an item property. For instance, you could display the most recently updated ones first, or sort alphabetically by name.
1. Click the + in the Sorting field to select the property that should be used to sort the items. Only fields selected earlier for use in the data selection are available for filtering. If your required field is not available here, add it first in the Field selection step.
Note: You can select multiple fields to sort the items. They are sorted in the order in which the fields are listed, from left to right.
2. To change the sorting order (ascending, descending) click the sorting field. The arrow will be inverted.
3. To change the order in which the sorting fields are listed, drag and drop the sorting field to its new position.
Example: Since
our data selection 'Top product' only returns one item with the best price,
we will instead apply sorting based on descending price.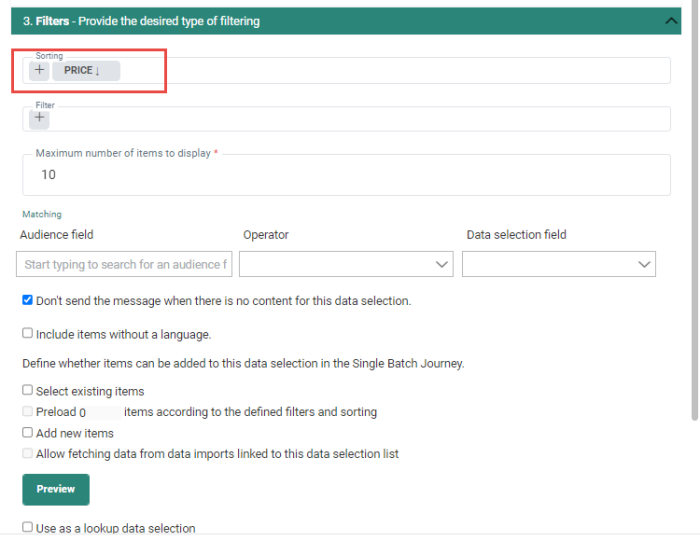
Filtering the items
The Filter field allows you to apply constraints to control which data is displayed when rendering the message content.
A filter is used to limit the number of records returned based on the data in the selection list. You can filter only on fields that were previously chosen in the Field Selection. For example, filters can be applied to display only data items with a discount or those from a specific brand.
Note: Filtering records in the data selection will load only those that meet the specified filter criteria.
1. To create a filter, click the + in the 'Filter' field. The Constraint Editor is displayed.
2. Give a name to the new constraint and click add constraint'to configure it. (For more information on how to create a constraint, check Constraint Editor.)
3. Press OK when done. The filter is added.
Example: Only
select the data items that have a URL associated with it.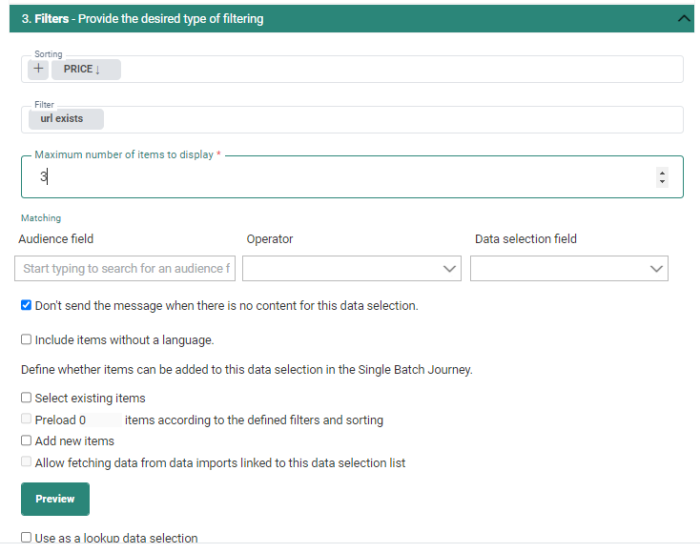
Note: If you want to filter the data using multiple fields from the data selection, add all the necessary constraints to the same filter as there can only be one filter defined.
Matching the articles
The Matching field lets you
select only the items that match a specific Audience List property or a variable value defined by the marketer. By
comparing a data selection item property to a contact property or variable, you can personalize
the content for each contact individually.
Matching is used to limit the number of records returned to those that match a contact's preferences, purchase history, latest order, etc.
Note: When using the matching method to filter items, all records are initially loaded from the database, and then only those that meet the matching criteria are selected.
1. Under Audience field, select a field from the audience or from a profile extension or select a variable. When Custom Events lists are linked to the Audience List, you can also select a field from that linked Custom Events List.
2. Under Operator, select a comparison operation.
3. Under 'Data select field', select the field in the data source with which to compare the audience list property.
Example: Display only the items that have the same category of the contact's preference. Or, only display the favorite shop of the contact. This type of information is usually stored in a profile extension which can then be compared with a field in the data source.
Example: Display only the items that match the selected color for the Variable 'color'.
Example: Only
select items that have a taxonomy value that corresponds to the top category
(TOP_CAT1) of the contact. The top category is stored in a profile extension
of the contact record.
Available operators — For each operator, an example is given. In case the value is a string, the string is evaluated as a whole. In case it is a multi-value, the individual values are evaluated and values are pipe separated:
| Data in contact record | Field type | Data in DSL | Conditions | |||||||
| Occurs in | Occurs in or is empty | does not occur in | does not occur in and is not empty | is equal to | is equal to or empty | is not equal to | is not equal to and not empty | |||
| Empty | string | Empty | TRUE | TRUE | TRUE | FALSE | TRUE | TRUE | FALSE | FALSE |
| cat | string | cat | TRUE | TRUE | FALSE | FALSE | TRUE | TRUE | FALSE | FALSE |
| cat | string | cats | TRUE | TRUE | FALSE | FALSE | FALSE | FALSE | TRUE | TRUE |
| cats | string | cat | FALSE | FALSE | TRUE | TRUE | FALSE | FALSE | TRUE | TRUE |
| cat | string | at&dog | FALSE | FALSE | TRUE | TRUE | FALSE | FALSE | TRUE | TRUE |
| cat | string | dog | FALSE | FALSE | TRUE | TRUE | FALSE | FALSE | TRUE | TRUE |
| cat|dog | multi-value | dog|cat | TRUE | TRUE | FALSE | FALSE | TRUE | TRUE | FALSE | FALSE |
| cat|dog | multi-value | cat | TRUE | TRUE | FALSE | FALSE | FALSE | FALSE | TRUE | TRUE |
| cat | multi-value | cat|dog | TRUE | TRUE | FALSE | FALSE | FALSE | FALSE | TRUE | TRUE |
| cat|dog | multi-value | rabbit|bird | FALSE | FALSE | TRUE | TRUE | FALSE | FALSE | TRUE | TRUE |
| cat | multi-value | Empty | TRUE | TRUE | FALSE | FALSE | FALSE | TRUE | TRUE | FALSE |
Additional filter options
- Exclude items from (only displayed when more than one data selection is defined) — Check this option to return only items from this data source that haven't been used in another data selection. (The option is only available if there are at least two data selections defined in the properties).
Example: One
single data source Products
is used to fill out two different content sections. We have created
a data selection that returns only one item from the data source and represents
the TOP product matching the preference of the contact. The second section is
filled with items returned by a second data selection Other
products.
So two different data selections are created, one that matches the contact's
profile and one based on the price of the items, displaying the lowest
prices first.
To ensure that the same item is not displayed twice, once in each section,
check the option Exclude
items from and select the data selection. This will ensure that
items returned in another data selection are not re-used here.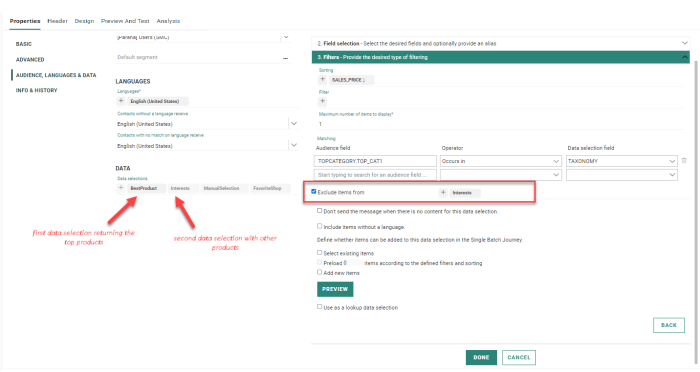
- Maximum number of items to display — Limits the number of items shown in the content (default is 10). The number of items defined here applies to all repeaters and any fixed layout element that uses this data selection.
- Don't send this message when there is no content for the data selection — (not applicable to Pages) When no items are returned after applying all filters, matching, and exclusion, no message will be sent.
Note: It is recommended that you select the Don't send this message... option.
- include items without a language — By default, only items with the same language as the language of the recipient will be displayed in the message, meaning that items with no language filled out will not be included. Use this option if the data source contains items with no language and you do want to include these items in your messages. With this option set, and for items that are the same in all languages, it is not necessary to duplicate these items in all languages to ensure they are included in the message.
Note: This option can not be used in combination with manual selection of items in the message. For this reason, the options 'Select existing items' and 'Add new items' are automatically unchecked.
Last, define what the marketer is allowed to do when using the template in a journey.
The following options
are only available for templates,
and are not available for a message or page. Messages and pages are used
directly in journeys where items are filled out automatically and no
manual selection is allowed.
When templates are used to create a Single Batch Journey, items can be selected manually or preloaded, and the marketer has more control over what items will be displayed. In this case, when selecting the items manually, the filters and sorting defined previously are taken into account and the marketer can only choose items according to those filters. However, when sending out the message, the matching rules are applied personalizing the final message based on the contact's profile.
The below options can be combined.
- Select existing items — The user can access the items in the data source and manually select the ones to display in the email. The Preview button provides an overview of all the items currently in the data source. The filter and sorting defined earlier are applied when selecting the items.
- Preload x items according to the defined filters and sorting — This option allows to preload the first x items into the message where the user can then make changes to these items (edit, delete, ..). The filters and sorting defined earlier in the data selection are applied when preloading these x items. (A maximum of 100 items can be preloaded.)
Note: When this option is used in combination with 'Allow fetching data from data imports linked to this data selection list' further down, the items will not be preloaded immediately when opening the content. The user is first prompted to fetch the latest data.
If this option is used without the 'Allow fetching data' option, the items will be preloaded automatically when opening the content.
When the message is sent out, the preloaded items will be further filtered applying the Matching rules. - Add new items — The user can add new items to the data source. When the message is sent out, the newly-added items will be further filtered applying the Matching rules.
- Allow fetching data from data imports linked to this data selection list — This option is only available if data imports have been detected for the current data selection and when the above option 'select existing items' has been selected. If this is the case and the option 'Allow fetching data' is checked, it will be possible to trigger the data import when using this message in a Single Batch Journey. The marketer will be presented with a warning when opening the content from a journey and informed of the last time the import was executed. He can then choose to execute the import or not.
Technical note: Repeater items in templates that have been configured for manual item selection, can be tagged with Interest tags (Only when EMIT is activated for the environment). When the content (with repeater) is used in a Single Batch Journey and when you edit or add a repeater item, the tags' check boxes are listed in the properties of the item and can be ticked. When saving the item, the tags are saved in the Data Selection List for the item. This is currently only the case for Single Batch Journeys. (For more information on Interest Tags, check this topic.)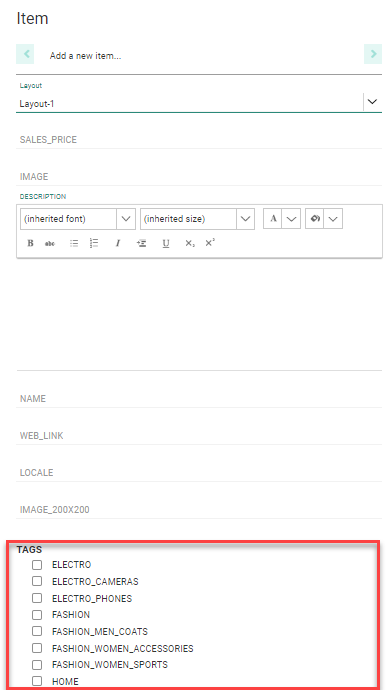
A Tag List is always linked to an Audience List and as a result all content created for that audience will have access to those tags. So, when a data selection is used in content, it is possible to tag the manual selected items in the repeater with the Interest tags available for this audience. However, if this same data selection is used in a content with a different audience and a different Tag List , the same items in the same data selection might have different Interest tags available for the marketer to choose from.
This results in items being stored in the data selection with a mixture of tags, coming from different Tag Lists. However, when these items are retrieved in the repeater only the tags for the currently used Audience List and associated Tag List will be listed
When none of the above options is flagged, items are filled out automatically, using the filtering and cropping criteria. However, if at least one of the above options is checked, the user must select the items manually, either by selecting them from the data source or by creating them. The user can select as many items as they want, but the cropping will be applied and the number of items displayed will be limited. It is recommended that you select more items than the cropping number because matching and filters will reduce the number of items returned for a contact anyway.)
The last option is available for data selections in transactional messages sent through the API as well as for non-transactional messages that use the lookup option to only retrieve items from the data source that correspond to a given set of IDs:
- Use as a lookup data selection — Set this option to only retrieve items from the data selection that corresponds to the criteria defined in this lookup. Several sources can be used to filter these items:
- In case of a transactional message the lookup in the data source is done using transactional fields passed on by the API. (Example below)
- For non-transactional messages, the lookup in the data source is done based on values (IDs) stored in a field of type 'Data Selection Identifier Set' in the Audience List or 1:1 profile extension. This 1:1 profile extension also includes fields in linked Custom Events.(Example below)
- This option can also be used for messages in an Abandoned Cart Journey. It allows filtering the items from the data selection and return only those items that correspond to the Site Abandoned cart items. To be able to use this feature, specific settings are required for the Abandon Cart journey, such as defining a scope. For more information on this, please check the Abandoned Cart topic. (Example below)
Example: Using transactional data in data selection filter
If you want to send out a transactional message with a list of items, and these items are already available in a data selection, it is possible to pass on just the identifier of the item in the API call. The field in the data selection that is used as the lookup field is configured in the data source.
The same can be achieved on a non-transactional message. Let us explain with an example:
We have an Audience List 'AUDIENCE' with a LOOKUPIDS field containing the preferences of the user. This field 'LOOKUPIDS' is set as 'Data Selection Identifier Set'. 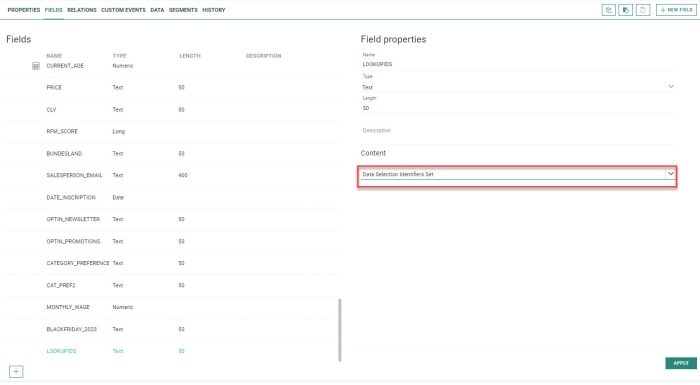
This field will for example contain the following IDs for user x: 1|2. 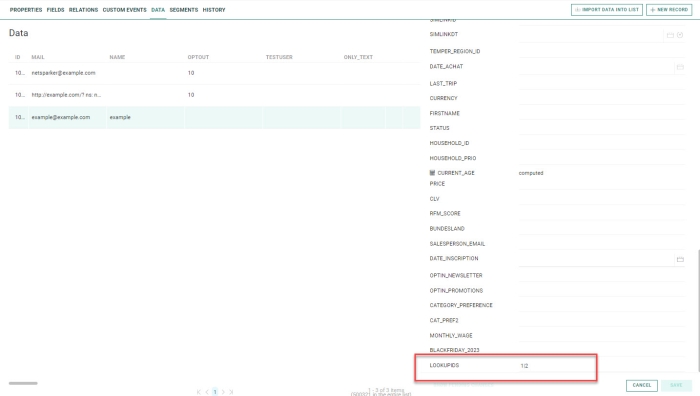
When a message is created for this audience, you can create a data selection for the message that will filter the items from the data source for which the lookup field ID (in the Data Selection List) is in the list of IDs in the LOOKUPIDS field of the Audience List.
(Note that this means that if, for the lookup, you want to use a different field than the ID field in the data source, then this field has to be configured as type LOOKUP).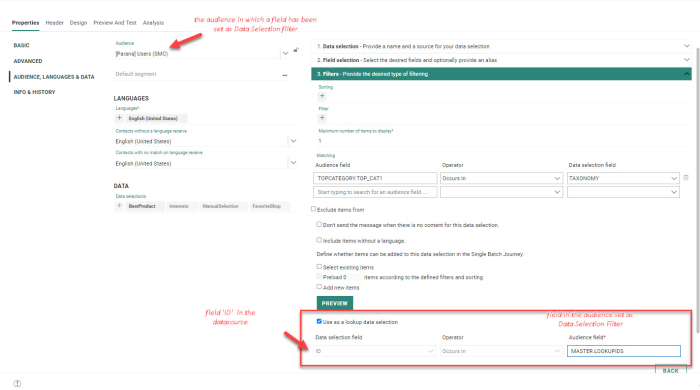
If several items in the data source have an ID in the list, they will be filtered further on returning only the items in the language of the user. Moreover, if several items in the data source have the same lookup ID only the first one will be returned.
Example: The data source has the following 3 items. 2 of the 3 items have the same LOOKUPID:
If the field MASTER.LOOKUPIDS contains 1|2|4 for a specific user with language EN, the items with ID=1 and ID=2 are returned. The item with ID=3 is not returned as it has the same lookupID as the item with ID=1. So the filter results in 2 items. After, an additional filter is applied to only return the items with language EN. This result in 1 item with ID=2. Content 2 will be displayed in the message.
Example: Using Custom Events data in data selection filter
In our example, we want to use the location ID field stored in the Custom Events List to filter the data selection and lookup and retrieve the details for that specific location.
We have an Audience List Parana Users with a Custom Events List ANNUALCUSTOMERDAY. In this Custom Events List, we have marked the LOCATIONSID field as the Data Selection Identifier set, allowing us to use that information to look for the right location details in the data selection: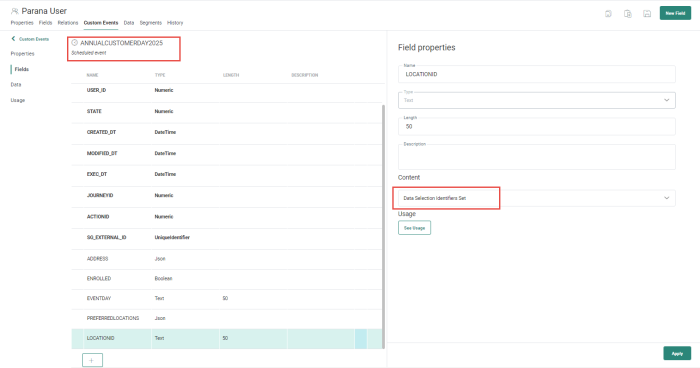
In the definition of the data selection lookup, this Custom Events field is available to define the lookup criteria: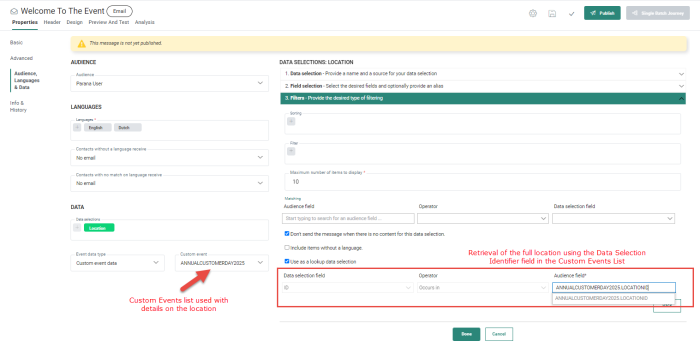
As a result, only the locations corresponding to the one in the Custom Events List are returned.
Example: Using Abandoned Cart data in a Data Selection filter.
When creating an Abandoned Cart Journey, data is passed on from Site to <MadCap:variable name="MyVariables.Product_Short" />. This Site data contains the IDs of the articles and properties such as price and quantity (limited to these 2 properties at the moment). These IDs can be used in a data selection lookup to filter the items from a data selection list and only return those that correspond to the abandoned cart items. (Prerequisite: all items used on the website must exist in a data selection list in <MadCap:variable name="MyVariables.Product_Short" />.)
To do so, we need the scope that is defined in the Abandoned Cart Journey as well the parameter name. Below is an example of an Abandon Cart Component: 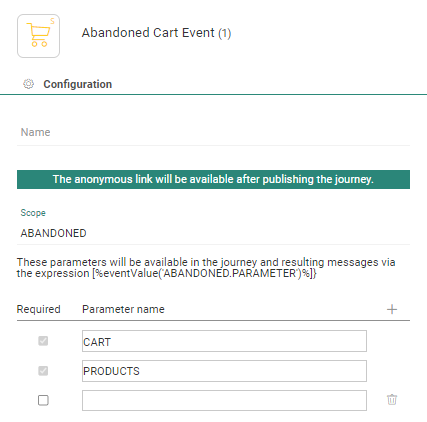
The scope is set to ABANDONED. The parameter name is fixed: PRODUCTS.
When this scope and parameter are used in the data selection filter, it will only return items from the Data Selection List that correspond to the products returned by Site.
More info on this can be found here: Abandoned Cart Journey
Data Selections and Lookups : Terminology
Example : Lookup Data Selections
Example : Using Data Selections with Repeaters
Test your knowledge about messages containing a set of catalog items
I want to send out a message with a set of items from my catalog that can be manually selected by the marketer. So I :
1 - create a template with a Repeater and set it to manual selection
2 - create a template and use Placeholders in which the marketer can drop text items
