
Introduction
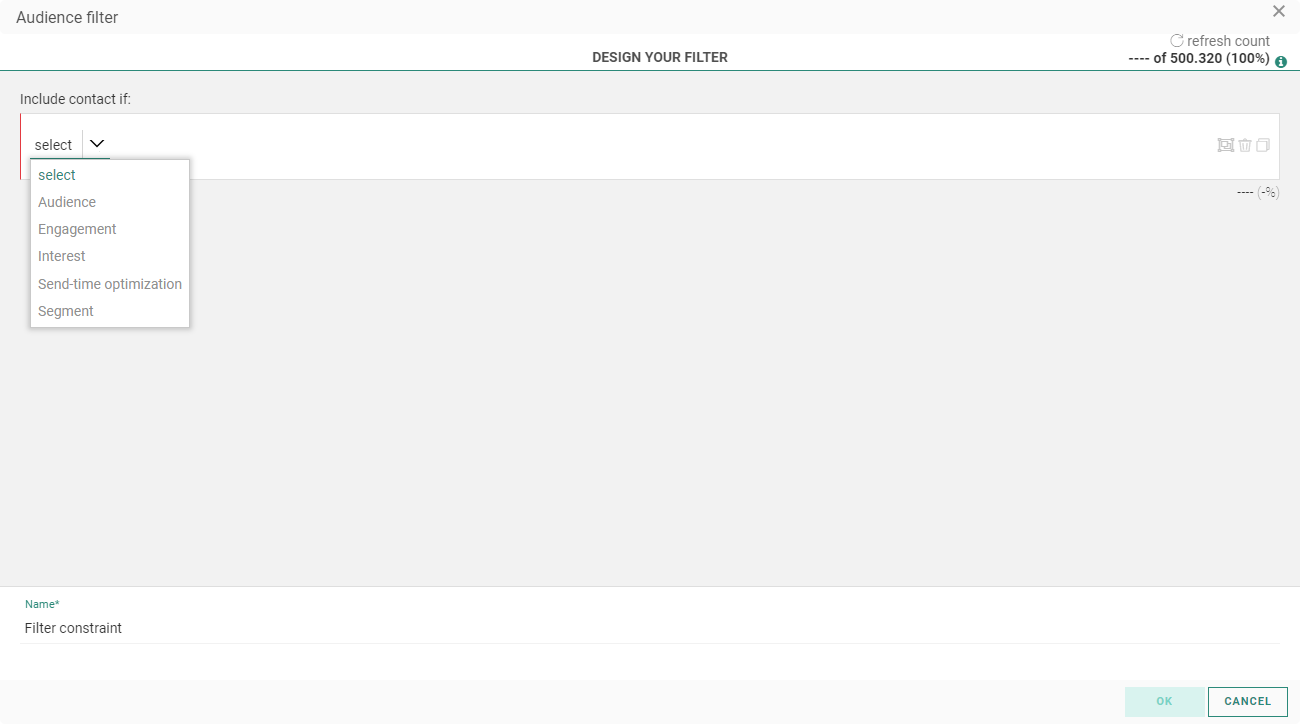
The Constraint Builder (also referred to as Segment Builder) lets you define filters to limit a target audience, when defining a list segment or filtering an audience in a journey.
The following types of constraints can be set (detailed explanations can be found in each section below) :
- Audience/Field — To set a filter on a field of the main list, or on a field of a 1:1 profile extension or 1:N / N:1 linked list.
- Engagement — For filtering on profile metrics or journey interactions.
- Interest — Option to filter on interest tag values.
This is only available when the Interest tags feature is activated on your environment and configured for the list. - Segment — To include/exclude existing segments of the main list
- Custom Event — Only applicable when defining an audience filter in Custom Journeys using the Custom Event entry component.
- Send-time Optimization — Filter to check if an STO profile exists or not.
This is only available when the Send-Time Optimization feature is activated on your environment and at least one interaction took place from a contact in this list during the last 6 months.
Audience/Field constraint
1. About audience/field constraints
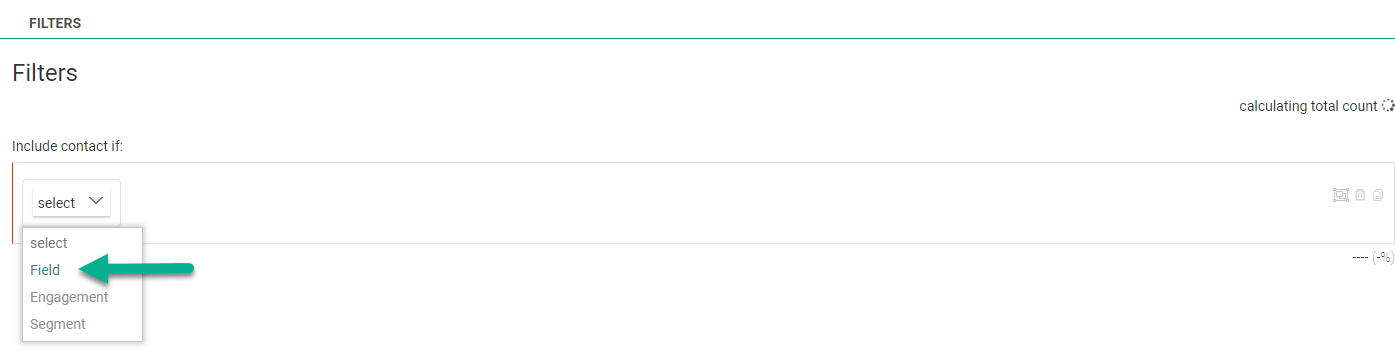
- The first drop-down shows :
- Audience — in the context of audience filters in Journeys

- Field — in the context of List Segments
- When you select Field (or Audience), a second drop-down lets you select the scope.
You can select the audience and all of its 1:1 relations (also called profile extensions) and 1:N relations (also called lookup lists).
Note:
- A 1:1 profile extension means 1 contact in the Audience List can only link to 1 record in the extended profile (for example, a user can only have one loyalty card in your shop : MASTER → 1:1 → LOYALTYCARD).
- A 1:N lookup list means 1 contact in the Audience List can link to one or more records in the linked list (for example, a contact can buy several times in your store, which results in an order each time they complete a transaction : MASTER → 1:N → ORDERS).
Example of values shown in the Scope drop-down:
- The main audience list = Master
- 1:1 profile extensions = Loyaltycard, Mobile, Preferences, etc.
- 1:N lookups = Appointments, Devices, Orders, Reviews, etc.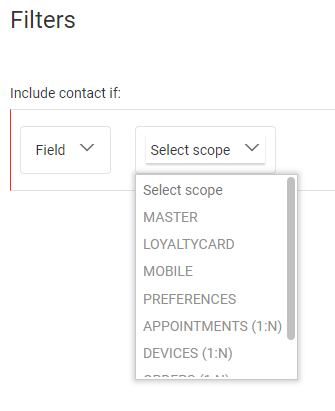
- After selecting a scope, another drop-down is shown to select a list field.
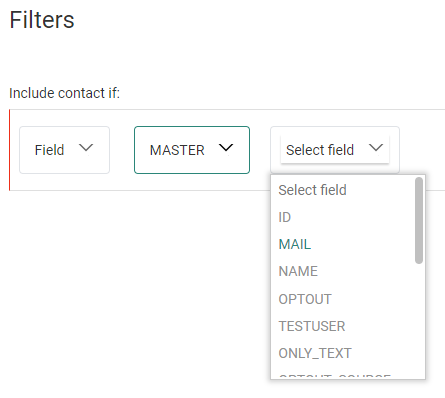
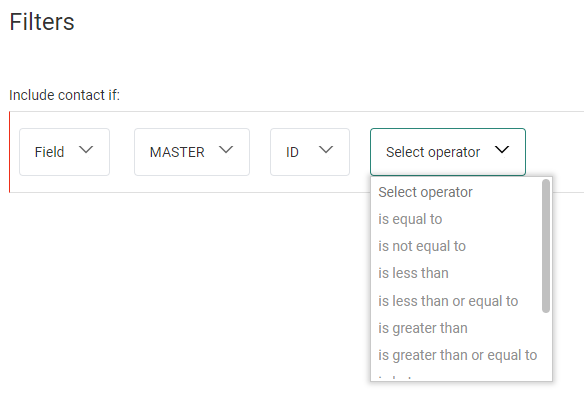
- Depending on the selected field, the next drop-down lists the corresponding operators.
Note:
- For text fields, the available operators are : is equal to, is not equal to, contains, does not contain, starts with, ends with, is one of, is empty, is not empty.
The contains operator should be used with caution as it can significantly impact calculation times and system performance. The user is informed when using this operator in filters used for dynamic segments.
- For numeric, float and long field types, the available operators are : is equal to, is not equal to, is less than, is less than or equal to, is greater than, is greater than or equal to, is between, is one of, is empty, is not empty.
- For date/time fields, the available operators are : is, is not, is before, is or is before, is after, is or is after, is between, is empty, is not empty.
- For boolean and Option List fields, the available operators are : is equal to, is not equal to, is empty, is not empty.
- When the operator is selected, you need to enter or select one or more values, depending on the field type and selected operator.
| Examples: | |||||
| Example # | Field | Field Type | Operator | Value(s) | Value(s) Type |
| Example 1 | LANGUAGE | Text | is equal to | EN | manually entered text |
 |
|||||
| Example 2 | ID | Numeric | is between | 12 and 80 | 2 numbers, entered manually, or selected with the up/down arrows |

|
|||||
| Example 3 | MOBILE | Text | is not empty | / | / |
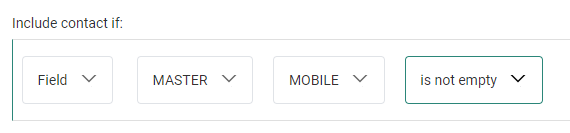
|
|||||
| Example 4 | OPTOUT_DT | Date/time | is after | 20/02/2024 10:30 | a date and time, selected through a date/time picker |
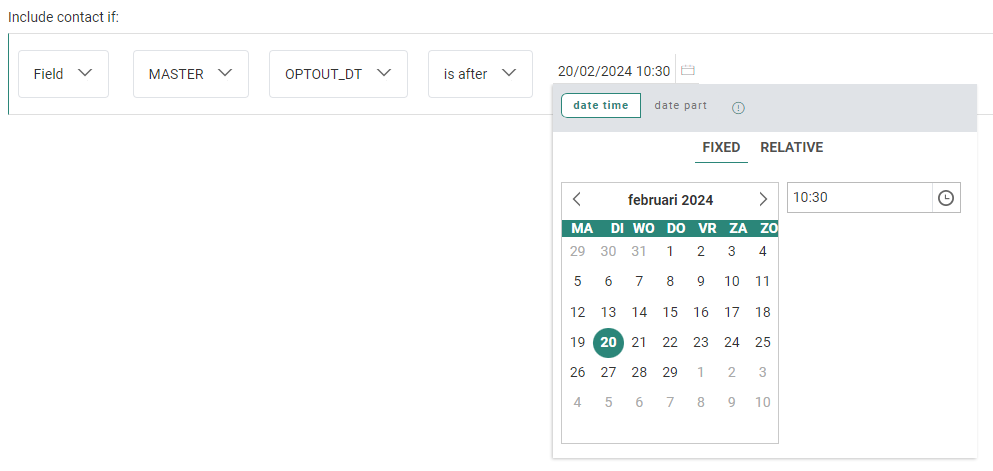
|
|||||
| Example 5 | NBR | Numeric | is one of | three (3), four (4), nine (9) | multiple numeric values from a linked Option List |
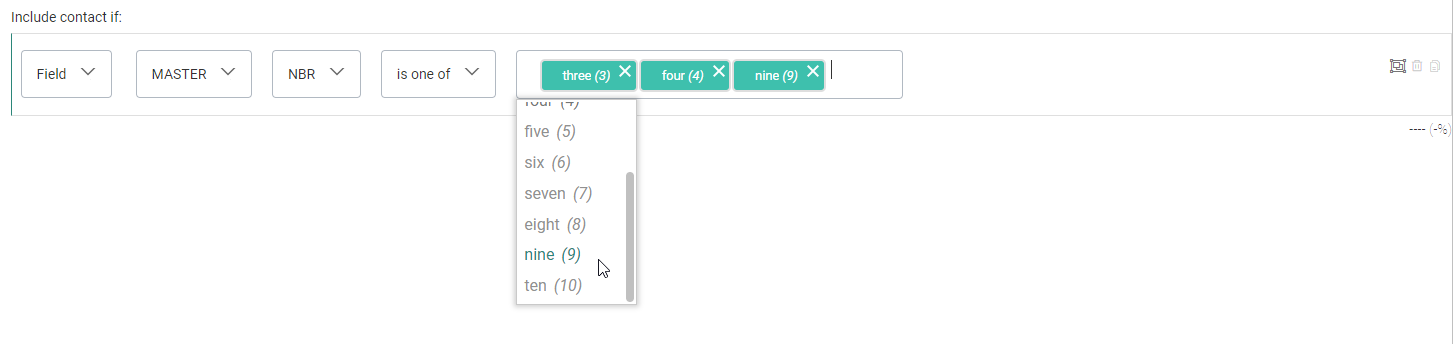
|
|||||
| Example 6 | FAV_PRODUCTS | Text | is one of | cars, music | pipe separated manually entered text values |

|
|||||
- In case of an Option List field, the values that can be selected are the ones defined in the Option List.
Example:
- Prerequisites:
* The configured Option List with code and values per language: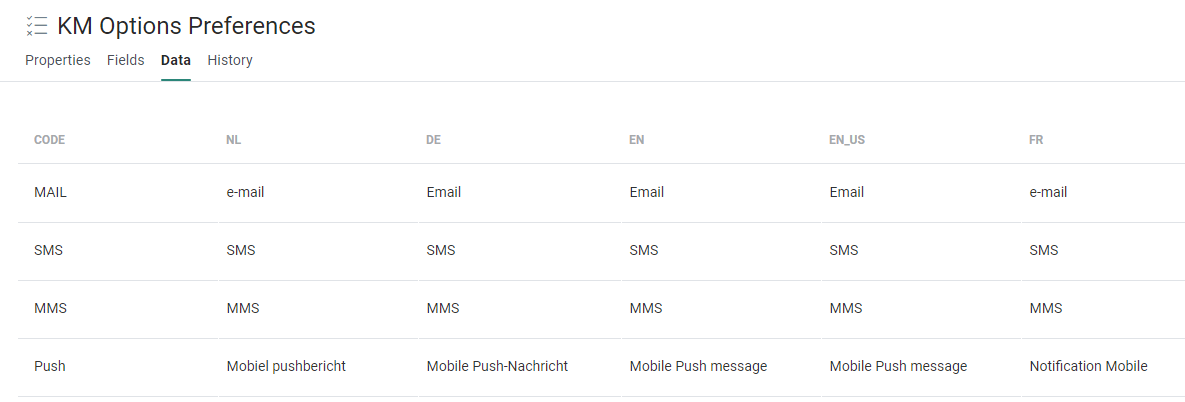
* The Audience List field that's linked to the Option List: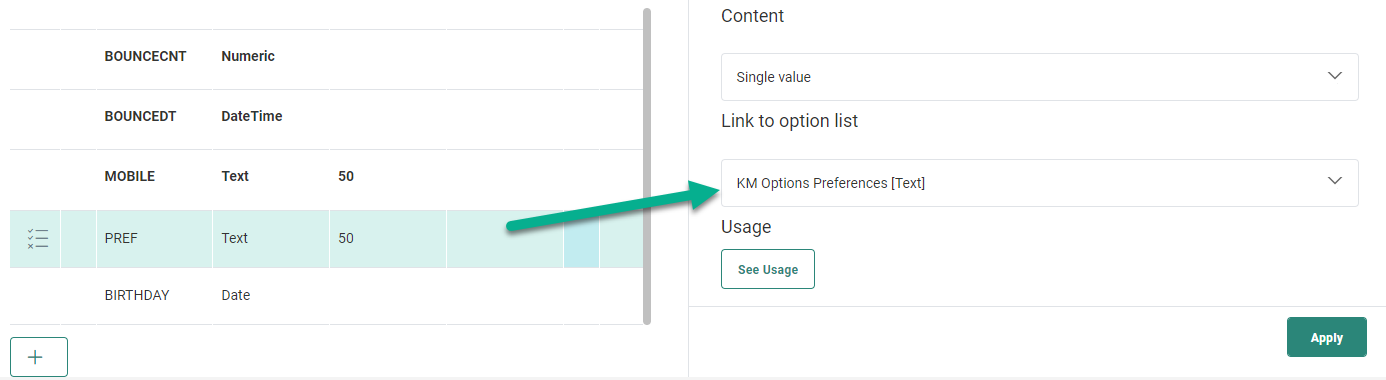
- Results:
* The Constraint Builder shows the Option List values (EN in this case, as the Selligent user's language is set to English) and each respective code between brackets: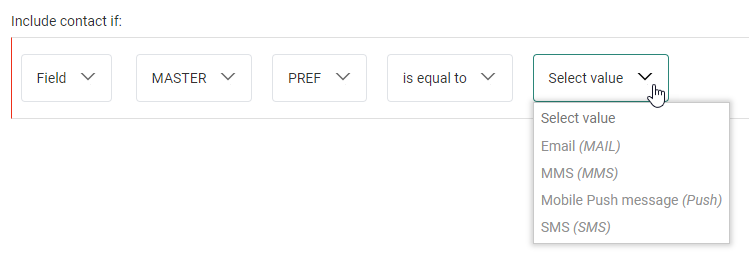
* When the Selligent user's language is set to French, the FR Option List values are shown: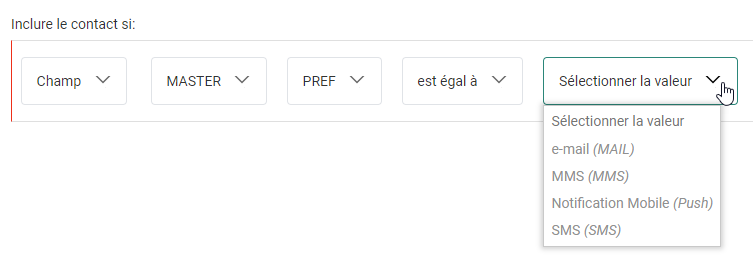
- Option Lists offer a limited set of operators : is equal to, is not equal to, is one of, is empty, is not empty.
Example :
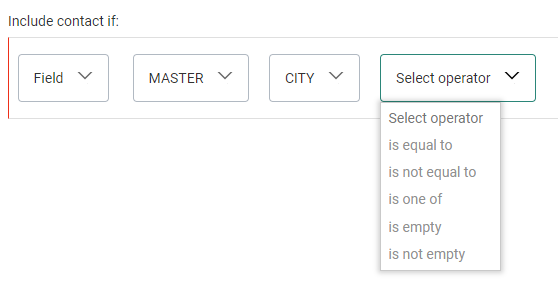
- For the equal to / is not equal to operators, you can search for a specific Option List value and select it.
This is helpful in case of a long list of options. That way, you don't need to scroll through the entire list to search for the desired value.
Example : An initial list of cities shows a long scrollable list of options.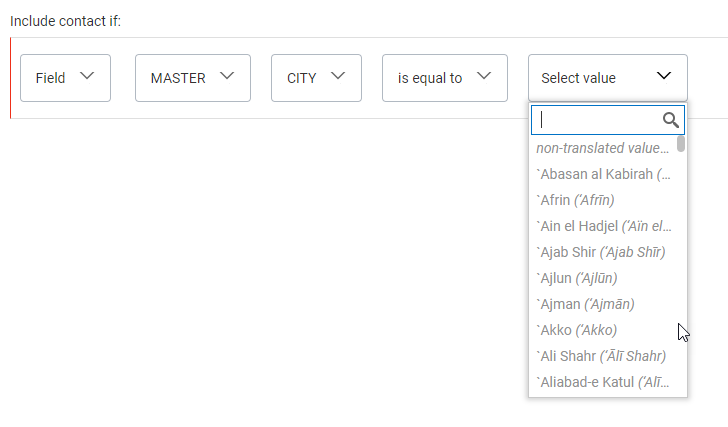
We want the city "Dublin". Instead of scrolling through the list, we use the search field and start typing "Dub".
Now "Dublin" already pops up as 6th option in the list.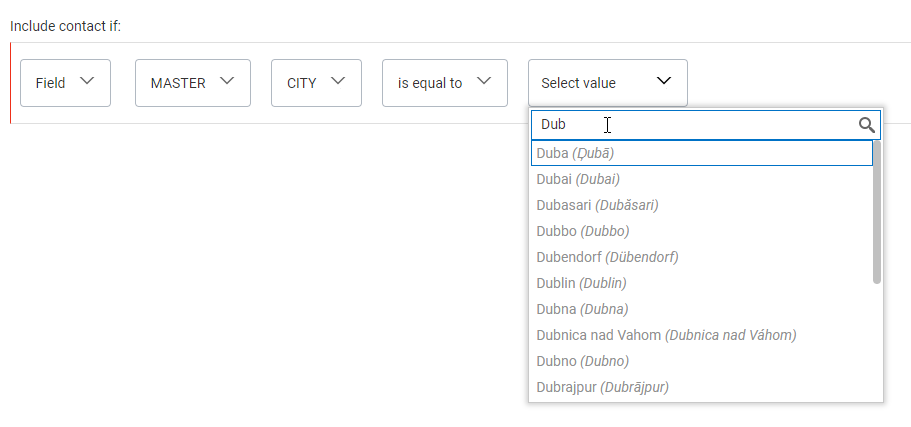
Simply clicking "Dublin" selects it as value.
Counts for field values
For certain field types (and in combination with certain operators), a count is shown for each field value based on how many times it's used in the selected list.
Note: Only users with access to Personal Data will see count information.
- Option List values shown in the drop-down are enriched with a count for each value, indicating how many times each of them is used in the selected list.
- Field values of data type Text and of content type Free, also show a count for the number of times they're used in the selected list, together with the Is Equal To operator.
Example:
In an Audience List, the field LANG is of data type TEXT, and of content type FREE.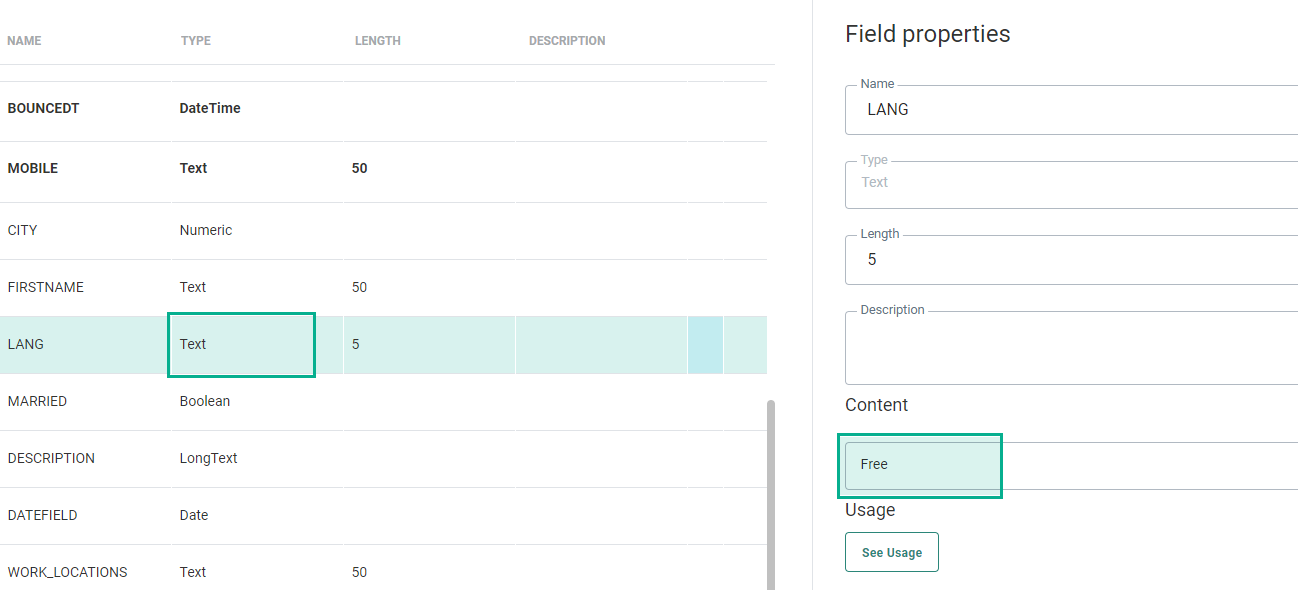
In the Constraint Builder, when selecting the LANG field and the IS EQUAL TO operator, the value field loads the values and shows a count next to each value.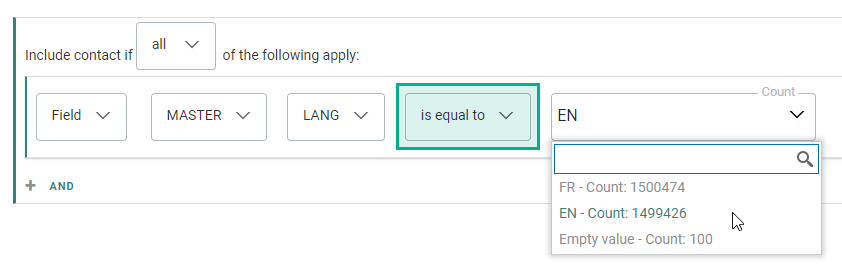
For date and date-time fields, different date selections are provided, where you can choose between a 'date/time' or a 'date part' (hour, day, month, month/day, year). See below for more info on date/time filters.
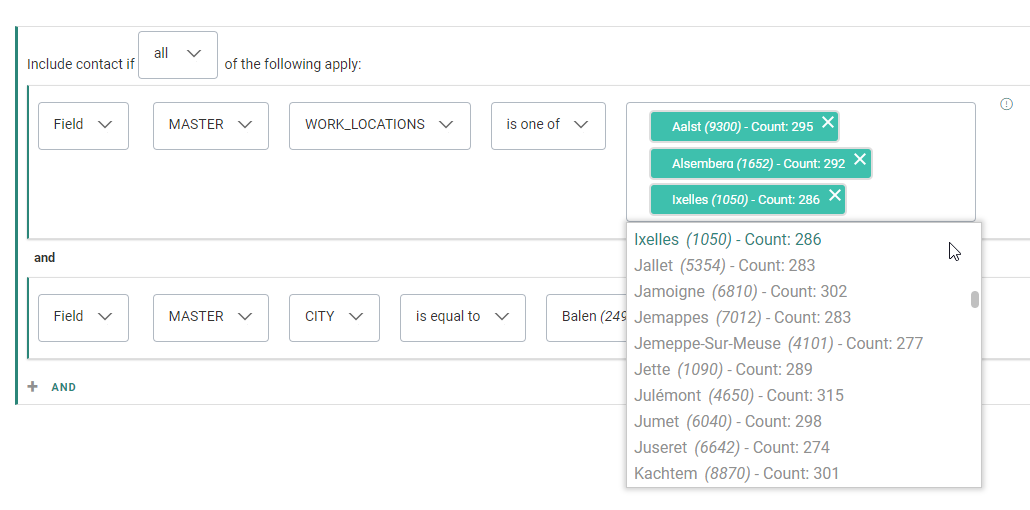
Operator 'is one of'
When using the is one of operator:
-
with a field that's linked to an Option List — A control is available, from which you can select one or multiple values from the Option List.
You can also remove a value by clicking its cross icon.
It's also possible to manually copy values from your clipboard and paste them into the field. Those values should be pipe separated (for example: 1|3|8).
Example:
When one or more pasted values do not exist in the Option List, a warning icon is shown next to each one of them:
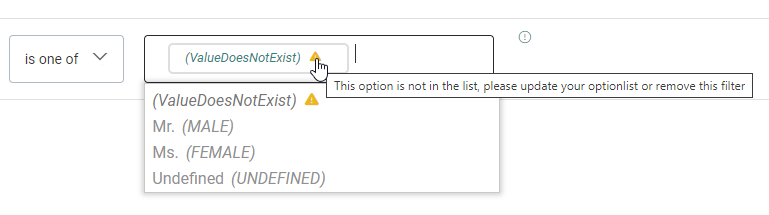
Note: You can save a filter with non-existing values. That way, you can still add those values later on in the Option List, making your filter valid.
The opposite is also true, when deleting a value from an Option List that’s being used in a filter, will make the filter invalid, showing the warning icon next to the value that no longer exists. -
with a field that's not linked to an Option List — An input field is shown, allowing the user to input a pipe separated list of values. The expected format is shown in a tooltip when hovering over the info icon (validation is in place in case you enter an incorrect value).
2. Date/time filters
The 'date time' picker allows you to select a fixed or relative date (for date fields) or date/time (for date/time fields).
2a. Fixed date/time
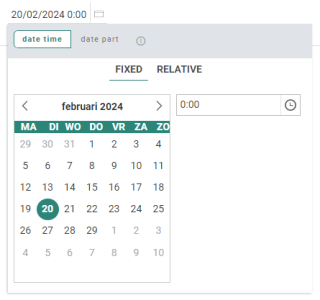
Example of a fixed date selection :
Target contacts with their date of birth on a specific day, month and year.
(e.g. October 16th 1981)
2b. Relative date/time
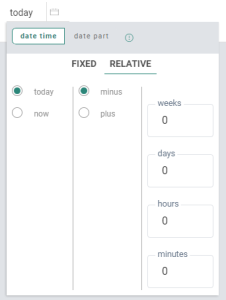
Example of a relative date selection :
Target contacts that opted out in the last week (Opt-out date is after 'today minus 1 week').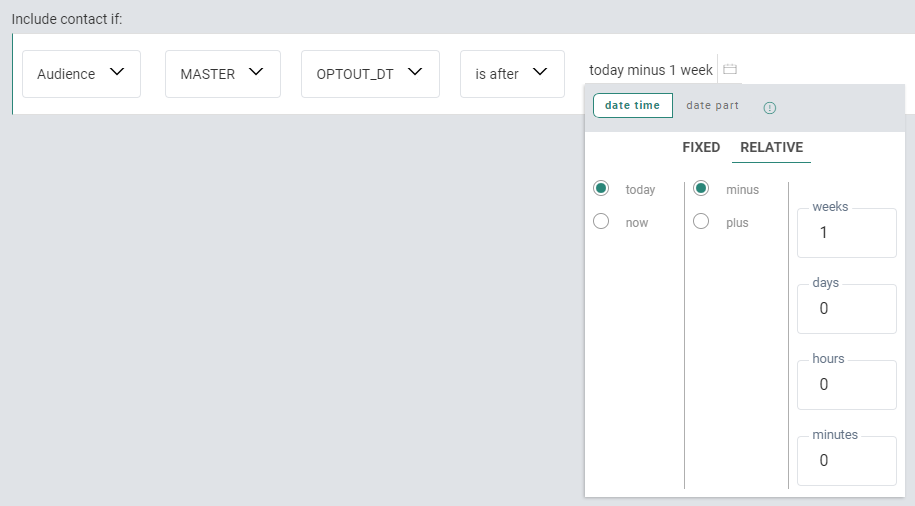
- If today is December 14th 2021, the constraint targets contacts who opted out after December 7th 2021.
- If today is January 20th 2023, the constraint targets contacts who opted out after January 13th 2023.
Note 1: A relative point in time can be relative to today or now.
- Today uses the current (*) day (which is the date without time).
- Now uses the current (*) date and time (and is therefore only available for datetime fields, not for date fields).
(*)current implies at the moment of journey execution.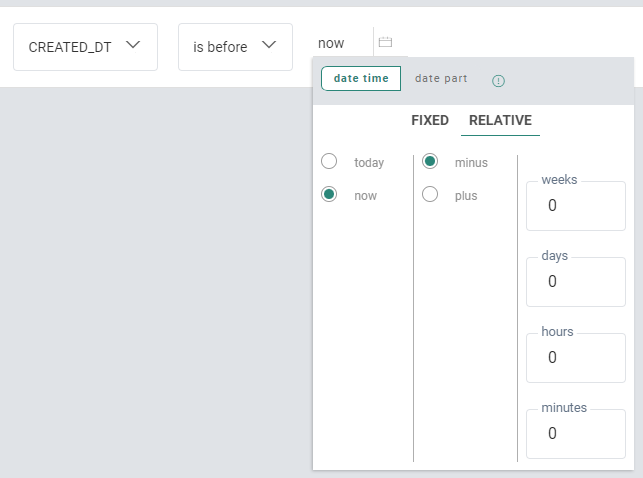
Note 2: 'Audience/Field is day/month/year' can only be selected when the field is a date field.
For datetime fields, the 'date time' selector is disabled when the is operator is selected.
Instead you'll need to configure a 'date part' configuration.
The reason for this is that it's impossible to make an equation of a datetime field (e.g. 01/09/2021 2:25) with a date value (e.g. 01/09/2021)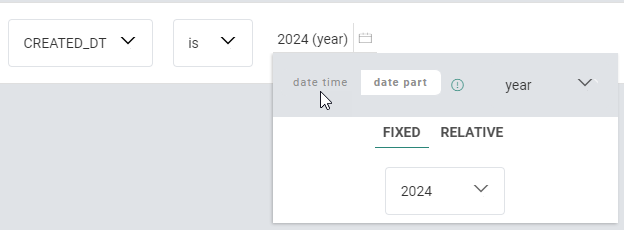
It's of course possible to use another operator for datetime fields (e.g. 'is before').
In that case, the 'date time' selector is available, and values can be chosen for a specific date and time. 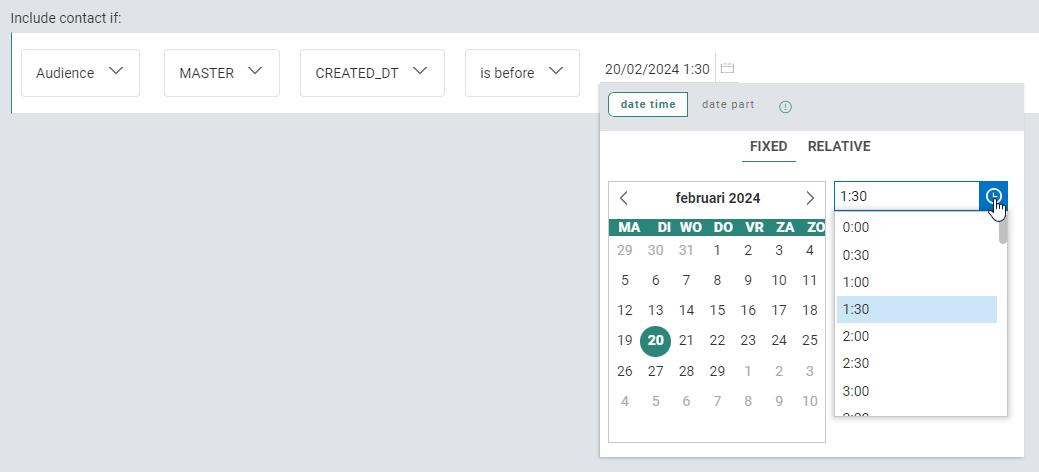
Note : Relative datetime constraints (e.g. now, today) are evaluated against the server datetime.
To make sure your constraints work as expected, one of the following is advised :
- Store datetimes in SQL server timezone.
or
- Account for the offset in the constraint you set up.
* For the EU servers the time used is Roman Central time -> UTC+1 or CET during daylight saving time in winter, and UTC+2 or CEST in summer. Meaning countries like, for example the UK, are down one hour from this at all times and will have to adjust for this.
* For the US servers, the server time is EST.
Example : If a UK contact wants to use "Now minus 10 minutes", they will have to make sure that either the data they use is adjusted to the server time, or to use "Now minus 70 min" in the constraint.
3. Date part filters
The 'date part' filters (year, month/day, month, day, hour) only take that specific part of the date (or date/time) into account (whether it's a relative or fixed filter).
3a. Fixed date part
Example of a fixed month/day selection :
Target contacts that have their birthday on a specific day of the month (eg. July 22nd), regardless the year they were born.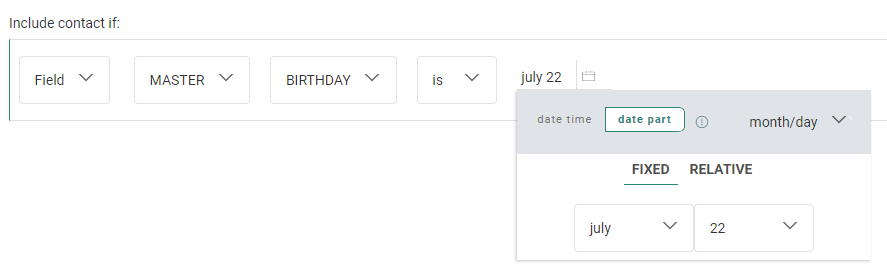
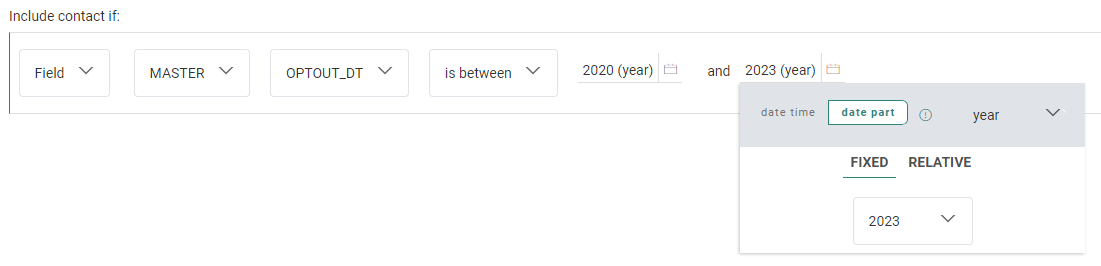
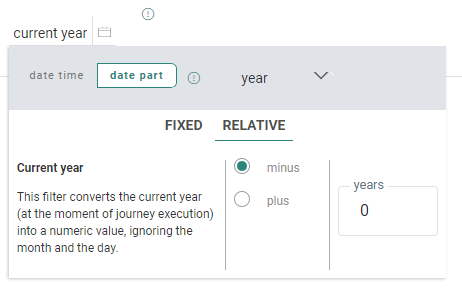
Example of a fixed year selection :
Target contacts that were born in a specific year.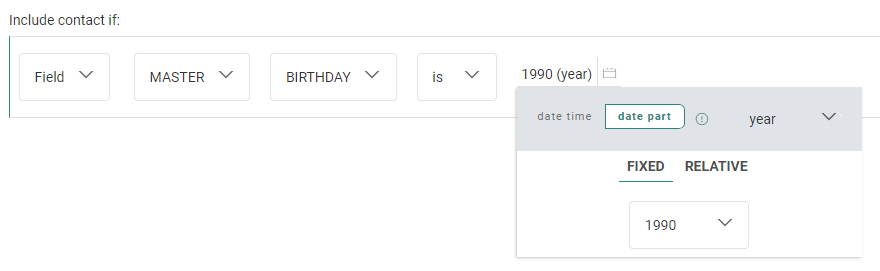
3b. Relative date part
Example of a relative month/day selection :
Target contacts that have their birthday on the current month and day.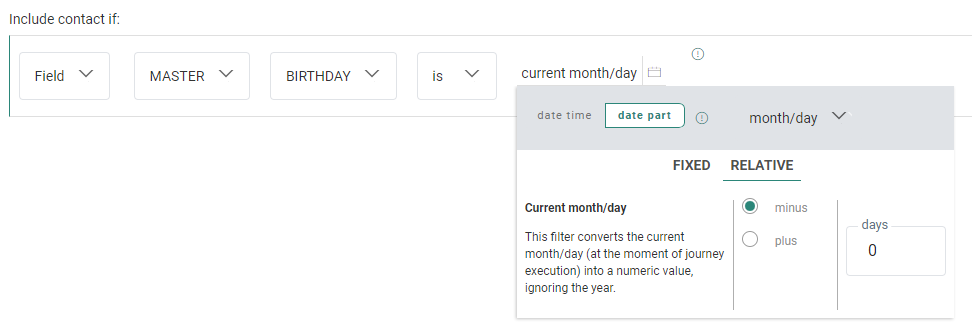
- If today is January 19th, the constraint only targets contacts with their birthday on January 19th (regardless of the year).
- If today is March 1st, the constraint only targets contacts with their birthday on March 1st (regardless of the year).
Note: The 'current' date part is always the date part at the moment of execution of the journey.
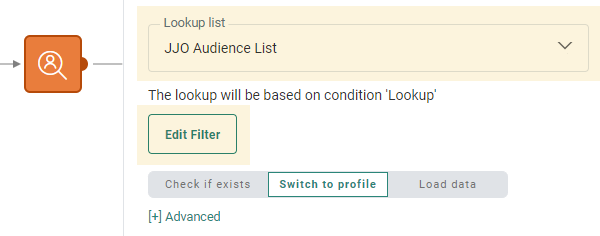
4. Lookup constraints
For the Lookup Component in Custom Journeys, it's not only possible to create a constraint filter based on a string value ('Value'),but also on a posted value, coming from a page form field ('Requestvalue'), a field value in the Lookup List or Linked List ( 'Listvalue') or a field value in the Audience List or 1:1 Linked List ('ProfileValue').
Example of a Value condition :
The MAIL field in the Lookup list (JJO Audience List) contains the value '@parana.com'
Example of a RequestValue condition :
The MAIL field in the Lookup list (JJO Audience List) contains the value entered in the MAIL field of the form.
Example of a ListValue condition :
The FAV_PRODUCTS field value in the Lookup list ('JJO Audience List') is the same as the value stored in the TOP_CAT1 field of the 1:1 linked list with scope TOPCATEGORY.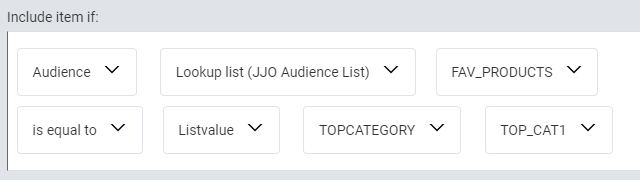
Example of a 'ProfileValue' condition :
The PREF field value in the Lookup list ('JJO Audience List') is the same as the value stored in the LEISURES field of the scope PREFERENCES which is a 1:1 linked list to the Audience List.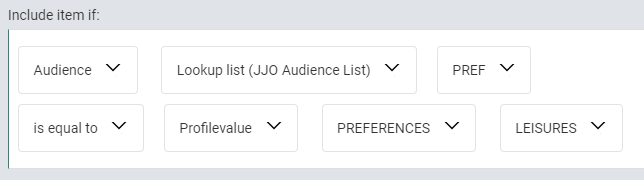
Combined expressions of 1:N related lists into single constraints
Instead of defining 2 separate constraints that use the same 1:N (lookup) scope, it's also possible to combine multiple expressions of a 1:N relation into a single constraint.
To do this, select a 1:N scope from the second drop-down.
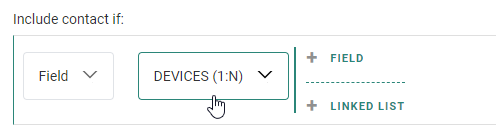
Two possibilities are available now :
+ FIELD — To add a field constraint on the current level of the constraint builder.
+ LINKED LIST — When you want to create a constraint on a 1:N linked list.
To combine different expressions of a 1:N related list into a single constraint, repeat this process for each expression:
Click '+ FIELD', select a field and operator and set values.
Example: Filter contacts who purchased an iPhone with a price above $700 in the last year. (The audience has a 1:N relation with an 'ORDERS' list)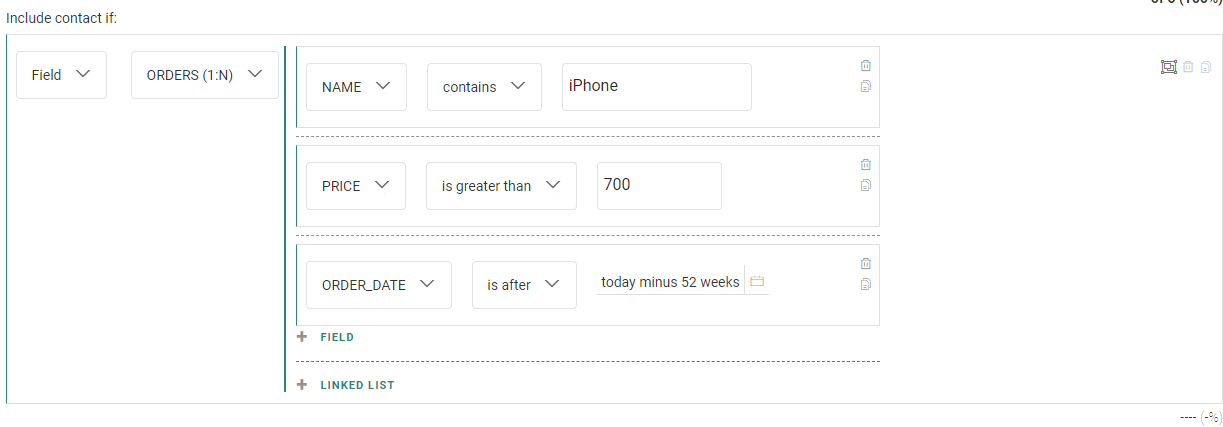
Nested relations
It's possible to use fields of nested 1:N relations in the Constraint Builder. This means that you can combine fields from lists that are 1:N linked to a previous 1:N linked list. You can use nested relations multiple levels deep.
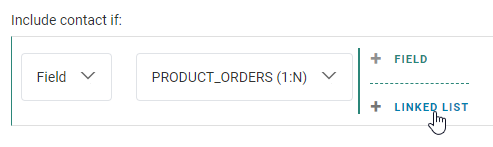
To create a constraint filter on a 1:N relation, first select a 1:N linked list to your Audience List:
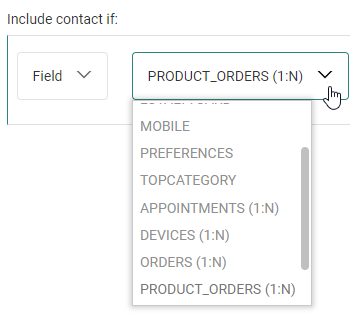
Then click on + LINKED LIST:
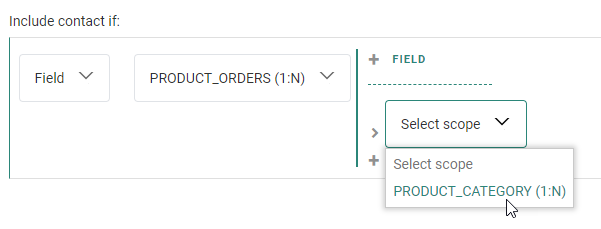
This will give you the possibility to select a 1:N related list (scope) :
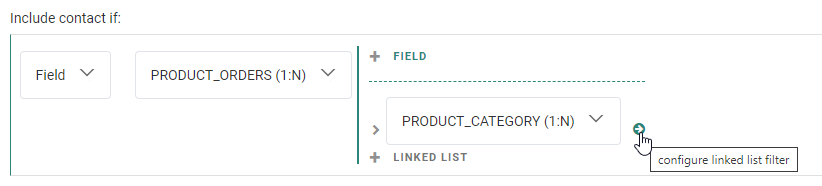
When a scope has been selected, you can click on the arrow icon to configure the linked list filter :
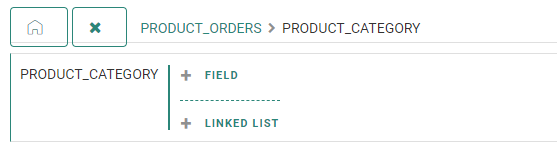
A new pane is then shown inside the Constraint Builder, that shows level 2 of the current constraint.
In here you can setup filters on the 1:N related scope, which can contain constraints on the fields of the scoped list, and also new links to 1:N related lists.
The same way of working can be used for all the lower nested levels that you want to add.
Each level (starting from level 2 on) shows :
-
breadcrumbs — The breadcrumbs contain the scope on each level. The current level scope is shown as non-clickable text. The scopes on higher levels are clickable links.

-
home button — This button can be used to navigate to the starting point of the constraint, which is level 1.

-
cancel button — This button can be used to discard all changes on the current constraint level.

Existing linked lists are shown as clickable links, which contain the scope name.
Additionally, a splitting-arrow-icon is shown in case the scope itself has constraints on multiple (different) 1:N related lists:
Example:
Level 1 : Audience list 'Clients' has a 1:N relation with datalist 'Orders' (*).
Level 2 : 'Orders' has a 1:N relation with datalist 'Categories' (*).
Level 3 : 'Categories' has two 1:N relations.
Level 1 is shown as follows:
Level 2 is shown as follows: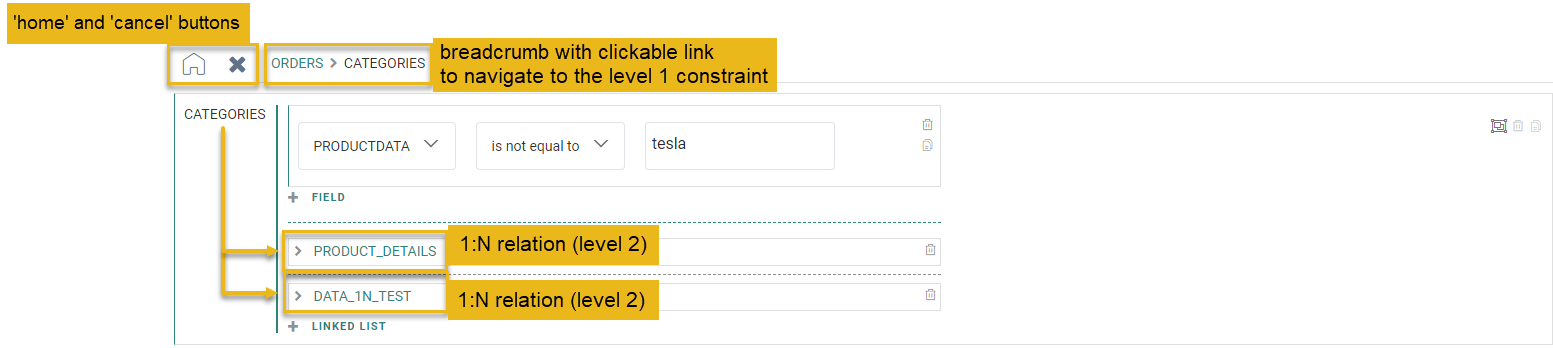
Level 3 is shown as follows:
(*) Note: Keep in mind that the scope names of relations are used in the Constraint Builder.
For example, when an Audience List has a 1:1 profile extension with a Device List called 'devices mobile', and the relation has been setup with scope name 'MOBILE', it's 'MOBILE' that is shown in the Constraint Builder.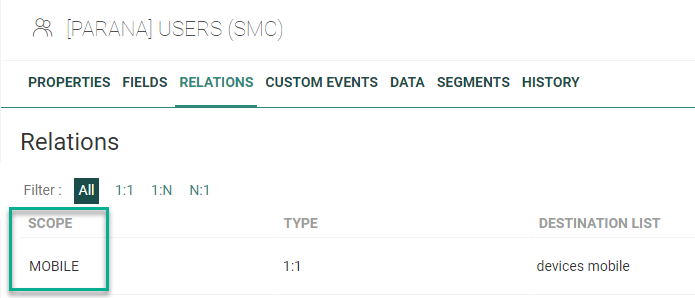
You can also create groups on each level to support all (AND) / any (OR) combinations. See this section about grouping.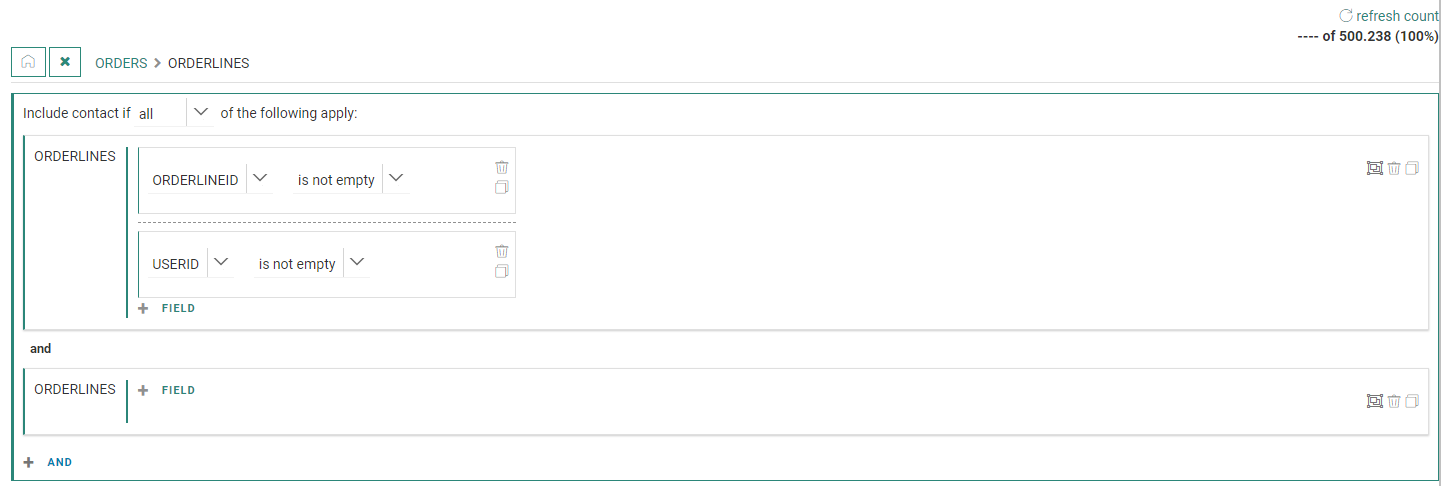
The following icons are visible for each constraint :
 Convert to group — enabled by default
 Remove expression / remove group — disabled by default
 Duplicate expression / duplicate group — disabled by default
Engagement constraint
Engagement constraints are for filtering on profile metrics or journey interactions.
Profile metrics
Profile metrics are based on engagement information such as emails sent, clicked, viewed, last view date etc. This data is collected when the Engagement Metrics feature is active for the environment.
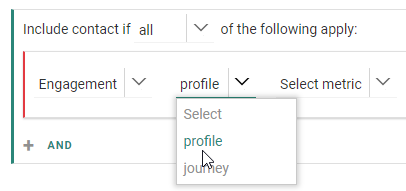
To use the profile metrics, select profile from the drop-down list.
This gives access to all the engagement metrics collected for the profile.
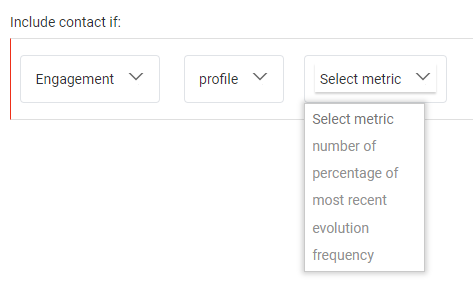
Select metric
The following profile metrics are available : number of, percentage of, most recent, evolution, frequency.
Select event
After selecting a metric, the next drop-down offers event selections :
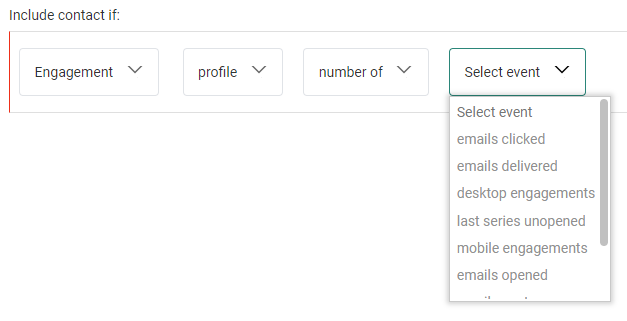
Per metric, these are the selectable events :
- number of :
- emails clicked — Number of unique emails clicked during the EMIT time window. Only emails that were delivered during the EMIT time window are taken into account for this calculation.
- emails delivered — Total count of emails delivered during the EMIT time window. Each recurring message is counted as 1.
- desktop engagements — Number of email views and clicks on desktop.
- last series unopened — The size of the sequence of emails which are not opened, meaning that the last opened emails were EML_STATS_UNOPENED_SERIES_CNT-1 emails ago. Helps to measure the (des-)interest of a contact and checks if a 'rest'-time is appropriate.
- mobile engagements — Number of email views and clicks on a mobile device.
- emails opened — Number of unique emails opened during the EMIT time window. Only emails that were delivered during the EMIT time window are taken into account for this calculation.
- emails sent — Total count of emails sent during the EMIT time window. Each recurring message is counted as 1.
- tablet engagements — Number of email views and clicks on a tablet.
- emails viewed — Number of unique emails opened during the EMIT time window. Only emails that were delivered during the EMIT time window are taken into account for this calculation. (emails viewed = emails opened. We advise to use the 'emails opened' event in the constraint builder.)
- percentage of :
- emails clicked — # of email clicks / # of emails delivered (used message type = "MAIL" and event action = "CLICK"). This rate is based on unique interactions.
- click-to-open — CTO rate over all available emails (= unique emails clicked versus unique emails opened = EML_CLICK_COUNT_UNIQUE/EML_OPEN_COUNT_UNIQUE). Shows the interest in the content of your email. (How well targeted is this person?)
- emails delivered — # of emails delivered / # of emails sent. This rate can still change due to asynchronous bounces at a later stage.
- mobile usage — Number of email views and clicks on mobile devices divided by the sum of the number of emails viewed on desktop, mobile and tablet.
- emails opened — # of email opens / # of emails delivered (used message type = "MAIL" and event action = "VIEW"). This rate is based on unique interactions.
- tablet usage — Number of email views and clicks on tablet divided by the sum of the number of emails viewed on desktop, mobile and tablet.
- emails viewed — # of email opens / # of emails delivered (used message type = "MAIL" and event action = "VIEW"). This rate is based on unique interactions. (emails viewed = emails opened. We advise to use the 'emails opened' event in the constraint builder.)
- most recent :
- first email click — Datetime of the first email clicked by the contact (minimum datetime based on the available data).
- last email click — The last time an email was clicked. This information takes into account data from outside the EMIT time window.
- first email delivery — Datetime of the first email sent to the contact (minimum datetime based on the available data) -> max 4 years back.
- last email delivery — The last time an email got delivered. This information takes into account data from outside the EMIT time window.
- first email opened — Datetime of the first email opened by the contact (minimum datetime based on the available data).
- last email opened — The last time an email was opened. This information takes into account data from outside the EMIT time window.
- email view — The last time an email was opened. This information takes into account data from outside the EMIT time window. (most recent email view = last email opened. We advise to use the 'last email opened' event in the constraint builder.)
- evolution :
- click rate — Represents the evolution of the ‘Click rate’ by comparing the penultimate (5 emails before the last 5 emails) ‘Click rate’ to the ultimate (last 5 emails) ‘Click rate’.
This means that the last 10 emails are split into 2 groups. The 5 most recent ones and the 5 before these. The ‘Click rate’ is then calculated for each group and compared. If the more recent group has a higher ‘Click rate’ than the earlier group, the ‘Click rate’ is increasing and the evolution is UP (+1). If the more recent group has a lower ‘Click rate’ than the earlier group, the ‘Click rate’ is decreasing and the evolution is DOWN (-1).
Example: There are 4 emails clicked out of the last 5 emails and 5 emails out of the 5 emails before that. This results in a downward evolution.
Exceptions: The 10 emails must fall within the default 90-day time window for EMIT. If there are less than 10 emails in this time window the rate falls back to 0, meaning no evolution. - click-to-open rate — Represents the evolution of penultimate (5 emails before the last 5 emails) ‘CTO rate’ to ultimate (last 5 emails) ‘CTO rate’.
This means that the last 10 emails are split into 2 groups. The 5 most recent ones and the 5 before these. The ‘CTO rate’ is then calculated for each group and compared. If the more recent group has a higher ‘CTO rate’ than the earlier group, the ‘CTO rate’ is increasing and the evolution is UP (+1). If the more recent group has a lower’ CTO rate’ than the earlier group, the ‘CTO rate’ is decreasing and the evolution is DOWN (-1).
Exceptions: At least 10 emails must fall within the default 90-day time window for EMIT. If there are less than 10 emails in this time window the rate falls back to 0, meaning no evolution. - delivery frequency — Represents the evolution of the penultimate (5 emails before the last 5 emails) delivery frequency to the ultimate (last 5 emails) delivery frequency. A tolerance of 10% is used.
The delivery frequency for the ultimate emails, is calculated by using the number of days between the first email and the last one of these 5 emails => 7* (#deliveries/#days). The same applies for the delivery frequency of the penultimate emails.
If the frequency increases it will indicate +1. If the frequency decreases, it will indicate -1.
Example: The last 5 emails were delivered in a time frame of 10 days (frequency = 3.5). The 5 previous emails were delivered in a time frame of 15 days (frequency = 2.33). In this case the evolution is UP (+1). When dividing 2.33/3.5 the result is 0.66 which is smaller than the 0.9 tolerance. - open rate — Represents the evolution of the ‘Open rate’ by comparing the penultimate (5 emails before the last 5 emails) ‘Open rate’ to the ultimate (last 5 emails) ‘Open rate’.
This means that the last 10 emails are split into 2 groups. The 5 most recent ones and the 5 before these. The ‘Open rate’ is then calculated for each group and compared.
If the more recent group has a higher ‘Open rate’ than the earlier group, the ‘Open rate’ is increasing.
If the more recent group has a lower ‘Open rate’ than the earlier group, the ‘Open rate’ is decreasing.
Exceptions:
At least 10 emails must fall within the default 90-day time window for EMIT. If there are less than 10 emails in this time window the rate falls back to 0, meaning no evolution.
- click rate — Represents the evolution of the ‘Click rate’ by comparing the penultimate (5 emails before the last 5 emails) ‘Click rate’ to the ultimate (last 5 emails) ‘Click rate’.
- frequency :
- delivery — Represents the average number of emails delivered per week when looking at the time frame between the first email delivered within the EMIT time window and the end of the EMIT time window.
Example: There are 56 days between the first email and the end of the time window. 500 emails were delivered within this time frame. This results is a delivery frequency of 500 emails/8 weeks = 62 emails/week.
Exception: If there are less than 5 deliveries within the default EMIT time window, this falls back to 0.
- delivery — Represents the average number of emails delivered per week when looking at the time frame between the first email delivered within the EMIT time window and the end of the EMIT time window.
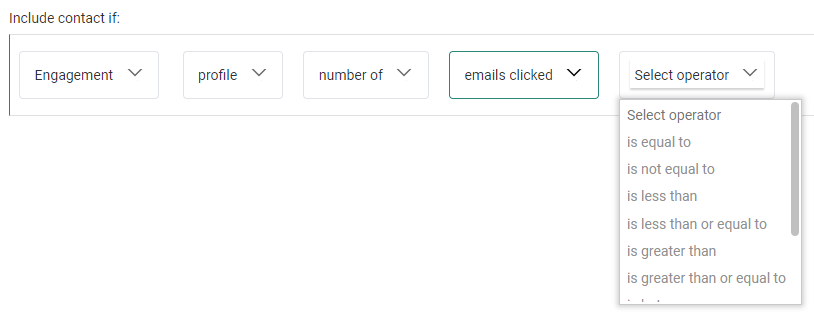
Select operator
After selecting an event, an operator can be selected :
Note:
- For the metrics number of and percentage of, the available operators are : is equal to, is not equal to, is less than, is less than or equal to, is greater than, is greater than or equal to, is between, is one of, is empty, is not empty.
- For the metric most recent, the available operators are : is, is not, is before, is or is before, is after, is or is after, is between, is empty, is not empty.
- For the metric evolution, the available operators are : is equal to, is not equal to, is one of, is empty, is not empty.
- For the metric frequency, the available operators are : is less than, is less than or equal to, is greater than, is greater than or equal to, is between, is empty, is not empty.
Set value(s)
Then you can set a value or multiple values in case of an 'is between' operator, which completes the profile metrics constraint.
Example:
The percentage of delivered emails is between 95% and 100%.
Note: A tooltip indicates that data is being used from the last 90 days (default time window setting).
Journey interactions
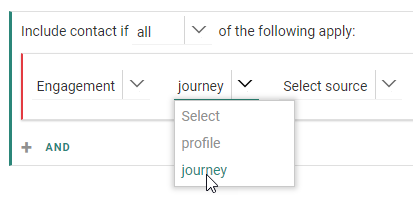
For journey interactions, this can be set for Selligent by Zeta journeys and Campaign journeys (if applicable).
If both are applicable for you, you need to select the correct source :

If not applicable, this will be applied to Selligent by Zeta journeys automatically (no source drop-down is shown in that case).
Selligent by Zeta journey interactions
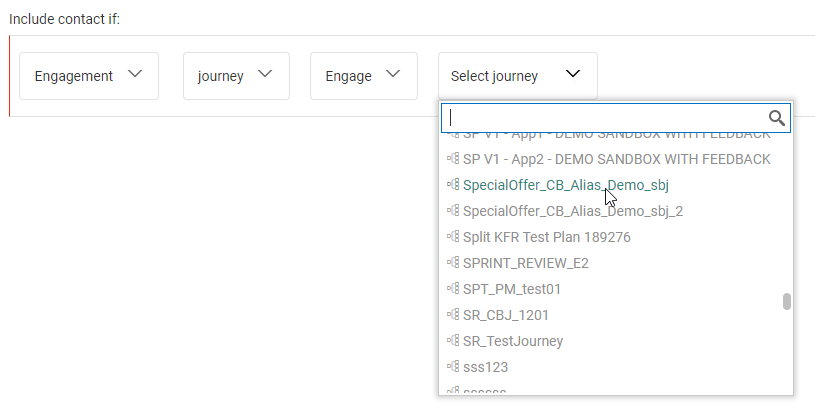
For Selligent journey interactions, a journey can be selected from the next drop-down.
This can be done by scrolling through the entire list and selecting a journey, or by entering a journey name to filter the journeys on the list, and then selecting one :
Next, content used in the journey can be selected (eg. email message, page, mobile message, SMS, MMS).
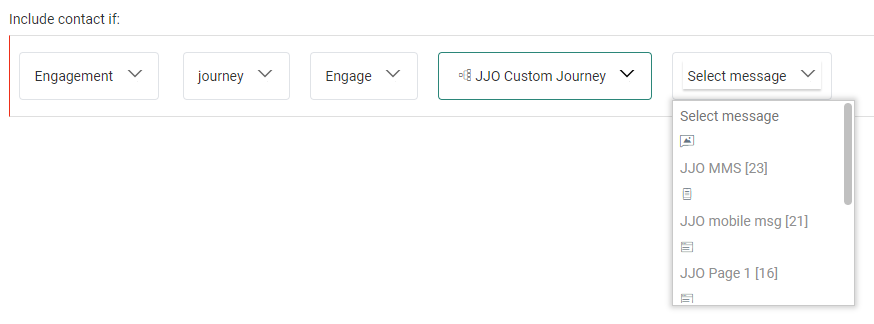
Note: Content can only be selected if the journey has been published and content is available.
Otherwise, the user is notified :

After selecting content, an operator can be selected (is/is not).

Select an event from the next drop-down.
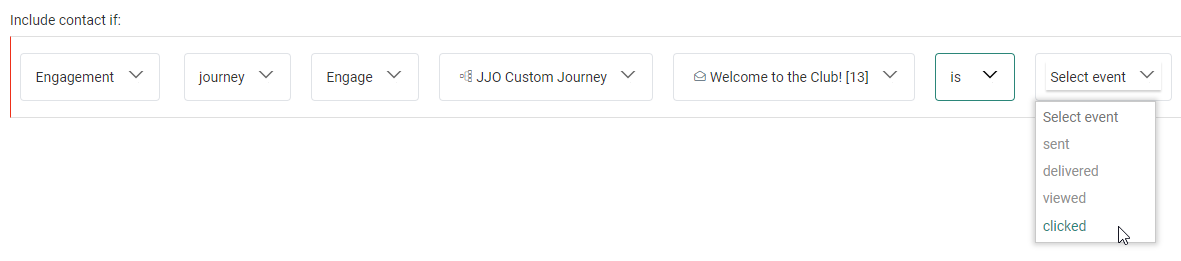
The available events depend of the content type:
- email/mobile message — sent, delivered, viewed, clicked
- page — viewed, clicked
- SMS/MMS — sent
Depending on the selected event, the functionality of the next drop-down differs:
- For the events 'viewed', 'sent' and 'delivered', another operator needs to be selected.

- before/after — Selecting one of these will show a date-time field. By default, the current date-time is set. This concludes the constraint.

- between — Selecting this one will show two date-time fields. By default, the current date-time is set for both. This concludes the constraint.

- any time — Selecting this one will conclude the constraint, without showing additional fields.

Note: Date-time fields can be edited by clicking on the calendar icon. This shows a date-time picker to set a fixed or relative date and time. See this section for more info on date-time pickers.
- before/after — Selecting one of these will show a date-time field. By default, the current date-time is set. This concludes the constraint.
- For the 'clicked' event, all links that are available in the selected content are shown.
Additionally, an 'any link' is available.
After selecting a link (or the 'any link' option), the next drop-down offers the same functionality as for the 'viewed' event.
This means that you need to select an operator (any time/before/after/between).
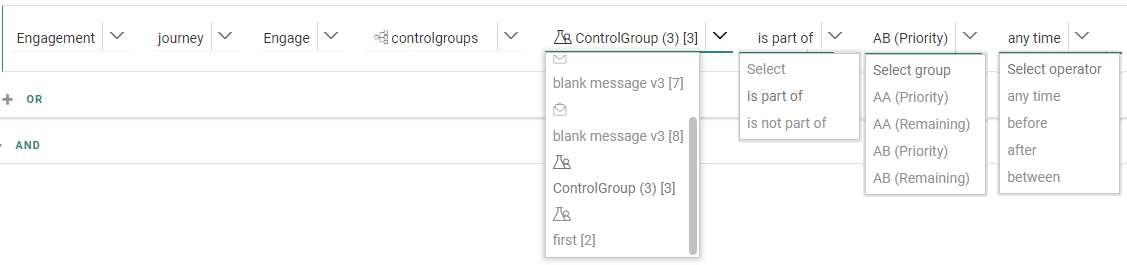
Next to Selligent journey interactions on content, control groups can also be selected, which further drill down into an "is part of / is not part of" selection, "priority / remaining" group selection, and a time frame.
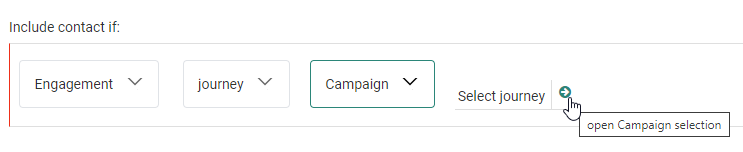
Campaign journey interactions
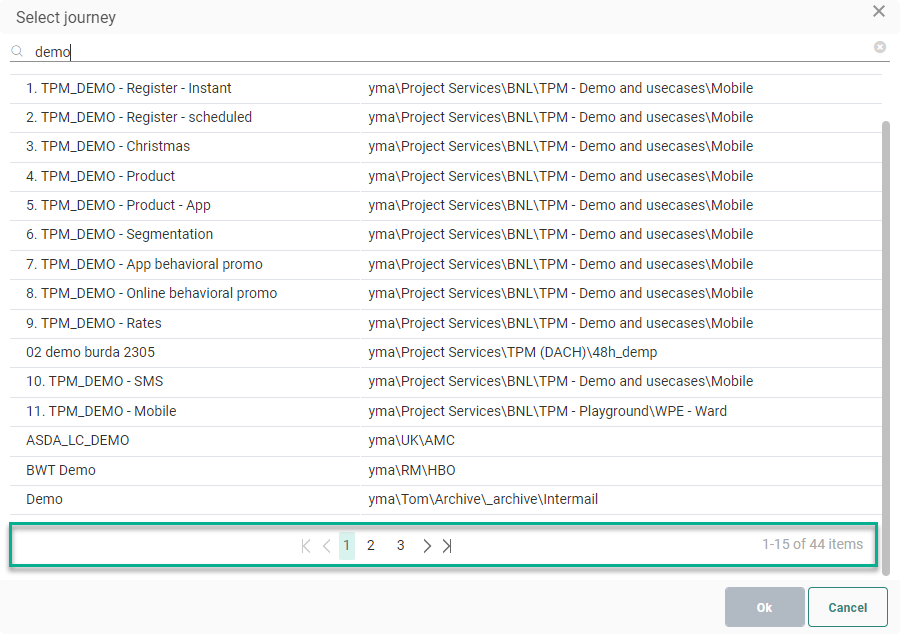
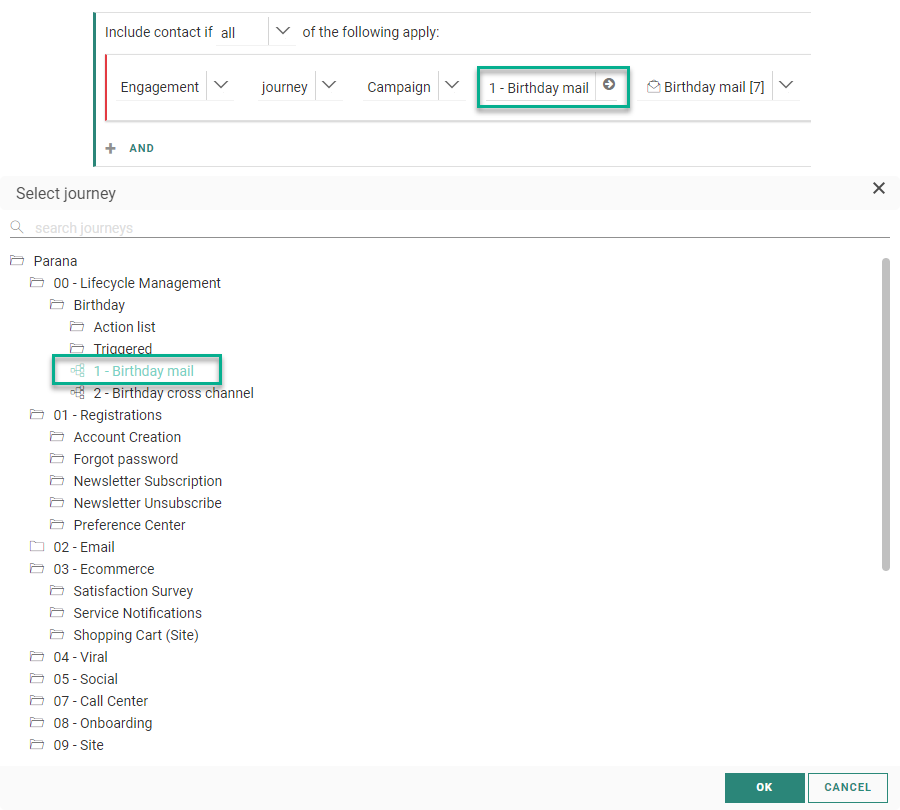
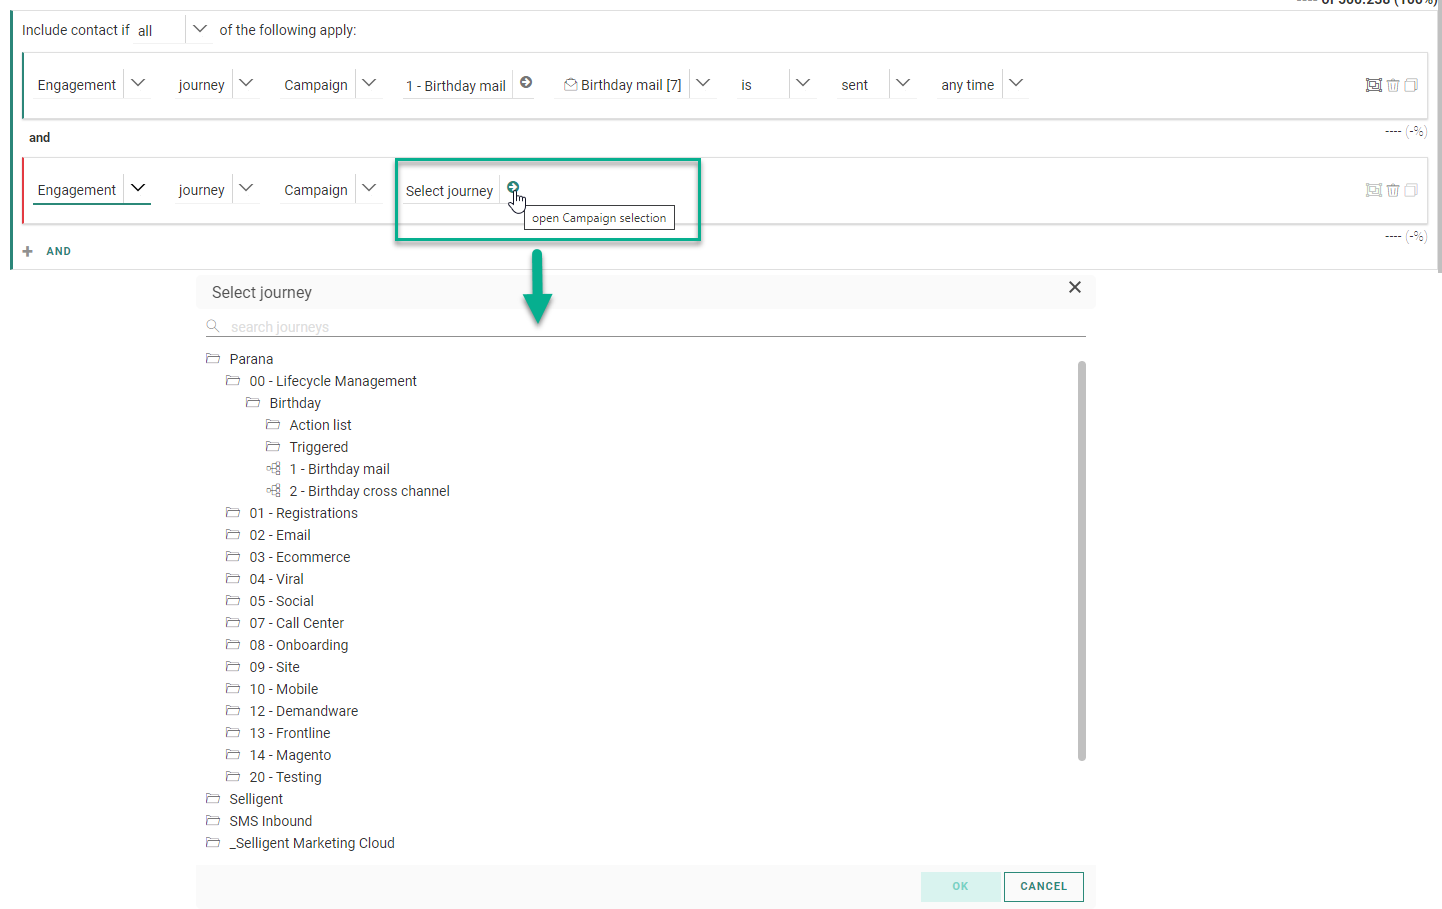
For Campaign interactions, you can select a journey by clicking on the arrow next to 'Select journey'.
A journey selector pop-up appears that contains the Campaign folder structure with all folders, sub-folders and Campaign journeys.
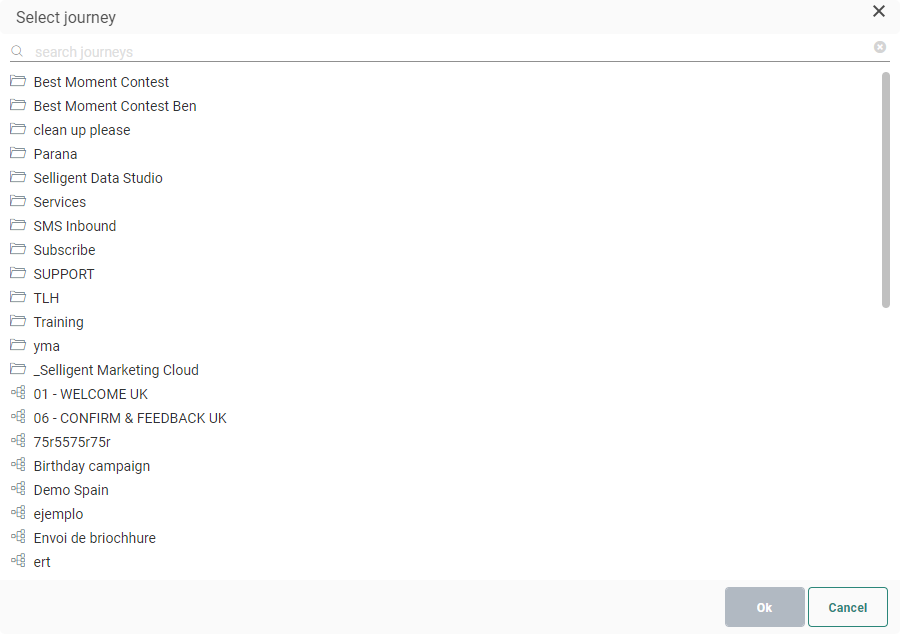
Two buttons are available: Ok and Cancel.
The Ok button is disabled as long as no journey is selected.
All folders can be expanded and collapsed.
When hovering over a folder or journey, the hovered item is highlighted.
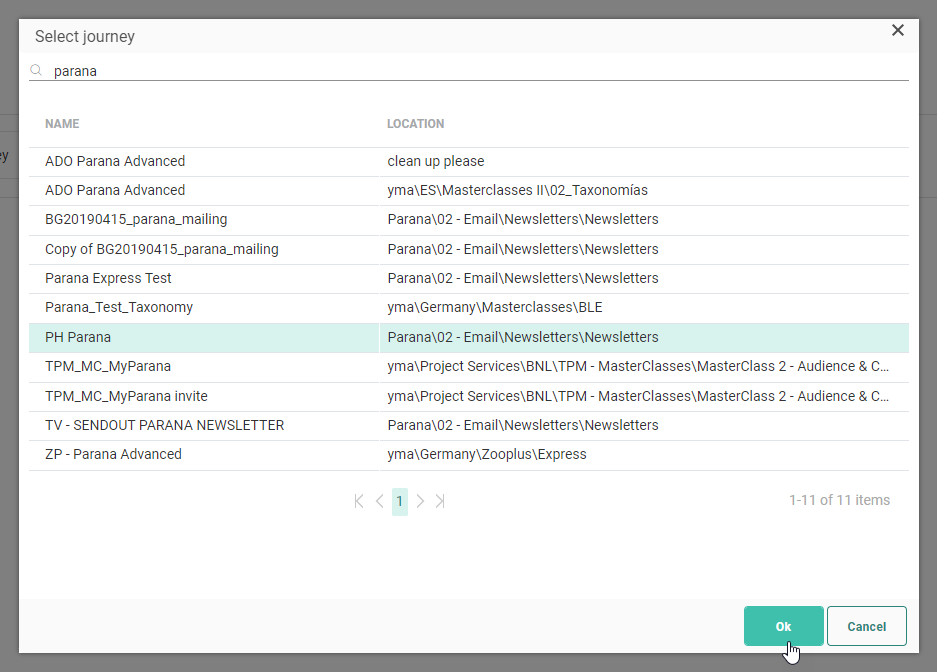
You can also search for journeys by entering (part of) a journey name.
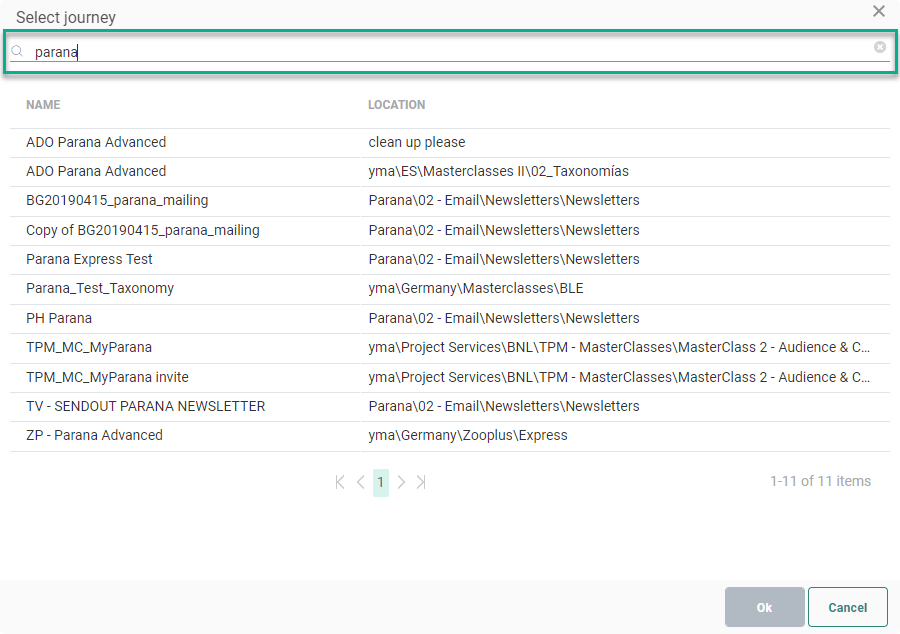
When there are a lot of search results, you can navigate through multiple pages.
After selecting a journey, the Ok button becomes enabled.
Click it to confirm your selection.
The selected journey is visible in the constraint builder and an asset can be selected:
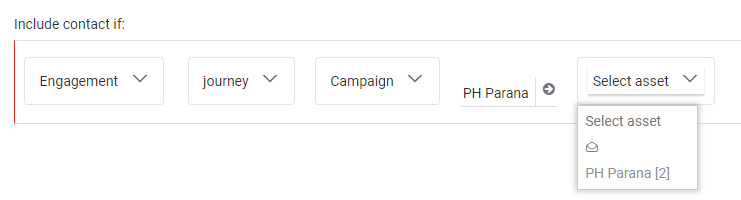
Note: Possible assets are: control groups, interfaces, email messages and pages.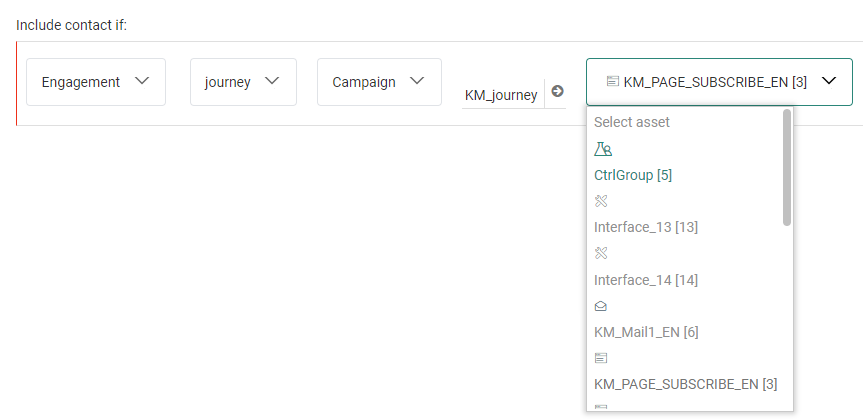
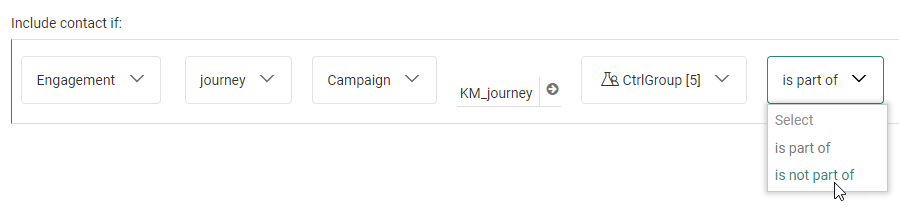
Next, an operator can be selected.
- For Control Groups, the operator can be 'is part of' or 'is not part of'.
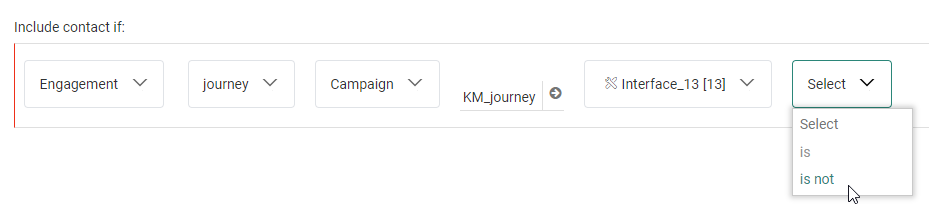
- For interfaces, pages and messages, the operator can be 'is' or 'is not'.
Select an event from the next drop-down.

The available events depend of the content type:
- email — sent, delivered, viewed, clicked
- page — viewed, clicked
- control group — select a group
- interface — done
Depending on the selected event, the functionality of the next drop-down differs:
- For the events 'viewed', 'sent' and 'delivered', another operator needs to be selected.
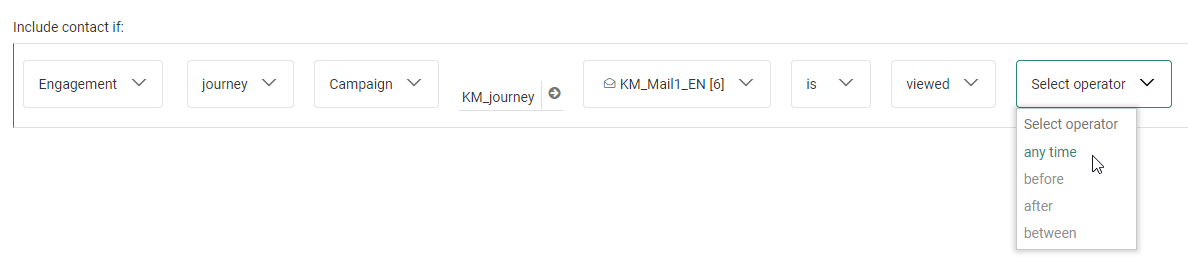
- before/after — Selecting one of these will show a date-time field. By default, the current date-time is set. This concludes the constraint.

- between — Selecting this one will show two date-time fields. By default, the current date-time is set for both. This concludes the constraint.

- any time — Selecting this one will conclude the constraint, without showing additional fields.

Note: Date-time fields can be edited by clicking on the calendar icon. This shows a date-time picker to set a fixed or relative date and time. See this section for more info on date-time pickers.
- before/after — Selecting one of these will show a date-time field. By default, the current date-time is set. This concludes the constraint.
- For the 'clicked' event, all links that are available in the selected content are shown.
Additionally, an 'any link' is available.
After selecting a link (or the 'any link' option), the next drop-down offers the same functionality as for the 'viewed' event.
This means that you need to select an operator (any time/before/after/between).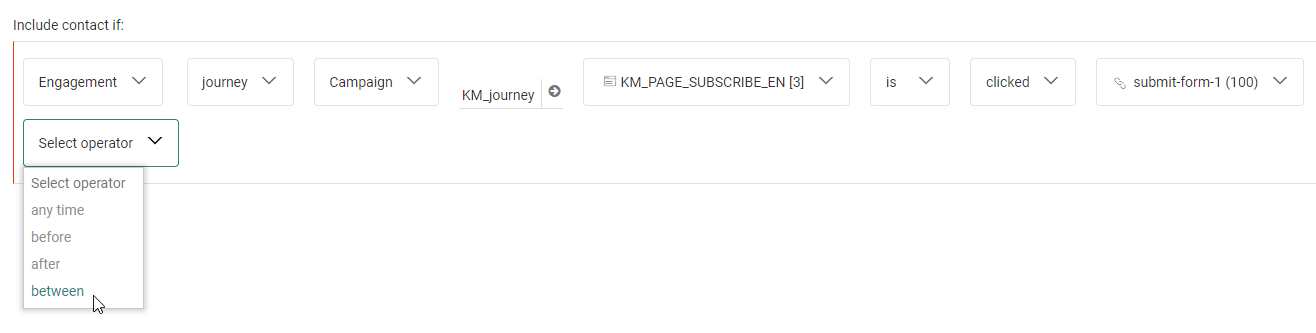
- Control Groups further drill down into an is part of/is not part of selection, priority/remaining group selection, and a time frame.

- Interfaces further drill down into is/is not done, and a time frame.

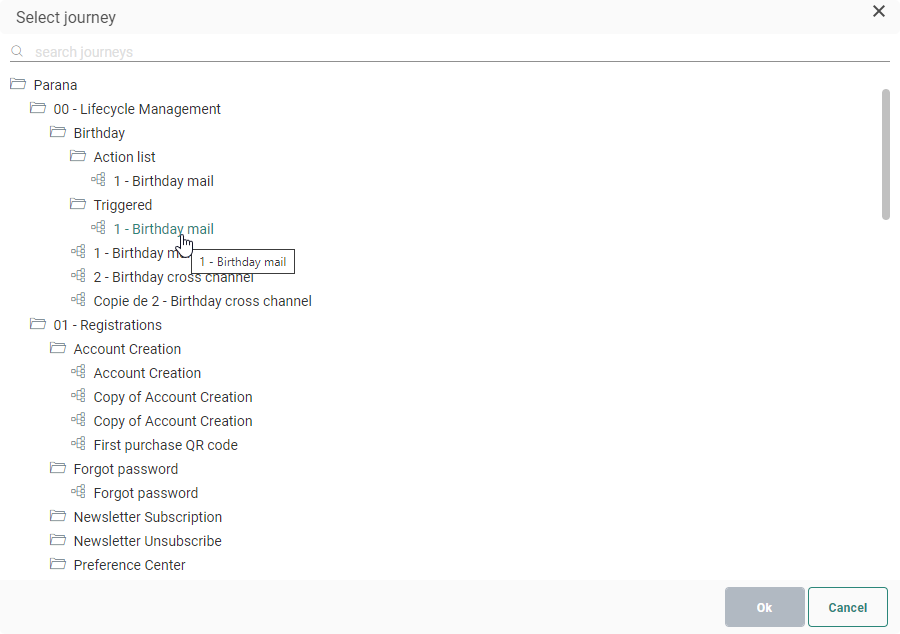
Note: When you've selected a Campaign journey before, and open the journey selector again for that constraint, the folders and sub-folders are expanded in which the journey is located and the journey is selected.
When you've selected a Campaign journey before, and open the journey selector for a new constraint (in the same Constraint Builder window), all folders and sub-folders that were expanded in the previous Campaign selection are now also shown as such, together with the scroll position of the last selection. No journey is selected in this case.
Interest Tags constraint
When the Interest Tags feature is activated and a Tag list has been configured and used in content, interest metrics are gathered providing insight in a contact's preferences. This information is stored in a profile extension of the Audience List and can be used for filtering.
To do so, select 'Interest' to access the interest data and then the type of data you want to use in the filter, followed by the constraint.
Example:
A filter based on the top email tag equal to ELECTRO.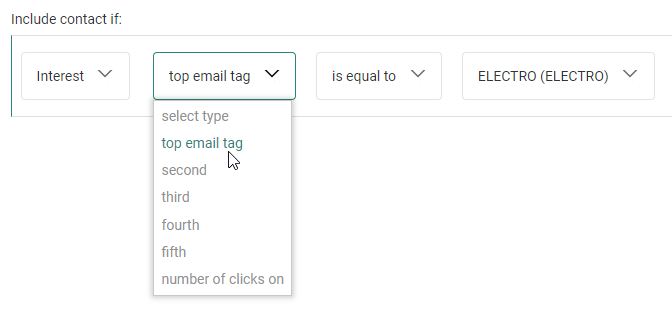
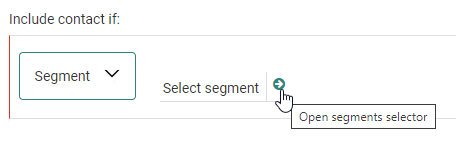
Segment constraint
When you select Segment in the first drop-down, a field appears to open the segment selector.
In the segment selector pop-up, you can navigate through the Global and My organization folders and select any segment of the audience.
The search field at the top can also be used to search for segments.

Select the desired segment and click Ok.
After your segment selection, an operator can be chosen from the next drop-down field.
This is either is included or is excluded.
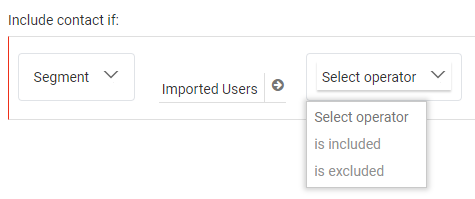
That concludes the segment constraint.
Custom Event constraint
Custom Events are used for event-driven journeys, triggered by Custom Event data defined in Audience Lists and react upon them.
When a Custom Journey starts with a Custom Event Component, it's possible to use the Custom Event data in the Constraint Builder.
An extra 'Custom event' option is available in the first drop-down for the use in an :
Example :
Custom Event Component -> Audience Filter -> Email message
A constraint has been set on the Audience Filter, which looks like this :
In the above example, when contacts have run a distance over 5 kilometers (= Custom Event data coming from the Audience List), they receive a run activity email.
Send-time optimization constraint
When the Send-time Optimization feature is activated on your environment and on individual journey level, messages are sent at the best send-time for the contact.
This best send-time is stored in an STO profile. Contacts with no interaction don't have an STO profile. The existence of an STO profile can be used in the Constraint Builder to filter the audience.
Example: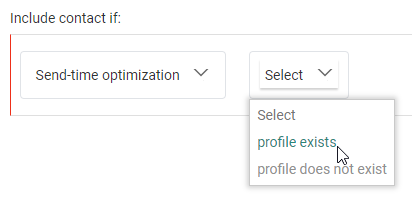
Convert to group
Click on this icon to convert a single constraint to a group constraint : ![]()
Example:
- A single constraint, before converting it to a group constraint:
- After converting it to a group constraint, it looks like this:
An extra block around a group constraint shows: Include contact if all/any of the following apply.
This determines if an AND operator or an OR operator is set for the group.
Example:
- A group constraint with Include contact if all of the following apply, showing an AND operator:
- A group constraint with Include contact if any of the following apply, showing an OR operator:
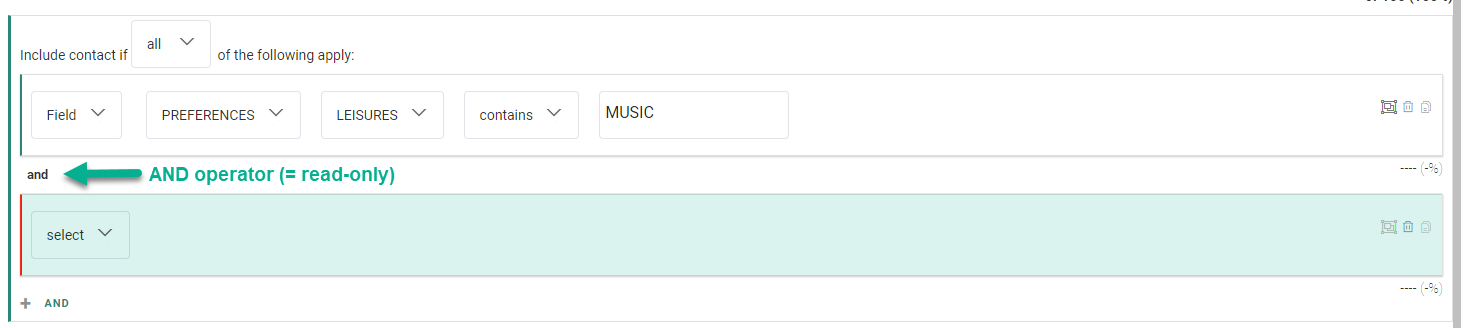
When you click on the AND or OR operator, a second single constraint is added inside the group.
The operator between the two single constraints is visible as read-only text.
Example:
A group constraint containing two single constraints, looking for contacts whose leisure preference contains the value music, and whose top category 1 is equal to rock.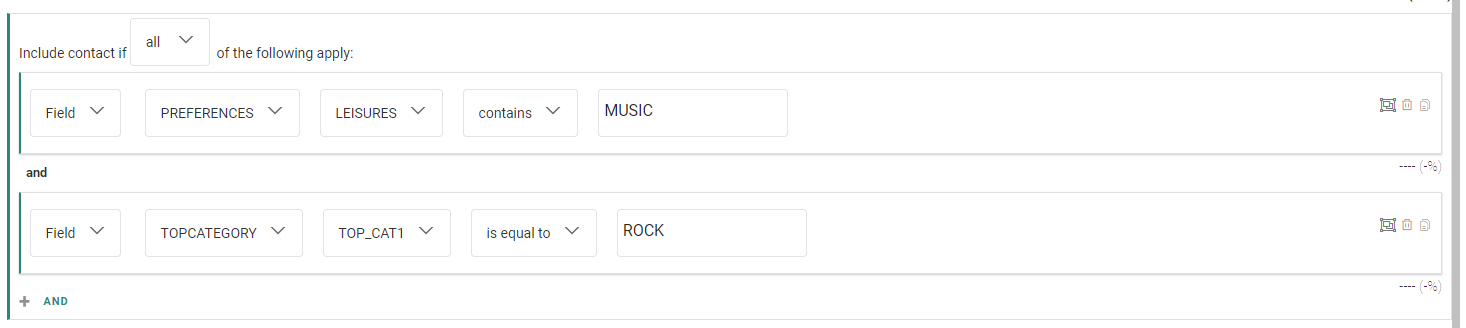
Each single constraint can be converted to a group constraint, allowing you to build complex, nested constraints.
Note: The convert icon ![]() is only available for single constraints.
is only available for single constraints.
Example:
A constraint looking for :
1. contacts who opted in to receive your digital communications (= the opt-out field contains the value 0 OR the opt-out field contains no value at all)
AND
2. whose preferred communication channel is equal to mobile push messaging
OR
who didn't set a preferred communication channel AND for which a contact record was created in the Audience List after today minus 2 days (which in our example are considered to be new contacts who didn't get the chance yet to set their preferred communication channel)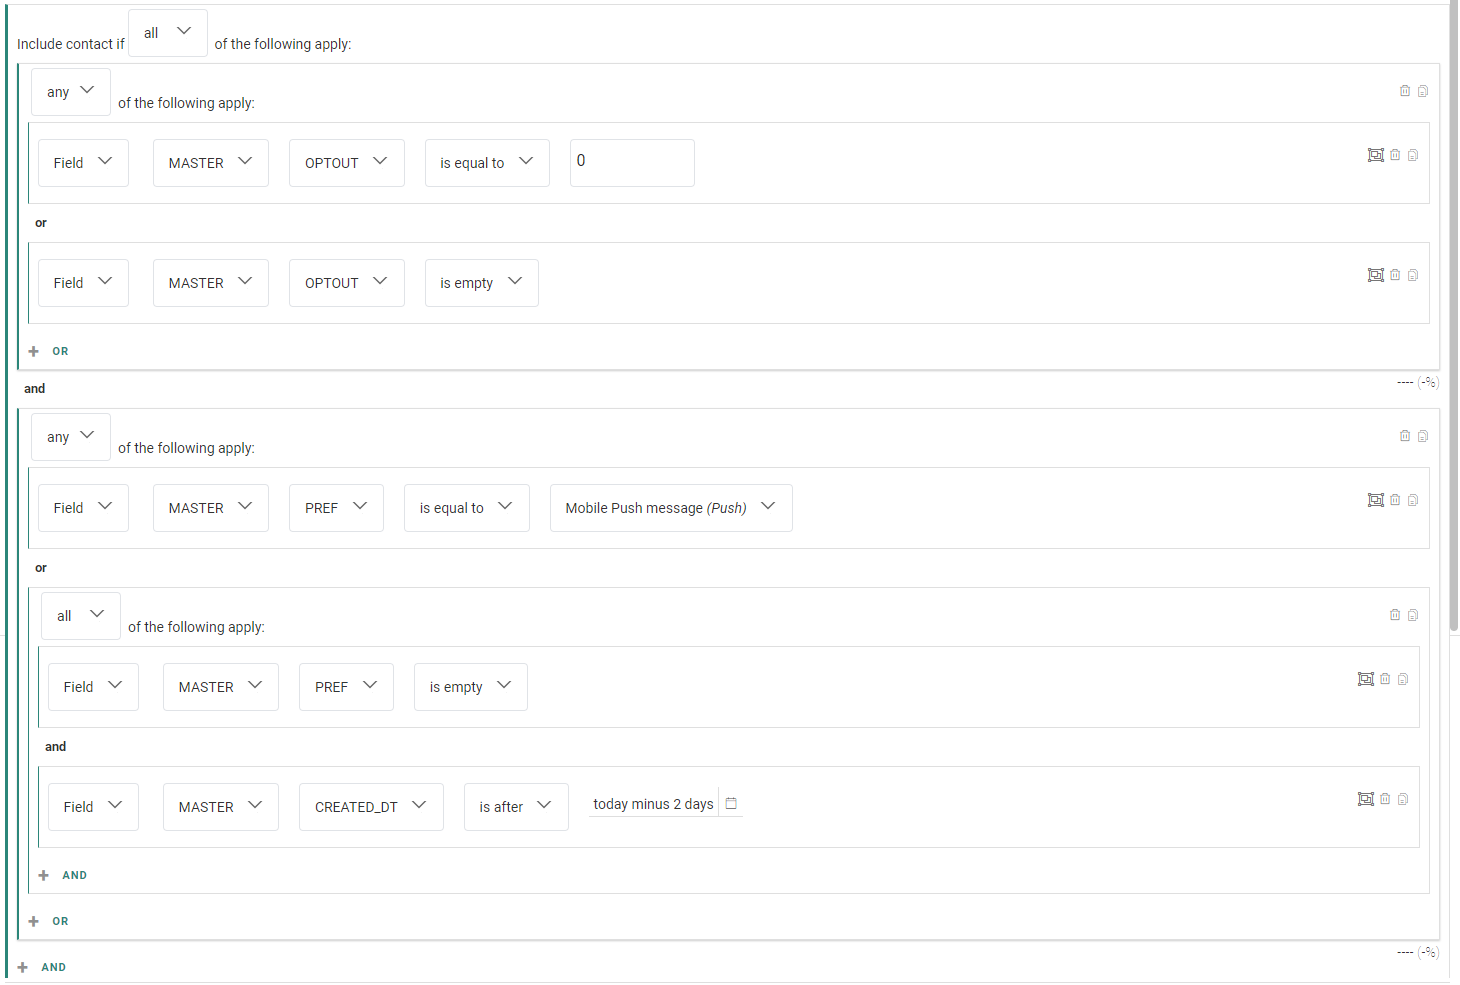
You'll notice that for this example, there are two main groups:
- The first group contains two single constraints (for the opt-out field check). It requires any of the single constraints to apply.
- The second group contains a single constraint (for the mobile push preferred channel) and a nested group constraint (for when no preferred channel is set, and it's considered to be a new contact).
Remove expression / remove group
For single constraints, when you click on the ![]() icon, the constraint is removed.
icon, the constraint is removed.
Note: The initial single constraint (on launch) cannot be removed. The rubbish bin icon is grayed out in this case.
For group constraints, when you click on the ![]() icon, the group, along with all of its inner constraints (group & single constraints), is removed.
icon, the group, along with all of its inner constraints (group & single constraints), is removed.
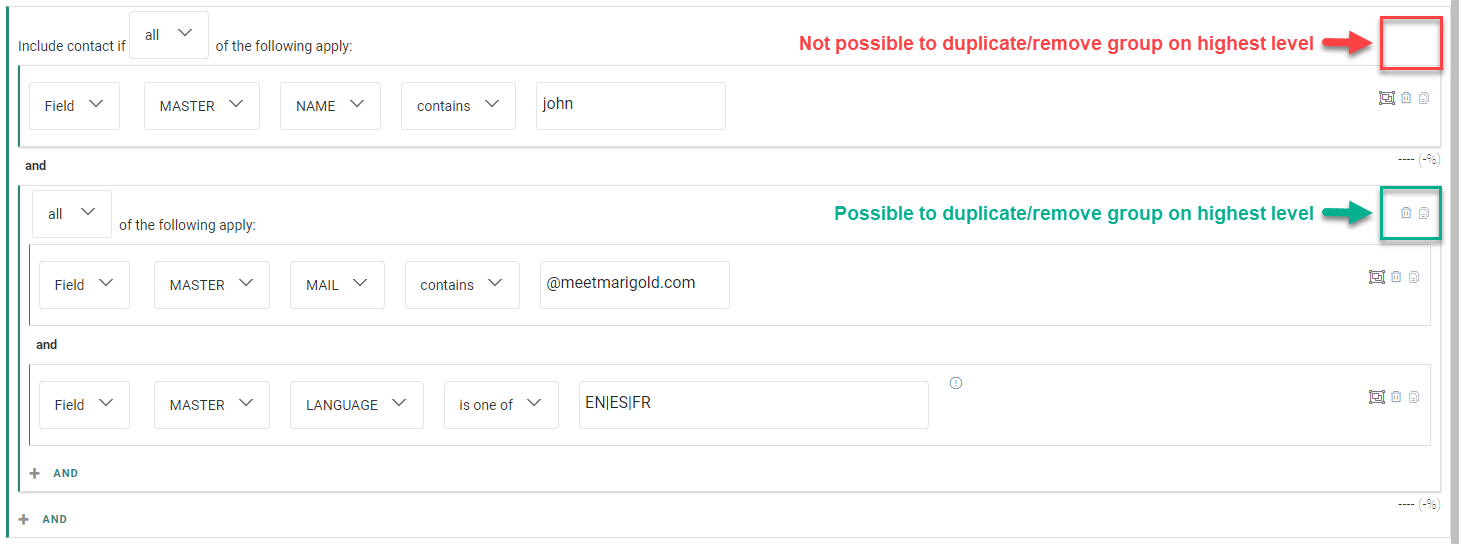
Note: The group at the highest level cannot be removed; only inner groups can be removed.
Duplicate expression / duplicate group
For single constraints, when you click on the ![]() icon, the constraint is duplicated (within the current group).
icon, the constraint is duplicated (within the current group).
Note: The initial single constraint (on launch) cannot be duplicated.
Similarly, incomplete constraints (red border on the left) cannot be duplicated.
The duplicate icon is grayed out in both cases.
For group constraints, when you click on the ![]() icon, the group constraint is duplicated (within the parent group).
icon, the group constraint is duplicated (within the parent group).
Note: The group on the highest level cannot be duplicated, only inner groups can be duplicated.
Example :
Waterfall count
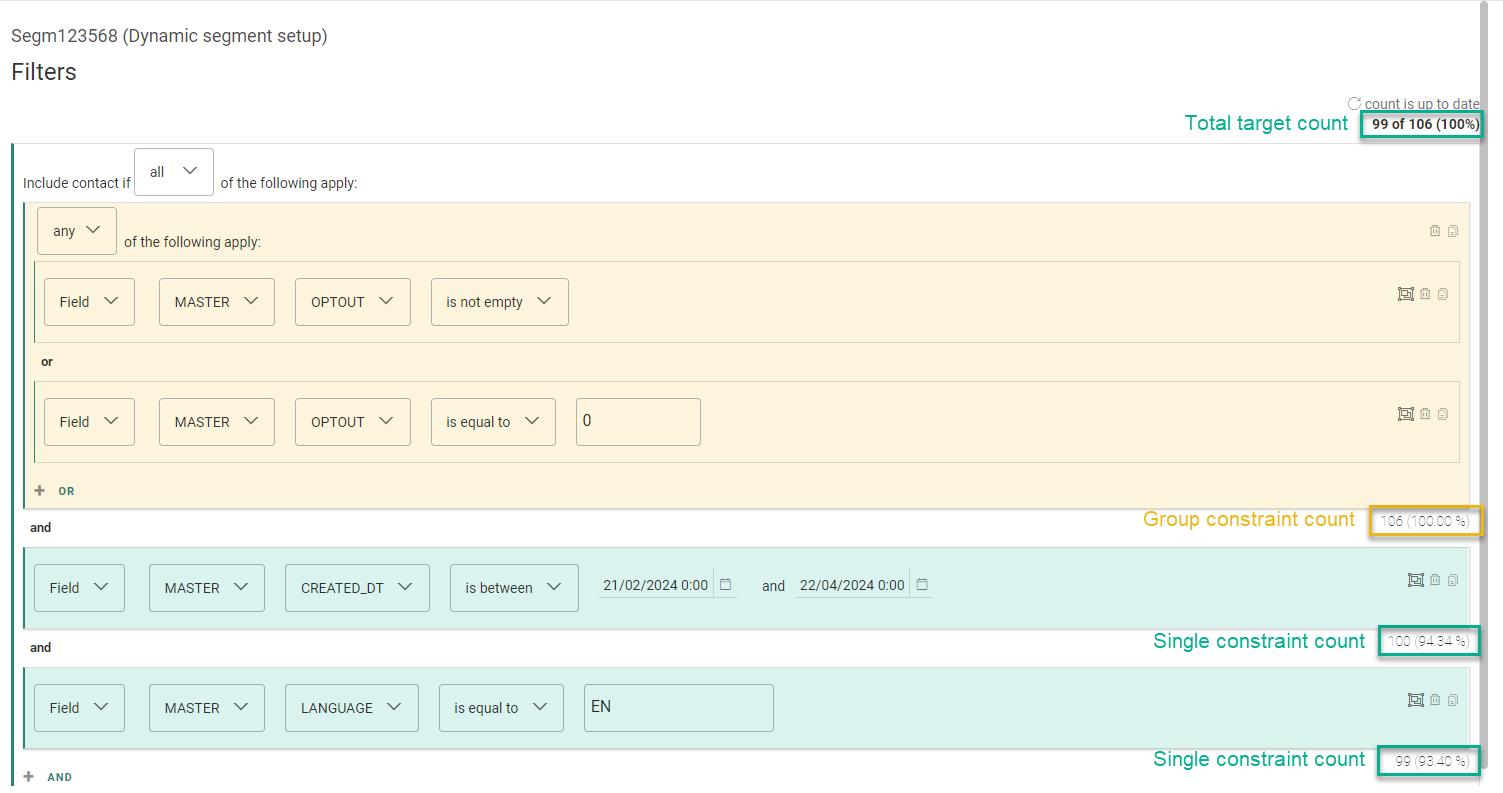
A target count is provided on all levels:
- Total target count — This is the highest level. It shows 'x of y (100%)', where x is the number of contacts that match all or any of the filters (depending on your selection), and y is the total number of contacts in the audience (which is also indicated by 100% next to it).
- Count per group — A number and percentage are shown at the bottom-right of each group constraint.
- Count per single constraint — A number and percentage are shown at the bottom-right of each single constraint that is not part of a group constraint.
How does the count work?
- Initially, no constraint is set.
The total target count at the highest level is the full audience.
The count for the first single constraint doesn't show a value, as it's not yet set.

- When you set a constraint, the initial count is removed and the 'count is up to date' text is replaced by a clickable 'refresh count' link.
The single constraint still doesn't show a value.
The total target count at the top always shows a value and percentage of 100%, referring to the full audience.

- When you click on the 'refresh count' link, a new calculation is started.
Spinning loading icons are shown for all values (total target count and individual counts) as long as the calculation is going on.

- When the calculation process is done, the single constraint shows a number and percentage value. This refers to the number of contacts and the percentage of the audience that are targeted with this constraint.
The total target count at the highest level is also updated.
The 'count is up to date' text is shown again, instead of the 'refresh count' link.

The same way, counts are calculated and shown for each other single constraint and group constraint that is added to the audience filter.
The total target count at the top takes all individual count calculations into account to determine the actual audience that will be targeted by the use of the defined constraint filters.
- Any action, such as adding a new group constraint, resets the count numbers of the affected constraints.
Example:
The following constraint set contains two single constraints.
We click Convert to group on the second constraint.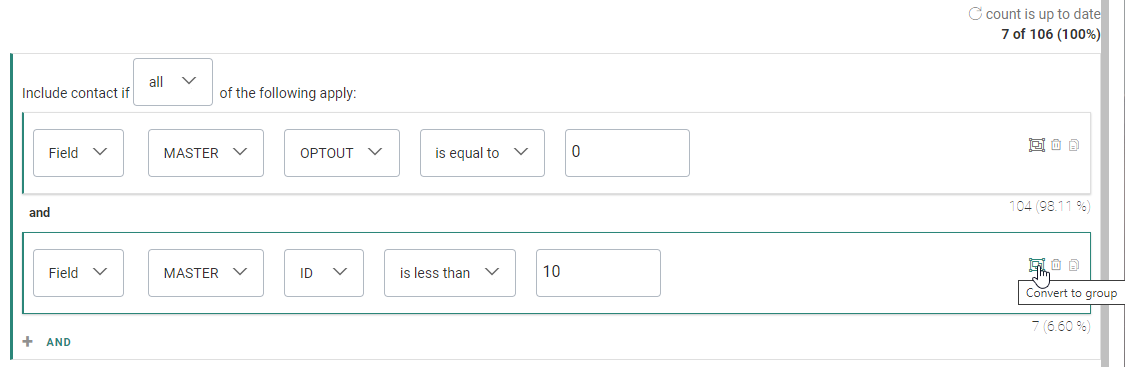
The value and percentage of the second constraint are reset, together with the total target count at the top (as it's impacted by each individual constraint).
For the first single constraint the value and percentage are not reset, as it hasn't changed.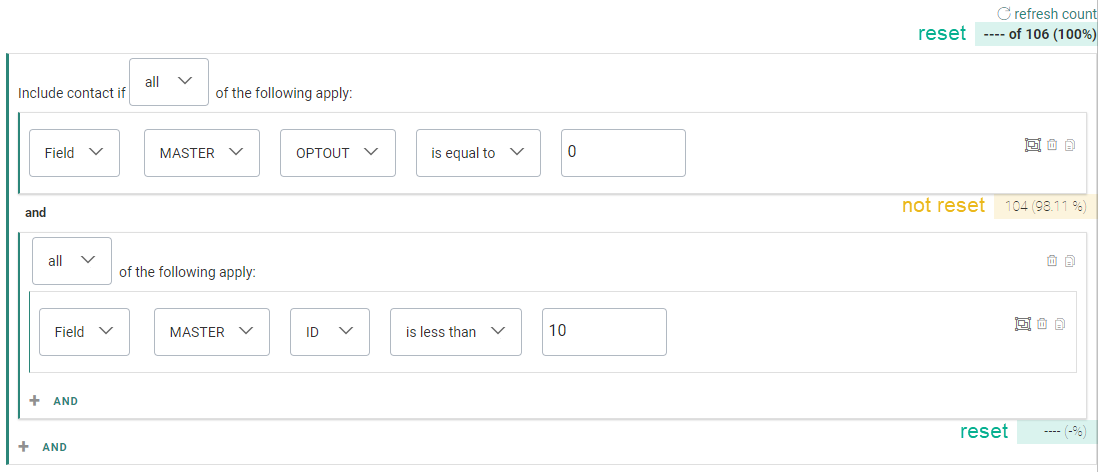
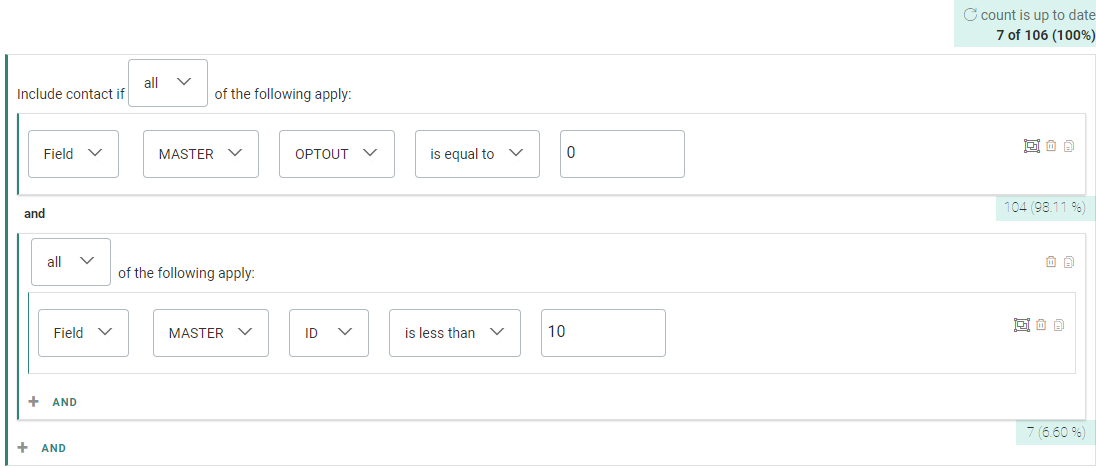
- A 'refresh count' click triggers a recalculation and updates the values.
Example:
Note: When you select 'Include contact if any of the following apply' at the highest level, only the total target count is shown. No count numbers (or placeholders) are shown for single and group constraints, as that doesn't have any added value.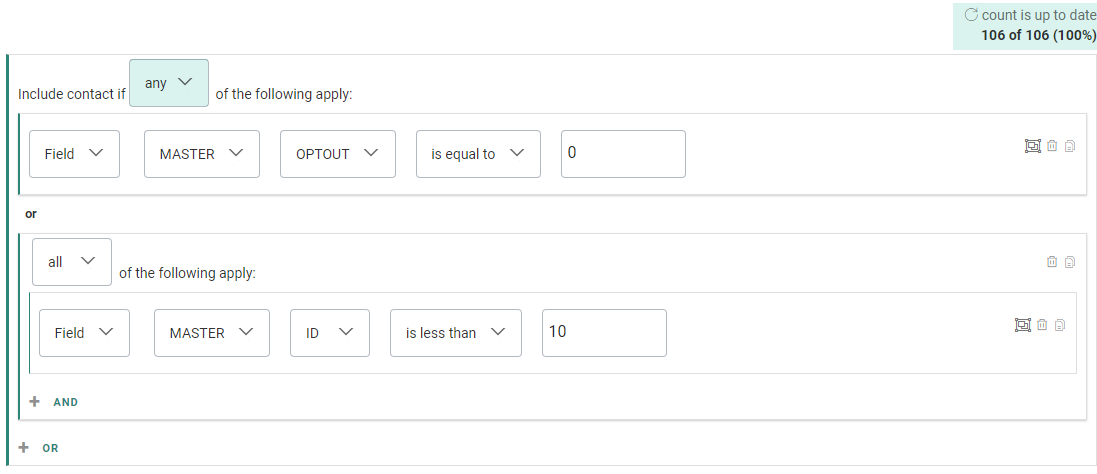
- The total target count is shown and can be recalculated on each level when using nested 1:N data.
Example:
Besides the total target count at the top, two constraints can be seen that each show the value and percentage of the targeted contacts.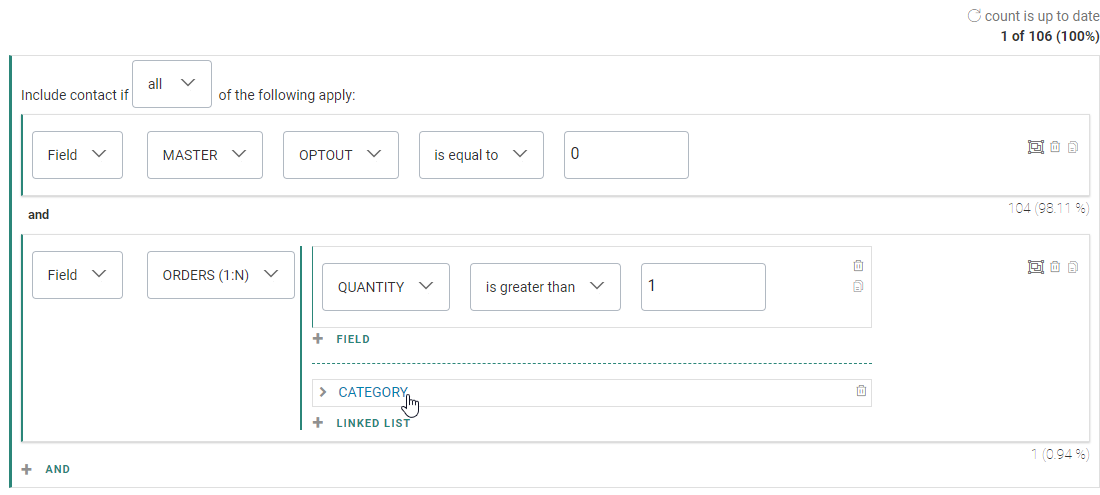
Clicking the category link inside the second constraint shows a level two constraint, that also shows a count for its filter set.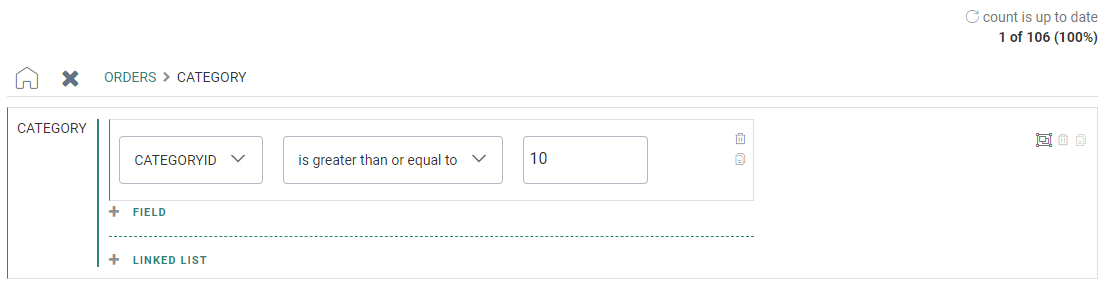
Note: The counts give an indication on the target audience based on your constraints defined.
This will result in the audience filter (that can be used in list segments and journeys) to contain a limited audience target.
Keep in mind that this target count does not reflect contacts who've already received messages through journeys, nor takes other components in a
Custom Journey into account. (Custom Journeys contain target counts themselves related to journey executions. Those counts are not related to the counts inside the Constraint Builder.)
Example : Creating Recurring Batch Journeys with Complex Constraints
Example : Create a constraint with nested 1-to-N data
Test your knowledge about the target count in the Constraint Builder
Consider the following case : A journey exists with an audience filter set that limits the target to 1005 contacts. The journey is launched and actually sends out messages to 987 of those contacts (18 others are bounced). When consulting the Constraint Builder afterward, and requesting a count refresh, what will the count value be?
