
Campaign Configuration: Webhook
The Webhook channel is an unusual channel in Cheetah Digital in that it's not used as a contact method for reaching your consumers. Instead, it's a communication method, typically used to transfer data between Cheetah Digital and some other client or third-party database or application.
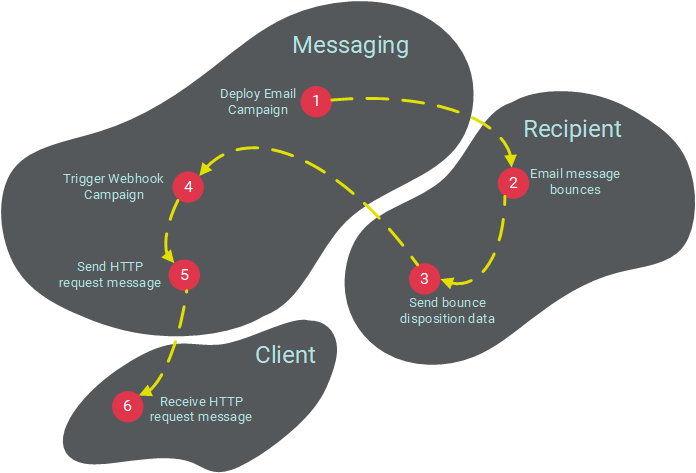
Many clients who utilize the Webhook channel set up Event-triggered Campaigns based on some consumer action, such as an email click, a form submission, or a web event, for example. When the event is identified, the platform will deploy the Webhook Campaign, and send an HTTP request containing information about the event to the client's internal system.
For more information on the Webhook features available through the Cheetah Digital by Zeta platform, please see the document Zeta Cheetah Digital-- Webhook Capabilities.
As an example, let's say you send out order confirmation email messages to your consumers. In the event that one of these messages bounces, you want to be notified so you can follow up with the consumer through another channel, such as over the phone or by SMS text. You could set up a Webhook Campaign that uses "Email Bounce" as its trigger type. When the system identifies a bounced email, it would trigger the deployment of the Webhook Campaign to send an HTTP request message to your internal customer service system. This message could be configured to include the consumer's name, order information, and phone number.
The Webhook Campaign screen allows you to build a simple, custom HTTP request message containing whatever fields you need to include. The fields and their associated values are submitted as key-value pairs, contained within the header of the HTTP request, rather than in the body. These key-value pairs are encoded using the "form-urlencoded" format, where each key-value pair is separated by an ampersand (&), and each key is separated from its corresponding value by an equal sign (=). The request messages are not authenticated, but can optionally be secured by using the HTTPS protocol.
The platform supports the following HTTP methods when sending messages through the Webhook channel:
-
GET: Used to read or retrieve data without directly modifying it.
-
POST: Used to create a new asset.
-
PUT: Used to update an asset (if it already exists), or create an asset (if it doesn't already exist).
-
PATCH: Used to partially modify an existing asset.
-
HEAD: Similar to GET, used to read or retrieve data, but without the response body. Instead, only the headers are returned.
-
DELETE: Used to delete an existing asset.
This topic describes all of the various configuration options available for Webhook Campaigns. This topic assumes that you already created the Campaign (see Campaigns for more details on how to create a Campaign).
The Campaign screen is organized into the following areas:
|
Triggers |
Audience |
Message |
Sending |
Responses |
Auditing |
Launching |
|---|---|---|---|---|---|---|
Campaign settings
The Tool Ribbon at the top of the screen provides access to the following general Campaign settings.
Configure Campaign metadata
Cheetah Digital offers the ability to tag Campaigns with custom Metadata fields and values. These Metadata fields allow you to create Filters that look for specific Metadata tags in them, or for use in reports, future Campaigns, or other tasks. You can also add Metadata fields to the Campaign content for personalization.
To assign Metadata values to a Campaign
-
In the Tool Ribbon, click Edit > Set Metadata. The Metadata pop-up window is displayed, listing every Metadata field defined for this account. A red asterisk is displayed next to every field that's required for Campaign launch.
-
Enter or select the desired Metadata values.
-
Click Ok.
Note: Metadata tagging is not available for every channel.
For more information on setting up Metadata fields, see Metadata Settings.
Assign Campaign tags
Optionally, you can assign one or more Tags to your Campaign. These Tags serve as an organization tool that allow you to group together items for reports and Filters.
To assign a Tag to the Campaign:
-
Click on the Add tag field in the Tool Ribbon. The system displays a pop-up menu of all the existing tags.
-
Select an existing tag, or type in a new one and press Enter.
-
Repeat the above step as needed to add more tags. Optionally, to remove a tag, click the X icon next to the tag label.
Configure report settings
Cheetah Digital tracks and reports various system events, such as user clicks, opens, delivery, and more. The platform allows you to configure various report options at a Campaign level.
To set the Campaign's report options:
-
In the Tool Ribbon, click Options > Report Options. The Report Settings pop-up window is displayed.
-
The Delivery Audit section is an optional feature that must be enabled in your account. This option is available only for Regular One-Off Campaigns in the email Channel. The platform maintains a special list of email addresses across all different domains. This list functions much like a Seed List, in that your Campaign will send copies of the message to these addresses. This feature validates the entire mailing process by checking your sending infrastructure, message content, and sending reputation. The feature indicates whether your message landed in the consumer's inbox or spam folder, or if it was blocked. To utilize this feature for this Campaign, place a check mark in this check box.
-
Tracking information is constantly gathered by the platform. However, the reports are updated only when manually executed, or based on the account-level schedule set for Automatic Updates on the Update Options screen. Optionally, you can override the account-level schedule, and define an automated update schedule that applies only to a Campaign. To define an automated Campaign-specific update schedule:
-
Place check marks next to the days of week on which you want the automated update schedule to run.
-
From the Every X Hours drop-down menu, select the automated update frequency. The possible frequency ranges from every hour to every twelve hours.
-
From the First X Days drop-down menu, indicate for how long this automated schedule should run after the Campaign is initially launched. The possible values are 5, 10, 15, 20, 25, or 30 days.
-
Note: Please speak with your Customer Service Representative for more information on enabling the Delivery Audit feature.
-
Click Ok.
Campaign management
The Campaign screen provides the following Campaign management features:
Copy a Campaign
To copy an existing Campaign:
-
In the Tool Ribbon, click Edit > Save As. The Save As pop-up window is displayed.
-
The default name of the new Campaign is Copy of followed by the base Campaign name. Optionally enter a different name in the Copy's Name field.
-
The default folder location for the new Campaign is the same folder as the base Campaign. Optionally select a different folder location where you want to save the new Campaign.
-
The default Campaign type for the new Campaign is the same as the base Campaign. Optionally select a different Campaign type.
-
Click Save a copy.
Delete a Campaign
When you delete a Campaign, the system moves it from its current folder location into the Recycling Bin, where it can optionally be restored if needed. If the selected Campaign is stored in a folder to which you don't have the proper access privileges, you won't be able to delete that Campaign.
-
In the Tool Bar, click Edit > Delete. A confirmation dialog box is displayed.
-
Click Delete. The system moves the Campaign to the Recycling Bin.
Rename a Campaign
To rename a Campaign:
-
In the Tool Bar, click Edit > Rename. The Rename the Item pop-up window is displayed.
-
In the New Name field, enter the new name.
-
Click Save new name.
View Campaign details
To view detailed information about the Campaign:
-
In the Tool Ribbon, click the Campaign tab. The Item Details panel is displayed, which provides the following information:
-
Who created the item, and who modified it last.
-
The Campaign's Object ID and Object Reference ID.
-
A log of actions taken on the Campaign, including what the action was, when it was taken, and who performed the action.
-
-
Optionally click Related Items in the left-hand menu. This section lists other items in the system that reference or utilize this Campaign.
Change Campaign type
From within the Campaign screen, you can switch the Campaign type between a Regular One-off Campaign and either form of triggered Campaign (Date-triggered or Event-triggered).
To change the Campaign type:
-
To change the Campaign to Event-triggered, click Edit > Convert to Event Triggered in the Tool Ribbon. A confirmation dialog box is displayed; click convert.
-
To change the Campaign to Date-triggered, click Edit > Convert to Date Calculated in the Tool Ribbon. A confirmation dialog box is displayed; click convert.
-
To change the Campaign from either of the triggered Campaign types to a Regular One-Off Campaign, click the remove button (X) next to the Campaign Type. A confirmation dialog box is displayed; click remove triggers.
Note: Depending on the Campaign channel, some of the above Campaign types may not be available.
Cells and splits
Marketers often need to divide their Campaign Audience into smaller segments, or cells. You might need to do this in order to test the effectiveness of a particular marketing message, or because you need to use a different sending method, or schedule, for the different cells.
Cheetah Digital by Zeta provides you with the ability to create complex, sophisticated ways of segmenting your Audience. The platform supports two different segmentation methods: A / B Testing and Split Cells (A / B testing is available only for email Campaigns).
Split Cells allow you to divide your Campaign Audience into different receiving groups, with or without the use of a remainder Audience. With Split Cells, you can create a complex hierarchy of nested cells, each of which is designated with a unique code that can be used elsewhere in the platform, such as reports, exports, and Filters. You can enter these cells directly into the user interface, or import them from a spreadsheet. This segmentation method can be used for testing purposes, although that's not really its primary intent, as this method won't calculate a winner like A / B Testing does.
Note: Split cells are available in all channels, and for all Campaign types.
For more information on configuring Split Cells within your Webhook Campaign, please see Split Cells.
