
Configure an Offer Certificate Code Import Definition
Loyalty allows you to use the Advanced Import feature to import a file of Offer Certificate Codes from a Secure FTP server, an Amazon S3 Bucket, a Google Cloud Storage Bucket, or your local PC.
This article assumes that you have already created the Import Definition, either by creating it from scratch, or by copying an existing Import Definition (see
-
Table: Offer Certificates
-
Offer (optional): The desired Offer to which all imported Certificates Codes will be assigned. If you select an Offer here, and if the import file contains an Offer ID column, this column will be ignored. Conversely, if you don't select an Offer here, the platform will use the Offer ID column in the import file to identify the Offer to which the Certificate Codes should be assigned.
Note: Loyalty supports importing Certificate Codes through both the Standard Import and Advanced Import features (see Importing Data into Loyalty for more information on these import features). This article describes how to import Certificate Codes using the Advanced Import feature. For details on how to import Certificate Codes using the Standard Import feature, please see Import Certificate Codes.
To configure an Offer Certificate Code Import Definition:
-
Select Admin from the top navigation bar, then select Integrations > Imports from the side navigation menu. The Imports screen is displayed.
-
Optionally, search for the desired Import Definition (see
-
Select the desired Import Definition, either by clicking its name, or by clicking the Edit icon within the Actions column. The Import Definition Details screen is displayed.
The Imports Definition Details screen is split into multiple steps, identified by a series of numbered items across the top of the screen. You can complete these steps (described below) in any order you like. The Next button at the bottom of the screen navigates to the next step in the sequence, and the Back button navigates to the previous step.
Step 1: Origin Settings
The Origin Settings step is used to identify the file’s location, and to define other high-level details about the file. The options vary depending on whether the import file resides on your local PC, or on an external server.
Import a File from your Local PC
To define an Import Definition for a file that’s located on your local PC:
-
At the top of the Import Definition Details screen, click Origin Settings.

-
From the Connector drop-down menu, select Desktop.
-
If you selected an Offer when you created the Import Definition, the Select Offer drop-down menu is populated with that Offer. Optionally, select a different Offer.
-
Click Choose File. Browse to and select the desired file, then click Open.
Note: The size of the import file can't exceed 25 megabytes.
-
From the File Delimiter drop-down menu, select a standard delimiter character (Tab or Comma), Or, optionally select Custom Delimiter and enter the custom character.
-
Optionally, the platform can validate that the import file contains the expected number of delimiter characters per row. To run this validation, select Yes from the Validate Delimiter Count drop-down menu.
-
If your import file uses text qualifiers, select a standard character from the Text Qualifier drop-down menu (Single Quote, Double Quote, or Pipe). Or, optionally select Custom Qualifier and enter the custom character.
-
From the File Encoding drop-down menu, select an encoding method (the default method is UTF-8).
-
If the import file is encrypted, select PGP from the Encryption Type drop-down menu.
-
From the Contains Unescaped Double Quotes drop-down menu, select Yes if you want the platform to ignore enclosing double quotes. Or, select No if you want the platform to treat enclosing double quotes as the CSV cell container.
-
If the import file has a column header row, select Yes from the File has Column Header drop-down menu.
-
If you want the platform to log missing files as an error, select Yes from the Log if File Missing drop-down menu. If you select No, the platform ignores missing files.
-
If the file is sorted, select Yes from the Is File Sorted drop-down menu.
-
Click Save.
Import a File from an External Server
To import a file that’s located on a Secure FTP server, an Amazon S3 Bucket, or a Google Cloud Storage Bucket, you must have a Connection Profile with the necessary connection details and login credentials. See Connectors for more information on creating Connection Profiles.
To define an Import Definition for a file that’s located on an external server:
-
At the top of the Import Definition Details screen, click Origin Settings.
-
From the Connector drop-down menu, select either Secure FTP, Amazon S3, or Google Cloud Storage.
-
From the Connection Profile drop-down menu, select a Connection Profile.
-
If you selected an Offer when you created the Import Definition, the Select Offer drop-down menu is populated with that Offer. Optionally, select a different Offer.
-
In the Folder Path field, enter the path to the folder on the server where the import file is located.
-
In the File Name field, enter the name of the import file. This field supports the use of a date pattern mask, and the use of wild card characters.
-
From the File Timestamp Time Zone drop-down menu, select the time zone to use for the file's timestamp.
-
From the After Import drop-down menu, select what to do with the original file after it's been imported:
-
Move File: In the Folder Path field, enter the location where you want to move the file.
-
Add Suffix: In the Suffix field, enter the text string you want to append to the file name, such as “processed” for example.
-
-
From the File Delimiter drop-down menu, select a standard delimiter character (Tab or Comma), Or, optionally select Custom Delimiter and enter the custom character.
-
Optionally, the platform can validate that the import file contains the expected number of delimiter characters per row. To run this validation, select Yes from the Validate Delimiter Count drop-down menu.
-
If your import file uses text qualifiers, select a standard character from the Text Qualifier drop-down menu (Single Quote, Double Quote, or Pipe). Or, optionally select Custom Qualifier and enter the custom character.
-
From the File Encoding drop-down menu, select an encoding method (the default method is UTF-8).
-
If the import file is encrypted, select PGP from the Encryption Type drop-down menu.
-
From the Contains Unescaped Double Quotes drop-down menu, select Yes if you want the platform to ignore enclosing double quotes. Or, select No if you want the platform to treat enclosing double quotes as the CSV cell container.
-
If the import file has a column header row, select Yes from the File has Column Header drop-down menu.
-
If you want the platform to log missing files as an error, select Yes from the Log if File Missing drop-down menu. If you select No, the platform ignores missing files.
-
If the file is sorted, select Yes from the Is File Sorted drop-down menu.
-
Some clients split very large import files into multiple files. In this situation, the platform can be directed to process these multiple files as a single import job, in a specified sequence. To enable this feature, select Yes from the Process multiple files as one drop-down menu. Then select the desired sort sequence from the Sort Files drop-down menu: Ascending - Alphanumeric or Descending - Alphanumeric.
-
Optionally, to use a Control File, select Yes from the Control File Name drop-down menu, then enter the name of the Control File. For more information on Control Files, see
-
Optionally, click Advanced Options. If you want to export the error log files generated by the platform, select Yes from the Export Error / Skip Logs drop-down menu, then enter the desired location to save these files in the Folder Path field.
-
Click Save.
Step 2: Map & Transform
The Map & Transform step is used to define the data map for the import file. The data map allows you to identify which column in the import file should be written to which field in the
Manually Define a Data Map
To manually define the data map:
-
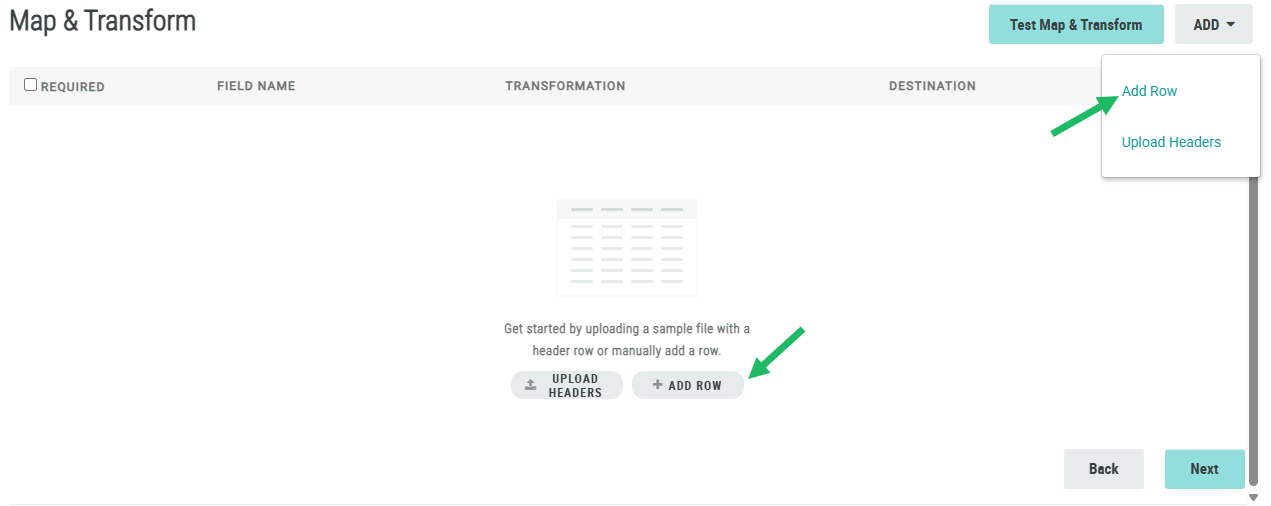
At the top of the Import Definition Details screen, click Map & Transform.
![]()
-
Click Add Row (or select Add Row from the Add drop-down menu).
-
Check Required if the column must be populated to be included in the import file (records with NULL values will be skipped). Otherwise, leave Required unchecked if having a NULL value in this field is acceptable (rather than skipping the record).
-
In the Field Name field, enter the column name as it appears in the import file.
-
Optionally, to perform a data transformation on an Attribute, click Add. From the pop-up menu of available options, click the desired Data Transformation. Repeat this step as needed to add more Data Transformations.
-
From the Destination drop-down menu, search for and select the Attribute where the value in this column is to be loaded.
-
Repeat the above steps to define additional columns to import. Optionally, to remove a column, click the Delete icon next to it.
-
Click Save. Optionally, you can test that the data map is configured correctly, and verify that any selected Data Transformations are working as expected. See Test Map and Data Transformations below for details.
Upload Headers
Instead of manually defining the data map as described above, you can upload a file of column header names to use as the data map. This file must be in .csv or .txt format. The platform will attempt to automatically match each header name in the uploaded file to an Attribute.
-
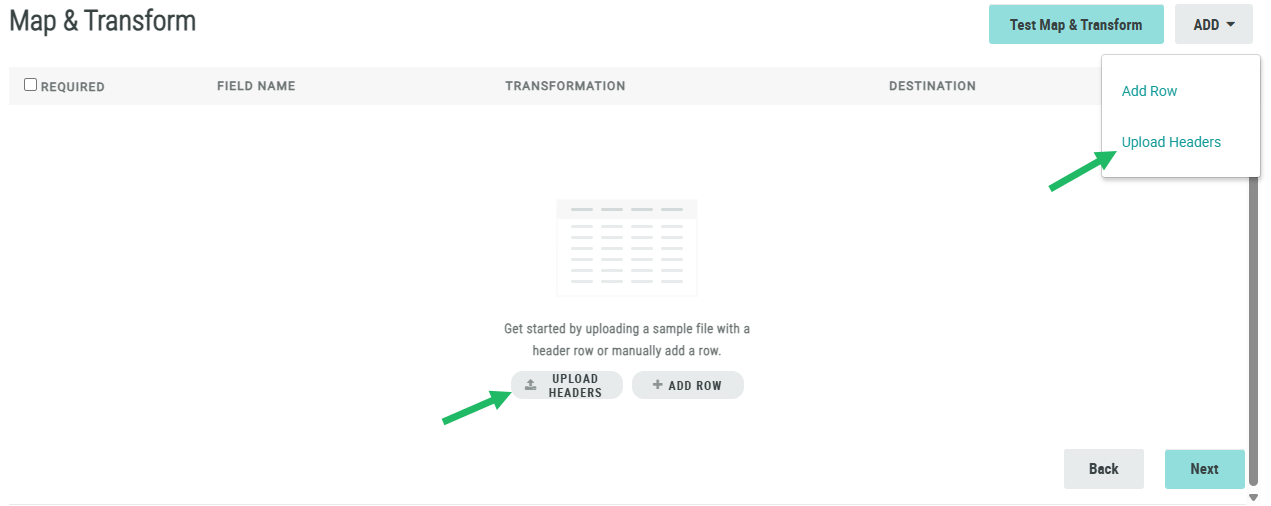
At the top of the Import Definition Details screen, click Map & Transform.
![]()
-
Click Upload Headers (or select Upload Headers from the Add drop-down menu). The Upload Headers pop-up window is displayed.
-
Click Choose File. Browse to and select the desired file, then click Open.
-
From the Delimiter drop-down menu, select a standard delimiter character (Comma or Tab), or select Custom and enter a custom character.
-
Click Upload. The Map & Transform screen is populated with the column header names from the uploaded file. The column header names are displayed within the Field Name field, in the same sequence as they appear in the column header file. The platform attempts to map each column name to an Attribute. If the platform finds a match, the Destination drop-down menu is populated with that Attribute name.
-
For the columns where the platform found a match, verify that the match is correct. If the match is incorrect, or if the platform couldn't match to an Attribute, select the desired Attribute from the Destination drop-down menu.
-
Optionally, to perform a data transformation on an Attribute, click Add. From the pop-up menu of available options, click the desired Data Transformation. Repeat this step as needed to add more Data Transformations.
-
Check Required if the column must be populated to be included in the import file (records with NULL values will be skipped). Otherwise, leave Required unchecked if having a NULL value in this field is acceptable (rather than skipping the record).
-
Optionally, if you need to add a column beyond what was included in the file of column header names, select Add Row from the Add drop-down menu. The platform adds a new blank row to the bottom of the screen, where you can enter the name of the column and select the Attribute.
-
Optionally, to remove an Attribute, click the Delete icon next to it.
-
Click Save. Optionally, you can test that the data map is configured correctly, and verify that any selected Data Transformations are working as expected. See Test Map and Data Transformations below for details.
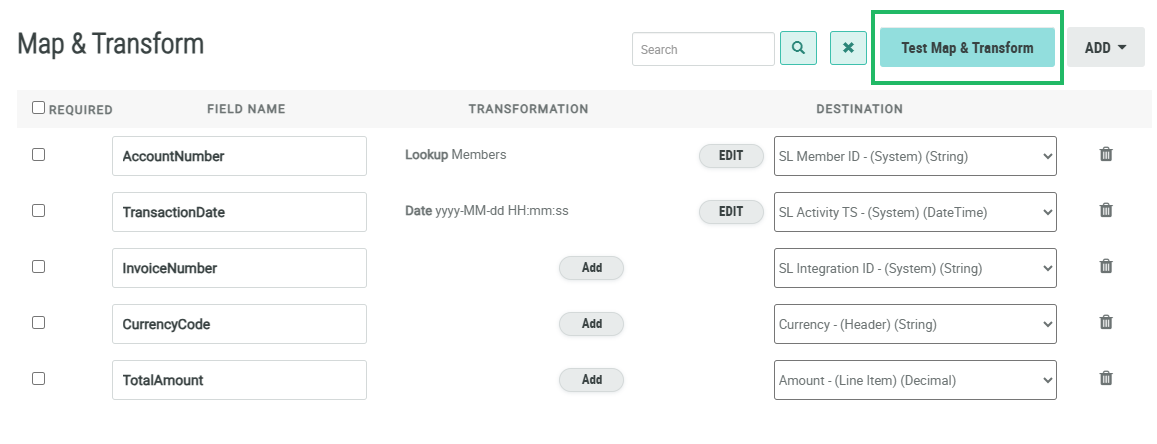
Test Map and Transformation Settings
The platform allows you to utilize a small test file to verify that you have defined the data map correctly, and that any selected Data Transformations are working as expected. This file must include a header row, and contain fewer than 100 rows.
For this validation, the platform will apply the import settings defined in the Origin Settings section (such as delimiter character, text qualifier, etc.), so your test file must conform to those same settings. In addition, the platform will validate that the incoming test file values are compatible with the Data Types of the destination Attributes.
To test your data map and data transformations:
-
On the Map & Transform screen, click Test Map & Transform. The Map & Transform Preview pop-up window is displayed.
-
Click Choose File. Browse to and select the desired file, then click Open.
-
Click Upload. The test results are displayed. If a row encountered any errors, the row is highlighted in red. Click the "i" icon to the left of the row to view additional details about the error condition(s).
-
Optionally, to download the results of the validation process, click either Success Rows or Failed Rows.
-
When finished, click Close.
Step 3: Action Settings
The Action Settings step is used to enable and define a variety of optional processes during the file import.
-
At the top of the Import Definition Details screen, click Action Settings.

-
From the Include Blank Values drop-down menu, determine how you want the platform to handle blank values in the import file:
-
Yes: The platform will overwrite a populated field in the
-
No: The platform will ignore blank values in the import file.
-
-
From the Skip Publish Activity drop-down menu, determine if you want the platform to skip the process of creating Activity records:
-
Yes: Skip the process of creating Activity records for individuals in the import file.
-
No: Create Activity records for individuals in the import file. Note that Activity records are created only for new records (inserts), and not for updated records.
-
Note: The default option for Skip Publish Activity is No. This option is enabled typically only for performance reasons.
-
If you want the platform to run email and phone number syntax validation on the appropriate import fields, select Yes from the Validate Records drop-down menu.
-
From the Action drop-down menu, determine how you want the platform to handle the import data:
-
Insert Data or Update if Duplicate: Create new records and update existing records.
-
Insert Data or Skip if Duplicate: Create new records only; existing records are ignored.
-
Update Data or Skip Insert: Update existing records only; new records are ignored.
-
Delete Records: Delete existing records.
-
-
In the Match Records By field, select the primary key (or keys) by which you want to match records in the import file to existing records. If you select more than one Match By key, select a logical operator:
-
All: A record must match on all selected keys to be considered a duplicate.
-
Any: A record must match on at least one of the selected keys to be considered a duplicate.
-
Note: The All / Any selector is an optional feature that must be enabled in your account. If this feature is not enabled in your account, the platform defaults to using All. Speak to your Zeta Global team for details on enabling this feature.
-
If you want the platform to automatically generate an Offer Response for each record in the import file, select Yes from the Create Offer Response drop-down menu. Select the status of the newly generated Offer Responses: Pending or Clipped. Each Offer Responses will be assigned to a Member based on the Member ID in the import file. If a Member ID is not provided in the import file, the platform will generate an anonymous Offer Response.
-
Click Save.
Step 4: Schedule
Import Definitions can be executed on-demand (see
In addition, you can create a schedule that executes the import once at a specified date / time, or on a recurring basis. These schedule options are described below.
Execute Only Once
To schedule an Import Definition to execute once at a specified date / time:
-
At the top of the Import Definition Details screen, click Schedule.

-
Toggle Enabled to Yes.
-
From the Recurrence drop-down menu, select Once.
-
Click into the Execute Once On field. A calendar pop-up window is displayed. Select the desired date when you want the import to execute.
-
Within the calendar pop-up window, click the Clock icon. Define the time when you want the export to execute.
-
From the Time Zone menu, select the time zone to use when determining the time to execute.
-
Click Save.
Execute on a Recurring Schedule
To schedule an Import Definition to execute on a recurring frequency:
-
At the top of the Import Definition Details screen, click Schedule.
-
Toggle Enabled to Yes.
-
From the Recurrence drop-down menu, select Repeat.
-
Next to Schedule Composer, select an interval:
-
15 Minutes
-
30 Minutes
-
Hour: Select the minute past the hour.
-
Day: Select the time of day.
-
Week: Select the day of the week, and the time of day.
-
Month: Select the day of the month, and the time of day.
-
Year: Select the day, the month, and the time of day.
-
-
As you configure the interval above, the CRON Expression field is automatically populated with the associated CRON expression. Optionally, to manually edit this expression, check Advanced Mode.
-
Optionally, using the From and To fields, define the import schedule begin and end date. If you leave these date fields blank, the schedule will run indefinitely.
-
From the Time Zone menu, select the time zone to use when determining the time to execute.
-
Click Save.
Email Notifications
You can configure the Import Definition to trigger success and / or failure notifications to one or more email recipients.
-
Optionally, if you want to send error notifications, toggle Error to Yes, then enter the email addresses for the notification recipients.
-
Optionally, if you want to send success notifications, toggle Success to Yes, then enter the email addresses for the notification recipients.
-
Click Save.
