Offers
Overview
Offers are a general-purpose Content Object within Marigold Loyalty, designed to let you present promotions, discounts, special deals, and advertisements to your Members. The platform supports several different actions that can occur as a result of the Offer, such as a granting a single use certificate code, redirecting the Member to a website, or referencing another Loyalty object (such as a Reward or Challenge).
For example, let's say you want to send a special one-time-use Offer to your "Gold Tier" Members that gives a 25% discount on their next purchase, but is only valid for this month. The Loyalty platform allows you to configure the Offer settings to target the desired tier, provide a coupon code for the discount, and set limits on the Offer's effectivity period and number of times it can be used.
Access
To access the Offers screen, select Campaigns from the Main Navigation Menu, then select Offers from the Sub-Category menu.
Features
Working with Offers
The Offers screen provides the following features:
 Searching and Sorting Searching and Sorting
 Click here Click here
Search
The search feature allows you to search for a specified text string anywhere within the Offer's Display Name, Internal Name, Type, Category label, Category name, or Tag name.
-
Optionally, in the search field near the top of the Offers screen, enter the desired text string.
-
Optionally, from the "Status" drop-down menu, select an Offer status (or "Any status").
-
Optionally, from the "Effectivity" drop-down menu, select an Offer effectivity (or "Any effectivity").
-
Press Enter, or click the search button (magnifying glass icon).
-
The Offer screen is refreshed to show only the Offers that meet your search criteria. Please note that if you enter multiple search criteria, the platform displays only the Offers that meet ALL criteria.
-
To remove all search criteria, click the remove button ("X" icon).
Sort
The "Sort" drop-down menu allows you to sort the Offers on a variety of different fields. To sort the list of Offers, select the desired sort option from this menu.
Navigation
Once you've found the desired Offer, you can navigate to the following other screens:
|
 Create a New Offer Create a New Offer
Click here
To create a new Offer:
1. In the Enter Display Name field, enter the Display Name value for the new Offer.
2. In the Select Offer Type drop-down, select which offer type you want to create.
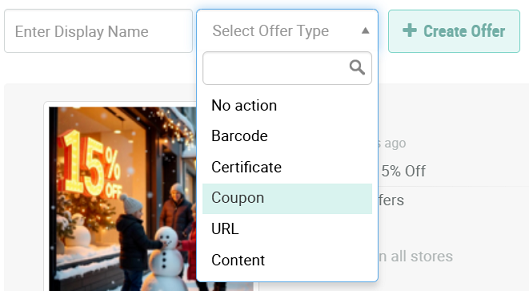
3. Click the + Create Offer button in the upper-left of the screen.
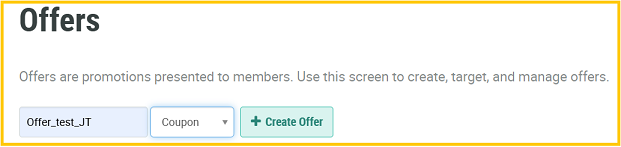
Note: You must enter a name for the offer and select what kind of offer action type you want in order for the + Create Offer button to be enabled (as pictured below).
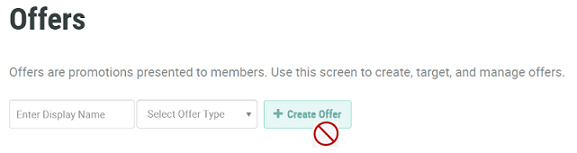
If not, the button will be disabled:
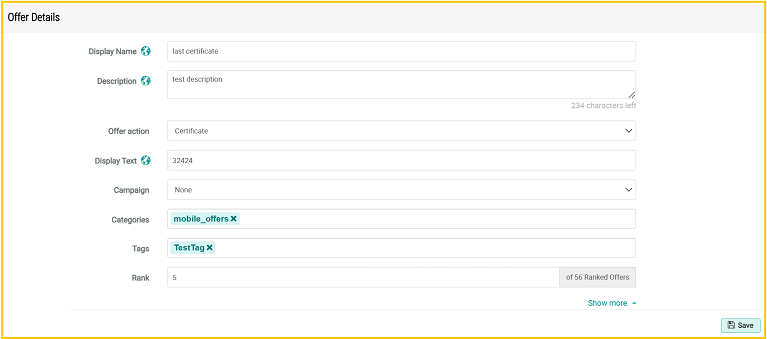
4. After creating a new offer (or clicking on an existing offer), you will be brought directly to the Definition tab, wherein the Offer Details screen is displayed.
Offer Details screen
- The Display Name field is automatically populated with the value you entered above in step 2; you may optionally edit this value. Note that after you edit the display name, the updated name will be reflected in the gray panel at the top of the main offer screen.
- In the Description field, enter a description of the Offer. Note that after you edit the description, the updated description will be reflected in the gray panel at the top of the main offer screen.
- The Offer actionis automatically populated from the Offer Type selected in the creation step. Note that in the Offer action drop-down menu here, you can modify the offer type previously selected.
After you edit the offer action, the updated offer action will be reflected in the gray panel at the top of the main offer screen. This update will automatically modify the Object tabs, Definition fields or sections, and any other related fields associated with the selected action type.
- Global Code: This is a generic code that all members can use to redeem an offer. For example, a member can use the global code HOLIDAY20 to redeem a 20% off holiday offer.
- Optionally, from the Campaign drop-down menu, select a campaign if the offer is associated with a campaign. Alternatively, you can also manually assign offers in campaigns. For more information on manually assigning offers, please see the campaign user guide here.
- Optionally, in the Categories field, assign one or more categories to this offer. Categories are used to organize Loyalty assets into groups. For more details, please see Offer Categories.
- Optionally, in the Tags field, assign one or more tags to the offer. Tags are used to help search, filter, and organize Loyalty assets within the platform. Offers are searchable by Tag from the Offer screen and from the Admin screen (but not from a "Get Offers" API request).
- Optionally, in the Rank field, enter a ranking for this offer. This is used only for the Sort by Rank function in the list view sort.
Additional Fields in the Offer Details screen
Click on Show more at the lower-right of the Offer Details screen.
- The Internal Name is automatically populated based on the Display Name value. This field is disabled by default. To edit the Internal Name, hover over the lock icon to the right of the field and click on Click to edit. A confirmation dialog box is displayed; click ok. Edit the new Internal Name value.
Caution: The Internal Name field is referenced by rules and other Program Objects. Please consult Marigold Support before modifying.
- The Integration ID is disabled by default. To edit the Integration ID, hover over the lock icon to the right of the field and click on Click to edit. A confirmation dialog box is displayed; click ok. Edit the Integration ID value.
Caution: The Integration ID field is referenced by rules and other Program Objects. Please consult Marigold Support before modifying.
- Optionally, in the Tracking Code field, specify a value to track clicks to an offer when you share the offer’s URL on external channels such as email or Facebook. Loyalty adds this tracking code to the offer URL.
Note: The Tracking Code is not used for tracking for Members logged into Loyalty apps.
- Optionally, in the Stores field, specify a store for which this offer applies. Note that this field is available only if Local Store Marketing is enabled.
- For the Optional? toggle switch, retailers may choose to opt in or out of this offer. Note that this field is available only if Local Store Marketing is enabled.
- The Certificates on responses toggle allows the system to display certificate details in API responses and automatically assign unused certificate codes to a member when they respond to an offer or when the offer is issued to the member. When this is enabled, it will display certificate details and automatically assign certificate codes to members at Response. When it is disabled, it will not.
- Extra JSON: Click on this button to add additional code for the offer.
5. Click Save.
|
 View or Edit an Offer View or Edit an Offer
Click here
To view or edit the details of an Offer:
-
Search, sort, or filter the Offers screen as described above.
-
Click on the desired Offer record.
-
The Offer Details screen is displayed and populated with all of the information about this Offer. See Offer Details for more information.
-
Make any necessary changes in the offer details fields directly, and click Save.
|
Export Offer Data
The Offers screen provides the following features related to exporting Offers records.
 Create Export Definition Create Export Definition
|
 View or Edit an Export Definition View or Edit an Export Definition
Click here
To view or edit an Offer Export Definition:
-
From the "Actions" drop-down menu in the top-right corner of the screen, select "Offers Exports." The "Offers Export Definitions" pop-up window is displayed and populated with a list of all Offer Export Definitions.
-
From the "Action" column of the desired Export Definition, click the Edit icon. The "Edit Export" pop-up window is displayed.
-
Make any necessary changes to the Export Definition properties.
-
When finished, click save.
|
 Manually Execute an Export Definition Manually Execute an Export Definition
Click here
To manually execute an Offer Export Definition:
-
From the "Actions" drop-down menu in the top-right corner of the screen, select "Offer Exports." The "Offers Export Definitions" pop-up window is displayed and populated with a list of all Offer Export Definitions.
-
From the "Action" column of the desired Export Definition, click the Enqueue this Export icon. A confirmation dialog box is displayed.
-
Click confirm.
|
Download an Export Definition
Click here
To download the last execution of an Export Definition:
-
From the "Actions" drop-down menu in the top-right corner of the screen, select "Offer Exports." The "Offers Export Definitions" pop-up window is displayed and populated with a list of all Offer Export Definitions.
-
In the "Action" column of the desired Export Definition, click the Download File icon. The platform downloads the file to your PC.
|
 Delete an Export Definition Delete an Export Definition
Click here
To delete an Offer Export Definition:
-
From the "Actions" drop-down menu in the top-right corner of the screen, select "Offers Exports." The "Offers Export Definitions" pop-up window is displayed and populated with a list of all Offer Export Definitions.
-
From the "Action" column of the desired Export Definition, click the Delete icon. A confirmation dialog box is displayed.
-
Click confirm.
|
Import Offer Data
The Offers screen provides the following features related to importing Offer records.
 Import Offer Import Offer
|
 View Offer Imports View Offer Imports
Click here
To view a list of previous Offer imports:
-
From the "Actions" drop-down menu in the top-right corner of the screen, select "Offers Import List." The "Offers Import List" pop-up window is displayed and populated with a list of all previous Offer imports. For each import, the screen displays the following:
-
Imported by
-
Filename
-
Result (i.e., the number of records successfully imported, the number of failed records, and the number of skipped records)
-
Created at
-
Duration
-
Status
|
