SMS Integration Component
SMS is not provided as a standard Selligent component but as an interface. SMS Integration provides a new set of interfaces used to trigger text messages (SMS) or to react to incoming SMS. Those interfaces are based on plug-ins installed on the Selligent application server.
This component is an interface component. Interfaces are custom-created
components that allow interaction between Selligent and external software.
Custom Components can be created for anything, depending on the external
software: send mobile messages (SMS), create ERP records, etc. It can
also be a Custom Component used with Selligent campaign, e.g., to create
customer specific vouchers.
A Custom Component's look, parameters, and functionality can be different
in the journey, depending on the settings defined on the linked interface.
Interfaces are setup under 'Processes'.
There are two types of interfaces:
- plug-in based (uses a dll file to define the interface)
- file based, which can generate output files (txt, csv, Excel, SPSS and
Word)
The Outbound and Inbound SMS components are linked to plug-in based interfaces.
An extra dll-file (plug-in) is installed on the server to handle the communication
between Selligent and the external mobile provider. Selligent does not
send the text messages, therefore the client needs an agreement with a
mobile provider. Depending on the provider's requirements, Selligent creates
the plug-in.
The plug-in also determines what variables are needed for the mobile provider
and which events can be used. Depending on these variables and events,
an interface component can have different input fields for the variables,
and different connectors for the events. Selligent has a default Outbound
and Inbound SMS plug-in. Their settings are discussed below. For more
information on Interfaces check out the Interfaces
topics.
To understand the explanations below, the following naming conventions are applied:
- Inbound / Outbound SMS component refers to the component inserted on the journey.
- Inbound / Outbound SMS interface
refers to the configuration of the interface (Interface tab in Process
section).
Outbound SMS component
The Outbound SMS component provides the ability to send SMS messages directly from a journey. Drag this component on the journey canvas from the 'Interfaces' folder in tree view on the left.
Note: The interface must already exist and already be linked to the plug-in. See interfaces for more information.
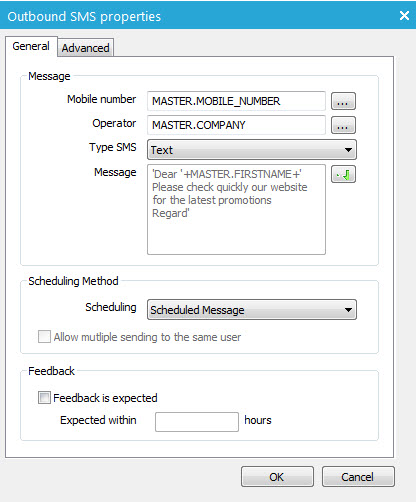
Once the component is added to the journey canvas and is linked to another component, its properties panel becomes active:
General tab settings
- Mobile number — Click the [...] icon to select the field from the Audience list that contains the contact's mobile number.
- Operator — You can leave this field blank. It is not used in the SMS plugin at this point
- Type SMS — Select the type of SMS message:
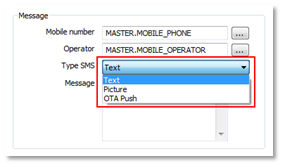
As illustrated on the picture above, three types are available. Depending on the selected type, the content of the “Message” field (Pencil icon) is defined in different ways.
-
- TextThe content is only text data. Click the 'Pencil' icon. The text message can contain personalization fields.
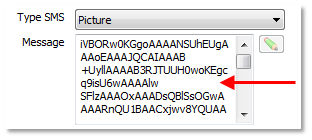
- Picture — Inserting an image into an SMS can be done in two ways:
-
- Converting
it to a Base64 format then pasting the resulting
string to the content of the 'Message'
field:
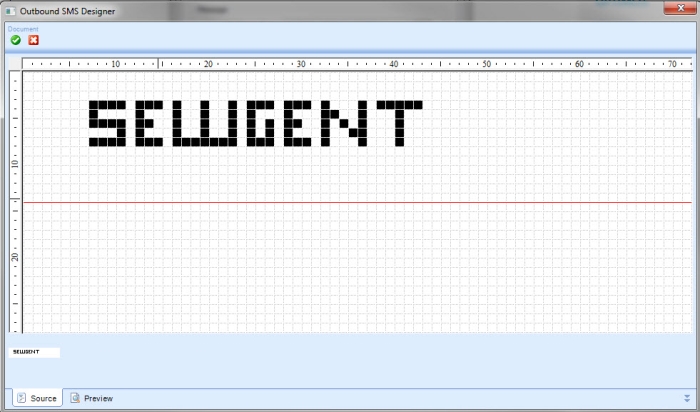
- Using
the “Image Designer” (the “Pencil” icon) —
This window
can be used to create bitmap image by using the right click
(white dot) or left click (black dot). The 'Preview'
tab allows previewing the result on a phone.
- Converting
it to a Base64 format then pasting the resulting
string to the content of the 'Message'
field:
-
- OTA
Push —
“Over The Air” push protocol is used to push content from
a Push Initiator (source server) to a WAP Client located on a
mobile phone via a Push Proxy Gateway. When selecting this type
of SMS, a wizard is available from the “Pencil” icon next to the
“Message” field:

- OTA
Push —
“Over The Air” push protocol is used to push content from
a Push Initiator (source server) to a WAP Client located on a
mobile phone via a Push Proxy Gateway. When selecting this type
of SMS, a wizard is available from the “Pencil” icon next to the
“Message” field:
- Message — Create the content of the text message and it can contain personalization fields. The icon next to the 'Message' field gives access to an editor allowing the composition of the message. A preview of the message is available from the editor. The “Send” icon in the editor's preview panel is used to send “test SMS” to the selected test contact.
Note: The layout can be verified for each contact of the Audience list by selecting the corresponding record on the left side of this tab. However, the final layout may vary depending on the type of mobile phone used by the contact.
Note: The size of the message including its URL is limited to 114 characters. If the size of the SMS exceeds it, the message is not sent.
- Scheduling Method — An interface component can be configured as 'scheduled'or 'instant'.
-
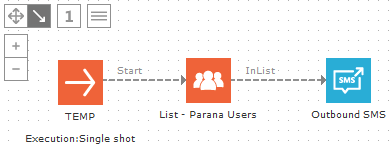
- Scheduled —
As a reference, for a scheduled Email component (default setting),
an email is created for each contact in the journey audience.
Usually the Email component is directly connected after the Audience
component. Likewise, a scheduled SMS component will generate a
text message for each contact in the journey audience when the
journey is executed (single-shot, scheduled, or triggered journeys).
- Instant — The creation of the text
message is triggered by a contact's action (e.g.: a click). Like
an instant email, the creation of the text messages, is done when
a contact clicks a sensor. For example, each time the contact
fills in and submits a request form, a record is created in the
interface table in the back-end to send the text message.

- Scheduled —
As a reference, for a scheduled Email component (default setting),
an email is created for each contact in the journey audience.
Usually the Email component is directly connected after the Audience
component. Likewise, a scheduled SMS component will generate a
text message for each contact in the journey audience when the
journey is executed (single-shot, scheduled, or triggered journeys).
Technical Note:
Text messages are not sent directly from the journey. Records will be
created in an interface table in the back-end, one record for each contact.
And the interface's 'Scheduling' (set in the interface's properties, under
'Processes') determines when and how many text message data are sent to
the mobile provider, for example, 100 records every 10 minutes.
Make sure you have a good balance between the number of interface records
the journey creates and the rate you generate data to the mobile provider.
If the journey generates more interface records (such as a scheduled journey,
creating 1000 interface records per hour) than you send (such as an interval
set to 60 minutes and a batch size of 100), some interface records
will not get exported because interface records are added faster than
you send them. See the interface's properties under 'Processes' for interval
and batch size.
- Feedback —
Together with an Inbound SMS component, a dialog can be created,
such as a mobile quiz, where you ask via an Outbound SMS message who
will be the winner of the next FIFA World Cup. This component expects
feedback (the answer) within two hours. When feedback is received
through the Inbound SMS interface, the Outbound SMS component's 'OnReply' event is executed to continue
in the journey to store the contact's answer and send a thank you
message back with another Outbound SMS component. In this example,
"Feedback is expected"
is checked, and "within"
is set to two hours.
(Refer to the ‘SMS Dialog’ topic get more information on SMS Inbound management, see also Inbound SMS component below.)
Note: The Outbound SMS components are set to 'Instant' scheduling.
Advanced
If there is more than one 'SMS' interface, you can select the correct interface from the drop-down in the 'Advanced' tab. Interfaces are created under 'Processes' and can have a certain 'SMS' plug-in. So it is possible multiple 'SMS' interfaces exists. For each custom interface custom fields and events can be defined in the plug-in (dll-file). If you select another interface from the drop-down, you might see different input fields on the 'General' tab, depending on the interface plug-in.
Inbound SMS component
The Inbound SMS interface allows taking actions based on an incoming text message (SMS) in a Selligent journey. Journeys using the Inbound SMS component are triggered by an action from the contact. This component can be inserted into a journey by dragging it from the 'Interfaces' list in the tree view on the left.
Example: Below,
a simple Inbound SMS journey stores a registration when it receives a
text message 'REGISTER' from the contact.
Note: The Inbound SMS component used here is an example. Customers wanting to use an Inbound SMS component should have a contract directly with a provider. The provider will deliver a short code (ex. 9999) where users can send an SMS to. Examples of providers are Paratel, RingRing for which plugins already exist.
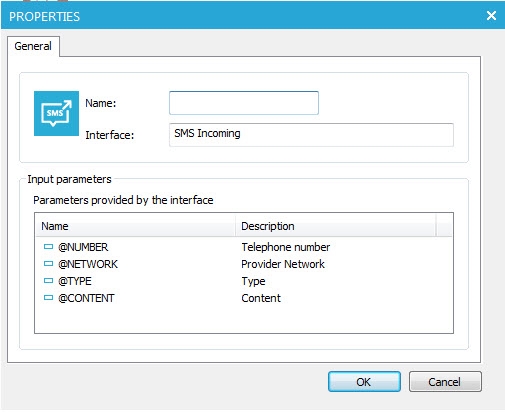
Opening the ‘Properties’ panel of the Inbound SMS component displays the following window:
Note: It’s not possible to configure specific features of this component because it is based on an Interface plug-in where the Input parameters are predefined (Definition: Static). Sometimes the plug-in can define that, in Selligent Campaign, you can add create own input parameters and events (Definition: Dynamic) . This is done in the interface Properties (under Processes) and the values for the input parameters and triggers are defined in the journey.
Dispatching incoming SMS
When the Inbound SMS interface is used as a component in multiple journeys, dispatch rules must be configured to route incoming SMS to the corresponding journey. In the example journey above, the contact sends 'REGISTER' as a text message. When this message is received, this specific 'Register" journey must be executed.
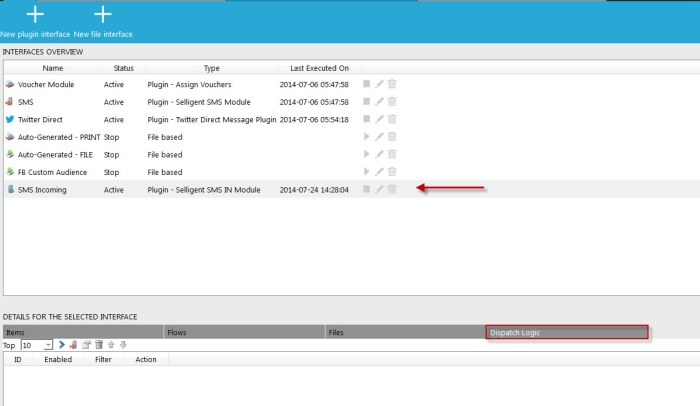
1. To define those rules, Go to the 'Processes' entry and select the ‘Interface’ tab.
2. Then, select the Inbound SMS Interface and click the ‘Dispatch Logic’ tab to access the list of rules for this interface.
3. The list of existing rules is displayed. Each rule represents a specific routing based on a filter (set of criteria) and a target journey.
Note: Rules are ordered by priority, the first in the list is analyzed first, then the second one, etc.
4. Adding a new rule can be done by clicking the ‘New’
button: 
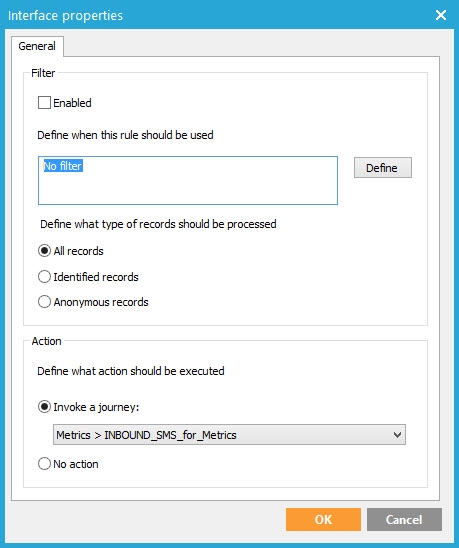
5. The ‘Rule Creation’ window is opened:
From this window the following configuration can be done:
Filter
- Enabled — Sets the rule as active or inactive.
- 'Define’ button — Gives access to the Filter Designer in which properties of the incoming SMS can be used to constitute a filter. E.g. CONTENT = 'REGISTER'
- Processed records — Provides an additional selection on the incoming SMS type based on their record authentication (SMS coming from a contact already stored in an Audience list or not)
Action
- Invoke a journey — Defines the journey to which incoming SMS are redirected (the journey must contain an Inbound SMS component to appear in the list). E.g. the 'Register' journey
- No action — No action is taken
Note: The 'Invoke a journey' drop-down menu will only list journeys where you inserted the Inbound SMS component from this interface. So create the journey first, and setup dispatch logic rule next.
6. Once the configuration is completed, validate with the ‘OK' button to display the rule in the list.
SMS dialog
SMS Dialog is used to create an interaction between the company and the contact based on SMS communication. This initiative can be taken either by the customer or by the company, but the interaction is created through the feedback on an ‘Outbound SMS’ component. The Inbound interface will receive the contact's message, but an Outbound interface will send a message back. On the inbound interface, under 'Dispatch logic' the matching Outbound interface needs to be linked.
If the contact can reply on the send message from the Outbound interface, the dialog can be continued in the journey. The Outbound SMS component's 'OnReply' event can be used to continue in the journey, e.g. store the contact's reply. In the Outbound SMS component's properties, 'Feedback is expected" must be checked, see also Outbound SMS component above.
1. To link the Outbound interface, go to the Inbound SMS interface,
under 'Processes', select the 'Dispatch
logic' tab and click the ‘New Dialog’ button: 

The following configuration window is displayed:
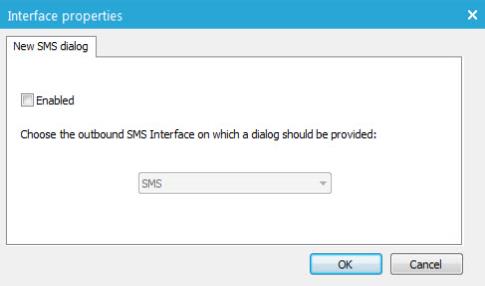
A drop down list is available to select the Outbound SMS interface to link with the current Inbound Interface. Select the required interface and click the ‘Ok’ button.
Note: Only one Outbound interface can be selected to create a dialog between an Inbound and an Outbound interfaces
The dialog is added to the list of rules:

2. In the journey, Check 'Feedback is expected' in the Outbound SMS component properties and use its 'OnReply' event to continue the dialog in the journey.
See 'Outbound SMS component > Feedback' above for an example of an SMS dialog journey.
