
Configure an Email Campaign: Review
The Review section is used to define the Campaign schedule, and to audit and review the Campaign prior to launch.
The features and options available from the Review section are described below.
If you need to move back to the Content section, click previous at the bottom of the screen, or click the content tab
Scheduling
The schedule options available within the Review section will vary depending on the Campaign type.
Note: For more details on the scheduling options available within Cheetah Digital, please see Campaign Scheduling.
Schedule a regular one-off campaign
When a campaign is launched, it goes through two separate and distinct phases: building messages and sending messages.
In the message building phase, the platform identifies the intended recipients of the campaign, identifies all the possible content variations based on the Dynamic Content options used in the campaign, and determines the Personalization values based on any Personalization fields used in the content. The steps in this first phase are often collectively referred to as the queue process.
In the sending phase, the system merges together the data and the content in order to assemble the final messages. These messages are then transmitted to the recipients.
Note: The duration between the two phases must be kept to a maximum of 7 days to ensure data freshness, deliver timely messages, and keep the scheduling process simple.
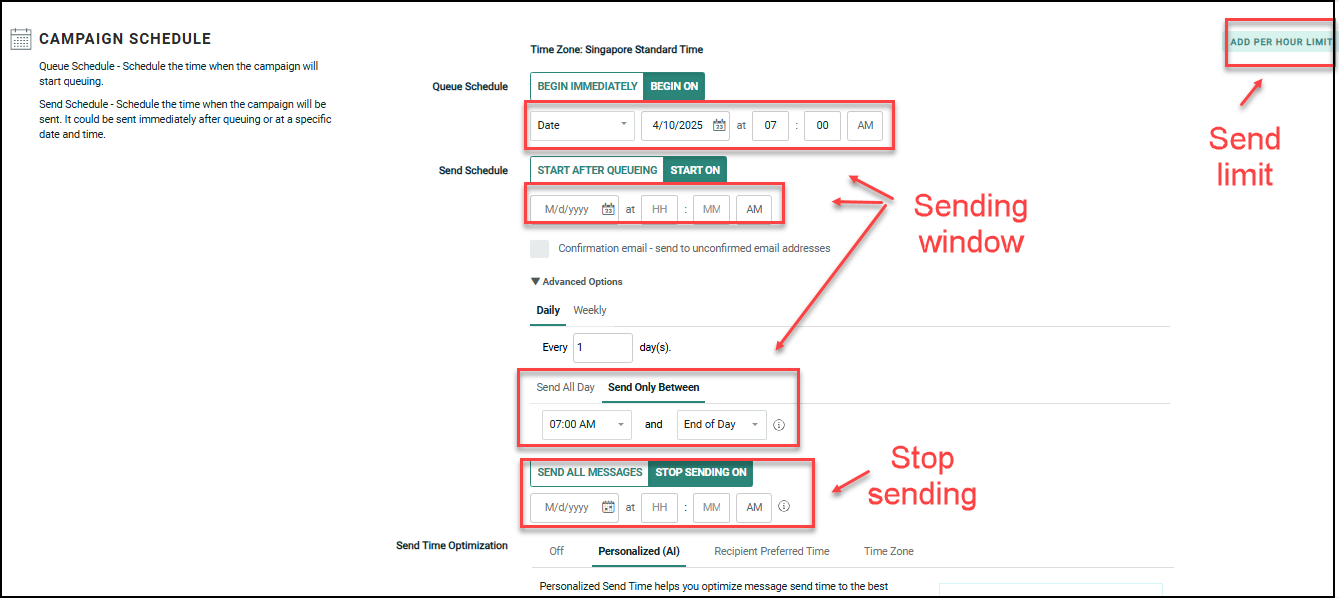
Queue Schedule
To define the Queue Schedule:
-
Within the Campaign Schedule section, next to Queue Schedule, select either:
-
If you want the Queue Schedule to begin immediately when the Campaign is launched, select Begin immediately (this option is selected by default).
-
If you want to set a custom start date / time at some point in the future, select Begin on, and select one of the following options:
-
To set a specific start date and time, select Date from the drop-down menu, then select a date and a time.
-
To set a start date relative to the Send Schedule (for example, Two hours before the Send Schedule start), select Relative Date from the drop-down menu. Enter a value, then select either Days or Hours.
-
-
Send Schedule
Send Schedules are used to control the message sending phase. The Send Schedule consists of the following parts:
-
Send Schedule Start -- Defines when you want to start sending messages -- either immediately after the messages are built, or at some specified date and time in the future. You can also set an end date / time when you want to stop sending messages.
-
Send Frequency -- Define a daily or weekly frequency when the platform will send messages. If the platform doesn't complete the sending process within a single interval, the remaining recipients will stay queued until the next frequency interval.
-
Send Window -- Define a limited daily time range, or "window," during which time the platform will send messages. This must be within seven days of scheduled queue time. If the Campaign doesn't complete the sending process during the Sending Window, the remaining recipients will stay queued until the next window. Or, you can select to send messages all day long, without the use of a Sending Window.
Note: The scheduled send time must be within 7 days (168 hours) of the scheduled queue time.
- If you use the Relative Date option in queue scheduling, you must enter a value that is ≤ 7 days (168 hours) prior to the send date.
- If you select Queue Schedule: BEGIN IMMEDIATELY and Send Schedule: START ON (specific date), you are not restricted to a date within 7 days. However, when the campaign is launched, you will be prompted to enter a valid date.
To define the Send Schedule:
-
Within the Campaign Schedule section, next to Send Schedule, select either:
-
If you want to send messages as soon as they're built, select Start after Queueing.
-
If you want to set a custom start date / time at some point in the future, select Start on, then enter the start date and time for the Send Schedule (this option is selected by default).
-
-
Optionally, click Advanced Options to expand it.
-
Define the Send Frequency:
-
Daily: Enter an interval (every "X" days).
-
Weekly: Select one or more days of the week.
-
-
Select the time of day when messages are sent:
-
To send all day long, select the Send All Day tab.
-
To define a Send Window, select the Send Only Between tab. Enter a specific start time and end time. The end time selection options are limited to specific intervals, for Machine Learning.
-
-
By default, the Campaign's Send Schedule will run until all messages are sent, or until the Campaign is stopped or cancelled. Optionally, to enter a Send Schedule end date, select Stop Sending On, then enter the end date and time.
Schedule a date-triggered campaign
When a Campaign is launched, it goes through two separate and distinct phases: building messages and sending messages.
In the "message building" phase, the platform identifies the intended recipients of the Campaign, identifies all the possible content variations based on the Dynamic Content options used in the Campaign, and determines the Personalization values based on any Personalization fields used in the content. The steps in this first phase are often collectively referred to as the "queue" process.
In the "message sending" phase, the system merges together the data and the content in order to assemble the final messages. These messages are then transmitted to the recipients.
Send Schedule
The Send Schedule controls when the Send Schedule is initially determined to be active, or to go "live." Please note that the Send Schedule start time controls ONLY the first deployment of the Campaign. All subsequent deployments after the first one will be controlled by the Recurrence Schedule Frequency (described below).
To define the Send Schedule:
-
Within the Campaign Schedule section, next to Send Schedule, select either:
-
If you want the Send Schedule to go "live" immediately when the Campaign is launched, select Start after queueing (this option is selected by default).
-
If you want to set a custom start date / time at some point in the future, select Start on, then select a date and a time.
-
Note: The Advanced Options displayed beneath the Send Schedule are not used within a Date-triggered Campaign.
Recurrence Schedule
Once the Send Schedule in a Date-triggered Campaign is "live," the Recurrence Schedule is used to control all subsequent message building and sending phases. The Recurrence Schedule consists of the following parts:
-
Recurrence Schedule Start: This component controls when you want the Recurrence Schedule to be active, or to go "live." You can either select Immediately, meaning the Recurrence Schedule will go live immediately after the Campaign is launched, or you can set a start date / time in the future. You can also optionally set an end date / time for the Recurrence Schedule, or let the schedule run indefinitely (until the Campaign is stopped or cancelled).
-
Recurrence Schedule Frequency: Once the Recurrence and Send Schedules are "live," this component controls when, and how often, the Campaign will build and send messages.
-
Recurrence Schedule Window: This component allows you to define a limited time range, or "window," during which time the platform will build and send messages. If the Campaign doesn't complete the process during the Recurrence Schedule Window, the remaining messages will get built and sent during the next window.
To set the Recurrence Schedule:
-
Within the Date Trigger Schedule section, next to Recurrence Schedule, select either:
-
If you want the Recurrence Schedule to go "live" immediately when the Campaign is launched, select Begin immediately (this option is selected by default).
-
If you want to set a custom start date / time at some point in the future, select Begin on, then select a date and a time.
-
-
Define the Recurrence Schedule Frequency:
-
Daily: Enter an interval (every "X" days). The default setting is "every 1 day."
-
Weekly: Select one or more days of the week.
-
Monthly: Select one of the following:
-
A specific number ("15th of the month" for example).
-
Define a business rule to calculate a date ("second Tuesday of every month" for example).
-
-
Yearly: Select one of the following:
-
A specific month / day ("January 15th" for example).
-
Define a business rule to calculate a date ("second Wednesday in August" for example).
-
-
-
Define the time of day when messages are created and sent. The default option is "once a day, at 9:00 AM."
-
Once a day: Select the time of day when the system should create and send messages.
-
Several times a day:
-
Define the daily frequency for when the system should create and send messages.
-
Optionally define a Recurrence Schedule Window, during which time the system will create and send messages.
-
-
-
By default, the Campaign's Recurrence Schedule will run indefinitely, until the Campaign is stopped or cancelled. Optionally, to enter a Recurrence Schedule end date, select "Stop Building On," then enter the end date and time.
Schedule an event-triggered campaign
When a Campaign is launched, it goes through two separate and distinct phases: building messages and sending messages.
In the message building phase, the platform identifies the intended recipients of the Campaign, identifies all the possible content variations based on the Dynamic Content options used in the Campaign, and determines the Personalization values based on any Personalization fields used in the content. The steps in this first phase are often collectively referred to as the "queue" process.
In the message sending phase, the system merges together the data and the content in order to assemble the final messages. These messages are then transmitted to the recipients.
Queue Schedule
The Queue Schedule controls the message building phase. The Queue Schedule consists of the following parts:
-
Queue Schedule Start -- Defines when you want to start the Queue Schedule to go "live" -- either immediately after the Campaign is launched, or at some specified date and time in the future. You can also set an end date / time when you want to stop building messages.
-
Queue Schedule Frequency -- Once the Queue Schedule has started and is considered "live," the frequency defines when, and how often, the system builds new messages.
-
Building Window: Define a limited time range, or "window," during which time the platform will build messages. If the Campaign doesn't complete the building process during the Building Window, the remaining messages will get built during the next window.
To define the Queue Schedule:
-
Within the Advanced Queue Schedule section, next to Recurrence Schedule, select either:
-
If you want the Queue Schedule to go "live" immediately when the Campaign is launched, select Begin immediately (this option is selected by default).
-
If you want to set a custom start date / time at some point in the future, select Begin on, then select a date and a time.
-
-
Define a custom Queue Schedule Frequency:
-
Daily: Enter an interval (every "X" days). The default setting is "every 1 day."
-
Weekly: Select one or more days of the week.
-
Monthly: Select one of the following:
-
A specific number ("15th of the month" for example).
-
Define a business rule to calculate a date ("second Tuesday of every month" for example).
-
-
Yearly: Select one of the following:
-
A specific month / date ("January 15th" for example).
-
Define a business rule to calculate a date ("second Wednesday in August" for example).
-
-
-
Define the time of day when messages are created:
-
Immediately: The system creates messages immediately after the triggering event occurs (this is the default setting).
-
Once a Day: Select the time of day when the system should create messages.
-
Several Times a Day:
-
Define the daily frequency for when the system should create messages.
-
Optionally define a Building Window, during which time the system will create messages.
-
-
-
By default, the Campaign will build messages indefinitely, until the Campaign is stopped or cancelled. Optionally, to enter a Queue Schedule end date, select Stop Building On, then enter the end date and time.
Send Schedule
Send Schedules are used to control the message sending phase. The Send Schedule consists of the following parts:
-
Send Schedule Start -- Defines when you want the Send Schedule to go "live" -- either immediately after the Campaign is launched, or at some specified date and time in the future. You can also set an end date / time when you want to stop the Send Schedule.
-
Send Window -- Defines a limited daily time range, or "window," during which time the platform will send messages. If the Campaign doesn't complete the sending process during the Sending Window, the remaining recipients will stay queued until the next window. Or, you can select to send messages all day long, without the use of a Sending Window.
To define the Send Schedule:
-
Within the Campaign Schedule section, next to Send Schedule, select either:
-
If you want the Send Schedule to go "live" immediately when the Campaign is launched, select Start after queueing (this option is selected by default).
-
If you want to set a custom start date / time at some point in the future, select Start on, then select a date and a time.
-
-
Optionally, click Advanced Options to expand it.
-
Select the time of day when messages are sent:
-
To send all day long, select the Send All Day tab (this option is selected by default).
-
To define a Send Window, select the Send Only Between tab. Enter a specific start time and end time.
-
-
By default, the Campaign will send messages indefinitely, until the Campaign is stopped or cancelled. Optionally, to enter a Send Schedule end date, select Stop Sending On, then enter the end date and time.
Enable send time optimization
Send Time Optimization (STO) allows you to derive the best time to contact each recipient within the Campaign's audience. The platform will deploy messages to each recipient based on their preferred time of day.
STO supports the following scenarios:
-
Email channel only
-
Regular One-off and Date-triggered Campaigns only; STO is not supported for Event-triggered Campaigns.
-
Advanced scheduling options (Sending Window, Stop Sending date / time , Per Hour Send Limit) can be used in conjunction with STO. The end time selection options are limited to specific intervals, in "Send Only Between" field for Machine Learning. If the STO-calculated send time falls outside of a specified delivery window, the platform will send the message at the nearest time within that allowed time frame.
STO is used in conjunction with the Queue Schedule / Send Schedule options. If the STO process is unable to identify a preferred sending time for a recipient, or if STO is unsupported for a recipient (for example, the recipient does not live in the U.S.), the platform will revert to using the Send Schedule defined for the Campaign, or to using the Default Sending Time (described below) if one is defined.
It's important to note that using STO can cause your Campaign deployment to stretch out over a longer period of time than the Campaign might otherwise take. When using STO, the platform will hold messages in the queue until the recipient's preferred send time is reached. As an example, let's say you launch a Campaign at 11:00 AM, and a recipient in the Campaign audience has a preferred send time of 8:00 AM. The platform will hold this message in the queue until 8:00 AM the next day, then send it.
Squeezing Mechanism for STO Hours:
Send Time Optimization (STO) is used in conjunction with the Queue Schedule / Send Schedule options.
If a recipient's STO hour falls outside the Sending Window, the system will adjust by squeezing these messages within 2 hours before or after the window.
For example, with a Sending Window from 9:00 AM to 5:30 PM:
-
Recipients with STO times of 7:00 AM, 8:00 AM, and 9:00 AM will be sent the message at 9:00 AM.
-
Recipients with STO times of 5:00 PM, 6:00 PM, and 7:00 PM will sent the message at 5 PM.
Note : Send & STO schedules will be disabled when you use Pickup Changes to modify a launched Campaign, to prevent conflicts with Personalized (AI) Send Time.
The different STO configuration options are described below.
Personalized (AI)
Personalized Send Time helps you optimize message send time to the best hour of the day for each person.
Personalized Send Time uses machine learning (ML) models based on recipient engagement to determine the optimal delivery time for each recipient. Using Personalized Send Time helps you to optimize send time to the best hour of the day for each person in your audience, which should help to improve opens, clicks, and overall engagement.
Note: Personalized (AI) Send Time is an optional feature that must be enabled in your account. Please speak with your Zeta Representative for more details.
-
Select the Personalized (AI) tab.
-
From the drop-down menu, select STO Hour to send the campaign at the best hour of the day for each recipient. (see STO Machine Learning for more details on how to configure this table).
If you are enabled to use Personalized send time for day parts, two additional choices will appear in the drop-down: STO AM and STO PM. Personalized send time runs on a 24-hour clock, you can now select a day part, which covers either the morning hours (01:00 to 12:00) or the afternoon and evening hours (13:00 to 24:00).
-
Select Default Sending Time checkbox. The Default Sending Time is used for recipients who do not have the STO hours yet, such as those added to Cheetah Digital after the last ML scoring, or recipient in the ML Control Group.
For best results with Personalized send time:
Schedule to start very early:
Set the Send Schedule as early in the day as possible, such as 1am or 2am.
- If the campaign is scheduled to send after a person's Personalized (AI) best hour, they will receive the message at their best hour on the following day.
- Schedule your campaign to send as early in the day as possible. This will ensure each person gets their best hour on the correct day.
Default to a normal sending time:
Set the Default Sending Time to a typical sending time such as 8am. Recipients will receive your campaign at the default time if their STO Hour is empty. This includes the ML Control Group.
- The ML scores are generated weekly for each email address in your recipient table.
- If you need to send a campaign with newly imported recipients then be sure to set a Default Sending Time in case those recipient email addresses are new and haven't yet been scored.
- The Default Sending Time is also used for people in the ML Control Group, since they do not have an STO Hour.
Send Schedule Chart
The Send schedule chart, displayed in Personalized (AI) tab, shows the campaign’s send schedule and STO setting. The chart illustrates the STO sending behavior based on the campaign schedule configuration, helping you understand how messages are sent to optimize engagement and improve overall campaign performance.
The scheduling chart is only supported for “scheduled campaigns” that have a defined “Start On” time. For recurring mailings, the chart reflects only the recurrence schedule and does not include the first and last occurrences, which may have specific start and end times. For example, if a campaign is set to recur every Monday at 10:00 AM, the chart will show the recurring schedule for Mondays. However, if the first mailing was scheduled to start on January 1st at 9:00 AM, and the last mailing is set to end on March 31st at 5:00 PM, these specific start and end times will not be reflected in the chart. Only the recurring Mondays at 10:00 AM will be shown.
For a one-time campaign, if the campaign’s “Start On” time falls within the “Send Only Between” window, some mailings may be sent during the next sending window. For example, if a campaign is scheduled to “Start On” at 8 AM but has a “Send Only Between” window defined as 7 AM to 7.30 PM, STO will use 7 AM for its calculations, including 6 AM and 5 AM as part of the adjusted times leading up to 7 AM.
However, because the campaign is scheduled to begin sending only at 8 AM, audiences with STO times of 5 AM, 6 AM, and 7 AM will not receive the mailing at 8 AM. Instead, they will receive it at 7 AM. the next day.
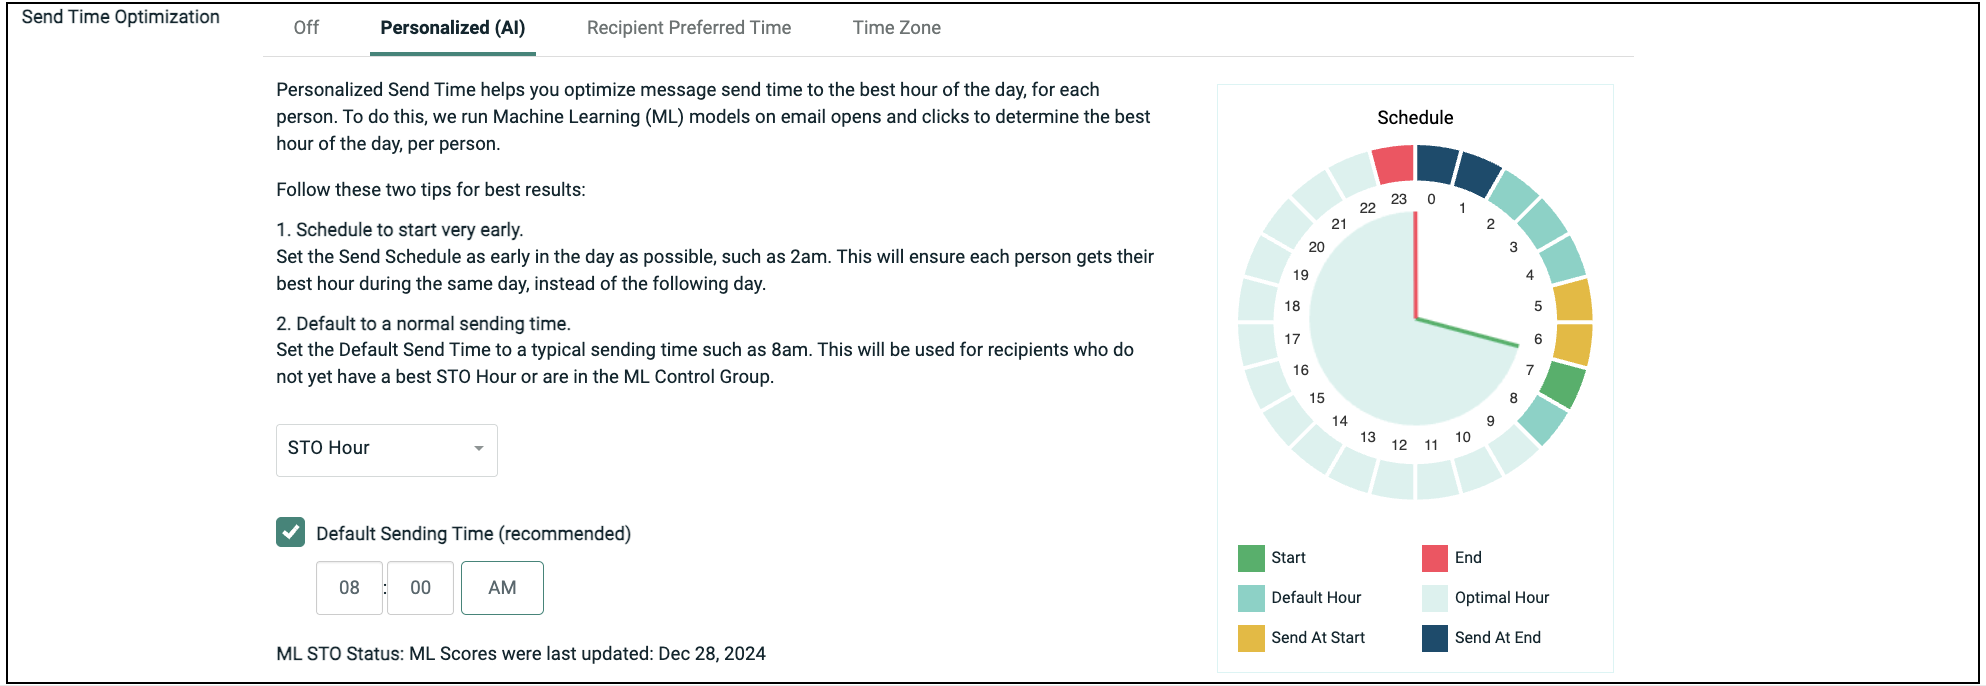
The chart shows the following details:
Start: This is the beginning of the sending window.
End: This refers to the “End Send” hour of the sending window.
Default Hour: Users with STO hours highlighted in this color will be sent the mailing at the Default Sending Hour.
Optimal Hours: Users with STO hours highlighted in this color will be sent the mailing at their designated STO time.
Send at Start: Users with STO hours highlighted in this color will be sent the mailing exactly at the Start Send Time.
Send at End: Users with STO hours highlighted in this color will be sent the mailing at the Stop Send Hour.
You can also refer Personalized Send Time User Guide.
Recipient Preferred Time
Recipient Preferred Time utilizes either a recipient's local time (as determined by Postal Code) or a preferred delivery time to optimize Campaign delivery.
The Recipient Postal Code option uses a postal code field to optimize Campaign deployment based on each recipient's local time. To use this feature, the Campaign's source table must have a dedicated Postal Code field that stores the Postal Code for each recipient in standard U.S. 5-digit ZIP Code format (not ZIP +4). See Working with Fields for more information on how to indicate that a field contains Postal Code data.
Note: This feature is available only for recipients who live in the United States.
-
Select the Recipient Preferred Time tab.
-
Select the Recipient Postal Code radio button.
-
From the drop-down menu, select the Postal Code field that you want to use.
The Recipient Preferred Time option lets you optimize Campaign deployment based on data imported into the platform from a third-party source. The Preferred Time must be stored in a Date / Time field. The platform will consider only the hour value of the Date / Time value when identifying the preferred sending time; the date, minute, and second components are ignored.
-
Select the Recipient Preferred Time tab.
-
Select the Recipient Preferred Time radio button.
-
From the drop-down menu, select the field in the Cheetah Digital table that contains the preferred time data.
-
Optionally, you can use the Recipient Preferred Time feature in conjunction with a Postal Code field to derive a recipient's local time zone. To use this feature, the Campaign's source table must have a dedicated Postal Code field that stores the Postal Code for each recipient in standard U.S. 5-digit ZIP Code format (not ZIP +4). See Working with Fields for more information on how to indicate that a field contains Postal Code data. Check "Combine with recipient Postal Code," then select the Postal Code field that you want to use to derive each recipient's time zone.
Note: This option should be used only when the recipient preferred time source doesn't already map to a recipient's local time zone.
Time Zone
The Time Zone option lets you optimize Campaign deployment based on each recipient's local time zone. To use this feature, the Campaign's source table must have a dedicated Time Zone field that stores the time zone value for each recipient (see Working with Fields for more information on how to indicate that a field contains Time Zone data). For more details on valid time zone field values, please see STO Time Zone IDs.
Note: This option is available for Regular One-off Campaigns only.
Even when the Campaign is scheduled by time zone, the email might be delayed by other factors, such as a Sending Window or a Per Hour Send Limit. If using a Sending Window, please note that the Sending Window is adjusted to the Campaign's overall time zone, and NOT to each recipient's specified time zone.
To configure the Time Zone STO option:
-
Select the Time Zone tab.
-
From the drop-down menu, select the field in the Cheetah Digital table that contains the Time Zone data.
Enable per-hour send limit
By default, the platform will send messages as quickly as it can after they've been created. However, to build and maintain a good sending reputation, care must be taken to limit the number of messages being sent out from any given IP Address at a time (this process is known as "throttling"). Throttling is especially important when starting to send messages from a new IP address (this process is known as "IP warming").
If your Campaign contains split cells, the selected flow rate is applied to every cell in the Campaign, which may result in a higher total flow rate than desired; the selected flow rate is not divided between the cells. As an example, let's say your Campaign has three cells, and you set the flow rate to "300K / hr." This flow rate is applied to each of the three cells, resulting in a total message send rate of 900K messages per hour.
If you use a Seed List in a Campaign that has a Send Limit, the platform treats the Seed List separately. The Seed List messages will get sent in the first hour, but these Seed List messages do not count toward the hourly Send Limit. For example, let's say you have twenty recipients in your Seed List, and you configure your Campaign with an hourly Send Limit of 500 messages per hour. In the first hour after the Campaign is launched, the platform will send the first batch of 500 records and the twenty Seed List messages. Then in the second hour, the platform will send the second batch of 500 records, and so on.
To set a hard limit on how many messages are deployed per hour:
-
Within the Campaign Schedule section, click Per Hour Limit button. Per Hour Limit field is added within this section.
-
In the Per Hour Limit field, enter the maximum number of messages that you want sent per hour, in increments of 500.

Note: If you enter a number that is not an increment of 500, then this is defaulted to the next highest increment of 500.
Send "confirmation" email
In order to comply with certain regional marketing regulations, Cheetah Digital can optionally be configured to enforce a double opt-in method for validating consumer eligibility. If using this method, the consumer must register to receive your marketing email messages, AND confirm the registration. Only consumers who have completed both steps in this process (i.e., the double opt-in) will be considered eligible to receive email messages.
Enforcement of the double opt-in is managed at the Sender Profile level. A Sender Profile can be configured with an optional "Requires Confirmation" parameter. When this parameter is enabled, all email Campaigns deployed using this Sender Profile will check the consumer's double opt-in status before sending that consumer a message.
Note: Configuring a Sender Profile to enforce the double opt-in status requires Administrator-level access to Cheetah Digital. Please speak with your Client Services Representative for assistance on configuring your Sender Profile.
If using the double opt-in process, you typically need to send a "Confirmation request" email message to a consumer who has submitted their registration (either via a Web Form or an Email Submission Handler). However, the consumer's status at this point in the process is still "Not confirmed" because they have not yet confirmed the registration. In order to deploy email messages to an "unconfirmed" consumer, the platform offers an override feature. This feature is intended primarily for this use case, when trying to send confirmation email messages to unconfirmed consumers.
To enable the override feature for Confirmation emails, place a check mark in the Confirmation Email - send to unconfirmed email addresses check box. Please note that this check box is enabled only if the selected Sender Profile for this Campaign has been configured to "Require Confirmation."
For more information on the email double opt-in process, please see the Email Submission Handler Help topic.
Proofing and Auditing
The Proofing and Auditing sub-section allows you to send proof messages and to audit the Campaign counts prior to launching the Campaign.
A proof is a sample message that gets sent to a select individual, or group of individuals, in order to verify that the content, format, and appearance of the message is accurate.
Send proofs to a proofing group
Cheetah Digital can generate test versions of an message, prior to actually launching the Campaign. These test versions, called "proofs," are used to check for accuracy in grammar, content, format, and appearance, and to verify that Personalization fields are correctly populated. In order to streamline this process, Cheetah Digital allows you to define and save a designated set of recipients called a Proofing Group.
To send proofs to a Proofing group:
-
From within the Review tab, navigate to the Proofing and Auditing section.
If your Campaign contains Cells & Splits, you must choose either a specific sub-cell (which sends proofs for only that sub-cell), or the top-level Campaign (which sends proofs to all sub-cells). Click 3. Setup and Launch Campaign. To pick a sub-cell, select it from the Cell Tree. To pick the top-level Campaign, select the top-most item in the Cell Tree.
-
Select Proof from the Action drop-down menu.
If you want to run pre-launch audits and proofs, select Audit and Proof . You must then set up your auditing options (see Audit section for more details).
-
In the Proofing Group field:
-
Select an existing Proofing group by typing in the name of the desired group and click the desired group from the displayed list.
-
Or, click
 icon and select from the existing groups in the Browse Proofing Group popup window.
 -
Alternatively, create a new Proofing group by clicking
 . The Create New Proofing Group popup window is displayed. Enter the details as below and click Create .
 -
Name for the group
-
Data source (preselected, same as the Campaign)
-
Select a type (Random Records or Specific Records)
Use Specific Records: Uses the Proofing group recipients to build and populate the proof message content. If using this option, the Proofing group recipient must exist as a record in the Proofing group's source table, with the necessary contact information (email address, mobile phone number, etc.) and other fields needed for Dynamic Content and / or Personalization.
Use Random Records: Randomly selects records from the Campaign's audience to build and populate the proof message content.
To add recipients to the new Proofing group, click
 icon. The Proofing group tab is displayed, where you can add recipients to the required Proofing group. When finished click Edit > Save. To return to your Campaign, click the Campaign's tab in the Top Navigation Pane.
 -
-
-
By default, the Campaign audience are selected and populated for the proofing records. However, you can optionally designate alternate audience for proofing, in the Alternate Data Set field. This alternate audience is defined through the use of a Filter. Type in the filter name, browse using
or create a new filter using icon. -
In the Proof Prefix field, enter a text string. This value will be inserted in front of the subject line of the proofing message, in order to help the recipient identify the message as being a test proof.
-
In the Proofing Limit field, optionally enter the maximum number of proofing messages that you want to generate.
-
Click Send Proofs.
-
If your Campaign contains Cells & Splits, the screen displays your cell hierarchy within the Proofing and Auditing section. Place check marks next to each cell from which you want to send proofs.
-
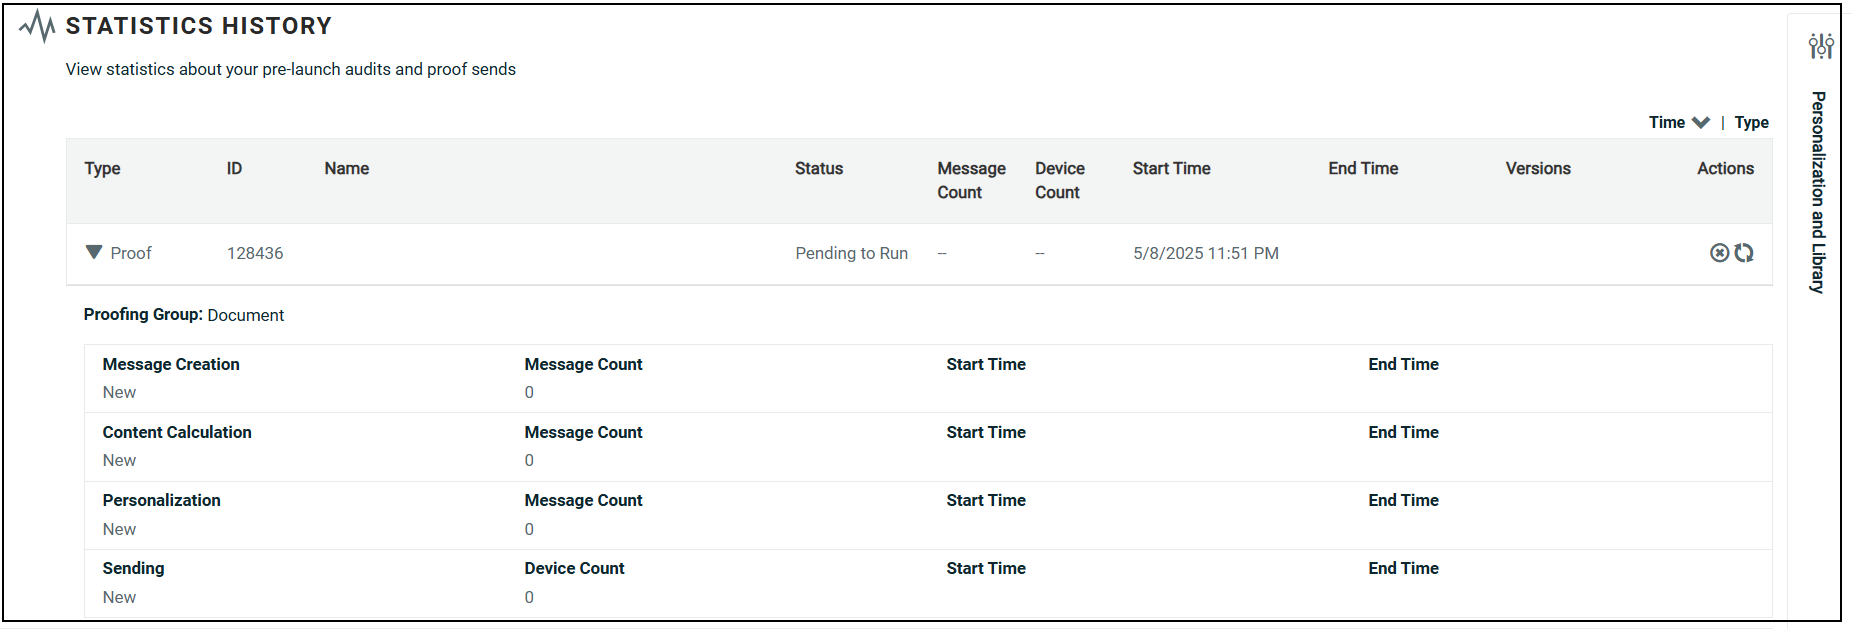
The progress of the proofs as they are created and sent is shown in the Statistics History section.
Send quick proofs
Proofing refers to the process of testing a marketing campaign by sending out sample messages to a special set of recipients referred to as a Proofing Group. Proofing is intended to verify that your marketing message appears the way you intend, and that any dynamic content within the message is being generated and populated correctly.
The Quick Proof function provides a simpler method to test the different content versions of an email Campaign than a Proofing Group. Quick Proof offers the following advantages over traditional Proofing Groups:
-
The user can send one-off proofs to email addresses that may not be in the database or in a Proofing Group.
-
The user can quickly select only the Dynamic Content that he or she wants to test, and test every iteration of that Dynamic Content.
-
The user can test Dynamic Content without having to find sample records that match the desired criteria.
Note: You can also send Quick Proofs from the Preview window (see Email Campaign for more details on this section). The Quick Proof method available from within the Preview window provides nearly the same functionality as the method available from the review section or More Actions in Tool bar, but with one notable difference -- the Preview window method lets you enter custom Personalization values. Conversely, the review section method or More Actions in Tool bar of Quick Proofing will use default values for any Personalization fields in the Campaign content.
Please note the following restrictions in regards to the Quick Proof function:
-
Quick Proofs are not available if the Campaign content contains Looping Blocks.
-
The eDesign Optimizer and Add Alternate Data Set options will not be available when using Quick Proof.
-
Any Personalization within the Campaign content will display the default values.
-
You can create a reusable Quick Proof-only Proofing Group comprised of the Quick Proof recipients (see Proofing Groups for more details). However, a Quick Proof-only Proofing Group doesn't have a designated source table, which limits its use to the following scenarios: an EDP-driven Campaign, or a Quick Proof within a Cheetah Digital Campaign.
To run a Quick Proof:
-
If your Campaign contains Cells and Splits, you must choose either a specific sub-cell (which sends proofs for only that sub-cell), or the top-level Campaign (which sends proofs to all sub-cells). Click "3. Setup and Launch Campaign." To pick a sub-cell, select it from the Cell Tree. To pick the top-level Campaign, select the top-most item in the Cell Tree.
-
In the Tool Bar, click More Actions > Send Proof. Alternately you can click on Send Proof at the right end of the Proofing and Auditing section of the Campaign Review tab. The Quick Proof pop-up window is displayed.
-
Select the email format – either HTML or Plain Text.
-
The Send Proof to field allows you to enter the email addresses to which you want to send the proof. You can either:
-
Manually type in one or more email addresses. If entering multiple addresses, they must be separated by commas or semi-colons.
-
Send the proof to an existing Proofing Group by clicking the Browse icon to the right of the Send Proof to field. A pop-up window is displayed, listing all of the existing Proofing Groups for the email channel. Select the desired group. The pop-up window is closed, and the field is populated with a comma-separated list of all the email addresses in the Proofing Group. Optionally you can then edit this list by removing or adding email addresses.
-
-
If your Campaign contains Cells and Splits, and you selected a parent cell above in step 1, the Cells tab is populated with a cell hierarchy. Place a check mark next to each sub-cell that you want to test. If you selected a sub-cell above in step 1, only that one sub-cell is displayed in the Cells tab. Based on the number of cells that you select, the "Cell Count" in the top-right corner of the Cells tab indicates how many proofs will be sent to each recipient. The system imposes a hard limit of 250 proofs to each recipient. If you surpass this threshold, an error message is displayed. You must then reduce the number of selected cells in order to decrease the Proof Count.
-
If your Campaign contains Dynamic Content, the Dynamic Content tab is populated with a tree diagram, showing all of the Dynamic Blocks, along with the rules within each Dynamic Block. Place a check mark next to a Dynamic Block and rule that you want to test. By default, the first rule is selected for each Dynamic Block. You can optionally select multiple rules within a Dynamic Block, and / or select multiple Dynamic Blocks. For Dynamic Block that use the IF > IF structure, all selections will be contained in a single proof version.
Note: If your Campaign includes static Content Blocks, they will appear in the Dynamic Content tab as well. Content Blocks will automatically be selected and uneditable, as they will always be included in your proofs.
-
Based on the number of Dynamic Content rules that you select, the Proof Count in the top-right corner of the Dynamic Content tab indicates how many proofs will be sent to each recipient. The system imposes a hard limit of 250 proofs to each recipient. If you surpass this threshold, an error message is displayed. You must then reduce the number of selected rules in order to decrease the Proof Count.
-
When finished, click send proof to generate and send the proofs.
The Proofs status area shows the progress of the proofs as they are created and sent. See "Review Proof Results" below for more details.
Review proof results
Each time you run proofs, the system adds a new row to the grid in the Statistics History section of the screen. Also, if your campaign contains Cells and Splits, and you selected the top-level campaign above in step 1, each sub-cell is listed as its own row within this grid.
In the Statistics History section, click the desired row to see the results from that execution. The row is expanded to show the start and end times of the proofing execution, the number of messages sent, and a link to the Preview window. Additional detail is provided for each step in the deployment process, along with the recipients of the proofing message (such as the Proofing Group).
Run pre-launch audits
To configure and run pre-launch Audits:
-
From within the Review tab, navigate to the Proofing and Auditing section.
If your Campaign contains Cells & Splits, you must choose either a specific sub-cell (which sends proofs for only that sub-cell), or the top-level Campaign (which sends proofs to all sub-cells). Click "3. Setup and Launch Campaign." To pick a sub-cell, select it from the Cell Tree. To pick the top-level Campaign, select the top-most item in the Cell Tree.
-
Select Audit from the Action drop-down menu.
If you want to run pre-launch audits and proofs, select Audit and Proof . You must then set up your auditing options (see Audit section for more details).
-
Optionally, to receive the pre-launch auditing statistics by email, place a check mark in the Email Excel Stats Report when complete check box.
-
Optionally, you can set up custom Cross Tab Audit reports. From the "Cross Tabs" drop-down menu, select the field you want to audit, then click the add icon
 . The field is added to as Map Fields. Repeat this step as needed to add more fields to your Cross Tab Audit report. If you need to remove a field, click X next to the Map fields.
-
Click Save and Audit.
The audit process validates that your Campaign has all the necessary components, such as a Sender Profile, an audience Filter, an Opt-Out Message, etc. Any errors are displayed at the top of the screen.
If your Campaign passes the above validation steps, the the stat calculation process begins. The Statistics History section shows you the progress of each of the main auditing steps:
-
Message Creation: This step runs all the campaign audience logic to determine the final number of recipients to be sent, and assigns them message IDs. This step consists of the following:
-
Run the Campaign audience Filter, any deduping logic, and any Exclusion Lists or Seed Lists.
-
Check the banned lists, status fields, and invalid addresses.
-
Run any custom stored procedures that were added to the Campaign.
-
-
Content Calculation: This step runs through all the Content Blocks to determine all the different possible permutations of that content, and assigns each recipient to a specific permutation.
-
Personalization: This step runs through all of the Merge Fields, Looping Blocks, etc., and pulls personalization fields and data specific information needed to populate the content.
-
Sending: This step contains all of your information from the above steps, and is ready to be pulled by the merge server.
-
When the audit is finished, the Statistics History section shows your audit results with a status and the time the stats were calculated. For more information on the auditing results, please see Review Pre-Launch Audits below.
Review pre-launch audits
To view the details for an audit run:
-
Click the Review chevron.
If your Campaign contains Cells and Splits, click 3. Setup and Launch Campaign. Then, from the Cell Tree, pick the top-level Campaign (Audits are executed at the Campaign level, not at a sub-cell level).
-
High-level statistics from the most-recent audit run are displayed in the Recent Statistics section.
-
Your previous audits are listed within the Proofing and Auditing section. Each time you run pre-launch audits on your Campaign, the system adds a new row to the grid in the Statistics History section of the screen.
-
Click on the desired row to see the results from that execution. The row is expanded to show the auditing details, as described below.
-
The menu icon within the row provides access to the following additional features:
-
Preview: View the Preview window.
-
Spam Score: View the Spam Score results for your message.
-
Cross Tab: If you defined custom Cross Tab Audits, you can view the results by selecting this item. The system displays the Pre-Launch Audit Cross Tab Results pop-up window. This window shows each field you selected for auditing. For each field, the report shows the counts for every value contained within that field. If your campaign includes cells and splits, you can view cross tabs for the separate versions. Click Download Stats to export the results in Excel spreadsheet.
-
Download: Exports the Cross Tab results.
After you select a specific auditing run, the system displays the details for that run, as described below.
-
Audience Processing
After expanding an audit row, the Audit Processing tab is selected by default. This section provides details on the Audience record quantities. The audit starts with the number of records selected by the Campaign's Audience Filter. Next, the platform identifies how many Audience Filter records were determined to be Non-mailable and the reason why. Possible reasons for being non-mailable are banned addresses, blank or invalid contact information, or being part of an Exclusion List. The resulting number shows how many recipients will be targeted by your Campaign when it launches (Audience Filter quantity minus non-mailable quantity).
Message Processing
Click the Message Processing tab to see the Message Processing section. This section shows the results of each step in the audit process -- Message Creation, Content Calculation, Personalization, and Sending. This section shows the status of each step, the start and end timestamps, and the record quantity.
Message Versions
Click the Message Versions tab to see the Message Versions section. This section shows the number of content variations within your message, and how many recipients will receive each variation. Next to the desired version, you can view the Spam Score for this content variation, or see a Preview.
STO
This tab provides insight to view the STO projected distribution of messages send per hour before launching a campaign, for Email Campaigns with STO settings. It helps to anticipate email volume distribution over time, ensuring a smooth and even spread of messages rather than a sudden surge that could overwhelm mail servers. It allows marketers to verify whether STO-selected send times align with expected peak engagement hours and enables adjustments if needed to maximize open rates and conversions.
The first bar shows the count of users that will be sent the mails at the start of the send window. This group includes both users with STO time set as the start send time and those with STO time set 2 hours before the start time.
The last bar shows the count of users who will be sent the mails at the end of the send window. This group includes both users with STO time set as the end send time and those with STO time set 2 hours after the scheduled end time.
Note: This is only available for non-split-cell, one-time, and date-triggered email campaigns.
Content Breakdown
This section displays a detailed breakdown of the various assets utilized within your message, such as Content Blocks, Dynamic Blocks, and Opt-Out Messages, for example. If you click on the expand button (plus-sign icon) next to an asset, the system displays the details of that asset (optionally, you can click expand all to automatically expand every asset listed).
If your message contains Dynamic Content, this section allows you to view how many records will receive each variation of your message content. Click on the Dynamic Block to expand it. The system displays all of the Rule / Block Pairs defined within that Dynamic Block, followed by a record quantity.
Calculate cells and splits
If your Campaign contains Cells and Splits, you can calculate the distribution of the Campaign Audience across all of the sub-cells. This feature is useful as an auditing tool, to verify that you've defined your Cell Tree correctly.
-
Click "3. Setup and Launch Campaign." Then, from the Cell Tree, pick the top-level Campaign (Audits are executed at the Campaign level, not at a sub-cell level).
-
Click the review chevron.
-
Within the "Proofing and Auditing" section, from the "Action" drop-down menu, select "Calculate Cells and Splits."
-
Click calculate cells and splits. The system calculates the distribution of the Campaign Audience.
-
When finished, the "Cells and Splits Stats" section is populated with the results. For each sub-cell in your Campaign, this section displays the cell code, a status, the split method used to create the cell, and a count of the cell's Audience.
-
Optionally, to export the "Cells and Splits Stats" section, click export to excel.
Details
The Details sub-section is intended as a final check on a Campaign prior to launch. This section displays key information about the Campaign, such as the schedule, Filter, Seed List, Subject Line, etc.
Review Campaign Details
To review the Campaign details:
-
If your Campaign contains Cells and Splits, click 3. Setup and Launch Campaign. Then choose either a specific sub-cell (to review details for only that sub-cell), or a parent cell (to review details for all its sub-cells) from the Cell Tree in the left-hand pane.
-
Click the review chevron.
-
Review the Details sub-section.
-
If your Campaign contains Cells and Splits, and you selected a parent cell above in step 1, you can review the details for all the sub-cells beneath this parent cell. Click the Cells and Splits Details link. The Cells and Splits Details pop-up window is displayed. This window lists every sub-cell beneath the selected parent cell. If you scroll to the right, the window displays every Campaign element being tested, and how that element is configured for every sub-cell. When finished, click ok.
Launching
The final step in the Campaign process is to launch it.
Launch the Campaign
To launch a Campaign:
-
In the Review tab, at the bottom of the screen, click Launch Campaign. Optionally, you can also select Actions > Launch Campaign in the Tool Bar. The "Launch Campaign" pop-up window is displayed.
If your Campaign contains Cells and Splits, click 3. Setup and Launch Campaign. Then, from the Cell Tree, pick the top-level Campaign (Campaigns must be launched at the Campaign level, not at a sub-cell level).
-
Place check marks next to the processing steps where the platform should stop and require an approval before continuing on to the next step.
-
Content Calculation: Confirm the stats before letting content calculation begin.
-
Personalization: Review the dynamic content permutations before letting personalization begin.
-
Sending: Require approval of the overall Campaign before sending messages.
For each option that's checked, an approval will be required before the Campaign can proceed. If your Campaign contains Cells and Splits, the selected approval steps apply to all cells in the Campaign.
-
-
Click Save and Launch. The system begins the Campaign launch process, and the Status screen is displayed.
After you launch a Campaign, you can view statistics and status information regarding each step in the Launch process, in the Status tab.
