
Campaign Configuration: Email
For many marketers, the email channel is a critical method for contacting their consumers. Cheetah Digital provides a fully-featured platform for managing your email message content, creating Campaigns with sophisticated audience selection tools and personalization options, and scheduling and deploying your Campaigns according to your marketing strategy.
The platform supports two different data sources for building Email Campaigns -- the Cheetah Digital database, and the Engagement Data Platform (EDP). This Help topic describes Campaigns built off the Cheetah Digital database; for more details on Email Campaigns built off the EDP, please see Configure an Email Campaign (EDP).
This topic describes all of the various configuration options available for Email Campaigns. This topic assumes that you have already created or uploaded the Campaign.
The Campaign screen is organized into four main sections available by clicking the appropriate tab at the top of the screen.
|
Setup |
Content |
Review |
Status |
Analytics |
Note: Email Campaigns can also be configured on the "classic," or legacy Campaign screen, although the classic Campaign screen lacks many recent feature enhancements and usability improvements. As a best practice, unless you have a specific reason for needing to use the classic Campaign screen, you should typically use the current Campaign screen instead.
Campaign settings
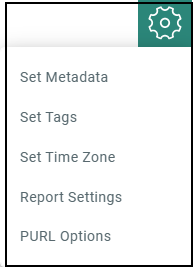
The ![]() icon at the top of the screen provides access to the following general Campaign settings.
icon at the top of the screen provides access to the following general Campaign settings.
Configure campaign metadata
To assign Metadata values to a Campaign from within the Campaign screen:
-
In the Tool Bar, click Settings > Set Metadata. The Metadata pop-up window is displayed, listing every Metadata field defined for this account. A red asterisk is displayed next to the fields that are required for Campaign launch.
-
Enter or select the desired Metadata values.
-
Click Ok.
For more information on setting up Metadata fields, see Metadata Settings.
Assign campaign tags
Optionally, you can assign one or more Tags to your Campaign. These Tags serve as an organization tool that allow you to group together items for reports and Filters.
Note: If your Campaign contains Cells & Splits, the Tag can be added only at the top-level Campaign, and not to an individual cell.
To assign a Tag to the Campaign:
-
In the Tool Bar, click Settings > Set Tags. The Mailing Tag pop-up window is displayed.
-
In the Add Tag field, begin typing the Tag value. The system displays a pop-up menu of all the existing tags. You can select one of these tags, or type in a new one and press Enter.
-
Optionally, repeat steps 2 and 3 to add more tags. To remove a tag, click the X next to the tag label.
-
Click Ok.
Set time zone
The first time you log into Cheetah Digital, the platform prompts you to set your time zone. Once the time zone is set, all system dates and times will display according to that time zone (this setting can later be modified through the Update Profile screen). However, when scheduling a Campaign, you can manually overwrite the user profile setting, and establish a different time zone to be used for just this Campaign.
To establish the time zone used for all scheduling activities related to this Campaign:
-
In the Tool Bar, click Settings > Set Time Zone. The Set Time Zone dialog box is displayed.
-
From the Time Zone drop-down menu, select the desired time zone.
-
Click Ok.
Configure report settings
Cheetah Digital tracks and reports various system events, such as user clicks, opens, delivery, and more. The platform allows you to configure various report options at a Campaign level.
To set the Campaign's report options:
-
In the Tool Bar, click Settings > Report Settings. The Report Settings pop-up window is displayed.
-
The Delivery Audit section is an optional feature that must be enabled in your account. This option is available only for Regular One-Off Campaigns in the email Channel. The platform maintains a special list of email addresses across all different domains. This list functions much like a Seed List, in that your Campaign will send copies of the message to these addresses. This feature validates the entire mailing process by checking your sending infrastructure, message content, and sending reputation. The feature indicates whether your message landed in the consumer's inbox or spam folder, or if it was blocked. To utilize this feature for this Campaign, place a check mark in this check box.
Note: Please speak with your Customer Service Representative for more information on enabling the Delivery Audit feature.
-
To use consistent users for seeding across all Campaigns, select the check box next to the option Inbox Monitor. This also excludes user's personal details from email headers, helps to achieve uniformity in subject lines and content, enhances data security, provides reliable reporting and also safeguards sensitive information, leading to a smoother and more compliant campaign experience.
-
Tracking information is constantly gathered by the platform. However, the reports are updated only when manually executed, or on the schedule set for Automatic Updates on the Update Options screen. Optionally, you can define an automated update schedule that applies only to this Campaign. To define an automated Campaign-specific update schedule:
-
Place check marks next to the days of week on which you want the automated update schedule to run.
-
From the Every X Hours drop-down menu, select the automated update frequency. The possible frequency ranges from every hour to every twelve hours.
-
From the First X Days drop-down menu, indicate for how long this automated schedule should run after the Campaign is initially launched. The possible values are 5, 10, 15, 20, 25, or 30 days.
-
-
Click Ok.
Configure PURL options
A Personalized URL (or "PURL") is a website address that contains one or more personalized elements, such as the consumer's first name and last name, for example.
Before you can use a PURL in your Campaign, you must complete the following setup steps:
-
Create a PURL Field
-
Bind that PURL Field to a PURL Domain
-
Assign the PURL Domain to a Web Form
After you've completed all those steps, you can bind the Web Form to your Campaign. When you bind the Web Form to the Campaign, the platform will automatically generate the values for the PURL Field.
To bind the Web From to your Campaign:
-
In the Tool Bar, click Settings > Set PURL Options. The PURL Options pop-up window is displayed.
-
The PURL field is used to select the Web Form. Either begin typing in the Web Form name, or click the search button (magnifying glass icon) to search for it.
-
From the URL Type drop-down menu, select either Prefix or Suffix to control where you want the personalization field(s) inserted into the URL.
-
Click Ok.
For more information on setting up Personalized URLs, see the PURL Domains topic.
Enter email header information
Most of the Email Header fields, such as" From Address" and "To Address," are available from the main Campaign screen. The platform also allows you to add optional Blind Carbon Copy (BCC) and Reply-to fields.
To add Email Header fields:
-
In the Tool Bar, click Settings > Email Headers. The Email Headers pop-up window is displayed.
-
Optionally, enter one or more Blind Carbon Copy email addresses into the BCC Address field. These email addresses will receive a copy of the Campaign message, but the addresses are not visible to the recipient.
-
Optionally, enter a Reply-to email address in the Reply-to field. This address instructs the recipient's email client where to send reply messages.
-
Click Ok.
Upload custom fonts
Marketers can easily achieve on-brand content designs by uploading your company fonts quickly and easily. This will then be available for selection from the font list in the Content Designer.
Note: To upload custom fonts, you must have the Content Designer feature enabled in your account.
To upload user custom fonts:
-
In the Tool Bar, click Settings > Custom Fonts. The Custom Fonts dialog box is displayed.
-
Click Add.
-
In the displayed Font Settings dialog box, enter the following details, and then click OK.
-
Font Display Name: The name of the custom font.
-
Font CSS URL: The URL for Cheetah Digital to retrieve the custom font.
-
Font and Its Fallback: This tells Cheetah Digital the fallback to use if the system fails to retrieve the font from the Font CSS URL above. The first value must be the current custom font name, followed by the fallback to use.
-
-
Click OK.
The custom fonts are available for the Content Designer Elements: Title, Paragraph, List and Menu. This can be selected from the Font family list in the Content Properties. See Content Designer > Add Content Elements to a Design for more information.
Preview
The Preview window allows you to view a rendering of your message content as it will appear to your recipients. The Preview window also provides additional features as described below.
To see a preview of your message content:
-
In the Tool Bar, click preview. The system displays a pop-up window containing a simulated version of your content, as well as the email header information (From address, To address, Subject line and Preheader pairings). The preheader will appear following the subject line and a “-” just as it will appear in the inbox preview in the Gmail browser email client. Optionally, you can collapse the header section by clicking the blue up-arrow icon above the email content.
-
If your content contains multiple format versions (HTML, plain text, etc.), you can select which version you want to view. From the format drop-down menu, select a format version. The screen is refreshed to show the selected version of the content.
-
TheDevice Widthdrop-down menu contains different screen resolution options for Mobile, Tablet, and Desktop devices. From this menu, select the device and resolution that you want to simulate. The screen is refreshed to show the content formatted for that device and resolution.
-
When finished, click ← at the left corner to exit the Preview window.
Note: When usingLiveContent content in your email campaign, an impression is always recorded on the content when previewed (or the URL requested in proofing) and will require your LiveContent credit.
There is a work around to prevent charging credits during previewing, through the use of seed list feature on LiveContent. In every LiveContent account, users can add up to 100 seed emails, designed especially for testing. This allows testing of LiveContent content using the value included in the seed list without charging credits. However, this is limited to 1,000 test impressions per day.
So, use the LiveContent Seed List feature, and include the same seed email addresses for testing purposes in both LiveContent Seed List and Cheetah Digital Proofing Group (use specific records) so that the proofing emails will only be sent to the members in the Seed list of LiveContent and Proofing Group in Cheetah Digital.
Test personalization fields
Personalization Fields allow you to populate message content with values pulled from your database. To test the Personalization Fields in your email content:
-
In the Tool Bar, click preview.
-
Click the Personalization tab, in the right pane. The system displays all of the Personalization Fields in the message, populated with their corresponding Merge Symbol (for example: {[first_name]}.
-
Select a method of testing the Personalization Fields in the message:
-
Type a test value into a Personalization Field. The system refreshes the preview screen with this value inserted into the message.
-
In the Email Record Lookup field, enter an email address for a recipient, then click the search button. The system refreshes the preview screen with the values from this recipient inserted into the message.
-
-
When finished, click reset to revert back to displaying Merge Symbols.
Test dynamic content
If you have Dynamic Blocks in your message content, different recipients will receive different variations of the message, based on the rules set up within the Dynamic Block. To test the Dynamic Content variants in your email content:
-
In the Tool Bar, click preview.
-
Click the Dynamic Content tab, in the right pane. The system displays all of the "Content Block" type assets (Content Blocks, Dynamic Blocks, etc.) included within the header and / or message content.
-
Place check marks next to each asset that you want to include within the message preview. The system refreshes the Preview window.
-
For Dynamic Blocks, the system displays all the Rule / Block Pairs defined with the Dynamic Block. To test a specific Rule / Block Pair, place a check mark next to it. The system refreshes the Preview window to show how the content appears for the selected Rule / Block Pair. Repeat this step as necessary to test other Rule / Block Pairs.
Note: If you have Dynamic Content in your header, the header fields are listed separately than the Dynamic Content fields in the message content.
Send proofs
Proofing refers to the process of testing a marketing campaign by sending out sample messages to a special set of recipients. Proofing is intended to verify that your marketing message appears the way you intend, and that any dynamic content within the message is being generated and populated correctly.
From within the Preview window, you can submit a quick proof. The Quick Proof function provides a simpler method to test the different content versions of an email Campaign than a Proofing Group.
Note: You can also send Quick Proofs from the review section of the Campaign screen (see Review for more details on this section). The Quick Proof method available from within the Preview window provides nearly the same functionality, but with one notable difference -- the Preview window method lets you enter custom Personalization values. Conversely, the review section method of Quick Proofing will use default values for any Personalization fields in the Campaign content. The proof will also include a one-click unsubscribe link to offer a clear representation of the campaign message.
To send a quick proof from the Preview window:
-
In the Tool Bar, click Preview.
-
Optionally, enter the desired Personalization values (see "Test Personalization" above for more details on this process).
-
Optionally, select the desired Dynamic Content variations (see "Test Dynamic Content" above for more details on this process).
-
Click the Review tab, in the right pane.
-
The Your Email field is used to define the recipients of the quick proof. To define the recipients, either:
-
Type in one or more email addresses, separated by commas, or
-
Click Add emails from Proof Group to see a list of all the Proofing Groups in your account. Select the desired Proofing Group (see Proofing Groups for more details). The Your Email field is populated with all of the recipients in this Proofing Group. You can optionally then edit this list of recipients.
-
-
In the Subject Prefix field, enter a text string that will be displayed at the beginning of the email subject line (such as "PROOF" for example). This prefix can help the recipients identify the proof message in their email inbox.
-
Click Send proof.
Campaign Management
The Campaign screen provides the following Campaign management features, which can be accessed from the More Actions menu.

Run Pickup Changes
The Pickup Changes feature allows you to make modifications to a launched Campaign while messages are in the process of being deployed. These changes will then be applied to all unsent messages.
You must suspend the Campaign before you can run Pickup Changes. The only exception to this rule is an Event-triggered Campaign that uses Advanced Event Trigger as the Trigger Type; in that one scenario, you don't need to first suspend the Campaign before running Pickup Changes.
Note: Any messages that have already been created and sent can't be retrieved.
For Regular One-Off Campaigns, you can change the Campaign schedule and content; however, you can't change the Filter once the Campaign launches.
For Event-triggered and Date-triggered Campaigns, you can change any aspect of the Campaign, including the Audience Filter.
If your Campaign contains Cells and Splits, click 3. Setup and Launch Campaign.
To modify a launched Campaign:
-
Make any necessary changes to the Campaign schedule and / or content, then click Save in the Tool Bar.
-
Click Suspend Campaign at the bottom of the screen. A confirmation dialog box is displayed. Click Suspend.
-
Now click Pickup Changes (alternatively select Pickup Changes from the Actions menu in the Tool Bar). Please note that this option is disabled if you don't first suspend the Campaign. A confirmation dialog box is displayed.
-
Click Save then Pickup Changes or Pickup Changes without Saving. When the Pickup Changes process is completed, a notification is displayed at the top of the screen.
-
Click Resume Campaign at the bottom of the screen to resume the Campaign with the changes made. A confirmation dialog box is displayed. Click Resume.
To view the change log for this Campaign, including the date / time of the change and other details, click Versions tab in the Statistics and Progress section.
Copy a Campaign
From within the Campaign screen, you can copy an existing Campaign to use as the basis for a new Campaign:
-
In the More Actions menu, click Copy Campaign. A Copy Campaign dialog box is displayed.
-
Enter a name for the new Campaign.
-
By default, the new Campaign will be saved in the same folder location as the base Campaign. Optionally, click the magnifying glass icon to browse to and select a different folder location.
-
Click Copy Campaign. The system creates a copy of the current Campaign.
Delete a Campaign
When you delete a Campaign, the system moves it from its current folder location into the Recycling Bin, where it can optionally be restored if needed. If the selected Campaign is stored in a folder to which you don't have the proper access privileges, you won't be able to delete that Campaign.
From within the Campaign screen, you can delete a Campaign:
-
In the More Actions menu, click Delete Campaign. A confirmation dialog box is displayed.
-
Click Delete. The system moves the Campaign to the Recycling Bin.
Rename a Campaign
To rename a Campaign:
-
In the Tool Bar, the name of the Campaign is displayed within a text field. Enter the new name within this field.
-
Click Save.
View Campaign details
To view detailed information about the Campaign:
-
Click the
 icon next to the campaign name.
 -
The Item Details panel is displayed, which provides the following information:
-
Who created the item, and who modified it last.
-
A log of actions taken on the Campaign, including what the action was, when it was taken, and who performed the action.
-
A Related Items section that lists other items in the system that reference or utilize this Campaign.
-
The Campaign's folder location.
-
Change Campaign type
From within the Campaign screen, you can switch the Campaign type between a Regular One-off Campaign and either form of triggered Campaign (Date-triggered or Event-triggered).
To change the Campaign type:
-
In the More Actions menu, click Change Campaign Type. The Set Campaign Type pop-up window is displayed.
-
Click the radio button for the desired Campaign type. A warning message is displayed within the pop-up window.
-
Click Ok.
Change content type
From within the Campaign screen, you can switch the Content type.
To select the content type for your Campaign:
-
In the More Actions menu, click Change Content Type. The Change Content Type pop-up window is displayed.
-
Select the required Content type.
Provide Content is the default content type, and allows you to enter HTML into the Content Editor, or to use the Content Designer.
-
In the Change Content Type pop-up window, click Provide Content.
-
Select the Content tab. See Content for more details.
By using a Template as the Content Type, all Campaign content will be pulled in from the selected Template. You won't be able to manually enter HTML into the Campaign content.
-
In the Change Content Type pop-up window, click Template. The Browse Templates pop-up window is displayed.
-
From the Browse Templates pop-up window, you can click on a folder in the directory structure to see a list of all the Templates stored within that Folder. Or, if you want to search across the entire system, click the double-left arrow icon near the top of the directory structure; the system collapses the directory structure and shows every Template in the system. This pop-up window also allows you to search based on Tags, or by name. When you find the desired Template, click on its name.
Note: Templates have to be created using the same source table as the Campaign in order for them to be available as a selection.
-
The Content tab is refreshed to show the selected Template.
By using a Dynamic Block as the Content Type, all Campaign content will be pulled in from the selected Dynamic Block. You won't be able to manually enter HTML into the Campaign content.
-
In the Change Content Type pop-up window, click Dynamic Block. The Browse Dynamic Blocks pop-up window is displayed.
-
From the Browse Dynamic Blocks pop-up window, you can click on a folder in the directory structure to see a list of all the Dynamic Blocks stored within that Folder. Or, if you want to search across the entire system, click the double-left arrow icon near the top of the directory structure; the system collapses the directory structure and shows every Dynamic Block in the system. This pop-up window also allows you to search based on Tags, or by Dynamic Block name. When you find the desired Dynamic Block, click on the Dynamic Block name.
Note: Dynamic Blocks have to be created using the same source table as the Campaign in order for them to be available as a selection.
-
The Content tab is refreshed to show the name of the selected Dynamic Block.
By using a Content Block as the Content Type, all Campaign content will be pulled in from the selected Content Block. You won't be able to manually enter HTML into the Campaign content.
-
In the Change Content Type pop-up window, click Content block. The Browse Content Blocks pop-up window is displayed.
-
From the Browse Content Blocks pop-up window, you can click on a folder in the directory structure to see a list of all the Content Blocks stored within that Folder. Or, if you want to search across the entire system, click the double-left arrow icon near the top of the directory structure; the system collapses the directory structure and shows every Content Block in the system. This pop-up window also allows you to search based on Tags, or by Content Block name. When you find the desired Content Block, click on the Content Block name.
Note: Content Blocks have to be created using the same source table as the Campaign in order for them to be available as a selection.
-
The Content tab is refreshed to show the name of the selected Content Block.
Send quick proofs
Proofing refers to the process of testing a marketing campaign by sending out sample messages to a special set of recipients referred to as a Proofing Group. Proofing is intended to verify that your marketing message appears the way you intend, and that any dynamic content within the message is being generated and populated correctly.
The Quick Proof function provides a simpler method to test the different content versions of an email Campaign than a Proofing Group. Quick Proof offers the following advantages over traditional Proofing Groups:
-
The user can send one-off proofs to email addresses that may not be in the database or in a Proofing Group.
-
The user can quickly select only the Dynamic Content that he or she wants to test, and test every iteration of that Dynamic Content.
-
The user can test Dynamic Content without having to find sample records that match the desired criteria.
Note: You can also send Quick Proofs from the Preview window (see Email Campaign for more details on this section). The Quick Proof method available from within the Preview window provides nearly the same functionality as the method available from the review section or More Actions in Tool bar, but with one notable difference -- the Preview window method lets you enter custom Personalization values. Conversely, the review section method or More Actions in Tool bar of Quick Proofing will use default values for any Personalization fields in the Campaign content.
Please note the following restrictions in regards to the Quick Proof function:
-
Quick Proofs are not available if the Campaign content contains Looping Blocks.
-
The eDesign Optimizer and Add Alternate Data Set options will not be available when using Quick Proof.
-
Any Personalization within the Campaign content will display the default values.
-
You can create a reusable Quick Proof-only Proofing Group comprised of the Quick Proof recipients (see Proofing Groups for more details). However, a Quick Proof-only Proofing Group doesn't have a designated source table, which limits its use to the following scenarios: an EDP-driven Campaign, or a Quick Proof within a Cheetah Digital Campaign.
To run a Quick Proof:
-
If your Campaign contains Cells and Splits, you must choose either a specific sub-cell (which sends proofs for only that sub-cell), or the top-level Campaign (which sends proofs to all sub-cells). Click "3. Setup and Launch Campaign." To pick a sub-cell, select it from the Cell Tree. To pick the top-level Campaign, select the top-most item in the Cell Tree.
-
In the Tool Bar, click More Actions > Send Proof. Alternately you can click on Send Proof at the right end of the Proofing and Auditing section of the Campaign Review tab. The Quick Proof pop-up window is displayed.
-
Select the email format – either HTML or Plain Text.
-
The Send Proof to field allows you to enter the email addresses to which you want to send the proof. You can either:
-
Manually type in one or more email addresses. If entering multiple addresses, they must be separated by commas or semi-colons.
-
Send the proof to an existing Proofing Group by clicking the Browse icon to the right of the Send Proof to field. A pop-up window is displayed, listing all of the existing Proofing Groups for the email channel. Select the desired group. The pop-up window is closed, and the field is populated with a comma-separated list of all the email addresses in the Proofing Group. Optionally you can then edit this list by removing or adding email addresses.
-
-
If your Campaign contains Cells and Splits, and you selected a parent cell above in step 1, the Cells tab is populated with a cell hierarchy. Place a check mark next to each sub-cell that you want to test. If you selected a sub-cell above in step 1, only that one sub-cell is displayed in the Cells tab. Based on the number of cells that you select, the "Cell Count" in the top-right corner of the Cells tab indicates how many proofs will be sent to each recipient. The system imposes a hard limit of 250 proofs to each recipient. If you surpass this threshold, an error message is displayed. You must then reduce the number of selected cells in order to decrease the Proof Count.
-
If your Campaign contains Dynamic Content, the Dynamic Content tab is populated with a tree diagram, showing all of the Dynamic Blocks, along with the rules within each Dynamic Block. Place a check mark next to a Dynamic Block and rule that you want to test. By default, the first rule is selected for each Dynamic Block. You can optionally select multiple rules within a Dynamic Block, and / or select multiple Dynamic Blocks. For Dynamic Block that use the IF > IF structure, all selections will be contained in a single proof version.
Note: If your Campaign includes static Content Blocks, they will appear in the Dynamic Content tab as well. Content Blocks will automatically be selected and uneditable, as they will always be included in your proofs.
-
Based on the number of Dynamic Content rules that you select, the Proof Count in the top-right corner of the Dynamic Content tab indicates how many proofs will be sent to each recipient. The system imposes a hard limit of 250 proofs to each recipient. If you surpass this threshold, an error message is displayed. You must then reduce the number of selected rules in order to decrease the Proof Count.
-
When finished, click send proof to generate and send the proofs.
The Proofs status area shows the progress of the proofs as they are created and sent. See "Review Proof Results" below for more details.
Cells and Splits
Marketers often need to divide their Campaign Audience into smaller segments, or cells. You might need to do this in order to test the effectiveness of a particular marketing message, or because you need to use a different sending method, or schedule, for the different cells.
Cheetah Digital by Zeta provides you with the ability to create complex, sophisticated ways of segmenting your Audience. The platform supports two different segmentation methods: A / B Testing and Split Cells.
Split Cells allow you to divide your Campaign Audience into different receiving groups, with or without the use of a "remainder" Audience. With Split Cells, you can create a complex hierarchy of nested cells, each of which is designated with a unique code that can be used elsewhere in the platform, such as reports, exports, and Filters. You can enter these cells directly into the user interface, or import them from a spreadsheet. This segmentation method can be used for testing purposes, although that's not really its primary intent, as this method won't calculate a "winner" like A / B Testing does. You can create cell variations by using different Title, Message and the Send Schedule.
Note: Split Cells are available in all Channels, and for all Campaign types. A / B Testing is available only for Regular One-Off Email Campaigns.
You can change your Campaigns to Cells ans Splits Campaign by selecting Cells and Splits from the More Actions menu.
For more information on configuring Split Cells, please see Split Cells.
A / B Testing is intended to be used to compare the effectiveness of a Campaign element in order to determine a "winner." For example, you might want to test how customers respond to a particular subject line or promotional offer. A typical testing approach is to divide your Audience into multiple segments consisting of a small portion of your total Audience. Each of these test segments (called "cells") is sent a Campaign message that varies based on whatever element you're testing. The platform tracks the responses to your different messages, and identifies which message variant was the most successful. The system can then automatically submit this winning message variant to the rest of your Campaign Audience (called the "Winner Cell"). This segmentation method is highly configurable, and allows you to define the element you're testing, how many test cells to create, how to calculate the Audience for each cells, and how to determine the "winner."
For more information on configuring an A / B Test within your Email Campaign, please see A / B Test.
Turn Off Tracking
To comply with recipient preference and evolving privacy regulations, you can switch off the receipient tracking option in an email or SMS campaign. Please ask your Zeta Representative to get his feature enabled in your Cheetah Digital by Zeta. To ensure complete Data Privacy, once tracking is turned off for a designated campaign, no open or click data will be collected or reported.
Note: You can turn off the tracking, only before the campaign has been sent.
To Turn Recipient Tracking Off in a Campaign:
-
In the Campaign Toolbar, select Options > Turn Tracking Off. A Confirmation Dialogbox is displayed.
-
Click Save & Confirm, to turn the tracking off in the campaign. This will only turn off tracking in a copy of a campaign, which is being sent exclusively to a filtered group of recipients who have asked to not be tracked.
When the Tracking is turned OFF, the Link Tracking settings in the Responses section of the Campaign is not available for editing. For cells and splits or AB Tests, when the tracking is switched off at the parent campaign, it is cascaded to all child cells. You cannot turn it back on once it is turned off.
