
Web Forms
Cheetah Digital by Zetaoffers several different ways to bring data into the platform and load it into your marketing database. Data can be imported in a manual process through a file import (see Imports for more details), or by way of an FTP automated process (see FTP Import Templates for more details). You can manually edit or enter records one at a time using the Record Lookup screen. Data can also be submitted to the platform through an API Post, or through Web Forms and Web Events. The best import method should be indicated by your business requirements and marketing strategy. If you have any questions about which import method best meets your needs, please speak with your Client Services Representative.
The Web Forms screen is accessible via the Main menu, select Production > Web Forms.
Note: Using the Web Forms feature of Cheetah Digital requires a strong working knowledge of HTML and JavaScript, as well as some experience using XSL.
The Web Form screens walks you through the process of building a consumer-facing web form that can be used for a variety of purposes, such as:
-
Collecting consumer information
-
Managing consumer opt-out preferences
-
Sharing a message
Web Forms can also be used to trigger an Event-based Campaign. For example, if a consumer uses your Web Form to subscribe to your email newsletter, you could trigger the deployment of a Campaign that sends a "Welcome" message.
The platform supports two different data sources for building Web Forms -- the Cheetah Digital database, and the Engagement Data Platform (EDP). The Engagement Data Platform is the data layer that powers and unifies Cheetah Digital by Zeta's Customer Engagement Suite (CES). The EDP empowers marketers to load and transform data from any source, at high volumes, and then to leverage that data to create lasting customer relationships across all engagement channels. These two options are described below in more detail.
Cheetah Digital supports the use of Google's reCAPTCHA API 2.0 as a validation mechanism. ReCAPTCHA is intended to distinguish between human users and automated spam or "bots." Cheetah Digital by Zeta strongly recommends the use of reCAPTCHA for all Web Forms in order to protect against automated abuse. ReCAPTCHA requires an API "key pair" for the domain/subdomain that hosts the Web Form.Zetacan generate these key pairs using its Google account, or you may supply your own keys. In either case, the hosting domain and key pairs used for your Web Forms must be added to the Cheetah Digital platformby a Client Services Representative. If you have any questions about this process, please speak with your Representative. More information about reCAPTCHA can be found on Google's developer site.
Pre-filling forms
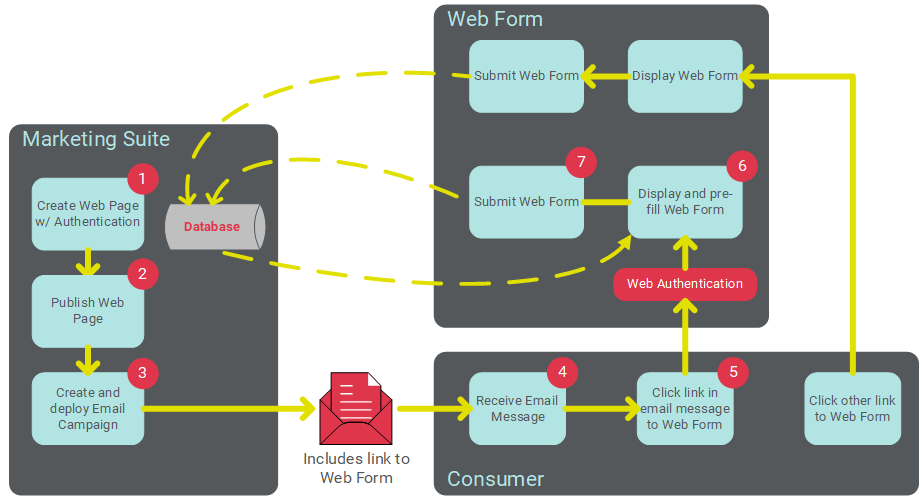
Web Forms can optionally be built with a Web Authentication in order to validate the consumer's identity when he or she lands on the Web Form. A Web Authentication contains the field (or fields) that you want to use to uniquely identify the consumer. Once the consumer's identify is verified, the Web Form can look that person up in the Cheetah Digital database, and pre-fill selected fields in the Form. For example, if you built a Form to gather consumer contact information, and you already had the viewer's postal address, you could pre-fill those postal address fields in the Form, thereby saving the viewer from having to re-enter that information.
To pre-fill the Form, the Web Authentication fields and values must be passed along in the URL by means of a query string. A common use case for this feature is to send this URL as part of an Email or SMS Text Campaign message.
The following diagram depicts this process of using a Web Form in conjunction with an Email Campaign. The email message contains a link to the Web Form. When the customer clicks this link, the URL passes the necessary identifying information, validates the consumer's identity, and pre-fills the Form. Consumers who access the Web Form through some other means, such as a link from your corporate website, will not use the Web Authentication, so the Form will not be pre-filled.
Personalized URLs
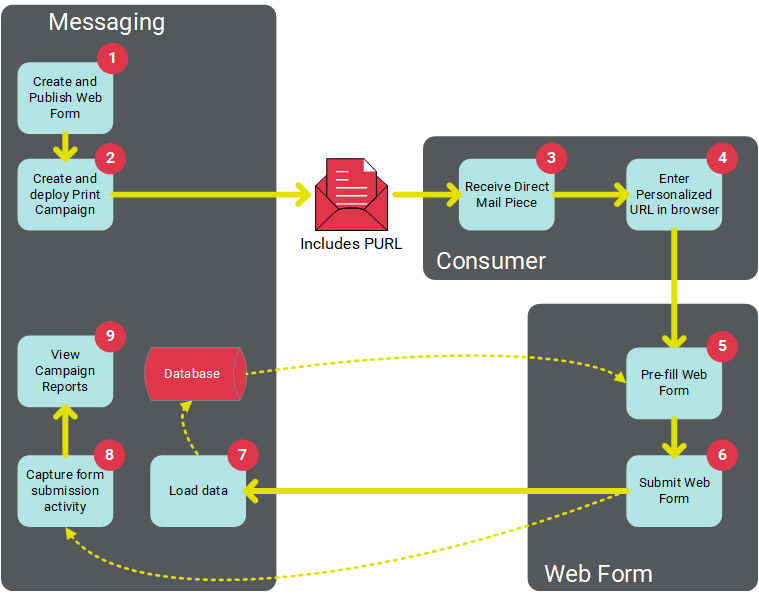
Web Forms can be used in conjunction with a Personalized URL (PURL). A PURL uses personalization values to create a unique URL for each recipient of your marketing Campaign (for example: "www.cheetahdigital.com/JohnSmith"). A PURL can be generated in the platform using any field, or fields, in a selected source table. PURLs add a personalized touch to your marketing strategy with the goal of being easier to remember, and garnering more attention from consumers. As an example, PURLs are often used to increase results from Print Campaigns. On the direct mail piece, you can print a Personalized URL that contains the consumer's name, and encourage the recipient to browse to this URL. Personalized URLs also allow for the ability to pre-fill the Web Form (similar in concept to a Web Authentication).
The following diagram depicts the process of using a Web Form with a PURL in conjunction with a Print Campaign.
Before using PURLs in your marketing Campaigns, the following steps must be completed:
-
Domain: You must have a web domain in place that you want to use for the Personalized URL.
-
Table: The source Table must be defined within your Cheetah Digital database. See Tables for more details on this process.
-
PURL Field: The source Table must have a "PURL Field" defined. A PURL Field is a special field that's populated based on the values in one or more other fields. For example, you could define a PURL Field that's composed of "First Name" and "Last Name" fields. See PURL Domains for more details on this process.
-
PURL Domain: You must have a "PURL Domain," which binds the PURL Field to your web domain. See PURL Domains for more details on this process.
-
Web Form: You must create a Web Form, and bind the PURL Domain to that Web Form. This Web Form contains the content of the web page that the user will see when he or she navigates to the Personalized URL. See "Create a New Web Form" below for more details on this process.
-
Campaign: The Web Form containing the PURL must be bound to the Campaign, which also causes the platform to populate the PURL Field you defined above. In addition, you typically want to add the PURL somewhere within the Campaign content, in order to communicate the PURL value to each recipient of your Campaign message (see "Add a Web Form Link to a Campaign" below for more details).
Web Form methods
Cheetah Digital offers three different methods of building Web Forms, each with their own unique features and intended use cases.
-
Web Forms: The Web Forms screen allows you to build a Web Form with the primary intent of collecting information from a consumer. The Form is hosted on the Cheetah Digital platform. The data collected from the consumer is sent via an HTTP(S) request, parsed, and loaded to the database. This method supports the use of Web Authentications to verify the consumer's identify for the purposes of pre-filling fields in the Form (described above in more detail). Web Forms also support Personalized URLs (see above for more details), confirmation pages, and exception notifications. In addition, the submission of a Web Form can be used to trigger the deployment of a Campaign.
-
Web Page with a Web Form: The Web Page screen allows you to add a simple data entry Web Form to the Page. Web Pages with Forms are treated much like a "channel," and they support the use of dynamic content and personalized content. Data collected from a Web Page with Form is sent via an HTTP(S) request, parsed, and loaded to the database. Web Pages with Forms support the use of Web Authentications to verify the consumer's identify for the purposes of calculating dynamic content and pre-filling fields in the Form. Web Pages with Forms support link tracking for reporting purposes, as well as the use of a confirmation page. Web Pages with Forms do not support Personalized URLs or exception notifications. In addition, the submission of a Web Page-based Form can't be used to trigger the deployment of a Campaign. See Web Pages for more details.
-
HTTP POST API: With this method, the web form is built and hosted on an external site, such as the client's website, or some other third party site. The API endpoint serves as the mechanism to transmit consumer-entered data from the form to Cheetah Digital. Data collected from the form is sent via an HTTP(S) request, parsed, and loaded to the database. See HTTP POST for more details.
Web Forms -- Cheetah Digital
The steps for creating a new Web Form that uses Cheetah Digital as its data source are described below.
Create a New Cheetah Digital-based Web Form
Web Forms can either be created through the Cheetah Digital user interface, or uploaded into the platform (see New Item: Create a New Web Form for details on that process)
To create a new Web Form through the user interface, that uses Cheetah Digital as the data source:
-
In the Tool Ribbon, click + New Web Form, or alternately from the Admin banner bar, select + New menu >Web Form.
-
A New Item pop-up window is displayed. To select the folder where you want to save this new Web Form, click the folder name in the Navigation Tree on the left side of this pop-up. The Where? field is updated with the selected folder name.
-
In the Name field, enter a name for your new Web Form. This name must be unique within the selected folder.
-
Using the toggle buttons, select Cheetah Digital as the data source for this Web Form.
-
From the Data Source drop-down menu, select the Cheetah Digital source table for this Web Form.
Note: You can never modify this source table after the Web Form is created.
-
From the Type drop-down menu, select the type of Web Form:
-
Regular -- A common Web Form, suitable for most uses.
-
Opt-Out -- Used for collecting consumer opt-out information; this Web Form will set the appropriate subscription flags, and allow you to use this opt-out activity in reports, Filters, etc.
-
Share Message -- Used when a consumer clicks a "forward message to a friend" link. The Web Form will allow the recipient to enter their friend's email address. The system will then send the message to that email address. If you defined a "Viral" format version of the message content, that version of the content is sent to the friend.
-
Device Registration Export -- Used for managing Push Notification device registrations.
-
Multi-Form -- Used when you want to create a series a Web Forms that span multiple web pages; the data collected in the Form isn't submitted until the consumer finishes and submits the last page in the series.
-
-
Click save new item. The Workspace is refreshed to show a blank Web Form details screen, where you can configure the details of the Web Form.
-
Optionally, you can assign one or more tags to your Web Form. To assign a tag, click on the Add tag field in the Edit > Tags section of the Tool Ribbon. The system displays a pop-up menu of all the existing tags. You can select one of these tags, or type in a new one and press Enter. You can repeat this process to add more tags. To remove a tag, click the "X" icon next to the tag label.
Cheetah DigitalWeb Form: Data options
The Data Options section is used to define various configuration options about your Web Form.
-
Optionally, select a different Web Form type from the Type drop-down menu (see above for more information on the Web Form types).
-
From the Encoding drop-down menu, select an encoding method: "Unicode - UTF-8" or "Japanese - Shift-JIS."
-
If you want the Web Form to pre-fill with known data about the viewer, place a check mark in the Populate Data check box. The pre-fill feature will attempt to identify the consumer viewing the Web Form, then pull information about that consumer from your database to populate fields in the Form.
-
Optionally, place a check mark next to one or more Web Authentications that you want this Web Form to use. If selected, the platform will check that the field(s) defined in the Web Authentication is present and valid in the URL before pre-filling the Web Form with data about the viewer.
-
When the consumer submits the Form, data is passed to Cheetah Digital via an HTTP request. If you want to use SSL encryption, place a check mark next in the Require HTTPS check box.
Note: If using SSL encryption, you'll need to purchase an SSL certification and provide it to Cheetah Digital by Zeta so it can be loaded on our server. Also, you'll need to make sure that all URL paths for images and form calls are set to use HTTPS. Please speak to your Customer Service Representative for more details.
-
If you want to capture and store records that encounter exceptions, place a check mark next to Import Exceptions (note: this is an optional feature that must be enabled within your account in order to be available for selection).
-
Optionally check Sanitize Data Fields to encode all fields in the Web Form. This feature is intended to prevent cross-site scripting (XSS) vulnerabilities in your Web Form. If enabled, the platform will automatically encode all fields in the form. You can optionally choose to leave specific fields un-encoded by attaching the suffix " unsafe" (with a space) to the field name. For example: "email unsafe."
Note: The Sanitize Data Fields option is enabled by default in all new Web Forms created after release 21.10 (October 2021) of ZetaCheetah Digital. All Web Forms created prior to this release will have this feature disabled by default. You can optionally enable the feature in older forms, or you can choose to encode specific fields by attacking the suffix "safe" (with a space) to the field name. For example: "email safe."Zeta's best practice is to enable this feature, but please note that enabling the feature in older Web Forms may cause changes to the format of field content, so be sure to test the Form after enabling this feature.
-
Select a mapping option:
 Simple
The "Simple" mapping option allows you to select one or more fields on the Web Form's source table.
-
Select the Simple tab.
-
From the Data Processing drop-down menu, select one of the following options that controls how the system handles the Web Form data:
-
Update or Create All Records: Select this option if you want the form to create new records, and update existing records.
-
Only Update Existing Records: Select this option if you want the form to only update existing records (new records are ignored).
-
Only Create New Records: Select this option if you want the form to only create new records (updates to existing records are ignored).
-
-
You can add fields to the Web Form automatically or manually.
-
Automatic: To use this feature, you must enter the Web Form content first (see below for details). Then, in the Tool Ribbon, click Edit > Scan Content for Fields. The system parses the Web Form content for any database fields. Any fields identified within the content are automatically added to the Mapped Fields list box.
-
Manual: Select the desired field in the Available Fields list box, then click the center Move bar. Optionally, you can use Shift + click or Control + click to select and move multiple fields. The selected field (or fields) is added to the Mapped Fields list box. Repeat this step as needed to add more fields to the Form.
-
-
To remove a field from the Form, click the X icon next to the field name within the Mapped Fields list box. To rearrange the fields in the Form, drag-and-drop the fields within the Mapped Fields list box into the desired sequence. To move a field to the top or bottom of the Mapped Fields list box, click the field to select it, then click the up-arrow or down-arrow icon.
-
Once you map a field, you can determine how you want to platform to handle data that the consumer provides. Next to the field name within the Mapped Fields list box, click the blue button to toggle through the following options:
-
Save & Populate: The platform will pre-fill this field if possible, and will save any values that the consumer enters.
-
Save Only: The platform will not pre-fill this field, but it will save any values that the consumer enters.
-
Populate Only: The platform will pre-fill this field if possible, and will ignore any values that the consumer enters.
-
Advanced
The Advanced option lets you pick an existing Data Map to use when bringing data in through the Web Form. Data Maps provide more sophisticated import options.
-
Select the Advanced tab.
-
In the Data Map field, either begin typing in the Data Map name, or click the browse button (magnifying glass icon) to browse for and select it. You can also create a new Data Map by clicking the new button (plus-sign icon). See Data Maps for more details.
-
Optionally, if you want to view the details of the Data Map after selecting it, click the jump-to button (green up-arrow icon). The system displays the Data Maps screen.
-
If the Web Form doesn't contain the Unique Identifier field for the Source Table, then you must use the Soft Match feature in order to successfully load the data. The Soft Match lets you match to the database using any fields with a Data Type of "Email," "Phone," "Twitter," or "Push Registration ID." For example, let's say the Unique ID on your "Recipient" table is "Member ID," but you don't collect Member ID data in your Web Form. You could instead select some other field, such as "Email Address," that contains unique data, and match on that instead.
If the soft-matched value in the Web Form matches an existing value in the database, then the platform will make the update to that record in the database. If the soft-matched value does not already exist in the database, the platform creates a temporary record. This temporary record can later be merged with a full record that contains the Unique Identifier.
If you're using the Soft Match feature, you still must add the Source Table's Unique Identifier field (or fields) to the Web Form, even if you're not actually intending on providing the Unique ID fields on the inbound data. The Unique ID must be part of the Web Form in order to save the Web Form; you don't need to actually include this field (or fields) when you bring data into the system.
-
In the Soft Match section, click the Select Fields tab. The Available Fields list box is populated with all of the mapped fields that can be used for soft matching.
-
Select a field in the Available Fields list box, then click the center Move bar. Optionally, you can use Shift + click or Control + click to select and move multiple fields. The selected field (or fields) is added to the Selected Fields list box. Repeat this step as needed to add more fields to the Soft Match. To remove a field from the Soft Match, click the X icon next to the field name within the Mapped Fields list box.
-
The Hierarchy Options drop-down menu is typically used if your account utilizes a multi-division setup, such as a Parent / Child database. Hierarchy Rules are a configuration feature set in the Parent system that determine which records from a given table a Child system can access. From this drop-down menu, select one of the following options:
-
Update Records in Current Customer Only: This option will load the data to the Parent system only.
-
Update Records in Current Customer and Children: This option will load the data to the Parent and to any Children systems as well.
-
Custom Hierarchy Rule: This option allows you to select a custom Hierarchy Rule. If you select this option, the Hierarchy Rule field is displayed. Either begin typing in the Hierarchy Rule name, or click the browse button (magnifying glass icon) to browse for and select it.
-
If the source table for this Web Form contains Calculated Fields, you can optionally derive and populate a value for those Calculated Fields. Click the Run Calculated Fields tab. The Available Fields list box is populated with all of the Calculated Fields in the source table. Select a field in the Available Fields list box, then click the center Move bar. Optionally, you can use Shift + click or Control + click to select and move multiple fields. The selected field (or fields) is added to the Selected Fields list box. Repeat this step as needed to add more Calculated Fields. To remove a Calculated Field, click the X icon next to the field name within the Selected Fields list box.
Note: If you run a Calculated Field as part of a Web Form, the system derives and populates that field only for the record in the Web Form. Conversely, if you set up a Calculated Field schedule, the system derives and populates the field for every record in the table (see Tables for more details).
-
In the Tool Ribbon, click Edit > Save.
-
Cheetah Digital generates sample code for each form input field that has been selected in the Data Map, as well as all required input fields. The platform will also generate sample JavaScript validation code that can be used to validate the Web Form when a viewer submits his or her data. To view this sample code, click Tools > Sample Code in the Function Menu. When the Sample Code screen is displayed, select the desired language option:
-
HTML Form (Hosted by Platform)
-
reCAPTCHA 2.0 (Hosted by Platform)
-
XSL Form (Hosted by Platform)
-
Externally hosted HTML
-
FormHTTP Post (C#)
-
Note: Cheetah Digital is not a fully-featured Web Form creation tool. The sample code generated by the platform is generic code that can be used as a reference for creating the actual Web Form, or as a base when creating the Web Form in some other third-party editing software.
Cheetah DigitalWeb Form: Form Content
The Form Content section allows you to enter the actual content of your Web Form, as either HTML or XSL code. XSL provides more advanced functionality than basic HTML, such as pre-populating check boxes and radio buttons, for example (see Sample XSL Web Form below for more details).
-
Enter your Web Form content as either HTML or XSL code by clicking the Basic (HTML) or Advanced (XSL) tabs.
-
Optionally, from the HTML editor, click wysiwyg to access the user-friendly text editor. This text editor allows you to enter the content of the Web Form without having to know how to code in HTML. The tool bar at the top of the text editor provides access to common word processing functions, such as text formatting, tables, lists, links, and images. Click code to toggle back to the HTML editor.
-
To preview your Web Form, click Edit > Preview in the Tool Ribbon. The Preview window is displayed. The pane on the right-hand side of the screen lists the mapped fields in the Form. Optionally, type in a value; the system refreshes the preview screen with this value inserted into the Form. When finished, click Edit > Show > Edit in the Tool Ribbon to return to the Web Form details screen.
-
In the Tool Ribbon, click Edit > Save. If you didn't use reCAPTCHA in your Web Form content, the system will display a warning message when you save the Form. Cheetah Digital by Zeta strongly recommends the use of reCAPTCHA for all Web Forms in order to protect from automated abuse.
Cheetah DigitalWeb Form: Notifications
Missing variable reference allows you to define email alerts if the contents of your form surpass certain thresholds for a selected import metric or exception. The Notifications section is displayed only if you placed a check mark in the Import Exceptions check box
Note: this is an optional feature that must be enabled within your account in order to be available for selection).
-
In the Choose Notification Type drop-down menu, select the desired metric (or All Metrics). The Notification Settings pop-up window is displayed.
-
In the Notification Thresholds section, enter the desired threshold settings that will trigger the alert notification. You can enter one or both of the following rules. If you enter both rules, the notification will be triggered if at least one condition is met.
-
Percentage of batch: Enter the percentage of "invalid" records that will trigger the notification.
-
Number of rows: Enter the quantity of "invalid" records that will trigger the notification.
-
-
Email notification settings can optionally be saved as a template, which allows you to reuse those settings. In the Email Settings sections, you can either select an existing email notification template, or create a new template.
-
Existing Template: Selected the desired template from the Template drop-down menu.
-
Note: If you want to delete an existing Template, select it from the Template drop-down menu, then click delete.
-
New Template: Enter the email subject line, "from" email address, and recipient email address (or multiple addresses). Enter a short message for the email notification. Optionally, if you want to save these email notifications settings, enter a name for the template in the "Save Template As" field.
-
If you want the system to send notifications after the parsing step, place a check mark next to "Parsing."
-
If you want the system to send notifications after the database update step, place a check mark next to "Update."
Note: You must check at least one of the above check boxes.
-
Click ok. the system adds the email notification to the Selected Notifications list. To view or edit the notification details, click the edit button (gear icon); the Notification Settings pop-up window is displayed. To delete a notification, click the delete button (X icon).
-
Repeat the above steps as needed to define the email notifications for additional metrics. Each selected metric is handled separately, and will generate its own email notification message.
-
In the Tool Ribbon, click Edit >Save.
Cheetah DigitalWeb Form: Confirmation
The Confirmation section is used to configure the page to which the consumer is directed once they successfully submit the Web Form.
You can also define the confirmation page using the "cp" parameter within the Web Form code. For example:
<input type="hidden" name="cp" value="http://www.cheetahdigital.com" />
Note: Optionally, you can choose to NOT define a confirmation page, which allows for the ability to use JavaScript or XSL to set the confirmation page dynamically depending on user input, or on already existing data pre-filled from the database or passed in the URL query string. See Sample XSL Web Form below for more details on dynamically selecting the confirmation page.
To define the confirmation page:
-
Select a confirmation page option:
Externally-hosted web page
To display a web page that's hosted externally to the Cheetah Digital by Zeta platform:
-
Click the Confirmation Page URL tab.
-
Enter the URL for the confirmation page.
Another Web Form
To display another Web Form (typically used for Multi-Forms):
-
Click the Move On To Another Form tab.
-
In the Next Form field, either begin typing in the Web Form name, or click the browse button (magnifying glass icon) to browse for and select it. You can also create a new Web Form by clicking the new button (plus-sign icon).
-
Optionally, if you want to view the details of the Web Form after selecting it, click the jump-to button (green up-arrow icon). The system displays the Web Form screen.
Enter web page content
To display a web page that's hosted by Cheetah Digital:
-
Click either the Basic (HTML) tab or the Advanced (XSL) tab.
-
Enter the HTML or XSL code for the confirmation page.
-
If you provided the confirmation page using the "cp" parameter in the Web Form code, check the check box labeled, Confirmation page URL indicated in form code via 'cp=' parameter. This check box instructs the platform to use the "cp" parameter value, and not to use anything provided above in step 1. Alternatively, leave the check box unchecked to use the confirmation page you provided above in step 1.
-
To preview your confirmation page, click Edit > Preview in the Tool Ribbon. The Preview window is displayed. From the Preview drop-down menu, select Confirmation Page. When finished, click Edit > Edit in the Tool Ribbon to return to the Web Form details screen.
-
In the Tool Ribbon, click Edit > Save.
If your Web Form is finished, the next step is to publish it. See "Publish a Web Form" below for more details on this process.
-
Cheetah Digital Web Form: Schedule
The Form Schedule section provides several options for disabling, or expiring, this Web Form, either based on the number of submissions received, or based on a schedule.
-
Optionally, in the Maximum entries per user field, enter the maximum number of times that a single recipient can submit this Web Form. If a recipient surpasses this threshold, the system displays an error message.
-
Optionally, in the Maximum entries per form field, enter the maximum number of submissions allowable for this Web Form, across all recipients. If the Web Form surpasses this threshold, the system displays an error message.
Note: Be careful when testing Web Form submissions, as the test submissions count toward both of the above thresholds. If you're testing a link to your Web Form from an email message, the platform will count Web Form submissions from your email "proof" recipients, as if they were actual, live email recipients.
-
Optionally, to define a start schedule for the Web Form, click the Start On toggle next to Form Start Date, then enter the start date and start time. Optionally, to make the Web Form available immediately after it's published, click the Start Immediately toggle.
Note: If using the schedule feature, when you publish your Web Form, it won't yet be available to users until the schedule's start date. If a user attempts to access the Form prior to the start date, a generic error message is displayed.
-
Optionally, to define an expiration schedule for the Web Form, click the End On toggle next to Form End Date, then enter the end date and end time. After the designated end date / time, the system will display the Expiration page or message (described below) if a recipient attempts to access the Web Form. Optionally, to make the Web Form run indefinitely, click the Run Indefinitely toggle.
-
In the Tool Ribbon, click Edit > Save.
If your Web Form is finished, the next step is to publish it. See Publish a Web Form below for more details on this process.
Cheetah DigitalWeb Form: Expiration
If you defined an end date for the Web Form in the Form Schedule section above, the Expiration section allows you to define the content that gets displayed to the recipient if they attempt to access an expired Web Form.
To define the expiration content:
-
Select an expiration page option:
To display a web page that's hosted externally to the Cheetah Digital platform:
-
Click the Expiration Page URL tab.
-
Enter the URL for the expiration page.
To display another Web Form (typically used for Multi-Forms):
-
Click the Move On To Another Form tab.
-
In the Next Form field, either begin typing in the Web Form name, or click the browse button (magnifying glass icon) to browse for and select it. You can also create a new Web Form by clicking the new button (plus-sign icon).
-
Optionally, if you want to view the details of the Web Form after selecting it, click the jump-to button (green up-arrow icon). The system displays the Web Form screen.
To display a web page that's hosted by Cheetah Digital by Zeta:
-
Click either the Basic (HTML) tab or the Advanced (XSL) tab.
-
Enter the HTML or XSL code for the expiration page.
-
To preview your confirmation page, click Edit > Preview in the Tool Ribbon. The Preview window is displayed. From the Preview drop-down menu, select Expiration Page. When finished, click Edit > Edit in the Tool Ribbon to return to the Web Form details screen.
-
In the Tool Ribbon, click Edit > Save.
If your Web Form is finished, the next step is to publish it. See Publish a Web Form below for more details on this process.
Cheetah DigitalWeb Form: Personalized URL (PURL)
Cheetah Digital provides the ability to generate Personalized URLs (PURLs) for a Web Form. PURLs can be used to make the call-to-action for any landing page or form much more personalized to the viewer, and allows for the ability to pre-fill the viewer's data just by going to the PURL in his or her browser (similar in concept to a Web Authentication). To assign a PURL Domain to your Web Form:
-
In the PURL Set-Up section, click the Generate a PURL tab.
-
From the drop-down menu, select the desired PURL Domain (see PURL Domains for more information on how to create a PURL Domain).
-
In the Tool Ribbon, click Edit > Save.
In order to use the PURL, this Web Form must be bound to a Campaign.
If your Web Form is finished, the next step is to publish it. See Publish a Web Form below for more details on this process.
Web Forms -- Engagement Data Platform
The steps for creating a new Web Form that uses EDP as its data source are described below
Create a New Web Form (EDP)
For Web Forms that use the Engagement Data Platform (EDP) as the data source, the platform uses the Member ID as the lookup value instead of the Email Address. This feature is mainly intended for clients who have Business Units defined in EDP, since a recipient could use the same email address across multiple Business Units, or have a shared email address with multiple Member IDs. The platform will extract the Member ID from the EDP tracking parameters, and use it as the lookup value.
To create a new Web Form through the user interface that uses the Engagement Data Platform as the data source:
-
In the Tool Ribbon, click Home > New.
-
A New Item pop-up window is displayed. To select the folder where you want to save this new Web Form, click the folder name in the Navigation Tree on the left side of this pop-up. The Where? field is updated with the selected folder name.
-
In the Name field, enter a name for your new Web Form. This name must be unique within the selected folder.
-
Using the toggle buttons, select EDP as the data source for this Web Form.
-
From the Type drop-down menu, select the type of Web Form:
-
Regular -- A common Web Form, suitable for most uses.
-
Opt-Out -- Used for collecting consumer opt-out information; this Web Form will set the appropriate subscription flags, and allow you to use this opt-out activity in reports, Filters, etc.
-
-
Click save new item. The Workspace is refreshed to show a blank Web Form details screen, where you can configure the details of the Web Form.
-
Optionally, you can assign one or more tags to your Web Form. To assign a tag, click on the Add tag field in the Edit > Tags section of the Tool Ribbon. The system displays a pop-up menu of all the existing tags. You can select one of these tags, or type in a new one and press Enter. You can repeat this process to add more tags. To remove a tag, click the X icon next to the tag label.
EDP Web Form: Data Options
The Data Options section is used to define various configuration options about your Web Form.
-
Optionally, select a different Web Form type from the Type drop-down menu (see above for more information on the Web Form types).
-
If you want the Web Form to pre-fill with known data about the viewer, place a check mark in the Populate Data check box. The pre-fill feature will attempt to identify the consumer viewing the Web Form, then pull information about that consumer from your database to populate fields in the Form.
-
When the consumer submits the Form, data is passed to Cheetah Digital via an HTTP request. If you want to use SSL encryption, place a check mark next in the Require HTTPS check box.
Note: If using SSL encryption, you'll need to purchase an SSL certification and provide it to Cheetah Digital by Zeta so it can be loaded on our server. Also, you'll need to make sure that all URL paths for images and form calls are set to use HTTPS. Please speak to your Customer Service Representative for more details.
-
Optionally check Sanitize Data Fields to encode all fields in the Web Form. This feature is intended to prevent cross-site scripting (XSS) vulnerabilities in your Web Form. If enabled, the platform will automatically encode all fields in the form. You can optionally choose to leave specific fields un-encoded by attaching the suffix " unsafe" (with a space) to the field name. For example: "email unsafe."
Note: The Sanitize Data Fields option is enabled by default in all new Web Forms created after release 21.10 (October 2021) of ZetaCheetah Digital. All Web Forms created prior to this release will have this feature disabled by default. You can optionally enable the feature in older forms, or you can choose to encode specific fields by attacking the suffix "safe" (with a space) to the field name. For example: "email safe." Cheetah Digital by Zeta's best practice is to enable this feature, but please note that enabling the feature in older Web Forms may cause changes to the format of field content, so be sure to test the Form after enabling this feature.
-
The Simple mapping option allows you to select one or more fields on the Web Form source table. The Advanced mapping option is not supported for Web Forms that use EDP as the data source.
-
The Data Processing drop-down menu is used to control how the system handles the Web Form data. For Web Forms built using EDP as he data source, the only supported option is Only Update Existing Records.
The Web Form will update existing records, and new records are ignored.
Note: If the platform encounters an error during the record update, the recipient does not have visibility into the failure. The error is added to the Cheetah Digital logs. Please speak to your Services Representative for more information.
-
The Available Fields list box is populated with all EDP attributes that have been configured to use in Cheetah Digital (see the EDP and Loyalty Data Manager for more details on this process). Select the desired field in the Available Fields list box, then click the center Move bar. Optionally, you can use Shift + click or Control + click to select and move multiple fields. The selected field (or fields) is added to the Mapped Fields list box. Repeat this step as needed to add more fields to the Form.
-
To remove a field from the Form, click the X icon next to the field name within the Mapped Fields list box. To rearrange the fields in the Form, drag-and-drop the fields within the Mapped Fields list box into the desired sequence. To move a field to the top or bottom of the Mapped Fields list box, click the field to select it, then click the up-arrow or down-arrow icon.
-
Once you map a field, you can determine how you want to platform to handle data that the consumer provides. Next to the field name within the Mapped Fields list box, click the blue button to toggle through the following options:
-
Save & Populate: The platform will pre-fill this field if possible, and will save any values that the consumer enters.
-
Save Only: The platform will not pre-fill this field, but it will save any values that the consumer enters.
-
Populate Only: The platform will pre-fill this field if possible, and will ignore any values that the consumer enters.
-
-
In the Tool Ribbon, click Edit > Save.
-
Cheetah Digital generates sample code for each form input field that has been selected in the Data Map, as well as all required input fields. The platform will also generate sample JavaScript validation code that can be used to validate the Web Form when a viewer submits his or her data. To view this sample code, click Tools > Sample Code in the Function Menu. When the Sample Code screen is displayed, select the desired language option:
-
HTML Form (Hosted by Platform)
-
reCAPTCHA 2.0 (Hosted by Platform)
-
XSL Form (Hosted by Platform)
-
Externally hosted HTML
-
FormHTTP Post (C#)
Note: Cheetah Digital is not a fully-featured Web Form creation tool. The sample code generated by the platform is generic code that can be used as a reference for creating the actual Web Form, or as a base when creating the Web Form in some other third-party editing software.
-
-
EDP-driven Email Campaigns utilize an EDP-specific tracking parameter which greatly improves throughput. When creating EDP-driven Web Forms, you need to add this tracking parameter to the Form's HTML, or else the Form will not trigger the unsubscribe process within the platform. The sample code does not yet contain this tracking parameter, so you must add it manually.
EDP Web Form: Form Content
The Form Content section allows you to enter the actual content of your Web Form, as either HTML or XSL code. XSL provides more advanced functionality than basic HTML, such as pre-populating check boxes and radio buttons, for example (see Sample XSL Web Form below for more details).
-
Enter your Web Form content as HTML code. Please note that the Advanced (XSL) tab is not supported for Web Forms built off the EDP database.
-
Optionally, from the HTML editor, click wysiwyg to access the user-friendly text editor. This text editor allows you to enter the content of the Web Form without having to know how to code in HTML. The tool bar at the top of the text editor provides access to common word processing functions, such as text formatting, tables, lists, links, and images. Click code to toggle back to the HTML editor.
-
To preview your Web Form, click Edit > Preview in the Tool Ribbon. The Preview window is displayed. The pane on the right-hand side of the screen lists the mapped fields in the Form. Optionally, type in a value; the system refreshes the preview screen with this value inserted into the Form. When finished, click Edit > Edit in the Tool Ribbon to return to the Web Form details screen.
-
In the Tool Ribbon, click Edit > Save. If you didn't use reCAPTCHA in your Web Form content, the system will display a warning message when you save the Form. Cheetah Digital by Zeta strongly recommends the use of reCAPTCHA for all Web Forms in order to protect from automated abuse.
EDP Web Form: Confirmation
The Confirmation section is used to configure the page to which the consumer is directed once they have successfully submitted the Web Form.
You can also define the confirmation page using the "cp" parameter within the Web Form code. For example:
<input type="hidden" name="cp" value="http://www.cheetahdigital.com" />
Note: Optionally, you can choose to NOT define a confirmation page, which allows for the ability to use JavaScript or XSL to set the confirmation page dynamically depending on user input, or on already existing data pre-filled from the database or passed in the URL query string. See Sample XSL Web Form below for more details on dynamically selecting the confirmation page.
To define the confirmation page:
-
Select a confirmation page option:
Externally-hosted web pageExternally-hosted web page
-
If you provided the confirmation page using the "cp" parameter in the Web Form code, check the check box labeled, Confirmation page URL indicated in form code via 'cp=' parameter. This check box instructs the platform to use the "cp" parameter value, and not to use anything provided above in step 1. Conversely, leave the check box unchecked to use the confirmation page you provided above in step 1.
-
To preview your confirmation page, click Edit > Preview in the Tool Ribbon. The Preview window is displayed. From the Preview drop-down menu, select Confirmation Page. When finished, click Edit > Edit in the Tool Ribbon to return to the Web Form details screen.
-
In the Tool Ribbon, click Edit > Save.
If your Web Form is finished, the next step is to publish it. See Publish a Web Form below for more details on this process.
EDP Web Form: Schedule
The Form Schedule section provides several options for disabling, or expiring, this Web Form, either based on the number of submissions received, or based on a schedule.
-
Optionally, in the Maximum entries per user field, enter the maximum number of times that a single recipient can submit this Web Form. If a recipient surpasses this threshold, the system displays an error message.
-
Optionally, in the Maximum entries per form field, enter the maximum number of submissions allowable for this Web Form, across all recipients. If the Web Form surpasses this threshold, the system displays an error message.
Note: Be careful when testing Web Form submissions, as the test submissions count toward both of the above thresholds. If you're testing a link to your Web Form from an email message, the platform will count Web Form submissions from your email "proof" recipients, as if they were actual, live email recipients.
-
Optionally, to define a start schedule for the Web Form, click the Start On toggle next to Form Start Date, then enter the start date and start time. Optionally, to make the Web Form available immediately after it's published, click the Start Immediately toggle.
Note: If using the schedule feature, when you publish your Web Form, it won't yet be available to users until the schedule's start date. If a user attempts to access the Form prior to the start date, a generic error message is displayed.
-
Optionally, to define an expiration schedule for the Web Form, click the End On toggle next to Form End Date, then enter the end date and end time. After the designated end date / time, the system will display the Expiration page or message (described below) if a recipient attempts to access the Web Form. Optionally, to make the Web Form run indefinitely, click the Run Indefinitely toggle.
-
In the Tool Ribbon, click Edit > Save.
If your Web Form is finished, the next step is to publish it. See Publish a Web Form below for more details on this process.
EDP Web Form: Expiration
If you defined an end date for the Web Form in the Form Schedule section above, the Expiration section allows you to define the content that gets displayed to the recipient if they attempt to access an expired Web Form.
To define the expiration content:
-
Select an expiration page option:
To display a web page that's hosted externally to the Cheetah Digital platform:
-
Click the Expiration Page URL tab.
-
Enter the URL for the expiration page
To display another Web Form (typically used for Multi-Forms):
-
Click the Move On To Another Form tab.
-
In the Next Form field, either begin typing in the Web Form name, or click the browse button (magnifying glass icon) to browse for and select it. You can also create a new Web Form by clicking the new button (plus-sign icon).
-
Optionally, if you want to view the details of the Web Form after selecting it, click the jump-to button (green up-arrow icon). The system displays the Web Form screen.
To display a web page that's hosted by Cheetah Digital:
-
Click either the Basic (HTML) tab or the Advanced (XSL) tab.
-
Enter the HTML or XSL code for the expiration page.
-
To preview your confirmation page, click Edit > Preview in the Tool Ribbon. The Preview window is displayed. From the "Preview" drop-down menu, select "Expiration Page." When finished, click Edit > Edit in the Tool Ribbon to return to the Web Form details screen.
-
In the Tool Ribbon, click Edit > Save.
If your Web Form is finished, the next step is to publish it. See "Publish a Web Form" below for more details on this process.
Other Features
This section describes additional features related to managing your Web Forms.
Copy a Web Form
To copy an existing item to use as the basis for a new item:
-
Search for the desired item (see Search for an Item for more details).
-
Click on the item name. The main item screen is displayed and populated with the details of the selected item.
-
In the Tool Ribbon, click Edit > Save as. A Save as dialog box is displayed.
-
Enter a name for the new item.
-
By default, the new item will be saved in the same folder location as the base item. Optionally, click the magnifying glass icon to browse to and select a different folder location.
-
Click save a copy. The system creates a copy of the selected item.
Publish a Web Form
After you've created the Web Form to your satisfaction, you must publish it to make it accessible to your customers.
To publish your Web Form:
-
In the Tool Ribbon, click Edit > Save and Publish.
-
If you need the URL for the published Web Form, click Tools > Generate URLs in the Functional Menu. Select a domain from the Domain drop-down menu. The Form URL field displays the final published URL.
Add a Web Form Link to a Campaign
After you've created and published a Web Form, you can provide the URL to the Web Form through another marketing channel, such as an Email message, SMS Text message, or Push Notification.
To add a Web Form to a Campaign message:
-
Navigate to the desired Campaign (see Campaigns for more details).
-
Scroll down to the Message section, and click edit. The Advanced Editor screen is displayed.
-
Place your cursor in the main content field. The Personalization Pane appears on the right-hand side of the screen.
-
In the Personalization Pane, click on the URLs group to expand it.
-
Within the URLs group, double-click on Web Form (PURL) (or, optionally, you can drag Web Form (PURL) from the Personalization Pane, and drop it into the content field). A Browse Web Forms dialog box is displayed.
-
From the Browse Web Forms pop-up window, you can click on a folder in the directory structure to see a list of all the Web Forms stored within that Folder. Or, if you want to search across the entire system, click the double-left arrow icon near the top of the directory structure; the system collapses the directory structure and shows every Web Form in the system. This pop-up window also allows you to search based on Tags, or by name. When you find the desired Web Form, click on its name.
Note: Web Forms have to be created using the same source table as the Campaign in order for them to be available as a selection.
-
A dialog box is displayed. From the Domain drop-down menu, selected the desired domain to use for this Web Form. Click OK.
-
The system inserts the URL for this Web Form into the message content at the current cursor location. If this Web Form uses a Web Authentication, the Web Authentication fields are included as a query string within the URL.
Note: If you're using a Web Form in conjunction with a Personalized URL (PURL), the Web Form containing the PURL must be bound to the Campaign, which also causes the platform to populate the PURL Field.
View or Edit a Web Form
To view or edit an existing Web Form:
-
Search for the desired Web Form (see Search for an Item for more details on the available search methods).
-
Click on the Web Form name. The Web Form screen is displayed and populated with the details of the selected Web Form.
-
Optionally, to view detailed information about the Web Form, click the Web Form tab in the Tool Ribbon. The Item Details screen is displayed, showing who created the item, who modified it last, and what the last actions taken on the item were. The direct link URL to the Web Form is available here, which can be copied to the clipboard using the Copy Link icon. This can be used to easily share and also open the Web Form in a browser. On this screen, click Related Items in the Function Menu to see other items in the system that reference or utilize this Web Form. When finished, click the Edit tab in the Tool Ribbon to return to the main edit screen.
-
Optionally, you can assign one or more tags to your Web Form. To assign a tag, click on the Add tag field in the Edit > Tags section of the Tool Ribbon. The system displays a pop-up menu of all the existing tags. You can select one of these tags, or type in a new one and press Enter. You can repeat this process to add more tags. To remove a tag, click the X icon next to the tag label.
-
Optionally, to rename the Web Form, click Edit > Rename. A Rename Item dialog box is displayed. Enter a new name for the Web Form, then click Save new name.
-
Make any necessary changes to the Web Form, such as adding or removing fields, changing the content, or changing the confirmation page.
-
To save your changes, click Edit > Save in the Tool Ribbon. Or, if you're ready to republish the Web Form, click Edit > Save & Publish.
Note: If you're using the "Maximum submission" counters for this Web Form, republishing the Form will reset all counters back to "0."
Delete a Web Form
To delete an item:
-
Search for the desired item (see Search for an Item for more details).
-
Click on the item name. The main item screen is displayed and populated with the details of the selected item.
-
In the Tool Ribbon, click Edit > Delete. A confirmation dialog box is displayed.
-
Click delete item to confirm the deletion.
Foldered items are moved to the Recycle Bin. Non-foldered items are permanently deleted.
View a Sample XSL Web Form
This section describes a sample Web Form built using XSL. Web Forms can also be built in HTML, but XSL provides some additional functionality.
-
Declare the subscription form as an XML document using XSL stylesheets. Begin the document with the header code (before <html>):
<?xml version="1.0" encoding="utf-8"?>
<xsl:stylesheet version="1.0" xmlns:xsl="http://www.w3.org/1999/XSL/Transform">
<xsl:output method="html" encoding="UTF-8" indent="yes" omit-xml-declaration="yes" />
<xsl:template match="/">
-
End the XML declaration by ending the document with the footer code (after </html>):
</xsl:template>
</xsl:stylesheet>
-
Use the “GetParam” Template to access the Recipient XML doc. Set the property names and values to the “GetParam” template which can access the database properties and values as well as the parameters passed along in the URL query string. *Note: To include this template, make sure it inserted after the closing template tag above </xsl:template>, but before the closing stylesheet tag </xsl:stylesheet>.
<xsl:template name="GetParam">
<xsl:param name="prop_name" />
<xsl:choose>
<xsl:when test="/FormData/Props/Prop[@name=$prop_name]/@val != ''">
<xsl:value-of select="/FormData/Props/Prop[@name=$prop_name]/@val" />
</xsl:when>
<xsl:when test="/FormData/RequestParams/RequestParam[@name=$prop_name]/@val != ''">
<xsl:value-of select="/FormData/RequestParams/RequestParam[@name=$prop_name]/@val" />
</xsl:when>
<xsl:otherwise></xsl:otherwise>
</xsl:choose>
</xsl:template>
This can be used along with XSL variables to easily access property data:
<!-- Declare and Set the Variable Name -->
<xsl:variable name="name_first">
<xsl:call-template name="GetParam">
<xsl:with-param name="prop_name">name_first</xsl:with-param>
</xsl:call-template>
</xsl:variable>
<!-- First Name Form Input Field -->
<xsl:element name="input">
<xsl:attribute name="type">hidden</xsl:attribute>
<xsl:attribute name="name">s_name_first</xsl:attribute>
<xsl:attribute name="value">
<xsl:value-of select="$name_first" />
</xsl:attribute>
</xsl:element>
-
Declare the Web Form. Use the following form tag (form name can be different):
Cheetah Digital Hosted Forms:
<form name="Subscribe" method="post" action="go.aspx">
Customer or third-party hosted forms:
<form name="Subscribe" method="post" action="http://ats.eccmp.com/ats/post.aspx">
-
Capture Recipient, Campaign, and Form information. After the form tag, input the following code: (Required Hidden Input Fields)
<xsl:element name="input">
<xsl:attribute name="type">hidden</xsl:attribute>
<xsl:attribute name="name">sb</xsl:attribute>
<xsl:attribute name="value">
<xsl:value-of select="/FormData/Submission/@submission_id" />
</xsl:attribute>
</xsl:element>
<xsl:element name="input">
<xsl:attribute name="type">hidden</xsl:attribute>
<xsl:attribute name="name">cr</xsl:attribute>
<xsl:attribute name="value">
<xsl:value-of select="/FormData/Submission/@cust_id" />
</xsl:attribute>
</xsl:element>
<xsl:element name="input">
<xsl:attribute name="type">hidden</xsl:attribute>
<xsl:attribute name="name">fm</xsl:attribute>
<xsl:attribute name="value">
<xsl:value-of select="/FormData/Submission/@form_id" />
</xsl:attribute>
</xsl:element>
<xsl:element name="input">
<xsl:attribute name="type">hidden</xsl:attribute>
<xsl:attribute name="name">ri</xsl:attribute>
<xsl:attribute name="value">
<xsl:value-of select="/FormData/SubmissionRecip/@recip_id" />
</xsl:attribute>
</xsl:element>
<xsl:element name="input">
<xsl:attribute name="type">hidden</xsl:attribute>
<xsl:attribute name="name">rk</xsl:attribute>
<xsl:attribute name="value">
<xsl:value-of select="/FormData/SubmissionRecip/@recip_key" />
</xsl:attribute>
</xsl:element>
<xsl:element name="input">
<xsl:attribute name="type">hidden</xsl:attribute>
<xsl:attribute name="name">cn</xsl:attribute>
<xsl:attribute name="value">
<xsl:value-of select="/FormData/RequestParams/RequestParam[@name='cn']/@val" />
</xsl:attribute>
</xsl:element>
<xsl:element name="input">
<xsl:attribute name="type">hidden</xsl:attribute>
<xsl:attribute name="name">mg</xsl:attribute>
<xsl:attribute name="value">
<xsl:value-of select="/FormData/RequestParams/RequestParam[@name='mg']/@val" />
</xsl:attribute>
</xsl:element>
Optional Hidden Input Fields:
<!-- Hidden Confirmation URL Field - useful for dynamic thank you pages -->
<xsl:element name="input">
<xsl:attribute name="type">hidden</xsl:attribute>
<xsl:attribute name="name">cp</xsl:attribute>
<xsl:attribute name="value"></xsl:attribute>
</xsl:element>
-
Cheetah Digital utilizes a specific field naming convention. In order to have the Web Form data processed by the platform, and to have the values saved into the database, each property name must be prefixed with one of the following “s_” or “m_”.
-
“s_property_name” -- used for Text, Textarea, Radio Button, and Checkbox fields
-
-
“m_property_name” -- used for select drop-down menu
-
This section provides some basic rules of XSL coding.
-
Every tag must have a closing tag. For stand-alone tags, add a forward slash (/) before the ending bracket:
<img src="picture.gif" /> or <input type="text" value="s_name_first" />
-
XSL is case sensitive (as a rule of thumb, use lowercase).
-
All tags must be nested properly.
Correct method:
<b><i>This sentence is emphasized. </i></b>
Incorrect method:
<b><i>This sentence is emphasized.</b></i>
-
Attribute values must be enclosed properly in single or double quotes.
Correct method:
<table border="0" cellspacing="0" cellpadding="0">
Incorrect method:
<table border=0 cellspacing=0 cellpadding=0>
-
Special characters must be properly encoded. The following table lists the most common special characters.
|
Character Name |
Character |
Code |
|
Quotation Mark |
" |
" or " |
|
Apostrophe |
' |
' or ' |
|
Ampersand |
& |
& or & |
|
Less Than sign |
< |
< or < |
|
Greater Than sign |
> |
> or > |
|
Non-breaking space |
  |
|
|
Copyright symbol |
© |
© |
|
Registered symbol |
® |
® |
|
Em dash |
-- |
— |
-
To create pre-fill text fields:
<xsl:variable name="name_first"><xsl:call-template name="GetParam"><xsl:with-param name="prop_name">name_first</xsl:with-param></xsl:call-template></xsl:variable>
<input type="text">
<xsl:attribute name="id">s_name_first</xsl:attribute>
<xsl:attribute name="name">s_name_first</xsl:attribute>
<xsl:attribute name="value"><xsl:value-of select="$name_first" /></xsl:attribute>
</input>
Note: If pre-fill is not necessary, use the same HTML input tags, but with a backslash before the closing brackets to end the code.
<input type="text" value="s_name_first" size="20" maxlength="75" />
-
To create pre-fill radio buttons for regular text or number fields:
<p>Yes! Please keep me informed with the monthly newsletter.</p>
<input type="radio">
<xsl:attribute name="name">i_newsletter_flag</xsl:attribute>
<xsl:attribute name="id">i_newsletter_flag</xsl:attribute>
<xsl:attribute name="value">1</xsl:attribute>
<xsl:if test="$newsletter_flag='1'">
<xsl:attribute name="checked">checked</xsl:attribute>
</xsl:if>
</input>
<p>No, Maybe later.</p>
<input type="radio">
<xsl:attribute name="name">i_newsletter_flag</xsl:attribute>
<xsl:attribute name="id">i_newsletter_flag</xsl:attribute>
<xsl:attribute name="value">0</xsl:attribute>
<xsl:if test="$newsletter_flag='0'">
<xsl:attribute name="checked">checked</xsl:attribute>
</xsl:if>
</input>
-
To create pre-fill check boxes for regular text or number fields:
<xsl:variable name="newsletter_flag">
<xsl:call-template name="GetParam">
<xsl:with-param name="prop_name">newsletter_flag</xsl:with-param>
</xsl:call-template>
</xsl:variable>
<xsl:element name="input">
<xsl:attribute name="type">checkbox</xsl:attribute>
<xsl:attribute name="name">i_newsletter_flag</xsl:attribute>
<xsl:attribute name="id">i_newsletter_flag</xsl:attribute>
<xsl:attribute name="value"><xsl:value-of select="$newsletter_flag"/></xsl:attribute>
<xsl:attribute name="onClick">if(this.checked) {this.form.s_newsletter_flag.value = '1';} else {this.form.s_newsletter_flag.value = '0';}</xsl:attribute>
<xsl:if test="$newsletter_flag='1'">
<xsl:attribute name="checked">checked</xsl:attribute>
</xsl:if>
</xsl:element>
<xsl:element name="input">
<xsl:attribute name="type">hidden</xsl:attribute>
<xsl:attribute name="name">s_newsletter_flag</xsl:attribute>
<xsl:choose>
<xsl:when test="not($newsletter_flag)">
<xsl:attribute name="value">0</xsl:attribute>
</xsl:when>
<xsl:otherwise>
<xsl:attribute name="value">
<xsl:value-of select="$newsletter_flag"/>
</xsl:attribute>
</xsl:otherwise>
</xsl:choose>
</xsl:element>
Note: In order to the have the check box work correctly and as a true preference value, JavaScript must be used in order to set the value of the hidden property field. In the sample above, we are using the JavaScript below to set the hidden input “s_newsletter_flag” value when the displayed input “i_newsletter_flag” is checked by the user.
<xsl:attribute name="onClick">if(this.checked) {this.form.s_newsletter_flag.value = '1';} else {this.form.s_newsletter_flag.value = '0';}</xsl:attribute>
-
To create pre-filled select drop-down menus:
<!-- Declare the variable bsst -->
<xsl:variable name="bsst">
<xsl:call-template name="GetParam">
<xsl:with-param name="prop_name">business_state</xsl:with-param>
</xsl:call-template>
</xsl:variable>
<select name="m_business_state" id="m_business_state" size="1">
<xsl:element name="option"><xsl:attribute name="value"></xsl:attribute><xsl:if test="not($bsst)">
<xsl:attribute name="selected">selected</xsl:attribute></xsl:if>Select a State</xsl:element>
<xsl:element name="option"><xsl:attribute name="value">AL</xsl:attribute><xsl:if test="contains($bsst,'AL')">
<xsl:attribute name="selected">selected</xsl:attribute></xsl:if>Alabama</xsl:element>
<xsl:element name="option"><xsl:attribute name="value">AK</xsl:attribute><xsl:if test="contains($bsst,'AK')">
<xsl:attribute name="selected">selected</xsl:attribute></xsl:if>Alaska</xsl:element>
<xsl:element name="option"><xsl:attribute name="value">AZ</xsl:attribute><xsl:if test="contains($bsst,'AZ')">
<xsl:attribute name="selected">selected</xsl:attribute></xsl:if>Arizona</xsl:element>
...
</select>
-
To create a pre-fill text area:
<xsl:variable name="comments"><xsl:call-template name="GetParam"><xsl:with-param name="prop_name">comments</xsl:with-param></xsl:call-template></xsl:variable>
<input type="textarea">
<xsl:attribute name="id">s_comments</xsl:attribute>
<xsl:attribute name="name">s_comments</xsl:attribute>
<xsl:attribute name="rows">5</xsl:attribute>
<xsl:attribute name="cols">40</xsl:attribute>
<xsl:attribute name="value"><xsl:value-of select="$comments" /></xsl:attribute>
</input>
-
You are able to combine JavaScript code with the XSL code. Place the JavaScript code within your document as usual, as long as it doesn’t throw any XML parsing errors when viewed in browser as a file_name.xml. To prevent JavaScript code from throwing any XML parsing errors, the JavaScript can be wrapped with CDATA tags as in the example below. The same can be use for wrapping poorly formatted HTML code that is not XML compliant.
<xsl:text disable-output-escaping="yes"><![CDATA[
<SCRIPT LANGUAGE="JavaScript">
// <!-- hide script contents from ancient browsers that don't support JavaScript
CODE IS HERE
// end hiding contents from old browsers -->
</SCRIPT>
]]></xsl:text>
Note: For best performance and ease of use, we recommend that you put all JavaScript and Style sheet code into a .js or .css file and reference it in the header like this:
<link rel="stylesheet" href=" http://__________/Style.css" type="text/css"/>
<script language="JavaScript" src=" http://__________.js /validate.js"></script>
The "Confirmation" section of the Web Form detail screen is used to configure the page to which the viewer is directed once he or she has successfully submitted the Web Form. Optionally, you can choose to NOT define a confirmation page, which allows for the ability to use JavaScript or XSL to set the confirmation page dynamically depending on user input, or on already existing data pre-filled from the database or passed in the URL query string.
HTML Sample:
<input type="hidden" name="cp" value="http://_______"/>
XSL Sample:
<!-- Declare the Variable Named "sourceID" -->
<xsl:variable name="sourceID"><xsl:call-template name="GetParam"><xsl:with-param name="prop_name">sourceID</xsl:with-param></xsl:call-template></xsl:variable>
<!-- Set the Confirmation Page based on the sourceID value passed in the URL String -->
<input type="hidden">
<xsl:attribute name="name">cp</xsl:attribute>
<xsl:choose>
<xsl:when test="$sourceID = '1'">
<xsl:attribute name="value">http://www.google.com</xsl:attribute>
</xsl:when>
<xsl:when test="$sourceID = '2'">
<xsl:attribute name="value">http://www.yahoo.com</xsl:attribute>
</xsl:when>
<xsl:when test="$sourceID = '3'">
<xsl:attribute name="value">http://www.hotmail.com</xsl:attribute>
</xsl:when>
<xsl:when test="$sourceID = '4'">
<xsl:attribute name="value">http://www.aol.com</xsl:attribute>
</xsl:when>
<xsl:otherwise>
<xsl:attribute name="value">http://www.conversen.com</xsl:attribute>
</xsl:otherwise>
</xsl:choose>
</input>
Troubleshooting
Troubleshooting a Web Form
If your Web Form isn't unsubscribing consumers as expected, check the following:
-
Does the Web Form use the same source table as the Campaign? The Form must use the same source table as the Campaign, so that the Form can be incorporated within the Campaign content.
-
Has the Web Form been published?
-
What's the Web Form type? For a Web Form intended to capture unsubscribes, the best practice is to use an Opt-Out Web Form.
-
Verify that the Form's data mapping is correct.
Note: If the problem persists, please contact Global Support for further assistance.
