
Imports
Cheetah Digital by Zeta offers several different ways to bring data into the platform and load it into your marketing database. Data can be imported in a manual process through a file import, or by way of an FTP automated process (see FTP Import Templates for more details). You can manually edit or enter records one at a time using the Record Lookup screen. Data can also be submitted to the platform through an API Post, or through Web Forms and Web Events. The best import method should be indicated by your business requirements and marketing strategy. If you have any questions about which import method best meets your needs, please speak with your Client Services Representative.
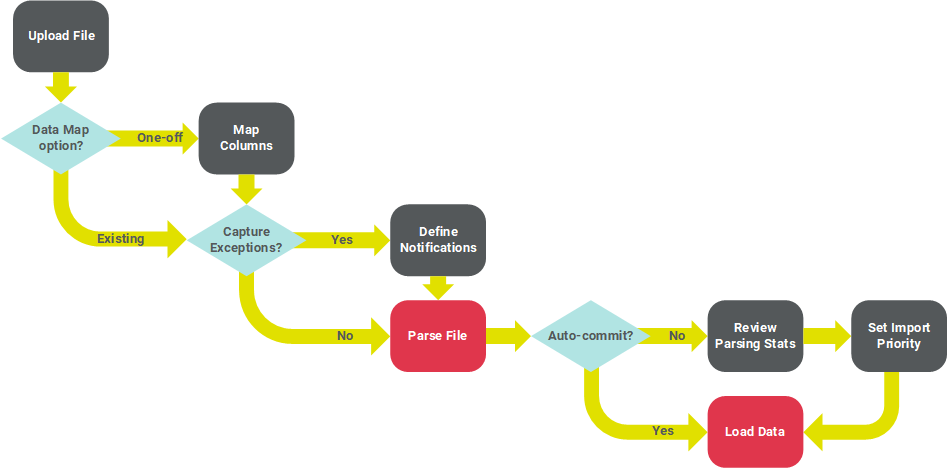
The Imports screen is used to perform a manual file import. From this screen you can browse to and select the import file, select or define a Data Map, set up email notifications, reviewing parsing results, and configure various options for how the platform should handle and process the data.
|
|
The ZetaHelp Center provides access to a wide range of enablement videos on manyZeta solutions that you can take as needed. Click here to browse to the video on how to use Imports. |

Prerequisites
Before proceeding to import data into the platform, the following required assets need to be created within Cheetah Digital by Zeta:
-
Tables: The destination Table where you want to load your import data should be created, and should include all the necessary fields and joins, as well a Unique Identifier (it is possible to create new fields "on the fly" when performing a manual import). See the Tables topic for more details.
-
Data Map: Data Maps identify the correct Table into which the data needs to be loaded, as well as the fields in that Table where each column in the import file will be stored. Data Maps can be created prior to defining the Import Template, or they can be created "on the fly" when performing a manual data import. See the Data Maps topic for more details.
Data File Formats
Cheetah Digital by Zeta accepts database imports as Microsoft Excel files or as text files, with the data fields being delimited using any of the following characters: tab, comma (,), semicolon (;), pipe (|), or caret (^).
The platform also supports the use of fixed-width import files, but you'll need to define the Data Map separately; you can't create an "on the fly" Data Map if importing a fixed-width file. See the Data Maps topic for more details.
The import file may contain any information that is available, and will typically contain the Unique Identifier for the destination Table; it is possible to load an import file that doesn't have the Unique Identifier, through the use of a "Soft Match" instead.
Before importing data into the platform, make certain the data is clean and formatted properly. The following tips can be useful when creating text files from Microsoft Excel:
-
Whenever possible, try to avoid using a comma as the delimiter character for your import file, and instead use tab or pipe for a delimiter. Commas are used more frequently within data, and as such, are more difficult to discern when examining data. The tab or pipe characters are rarely found in data.
-
Preview the text file in a text editor, such as Notepad, using line numbers and visible spaces to review the file and ensure proper formatting.
Data Parsing
The platform parses the import data to ensure that the values are clean, valid, and usable. Depending on the Data Type for a field, various methods of parsing and cleansing are utilized. The platform may adjust the import value for a field according to rules set for that type of field. For example, if a numeric value is being imported into a field identified as a "Phone Number," the platform will verify that this value is the correct length, and will remove any unnecessary and invalid characters. For more details on the Data Parsing rules utilized by Cheetah Digital, please see the Data Parsing Help topic.
Access
The Imports screen is accessible by the following method:
-
From the Main menu, select Data > Execution > Imports
Create a New Manual Import |
|
|
|
|
|
|
|
|
Troubleshooting
|
|
