This guide explains the value of our enhanced Mobile Push capabilities and how to use both push and in-app notifications.
What is a Mobile Push Notification?
As a marketer you know the importance of capturing good customer data, of being able to personalize your messages and of being able to identify and target segments in your customer audience. Mobile Push Notifications enable you to do all these.
The Mobile Push Notification channel includes 2 types of messages that appear on your customer or subscriber’s mobile device once they’ve downloaded your mobile app: Mobile Push and In-App Notifications. These messages bypass spam traps and avoid getting buried in your customer’s inbox. They allow you to engage with your customers directly on their mobile screens with timing and impact.
A Push Notification is a short message that's viewable on a customer's mobile device, such as a smartphone or tablet. Push Notifications are enabled when a customer installs your app on their mobile device, and agrees to receive notifications. In most cases, users will be prompted by the app as to whether they want to receive Push Notifications. If the customer opts-in, then they become a viable candidate for your campaign. If the customer opts-out of Push Notifications, then they won't receive the Push Notifications, however they will still receive the In-App Notifications when they open your mobile app.
Push notifications are short text-based messages and can include images, videos, audio, GIFs, emojis and links. One great advantage of Push notifications is that they appear on device lock screens.
In-App notifications, on the other hand, appear within your mobile app while the recipient is actively using it. They can display with all the rich media elements and interactivity of Push notifications, but they don’t appear on lock screens.
For use case ideas on Push and In-App notifications, refer Mobile Push Use Cases.
How to Request Mobile Push Notification
Mobile Push Notification is an optional feature that must be enabled in your account. Please speak with your Marigold Representative for more details.
Integrating Mobile app and Marigold SDK
App developers must integrate the Mobile app with the Marigold SDK to enable Push notifications. Refer to the Marigold Mobile SDK Integration Documentation for details. If you do not have access to the platform, contact your Marigold Services Representative for assistance.
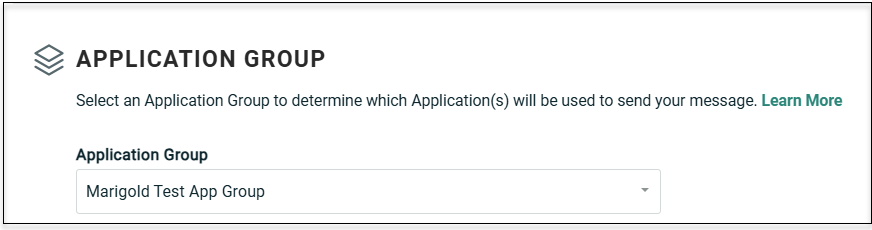
Application Groups
Apps can be organized into "Application Groups," which simplifies the process of sending out notifications. When you create a Push Notification Campaign, the notifications are sent out to an entire Application Group at once. For example, if you have an iOS version and a Google Android version of an app, you could add both versions to the same Application Group, and send out notifications to both versions of the app at the same time.
Mobile groups must be associated with a recipient table. Multiple mobile groups can be associated with a recipient table.
You must create a mobile group and then add your mobile apps to this group.
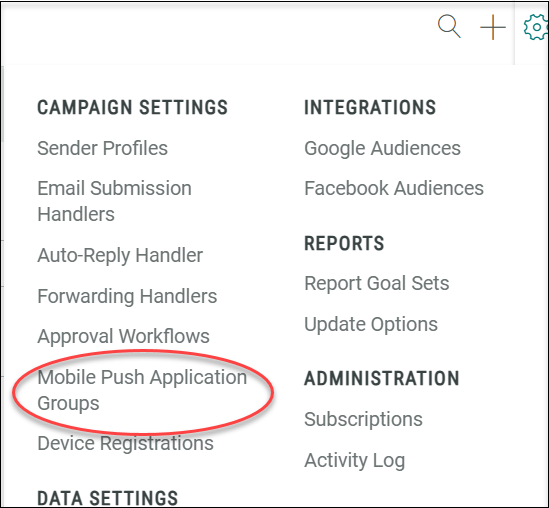
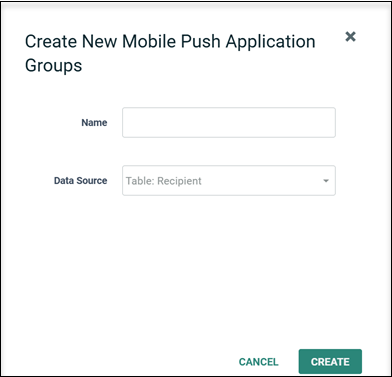
To create a new application group:
-
In the top menu bar, select Settings > Campaign Settings > Mobile Push Application Groups.
-
Click the new item button (plus-sign icon) above the list of existing application groups. The New Mobile Push Application Group pop-up window is displayed.
-
Enter a name for your new application group.
-
Select the primary recipient table that will be used for sending your push campaign. For cross-channel orchestration, this should be the same primary recipient table that is used for email and SMS campaigns as well. This means that email, SMS, and mobile push message can all be deployed from and associated with a single recipient record, allowing channel activities from that recipient record to be easily queried and coordinated.
-
Click Save new item. A blank Mobile Push Application Group screen appears, allowing you to add mobile apps to the group.
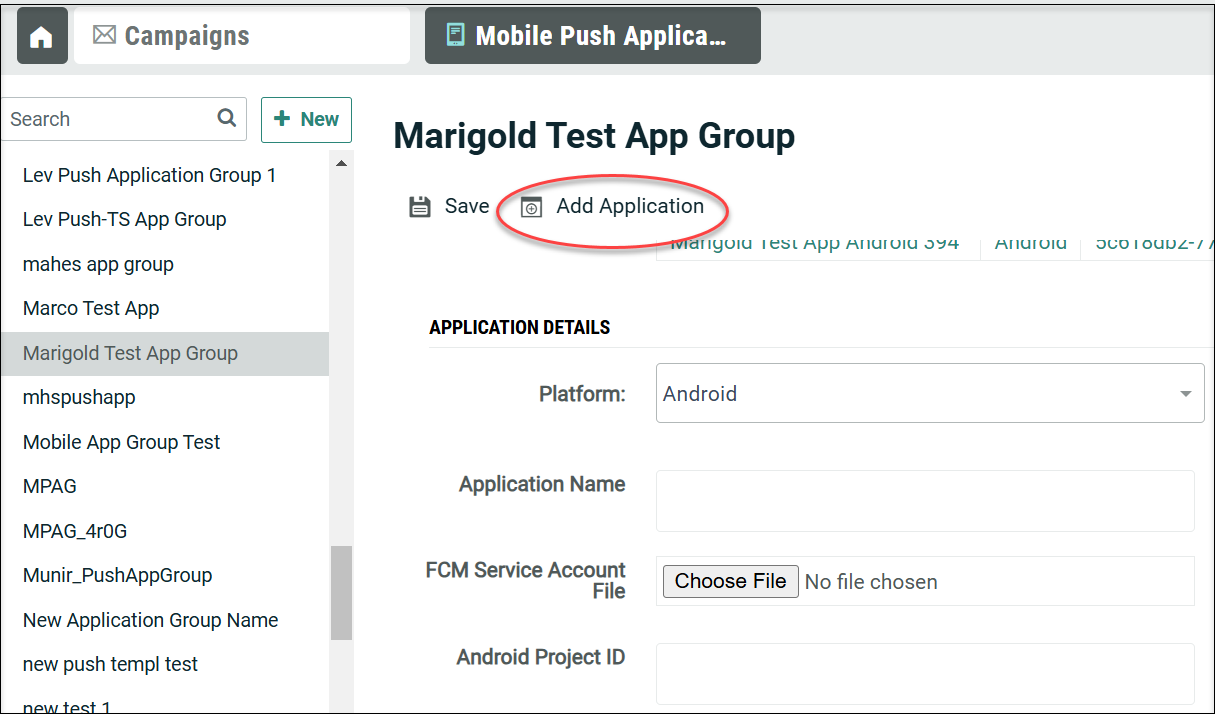
Follow these steps to add a mobile app to the application group:
-
In the Mobile push application groups tab, select the required application group from the left pane.
-
Click Add Application in the tool bar. A new Application details section is displayed.
-
From the Platform drop-down menu, select the operating system for your app (Cheetah Digital supports iOS and Android).
-
iOS: Enter the name of your app and iOS Bundle ID. In the P8 Certificate File field, click Choose File to navigate and select your app's certificate file (only files with .p8 file extension is allowed). Enter theP8 key ID and team ID of the certificate file.
-
Android GCM: Enter the name of your app, upload the FCM Service Account File (JSON file) by clicking the Choose File button, to use FCM authentication, and enter the Android Project ID.
Please note that the Google GCM API Key is no longer supported by Google and has been deprecated.
-
-
Click Save. Your app is added to the list within the Applications Belonging to this Group section. This list shows the application name, operating system or platform, and application ID. The application ID is a system-generated identifier that will be needed by the app developer.
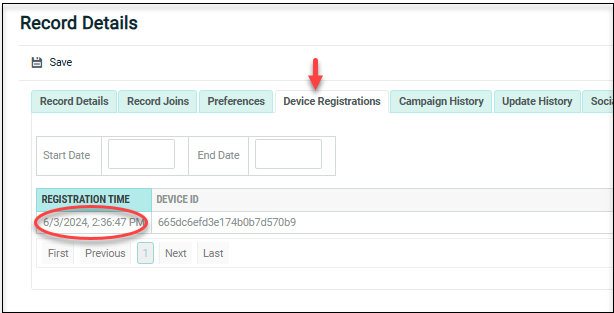
Device Registration Information
When a recipient downloads and installs your mobile app, Cheetah Digital will receive and record the device's attributes. These attributes include app installation time, the mobile device's ID (the distinct combination of a recipient’s app and device), the device token, the name and platform (iOS | android) of the app, the device status and message status.

The Device Registrations tab displays all the above attributes along with the following statuses:
Device Status - indicates if the device registration status is Valid (successful) or Invalid (not currently registered)
Message Status - indicates if the audience member has elected to receive push and in-App Messages. It can be one of the following:
Unknown -The user has not yet confirmed their permissions.
Quiet - The user can receive push notifications in quiet mode - i.e. the application will not actively alert the user.
Active - The user has allowed push notifications.
Disabled - The user has blocked push notifications.
In order to send a message, the Device status must be Valid and Message status must be Active or Quiet.
Whenever the recipient signs in to your mobile app, the device and message status are sent and updated in Cheetah Digital.
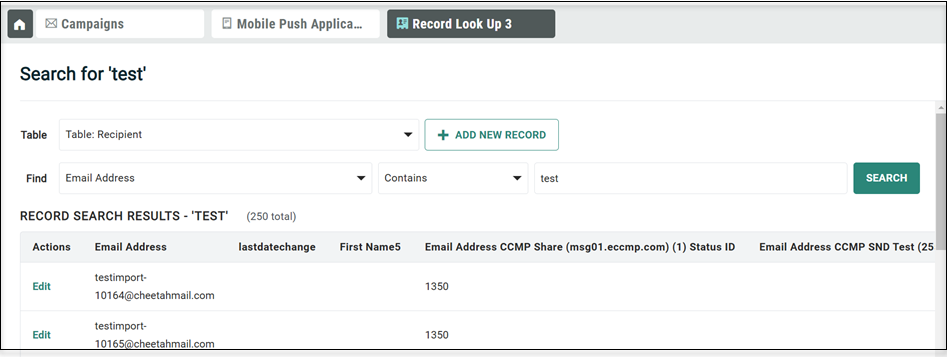
The device registration information can be viewed in Cheetah Digital's Record Lookup.
-
From the Main menu, select Data > Management > Record Lookup.
-
From the Table drop-down list, select the recipient table that you want to search.
-
The Find drop-down list is populated with all of the fields in the table you selected in step 1. From this menu, select the field that you want to search.
-
Select a mathematical operator from the drop-down menu, such as equal to, contains, or more than.
-
Enter the text string for which you're searching.
-
Click Search. The system displays a list of records (up to a maximum of 250) that meet your search criteria.
-
Within the search results, click Edit next to the desired record. The system opens a new Database Record tab within the Top Navigation Panel.
-
The Database Record screen displays several tabs which provide access to different information. Click Device Registrations tab.
The Device Registrations tab displays the selected device's attributes along with the notification status.
Optionally, you can apply a date filter to show only the devices that were registered within the specified date range.
Creating Mobile Push Notification Campaign
-
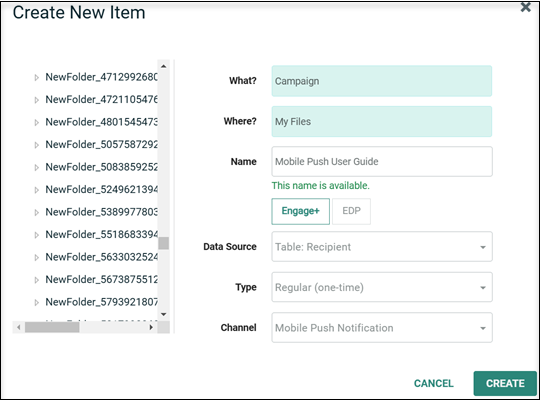
In the Tool Ribbon, click + new Campaign, or alternately from the Admin banner bar, select + New menu >Campaign. In this user guide, we will create a regular one-time Mobile Push Notification Campaign.
-
A "New Item" pop-up window is displayed. To select the folder where you want to save this new Campaign, click the folder name in the Navigation Tree on the left side of this pop-up. The "Where?" field is updated with the selected folder name.
-
In the "Name" field, enter a name for your new Campaign. This name must be unique within the selected folder.
-
Click on Cheetah Digital.
-
From the "Type" drop-down menu, select the Campaign type:
-
Regular One-off – a one-time submission to all recipients in the Campaign audience
-
Date-triggered – Campaign messages are submitted to all Campaign audience recipients on a recurring frequency.
-
Event-triggered – Campaign messages are submitted to recipients based on a specified event trigger (see Event Trigger Options for more details on the types of Triggers supported by the platform).
-
-
From the "Channel" drop-down menu, select Mobile Push Notification.
-
Click Create. The Workspace is refreshed to show a blank Campaign details screen, where you can configure the details of the Campaign.
The Campaign screen includes 5 tabs.
Setup tab: In this tab include the recipients to send your Campaign message. You can specify a group of audience using the Filters. Also, you can select the Application groups connected to the Campaign's recipient table. For more details on the settings in this tab, refer screen-based help - Audience.
Content tab: In this tab define your push type and message.
This section allows you to create your message and add additional features to increase engagement with your message not only with a Title and Message, but with notification badges, custom sounds, images and GIFS, Deep links and specific Call to Action buttons.
There are two types of messages you can send using the Mobile push notification channel:
Push Notifications are sent to users' mobile devices, even if your app isn't open. A push notification is a simple message directing users to your app when the Push Message is tapped. These messages appear on your Lock or Home Screen, outside of your Mobile App.
In-App Notifications engage your users while they are using your app. In-App notifications are displayed once users open your app.
For more details on this tab, refer screen-based help - Message.
Review tab: In this tab define the Campaign schedule, proof review and audit the Campaign prior to launch. For more details on this tab, refer screen-based help - Review.
Status tab: This tab is available only after the Campaign is launched. Here you can monitor a Campaign after it's been launched, and configure any post-launch options. In addition, you can pause or stop the Campaign. For more details on this tab, refer screen-based help - Status.
Analytics tab: This tab provides marketers with the ability to measure and review what is currently happening with their mobile push campaigns. Data is shown in real-time and the dashboards include consolidated reports, providing insights on engagement and audience. For more details, refer Real Time Analytics User Guide.
In this user guide, we will create an audience group using the Mobile device registrations from a specific application.
-
In the Campaign screen, click the "Setup" tab.
-
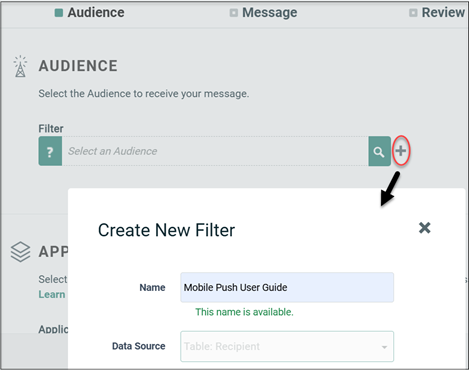
In the "Audience" section, to create a new Filter, click the new button (plus-sign icon). A "New Item" dialog box is displayed. Enter a name for this Filter, and the data source is selected for you which is same as the recipient table of the Campaign.
-
Click Create. The filter is now added to the Campaign.
-
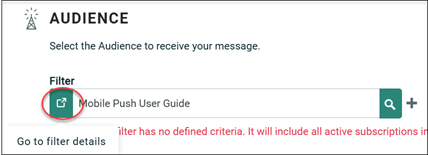
In the Audience section, click "Go to filter details". The system displays the Filter detail screen where you can define the filter logic.
-
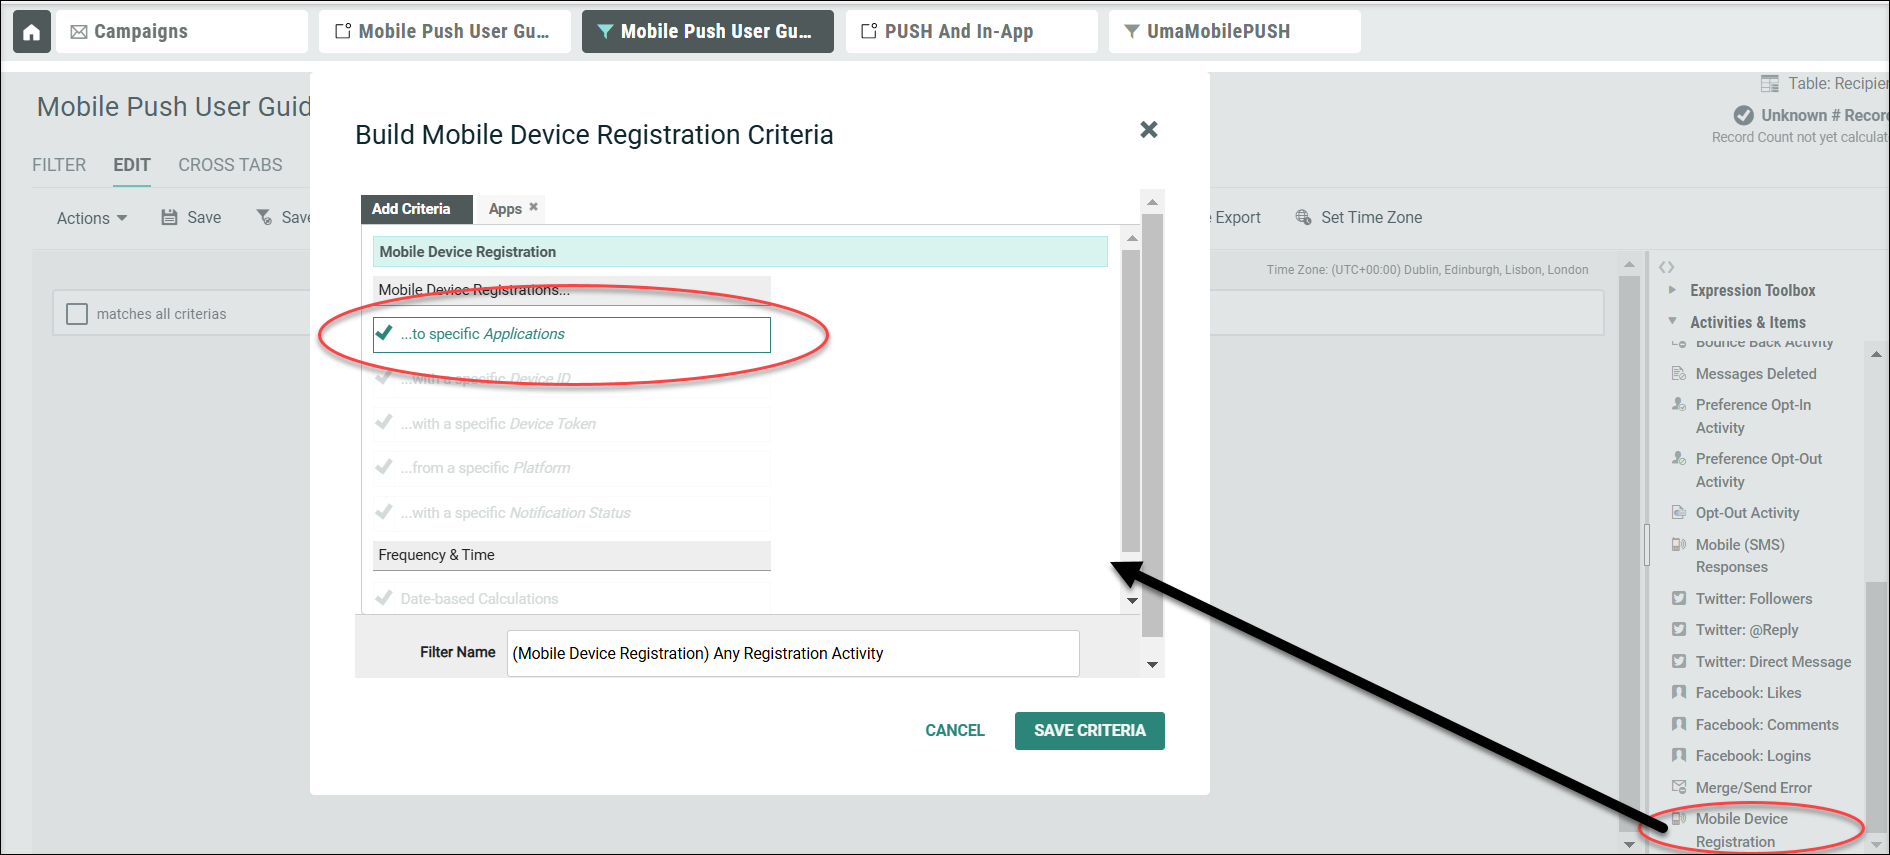
In the Dynamic Pane, click "Activities and Items."
-
From the displayed list of activities, locate "Mobile Device Registration".
-
Drag this activity from the Dynamic Pane, and drop it into the Workspace.
-
A "Build Criteria" dialog box is displayed.
-
Click the check mark next to "... to specific Applications." The system opens a new tab in the dialog box named "Apps."
-
Select the required application from the displayed list, in the Apps tab.
-
Click Save Criteria.
-
Click Save to save the filter.
-
Click the Campaign's tab in the top navigation pane, to return to your Campaign.
For more information on the Setup tab, refer screen-based help - Setup.
To select the Application Group for this Campaign, from the Application Group drop-down menu, select the desired Application Group. This drop-down menu displays all of the Application Groups that have been setup using the same primary recipient table as the campaign.
The Push type section allows you to choose which type of message you’d like to send. There are 3 options displayed, you can choose one of these.
-
The default setting is to create both Push notification and In-App message together.
-
Create a Push notification only
-
Create an In-App message only
Note: If you toggle between the Push types, your settings in Cheetah Digital will not be lost. For example, if you first create a Push notification, but then decide to add an In-App message, you can choose Push and In-App notification and all of your settings for Push notifications are saved and available for use.
In this user guide, we will create the combined Push and In-App notification Campaign message.
Based on the push type selected, further fields are displayed in this section allowing you to create your notification message.
-
Title: The Title represents the first line of your message and it is typically very short. The title can also be personalized to increase engagement. Enter your Title in Plain Text format.
-
Message: In the message, enter a longer message to give the recipient a bit more information about your notification topic. Enter your message in Plain text Format.
-
Emojis: You can include emojis in the Title and Message fields to grab the attention of your recipients.
Windows users can use the keyboard shortcut Windows logo key and .(period) to launch the emoji keyboard.
Mac users can use the keyboard shortcut Control + Command + Space to open the Character viewer.
-
-
Notifications Settings - Badge and Sound
-
Badge (iOS devices only) appears as a small circle indicator with a number on your app icon and indicates a new message that has been sent from your mobile app.
Android badges are controlled inside your mobile app settings.
-
Sound is the specific alert sound that can be used to indicate your message if your mobile app uses custom sounds. Keep in mind, the recipient may override your custom sound with their own sound notification sounds on their device.
-
Select Sound and enter the exact sound file format that your mobile app uses.
-
-
-
Media: Add media to your message to increase engagement. This can be from an external source or hosted items in Cheetah Digital.
-
Paste your URL into the media field:
-
Choose media either from Engage+ Hosted Items (use the copy icon in the File URL) or an external source URL.
-
Accepted formats: JPEG, JPG, PNG, GIF, MP4
-
Image size must be within 50MB, as larger images could impact loading times.
Smaller, high-quality images typically load faster, so we suggest using the smallest asset that meets your desired output. And of course, be sure to test across various device types to ensure those visually rich messages have the impact you are looking for.
As a best practice, use images with an aspect ratio of 2:1 so your images look great across devices.
-
URL should read as: https://myimage.png
-
To use the media from hosted items in Cheetah Digital, Click Hosted Item and select the required file in the pop-up window. Alternatively, you can upload new media file to Cheetah Digital hosted items by clicking Upload New Media and then use this media in your Push message.
-
Click away from the field and the image will be processed, checking for validation of format, URL format and the location.
For more information on Hosted items, see Hosted Items.
-
-
-
On Click Behavior: when your notification is tapped you can either redirect recipients to the Home page of your mobile app or use the Deep link to go to the specific page within your app or to a web page.
-
Select Open App to open the Home page of your mobile app
-
Select Deep Link to open to a specific location within your mobile app or to a Web page. Enter the link in the format "my-app://deep-link-page" for the mobile app or enter the Web URL for the web page.
-
-
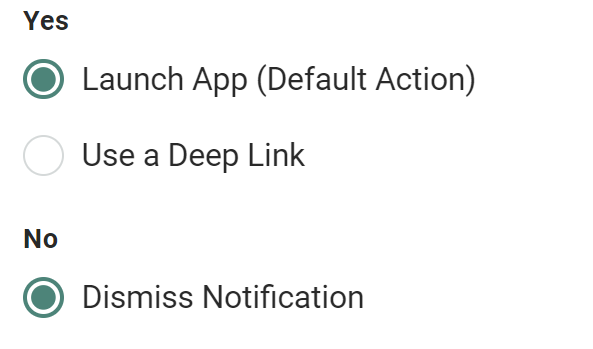
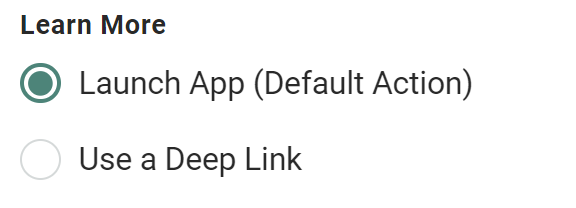
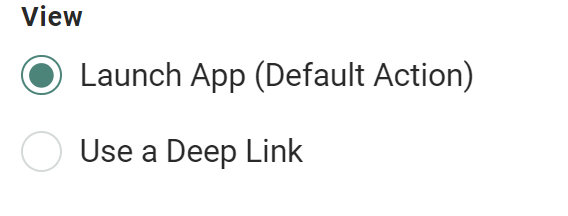
Buttons: Buttons add more engagement to your message by introducing actions which direct recipients directly to specifc deep link URLs within your mobile app. You can add the following buttons or add your own custom button.
Button Name Description Image Yes/No
Displays two buttons on your push notification, aYesbutton and aNobutton. TheYesbutton takes users directly to your app or to a specified link. TheNobutton dismisses the notification.
Learn More
Displays a singleLearn Morebutton on your push notification. The button takes users to your app or to a specified link.
View
Displays a singleViewbutton on your push notifications. The button takes users to your app or to a specified link.
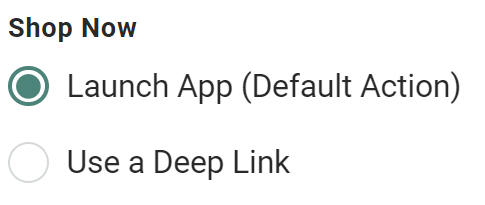
Shop Now
Displays a singleShop Nowbutton on your push notifications. The button takes users to your app or to a specified link.
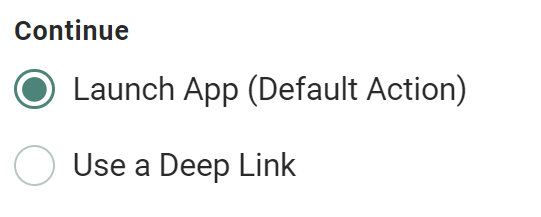
Continue
Displays a singleContinuebutton on your push notifications. The button takes users to your app or to a specified link.
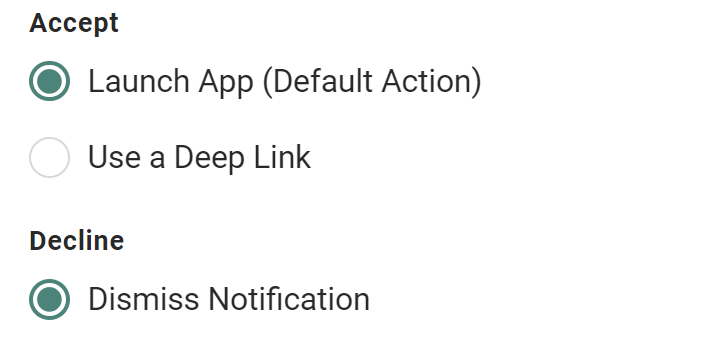
Accept/Decline
Displays two buttons in your push notification, anAcceptbutton and aDecline button. TheAcceptbutton takes users directly to your app or to a specified link. TheDeclinebutton dismisses the notification.
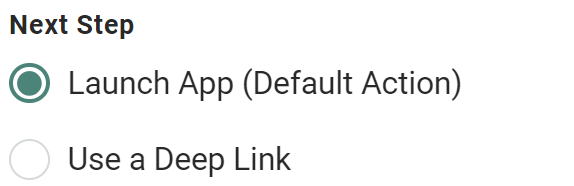
Next Step
Displays a singleNext Stepbutton on your push notifications. The button takes users to your app or to a specified link.
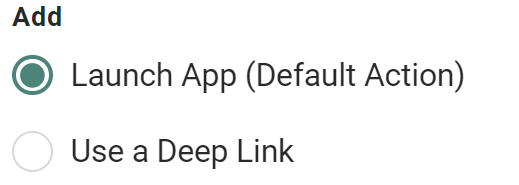
Add
Displays a singleAddbutton on your push notifications. The button takes users to your app or to a specified link.
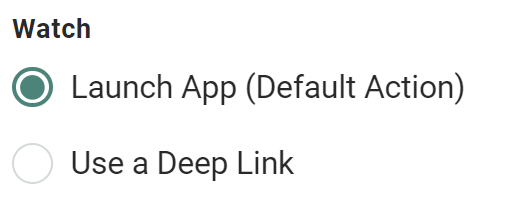
Watch
Displays a singleWatchbutton on your push notifications. The button takes users to your app or to a specified link.
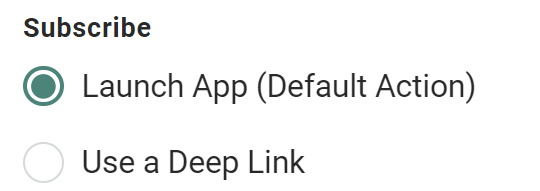
Subscribe
Displays a singleSubscribebutton on your push notifications. The button takes users to your app or to a specified link.
Share
Displays a singleSharebutton on your push notifications. The button takes users to your app or to a specified link.

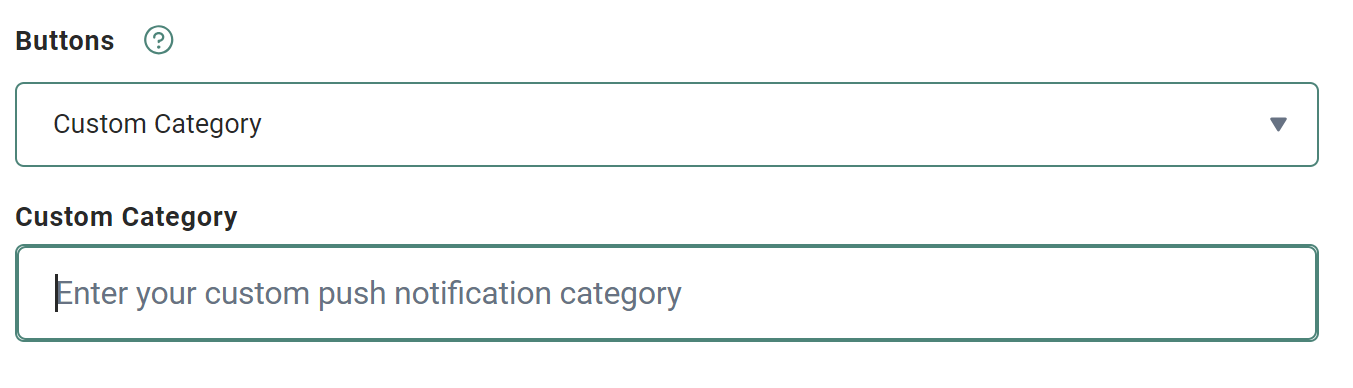
Custom
You can use the custom button that's built into your mobile SDK, by selecting this option.
Once selected, enter a name for your custom category that matches with the name registered in the Mobile SDK.
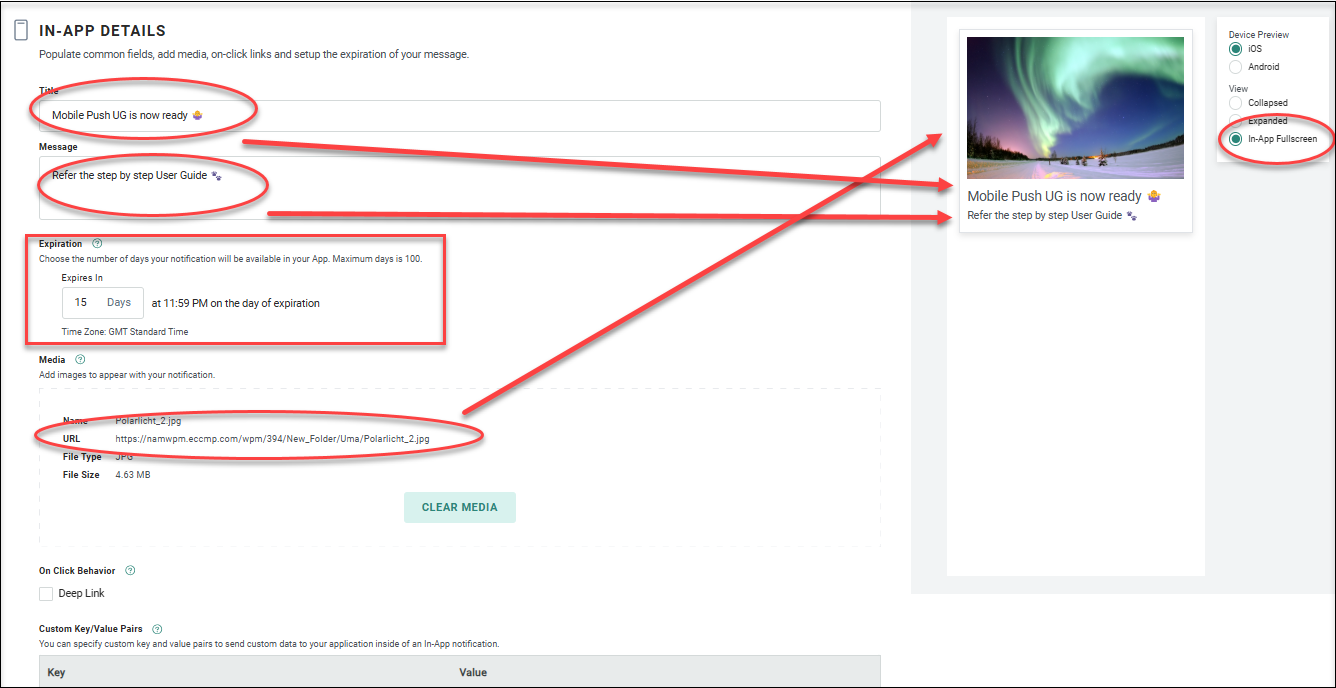
- In the In-App Details section, set the message expiration by specifying how many days it remains available in your app after being sent.
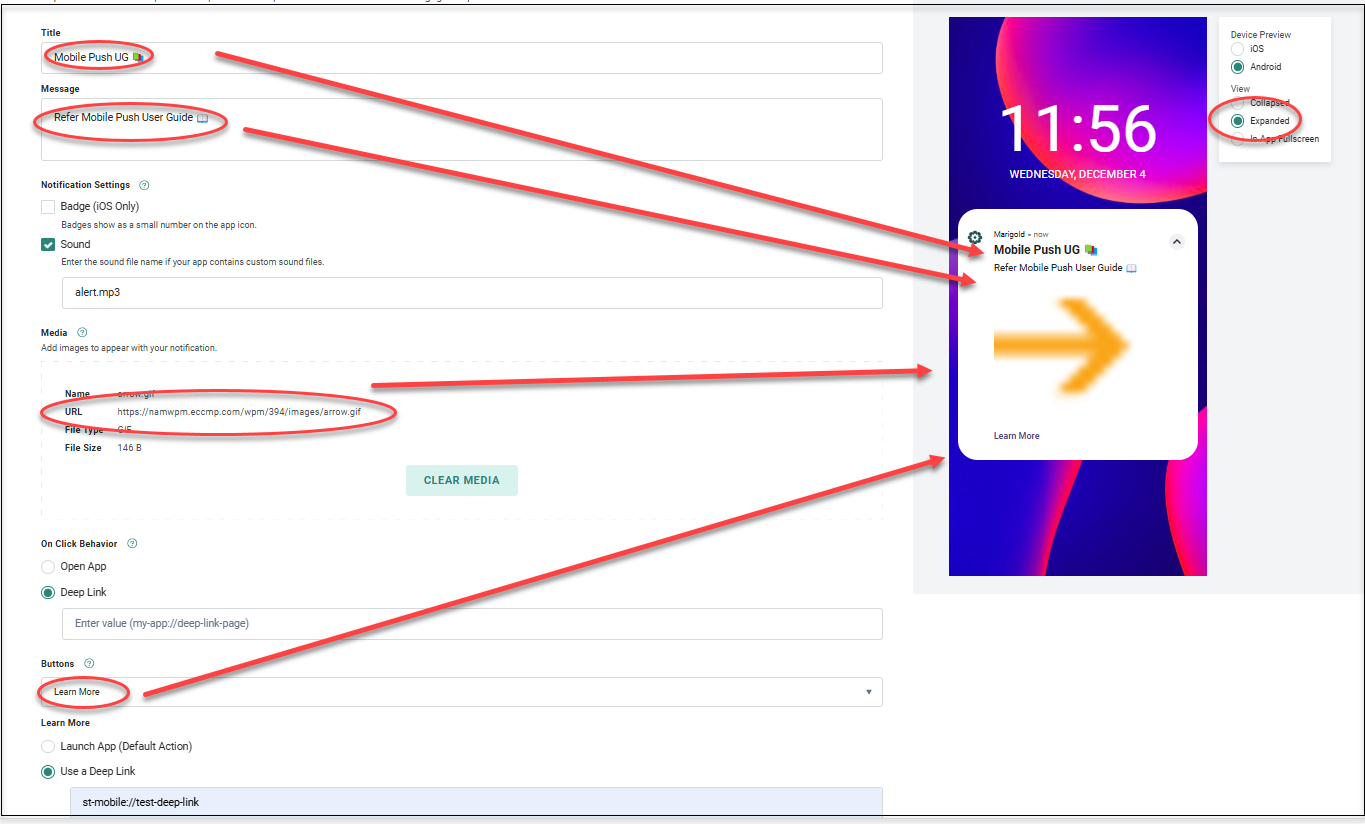
We will now create the message for our example Push and In-App Notification Campaign. While creating your message Cheetah Digital dynamically creates your message in the mobile device Preview, allowing you to see how your message might appear.
-
Click the option "Push and In-App Notification".
-
In the Push Details section:
-
Title: Enter a short title line for your push notification title and an emoji
-
Message: Enter your longer message and an emoji
-
Notification: Select "Sound" and enter the sound file name in the app
-
Media: Enter the image file link, in this example, it is an hosted image in Cheetah Digital
-
On Click Behavior: Select "Open App"
-
Buttons: Select "Learn More" from the list and click "Deep link" and provide the link to the section of the app to be opened when the button is clicked by the recipient
-
-
In the In-App Details section, provide the required information as above and in addition enter the number of days for the message to be available in your app in the Expiration field.
-
Click Save to save your message.
When a campaign is launched, it goes through two separate and distinct phases: building messages and sending messages.
In the message building phase, the platform identifies the intended recipients of the campaign, identifies all the possible content variations based on the Dynamic Content options used in the campaign, and determines the Personalization values based on any Personalization fields used in the content. The steps in this first phase are often collectively referred to as the queue process.
In the sending phase, the system merges together the data and the content in order to assemble the final messages. These messages are then transmitted to the recipients.
Note: The duration between the two phases must be kept to a maximum of 7 days to ensure data freshness, deliver timely messages, and keep the scheduling process simple.
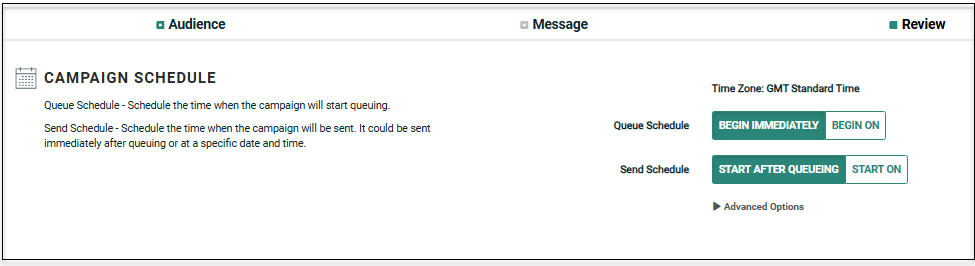
The settings for these phases can be made in the Queue schedule and Send schedule fields respectively in the Campaign schedule sub-section. These options vary for the Regular one-off, Date Triggered and Event Triggered Campaign types. For more details on these settings, refer screen-based help - Review.
To schedule a Regular (one-off) Campaign:
-
Define Queue Schedule:
-
Within the Campaign Schedule section, next to Queue Schedule, select either:
-
If you want the Queue Schedule to begin immediately when the Campaign is launched, select Begin immediately (this option is selected by default).
-
If you want to set a custom start date / time at some point in the future, select Begin on, and select one of the following options:
-
To set a specific start date and time, select Date from the drop-down menu, then select a date and a time.
-
To set a start date relative to the Send Schedule (for example, Two hours before the Send Schedule start), select Relative Date from the drop-down menu. Enter a value, then select either Days or Hours.
-
-
-
-
Define Send Schedule:
-
Within the Campaign Schedule section, next to Send Schedule, select either:
-
If you want to send messages as soon as they're built, select Start after Queueing.
-
If you want to set a custom start date / time at some point in the future, select Start on, then enter the start date and time for the Send Schedule (this option is selected by default).
-
-
Optionally, click Advanced Options to expand it.
-
Define the Send Frequency:
-
Daily: Enter an interval (every "X" days).
-
Weekly: Select one or more days of the week.
-
-
Select the time of day when messages are sent:
-
To send all day long, select the Send All Day tab.
-
To define a Send Window, select the Send Only Between tab. Enter a specific start time and end time. The end time selection options are limited to specific intervals, for Machine Learning.
-
-
By default, the Campaign's Send Schedule will run until all messages are sent, or until the Campaign is stopped or cancelled. Optionally, to enter a Send Schedule end date, select Stop Sending On, then enter the end date and time.
-
In our example, we will schedule to send the Campaign immediately on launch.
In the Campaign Schedule sub-section, click "Begin Immediately" in Queue Schedule and "Start After Queueing" in Send Schedule.
Cheetah Digital can generate "test" versions of an Email, SMS message, or Push Notification message, prior to actually launching the campaign. These test versions, called "proofs," are used to check for accuracy in grammar, content, format, and appearance, and to verify that Personalization fields are correctly populated. In order to streamline this process, Cheetah Digital allows you to define and save a designated set of recipients called a Proofing Group.
-
Above the list of existing Proofing Groups, click + New button. If you are within a Mobile push notification campaign, click the new button
 . A "New Proofing Group" dialog box is displayed.
 -
A "New Proofing Group" pop-up window is displayed. In the "Name" field, enter a name for the new Proofing Group.
-
Select the Cheetah Digital toggle. This is already selected if you are creating the Proofing group from within a campaign.
-
From the "Channel" drop-down menu, select Push Notification. This is already selected if you are creating the Proofing group from within a campaign.
-
From the "Type" drop-down menu select:
- Use Specific Records: The platform uses the Proofing Group recipients to build and populate the proof message content. If using this option, the Proofing Group recipient must exist as a record in the Proofing Group's source table, with the necessary contact information (email address, mobile phone number, etc.) and other fields needed for Dynamic Content and / or Personalization.
-
Use Random Records: The platform randomly selects records from the Campaign's audience to build and populate the proof message content.
Note: The "Specific Records" option is not supported in Push notification channel.
-
Click Create. The Workspace is refreshed to show the Proofing Group detail screen.
-
Expand the "Group Members" section, to add members to the group. Enter the member's Device ID in the "List Member" text field. In the Group Members section. Find the Device ID using the Record Lookup. For instructions, refer Mobile Push Application Groups. Alternatively, use the Filter search using Device Registration. For instruction, refer Filter - Device Registration.
-
Click Add
. -
Repeat the above steps as needed to add more members to the Group. To remove a member, click
 next to the member.
 -
Optionally, you can assign one or more tags to your Proofing Group. To assign a tag, click on the Set tags field in the Edit > tab of the Tool Ribbon. The system displays a pop-up menu of all the existing tags. You can select one of these tags, or type in a new one and press Enter. You can repeat this process to add more tags. To remove a tag, click the X icon next to the tag label.
-
When finished, click Save in the Tool Ribbon.
-
In the Proofing and Auditing sub-section in the Review tab of your Campaign, select "Proof" from the Action list.
-
Select the required Proofing Group.
-
Alternate Data set
-
In the "Proofing Limit" text field, optionally enter the maximum number of proofing messages that you want to generate.
-
Click Save and proof. If the system detects unsaved changes in your message, a confirmation dialog is displayed, asking if you want to save and then send the proofs, or send the proofs based on the last-saved state.
The "Proofs" status area shows the progress of the proofs as they are created and sent.
In our example Campaign, we will create a Proofing group.
-
In the Proofing and Auditing sub-section, select "Proof" from the Action list.
-
In the Proofing Group, click the
icon. A pop-up window is displayed to create a new proofing group for Push notifications.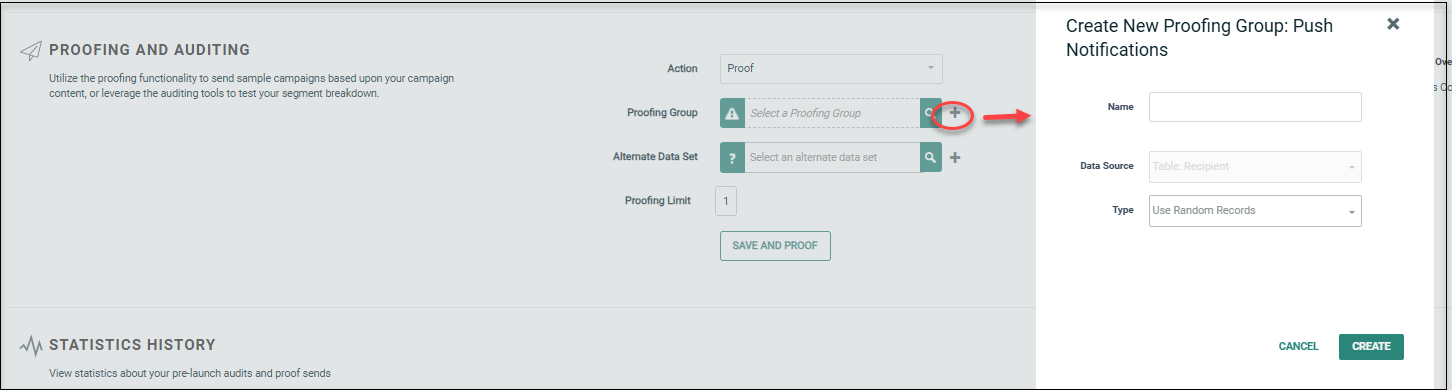
-
Enter a name and click Create.
-
Click
 "Go to Proofing group details" icon to open the Proofing group screen, to add members to the group.
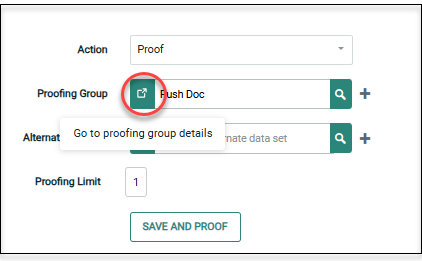
-
Find the Device ID of the members you want to add to the group using the same instructions as given in Device Registration Information
-
Enter the Device ID in "List Member" field and click
.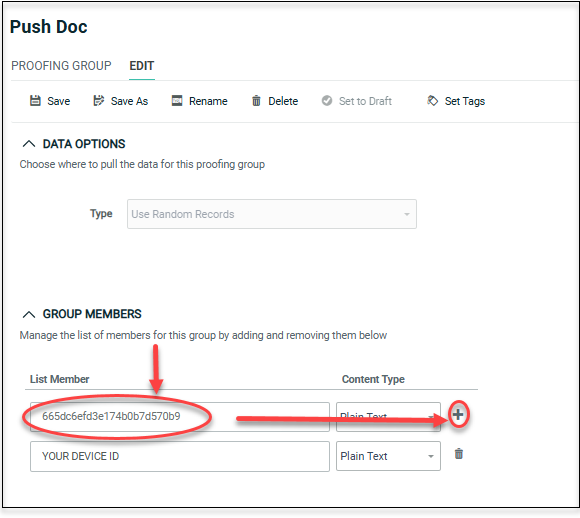
-
Repeat this process to add all the members and then click Save.
-
Go to the Campaign tab and click Proof to run the proofs. The "Proofs" status area shows the progress of the proofs as they are created and sent.

-
At the bottom of the screen, click Launch Campaign. Optionally, you can also select Actions > Launch Campaign in the Tool Bar. The "Launch Campaign" pop-up window is displayed.

-
Place check marks next to the processing steps where the platform should stop and require an approval before continuing on to the next step. For each option that's checked, an approval will be required before the Campaign can proceed.
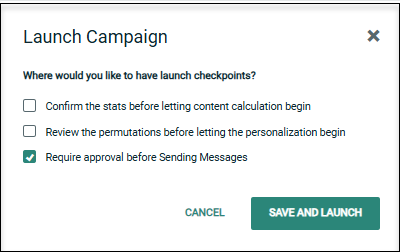
-
Queuing Statistics: Confirm the stats before letting content calculation begin.
-
Content Permutations: Review the dynamic content permutations before letting personalization begin.
-
Sending: Require approval of the overall Campaign before sending messages.
-
-
Click Save and launch. The system begins the Campaign launch process, and the Status screen is displayed.
If you enabled any of the approval steps when you launched the Campaign, you'll need to approve that step before the launch process can continue.The Review & Approve sub-section allows you to review Campaign counts and stats, and then approve any launch steps that are awaiting approval.
In the status tab, you can stop, pause or cancel a Campaign. Refer screen-based help - status for details.
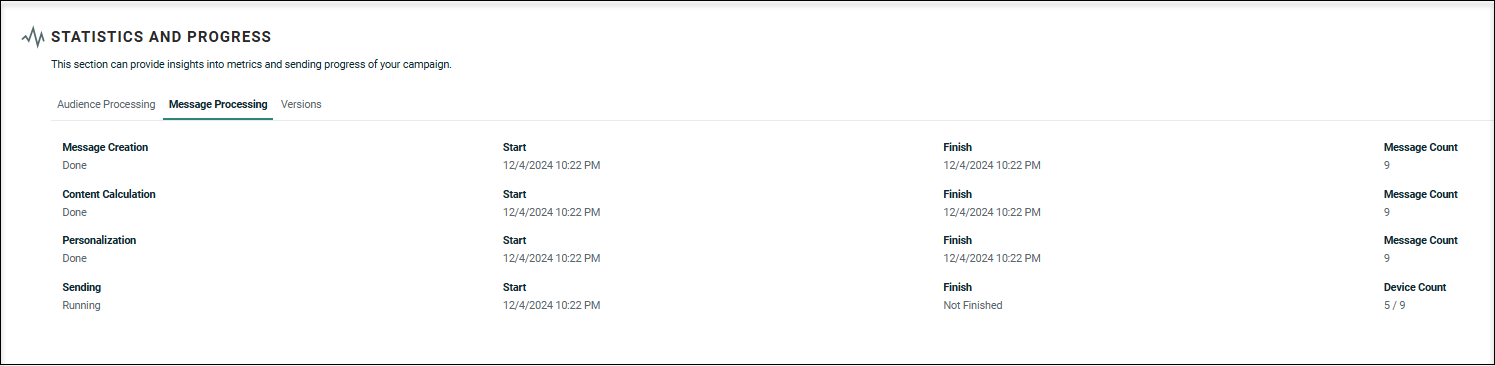
After you launch a Campaign, you can view statistics and status information regarding each step in the Launch process by selecting the Message Processing tab. This tab displays each of the four Launch steps (Message Creation, Content Calculation, Personalization, and Sending), along with the status, start time stamp, end time stamp, and record quantity. Optionally, click the down-arrow icon next to a step to view detailed statistics for that step.
Video Learning
You can also watch our videos to quickly learn some of the Mobile Push concepts.
How is this different from the legacy push notification?
The new recipient-centric Mobile Push channel offers several improvements over the legacy push feature:
-
A new data model is automatically created when defining the App Group
-
Leverages Device ID and Token
-
Device information is accessible in Record Lookup
-
Supports both Push and In-App notifications
-
Features an updated, simplified user interface for Campaign creation, similar to the Email Campaign
-
Includes enhanced reporting with a new real-time analytics report alongside the legacy operational report.
