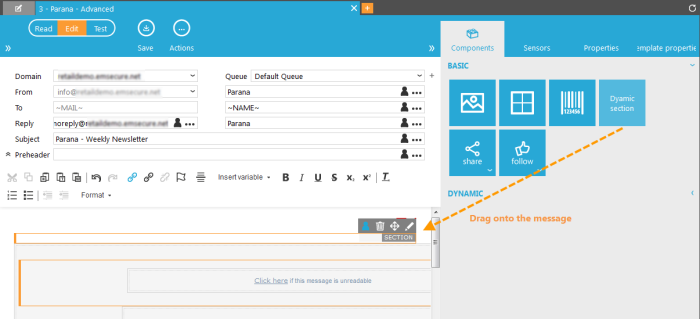
This is used to create smaller sections within a message. The design area of a message must be considered as one large section in which smaller sections can be placed. (Example: different Content Blocks for male and female contacts while the remainder of the message is the same for both). So in general, dynamic section components are used when small blocks of content need to be different between target groups while the remainder of the message is the same.
A dynamic section component is added through drag and drop from the Basic components section on the right.
Hover the dynamic section in the message to display 4 handles on this section:
- Properties: accesses the properties dialog for the selected component.
- Delete
- Move
- Constraint: accesses directly the constraint editor to define a filter on this component.

Usually only a constraint needs to be set on the section. Select Properties to set all other options:
On the 'Section properties' tab:
1. Visibility: Here, you can also define the constraint to limit the current section to only a specified number of contacts
Check the option if you want to set a constraint for the contacts that should be able to see the section. The text box is enabled. (Example: limit this section only to men)
2. Press the ... button to access the Constraint editor.
3. Define a constraint. (Example: GENDER='M'; SYSTEM.MAIL=1). If an audience list is selected in the message properties, it is listed here with all its fields and extended profiles from where data can be used for the constraint. If no audience list is selected in the message properties, you'll first need to select the audience list first in the message properties.
4. When done, press the 'Accept' button. The constraint is returned to the text field in the properties.
When a constraint is defined it is visible when hovering the section. The Tilde icon is displayed in blue and a tooltip displays the actual constraint.
Click the tilde icon to directly access the constraint editor.
5. Next, define the language for this section. By default the language of the message is used. That setting can be overruled for the selected section by specifying a different language.
When a language is defined for a section, all translatable values will be translated automatically into the selected language. By default, the section will only be displayed to contacts having the selected language in their profile.
NOTE: This is rarely done because the language choice has to be defined on a higher level, either in the audience list properties or passed to the page in a content renderer (advanced).
Fields in audience lists that have option lists linked to them, will be translated. These translations are created in the configuration. When the section contains personalization fields with a $ sign in front, these fields are translated into the selected language. See list design and translations for more info on option lists.
6. If the current section must also be available to contacts with a different language, tick the corresponding check box.
7. Next, it is possible to link the current section to another section within the same page. This is an option that is only used when creating templates with dynamic sections.
On the 'Style' tab
8. On the 'Style' tab it is possible to define a custom style or select a predefined css class. By default, a section is included in a <div> tag.
By default 'Include a style frame (DIV)' is unchecked. If you check this option, it will add the div tags of the dynamic section to the final mail. So your section content will be displayed within a div. Since a div is a block level element (like a paragraph, the rest of the content starts on a new line) it can sometimes break the layout, because it was not foreseen in the original design. In this case the DIV option must remain unchecked. The div tags will not be added to the final message and the section content is displayed in line with the surrounding content. If unchecked, a parameter mahidediv="TRUE" will be added.
Use the 'Applystyle' field to select a predefined style. Or use the 'Styles' field to enter the style manually. (Example: margin:0px; font-size:12px;font-weight:bold). 'Include a style frame (DIV)' must be checked, because the style will be added to the div tag.
The section is now ready for use. Below an example in the source code of a section to show the web version sensor (~PROBE(0)~) only in the email client and not in the browser (constraint SYSTEM.MAIL=1), with the section div tags not included (mahidediv="true") in the final message:
<div id="masection" maconstraint="SYSTEM.MAIL=1" mahidediv="true"><a href="~PROBE(0)~">View this email in your browser</a></div>
Technical note
When a dynamic text section is added to the email message, the following HTML code is used:
<div id="MASECTION" maconstraint="" macontenteditable="FALSE" maparameter="" matype=""></div>
So by default the content is rendered in a DIV which allows setting styles and classes on these sections.
<div maclass="classname" id="MASECTION" maconstraint="" macontenteditable="FALSE" mahidediv="FALSE" malanguage="" maparameter="" mashowalllanguages="FALSE" matype="" mastyle="color: blue;"></div>
By unchecking the option 'Include a style frame', the MAHIDEDIV attribute is added:
<div id="MASECTION" maconstraint="" macontenteditable="FALSE" mahidediv="TRUE" malanguage="" maparameter="" mashowalllanguages="FALSE" matype=""></div>


