Export Lists and User Profile Data
In My Sailthru, you can download a CSV file of user data for any list. You can select which fields and vars to export, or choose to export only email addresses or opt-out data.
To export this data through our API, see the job export_list_data call. If you need to export additional data that is not included in these exports, see Data Exporter.
For enhanced security, only Sailthru seats (admins) that have been assigned PII (Personally Identifiable Information) permissions by their administrator are able to download raw email addresses. By default, your list exports will instead contain hashed email addresses. For more information, see Hashed Email Addresses below.
The EXTID and SMS identifiers are included when present on the profile.
Export All Email Addresses
- In My Sailthru, go to Users > Lists.
- Locate the list you want to export, and in the rightmost column, click
 .
. - Select All Emails, and click Export.
- When your file is ready, the download begins automatically. Or, while your export is processing, you can navigate away from the page, and return later to the Jobs page through the Analytics menu.
Export Var Usage Data
Export a CSV file containing the names of all custom vars in use across your userbase. You can choose to export additional details for each var, such as the number of profiles that contain it and sample values.- On the Lists page, click the Export User Vars button.

- Choose to export user var Names only (a very quick process) or Names and usage information (which may take some time if you have a larger user database).
A CSV file is downloaded containing the requested data.
If you chose to include usage information, the following data fields are also included as additional rows:
Var Name Count -- how many user profiles have this var
String Count -- how many instances of this var are text values
Boolean Count -- how many instances of this var are boolean (true/false) values
Float Count -- how many instances of this var are float/double values
Integer Count -- how many instances of this var are integer values
Object Count -- how many instances of this var are objects aka maps
Array Count -- how many instances of this var are arrays aka lists
Null Count -- how many instances of this var are null (Note: This does not include profiles that do not have the var on the profile at all--only those where the var is present and set to null.)
Unknown Type Count -- how many instances of this var are an unknown type (these are unlikely to exist)
Sample Profile IDs -- 5 of your user profile IDs which have this var
Sample Values -- 5 sample values for this var that exist across your userbase
Select Specific Fields and Vars to Export
- In My Sailthru, go to Users > Lists.
- Locate the list you want to export, and in the rightmost column, click
 .
. - Click Select Data.
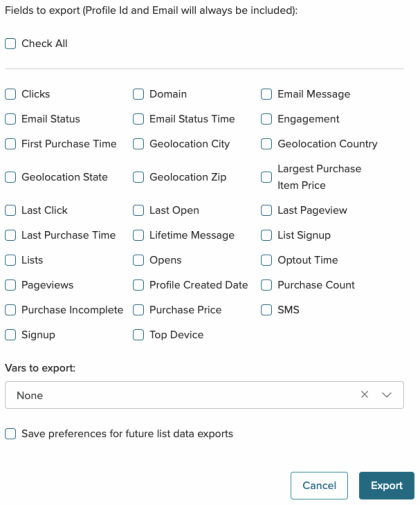
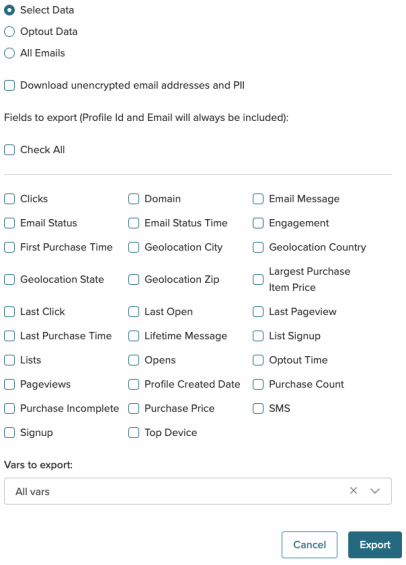
- Under Fields to export, select individual fields, or Check/Uncheck All.

For information about each field, please see the field glossary. - Next to Vars to Export, select Only Specific Vars.
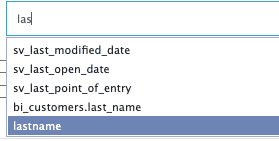
- In the field below, begin typing a var name. Matching auto-complete results appear below.

Use the arrow keys to select one, and press enter, or simply click the result you wish to use. You can alternatively paste in a comma-separated list of var names. - If you want to default to these field and var selections the next time you view this screen, check Save preferences for future list data exports.
- Click Export.
- When your export is ready, you'll see a message pop up at the bottom of the screen. Select the link to begin your download.

Export All User Data
Note that if you only require certain fields or vars in your export, a custom export of only those fields and vars will be generated more quickly. See "Select Specific Fields and Vars to Export" above.- In My Sailthru, go to Users > Lists.
- Locate the list you want to export, and in the rightmost column, click
 .
. - Click Select Data.
- Under Fields to export, select Check/Uncheck All.
Then, in the to Vars to Export drop down, select All Vars.

For information about each field, please see the field glossary. - If you want to default to export all fields and vars the next time you view this screen, check Save preferences for future list data exports.
- Click Export.
- When your export is ready, you'll see a message pop up at the bottom of the screen. Select the link to begin your download.

Export Optout Data Only
Your export will contain only the email addresses or hashes (based on your account permissions) of those users who have opted out of all email, campaigns only, and/or specific templates, along with an optout timestamp for each.- In My Sailthru, go to Users > Lists.
- Locate the list you want to export, and in the rightmost column, select
 .
. - Select Opt Outs, and click Export.
- When your file is ready, the download begins automatically. Or, while your export is processing, you can navigate away from the page, and return later to the Jobs page:
- Find your job in the table. If it is complete, at the end of its row, click
 to download the file.
- Find your job in the table. If it is complete, at the end of its row, click
Email Address Hashing
Downloading hashed email addresses protects you in case of a security breach involving one of your employees. Most of the time, an admin should never need access to raw email addresses; you can segment, report, and create audiences with the data that is given to you in a hashed email list or within the interface itself, for example, by using Audience Builder. Because Sailthru uses the industry-standard MD5 hashing algorithm, you can also match hashed email exports with known users in your other systems.The Account Admin of your account can change who has access to raw emails in Permissions > User Management. You can read more about the User Management page here.
- Click the wrench next to the user's name.
- In the new window, check the box, "Enable PII Permissions"
When you download a list and have PII permissions enabled, you will be prompted to choose the type of data. For unencrypted emails, check the box, "Download unencrypted email addresses and PII." You must then complete an sms or email verification to finish the download process. The sms verification option will only appear if you have an sms number entered on My Info in the platform.
Verification emails will only go to the email address you use to log in to the platform. You cannot add multiple email addresses for verification messaging. External IDs (extid) will not be hashed.

