Campaign Configuration: SMS Text
Overview
SMS, or "Short Message Service," consists of a short text message transmitted to a recipient's mobile device. Cheetah Digital allows you to create and manage Campaigns with SMS, allowing you to engage with your customers by sending timely, focused messages.
Note: Before you can use Cheetah Digital's SMS Text Campaign features, you must complete all of the configuration and setup steps, as described in the Help topic SMS Text Channel Setup.
The SMS Text channel also supports the use of Multimedia Cheetah Digital Service (MMS), which extends the capability of SMS by supporting the use of an image, video, or audio clip within the message. The total file size of the entire MMS message, including the text component and multimedia file, can't exceed the maximum size allowed by your country's mobile carriers.
Note: The use of MMS is an optional feature that must be enabled with your account, and within the Sender Profile utilized by your Campaign. Currently, the MMS feature is available only to clients who utilize OpenMarket as their short code aggregator. Please speak with your Client Services Representative for more details on enabling MMS.
The platform supports two different data sources for building SMS Text Campaigns -- the Cheetah Digital database, and the Engagement Data Platform (EDP). This topic describes Campaigns build off the Cheetah Digital database; for more details on Campaigns built off EDP, please see Configure an SMS Text Campaign [EDP].
This topic describes all of the various configuration options available for SMS Text Campaigns. This topic assumes that you have already created the Campaign (see Campaigns for more details on how to create a Campaign).
The Campaign screen is organized into the following areas:
|
Setup |
Content |
Review |
Status |
Analytics |
Campaign Settings
The ![]() icon at the top of the screen provides access to the following general Campaign settings.
icon at the top of the screen provides access to the following general Campaign settings.
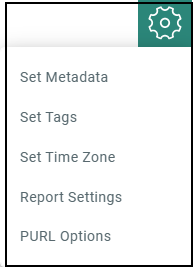
Campaign settings
The Campaign screen provides access to the following features.
Configure campaign metadata
To assign Metadata values to a Campaign from within the Campaign screen:
-
In the Tool Bar, click Settings > Set Metadata. The Metadata pop-up window is displayed, listing every Metadata field defined for this account. A red asterisk is displayed next to the fields that are required for Campaign launch.
-
Enter or select the desired Metadata values.
-
Click Ok.
For more information on setting up Metadata fields, see Metadata Settings.
Assign campaign tags
Optionally, you can assign one or more Tags to your Campaign. These Tags serve as an organization tool that allow you to group together items for reports and Filters.
Note: If your Campaign contains Cells & Splits, the Tag can be added only at the top-level Campaign, and not to an individual cell.
To assign a Tag to the Campaign:
-
In the Tool Bar, click Settings > Set Tags. The Mailing Tag pop-up window is displayed.
-
In the Add Tag field, begin typing the Tag value. The system displays a pop-up menu of all the existing tags. You can select one of these tags, or type in a new one and press Enter.
-
Optionally, repeat steps 2 and 3 to add more tags. To remove a tag, click the X next to the tag label.
-
Click Ok.
Set time zone
The first time you log into Cheetah Digital, the platform prompts you to set your time zone. Once the time zone is set, all system dates and times will display according to that time zone (this setting can later be modified through the Update Profile screen). However, when scheduling a Campaign, you can manually overwrite the user profile setting, and establish a different time zone to be used for just this Campaign.
To establish the time zone used for all scheduling activities related to this Campaign:
-
In the Tool Bar, click Settings > Set Time Zone. The Set Time Zone dialog box is displayed.
-
From the Time Zone drop-down menu, select the desired time zone.
-
Click Ok.
Configure report settings
Cheetah Digital tracks and reports various system events, such as user clicks, opens, delivery, and more. The platform allows you to configure various report options at a Campaign level.
To set the Campaign's report options:
-
In the Tool Bar, click Settings > Report Settings. The Report Settings pop-up window is displayed.
-
The Delivery Audit section is an optional feature that must be enabled in your account. This option is available only for Regular One-Off Campaigns in the email Channel. The platform maintains a special list of email addresses across all different domains. This list functions much like a Seed List, in that your Campaign will send copies of the message to these addresses. This feature validates the entire mailing process by checking your sending infrastructure, message content, and sending reputation. The feature indicates whether your message landed in the consumer's inbox or spam folder, or if it was blocked. To utilize this feature for this Campaign, place a check mark in this check box.
Note: Please speak with your Customer Service Representative for more information on enabling the Delivery Audit feature.
-
To use consistent users for seeding across all Campaigns, select the check box next to the option Inbox Monitor. This also excludes user's personal details from email headers, helps to achieve uniformity in subject lines and content, enhances data security, provides reliable reporting and also safeguards sensitive information, leading to a smoother and more compliant campaign experience.
-
Tracking information is constantly gathered by the platform. However, the reports are updated only when manually executed, or on the schedule set for Automatic Updates on the Update Options screen. Optionally, you can define an automated update schedule that applies only to this Campaign. To define an automated Campaign-specific update schedule:
-
Place check marks next to the days of week on which you want the automated update schedule to run.
-
From the Every X Hours drop-down menu, select the automated update frequency. The possible frequency ranges from every hour to every twelve hours.
-
From the First X Days drop-down menu, indicate for how long this automated schedule should run after the Campaign is initially launched. The possible values are 5, 10, 15, 20, 25, or 30 days.
-
-
Click Ok.
Configure PURL options
A Personalized URL (or "PURL") is a website address that contains one or more personalized elements, such as the consumer's first name and last name, for example.
Before you can use a PURL in your Campaign, you must complete the following setup steps:
-
Create a PURL Field
-
Bind that PURL Field to a PURL Domain
-
Assign the PURL Domain to a Web Form
After you've completed all those steps, you can bind the Web Form to your Campaign. When you bind the Web Form to the Campaign, the platform will automatically generate the values for the PURL Field.
To bind the Web From to your Campaign:
-
In the Tool Bar, click Settings > Set PURL Options. The PURL Options pop-up window is displayed.
-
The PURL field is used to select the Web Form. Either begin typing in the Web Form name, or click the search button (magnifying glass icon) to search for it.
-
From the URL Type drop-down menu, select either Prefix or Suffix to control where you want the personalization field(s) inserted into the URL.
-
Click Ok.
For more information on setting up Personalized URLs, see the PURL Domains topic.
Turn Off Tracking
To comply with recipient preference and evolving privacy regulations, you can switch off the receipient tracking option in an email or SMS campaign. Please ask your Marigold Representative to get his feature enabled in your Engage+. To ensure complete Data Privacy, once tracking is turned off for a designated campaign, no open or click data will be collected or reported.
Note: You can turn off the tracking, only before the campaign has been sent.
To Turn Recipient Tracking Off in a Campaign:
-
In the Campaign Toolbar, select Options > Turn Tracking Off. A Confirmation Dialogbox is displayed.
-
Click Save & Confirm, to turn the tracking off in the campaign. This will only turn off tracking in a copy of a campaign, which is being sent exclusively to a filtered group of recipients who have asked to not be tracked.
When the Tracking is turned OFF, the Link Tracking settings in the Responses section of the Campaign is not available for editing. For cells and splits or AB Tests, when the tracking is switched off at the parent campaign, it is cascaded to all child cells. You cannot turn it back on once it is turned off.
Campaign Management
The Campaign screen provides the following Campaign management features, which can be accessed from the More Actions menu.

Run Pickup Changes
The Pickup Changes feature allows you to make modifications to a launched Campaign while messages are in the process of being deployed. These changes will then be applied to all unsent messages.
You must suspend the Campaign before you can run Pickup Changes. The only exception to this rule is an Event-triggered Campaign that uses Advanced Event Trigger as the Trigger Type; in that one scenario, you don't need to first suspend the Campaign before running Pickup Changes.
Note: Any messages that have already been created and sent can't be retrieved.
For Regular One-Off Campaigns, you can change the Campaign schedule and content; however, you can't change the Filter once the Campaign launches.
For Event-triggered and Date-triggered Campaigns, you can change any aspect of the Campaign, including the Audience Filter.
If your Campaign contains Cells and Splits, click 3. Setup and Launch Campaign.
To modify a launched Campaign:
-
Make any necessary changes to the Campaign schedule and / or content, then click Save in the Tool Bar.
-
Click Suspend Campaign at the bottom of the screen. A confirmation dialog box is displayed. Click Suspend.
-
Now click Pickup Changes (alternatively select Pickup Changes from the Actions menu in the Tool Bar). Please note that this option is disabled if you don't first suspend the Campaign. A confirmation dialog box is displayed.
-
Click Save then Pickup Changes or Pickup Changes without Saving. When the Pickup Changes process is completed, a notification is displayed at the top of the screen.
-
Click Resume Campaign at the bottom of the screen to resume the Campaign with the changes made. A confirmation dialog box is displayed. Click Resume.
To view the change log for this Campaign, including the date / time of the change and other details, click Versions tab in the Statistics and Progress section.
Copy a Campaign
From within the Campaign screen, you can copy an existing Campaign to use as the basis for a new Campaign:
-
In the More Actions menu, click Copy Campaign. A Copy Campaign dialog box is displayed.
-
Enter a name for the new Campaign.
-
By default, the new Campaign will be saved in the same folder location as the base Campaign. Optionally, click the magnifying glass icon to browse to and select a different folder location.
-
Click Copy Campaign. The system creates a copy of the current Campaign.
Delete a Campaign
When you delete a Campaign, the system moves it from its current folder location into the Recycling Bin, where it can optionally be restored if needed. If the selected Campaign is stored in a folder to which you don't have the proper access privileges, you won't be able to delete that Campaign.
From within the Campaign screen, you can delete a Campaign:
-
In the More Actions menu, click Delete Campaign. A confirmation dialog box is displayed.
-
Click Delete. The system moves the Campaign to the Recycling Bin.
Rename a Campaign
To rename a Campaign:
-
In the Tool Bar, the name of the Campaign is displayed within a text field. Enter the new name within this field.
-
Click Save.
View Campaign details
To view detailed information about the Campaign:
-
Click the
 icon next to the campaign name.
 -
The Item Details panel is displayed, which provides the following information:
-
Who created the item, and who modified it last.
-
A log of actions taken on the Campaign, including what the action was, when it was taken, and who performed the action.
-
A Related Items section that lists other items in the system that reference or utilize this Campaign.
-
The Campaign's folder location.
-
Change Campaign type
From within the Campaign screen, you can switch the Campaign type between a Regular One-off Campaign and either form of triggered Campaign (Date-triggered or Event-triggered).
To change the Campaign type:
-
In the More Actions menu, click Change Campaign Type. The Set Campaign Type pop-up window is displayed.
-
Click the radio button for the desired Campaign type. A warning message is displayed within the pop-up window.
-
Click Ok.
Change content type
From within the Campaign screen, you can switch the Content type.
To select the content type for your Campaign:
-
In the More Actions menu, click Change Content Type. The Change Content Type pop-up window is displayed.
-
Select the required Content type.
Provide Content is the default content type, and allows you to enter HTML into the Content Editor, or to use the Content Designer.
-
In the Change Content Type pop-up window, click Provide Content.
-
Select the Content tab. See Content for more details.
By using a Template as the Content Type, all Campaign content will be pulled in from the selected Template. You won't be able to manually enter HTML into the Campaign content.
-
In the Change Content Type pop-up window, click Template. The Browse Templates pop-up window is displayed.
-
From the Browse Templates pop-up window, you can click on a folder in the directory structure to see a list of all the Templates stored within that Folder. Or, if you want to search across the entire system, click the double-left arrow icon near the top of the directory structure; the system collapses the directory structure and shows every Template in the system. This pop-up window also allows you to search based on Tags, or by name. When you find the desired Template, click on its name.
Note: Templates have to be created using the same source table as the Campaign in order for them to be available as a selection.
-
The Content tab is refreshed to show the selected Template.
By using a Dynamic Block as the Content Type, all Campaign content will be pulled in from the selected Dynamic Block. You won't be able to manually enter HTML into the Campaign content.
-
In the Change Content Type pop-up window, click Dynamic Block. The Browse Dynamic Blocks pop-up window is displayed.
-
From the Browse Dynamic Blocks pop-up window, you can click on a folder in the directory structure to see a list of all the Dynamic Blocks stored within that Folder. Or, if you want to search across the entire system, click the double-left arrow icon near the top of the directory structure; the system collapses the directory structure and shows every Dynamic Block in the system. This pop-up window also allows you to search based on Tags, or by Dynamic Block name. When you find the desired Dynamic Block, click on the Dynamic Block name.
Note: Dynamic Blocks have to be created using the same source table as the Campaign in order for them to be available as a selection.
-
The Content tab is refreshed to show the name of the selected Dynamic Block.
By using a Content Block as the Content Type, all Campaign content will be pulled in from the selected Content Block. You won't be able to manually enter HTML into the Campaign content.
-
In the Change Content Type pop-up window, click Content block. The Browse Content Blocks pop-up window is displayed.
-
From the Browse Content Blocks pop-up window, you can click on a folder in the directory structure to see a list of all the Content Blocks stored within that Folder. Or, if you want to search across the entire system, click the double-left arrow icon near the top of the directory structure; the system collapses the directory structure and shows every Content Block in the system. This pop-up window also allows you to search based on Tags, or by Content Block name. When you find the desired Content Block, click on the Content Block name.
Note: Content Blocks have to be created using the same source table as the Campaign in order for them to be available as a selection.
-
The Content tab is refreshed to show the name of the selected Content Block.
Cells and Splits
Marketers often need to divide their Campaign Audience into smaller segments, or cells. You might need to do this in order to test the effectiveness of a particular marketing message, or because you need to use a different sending method, or schedule, for the different cells.
Messaging provides you with the ability to create complex, sophisticated ways of segmenting your Audience. The platform supports two different segmentation methods: A / B Testing and Split Cells.
Split Cells allow you to divide your Campaign Audience into different receiving groups, with or without the use of a "remainder" Audience. With Split Cells, you can create a complex hierarchy of nested cells, each of which is designated with a unique code that can be used elsewhere in the platform, such as reports, exports, and Filters. You can enter these cells directly into the user interface, or import them from a spreadsheet. This segmentation method can be used for testing purposes, although that's not really its primary intent, as this method won't calculate a "winner" like A / B Testing does. You can create cell variations by using different Title, Message and the Send Schedule.
Note: Split Cells are available in all Channels, and for all Campaign types. A / B Testing is available only for Regular One-Off Email Campaigns.
You can change your Campaigns to Cells ans Splits Campaign by selecting Cells and Splits from the More Actions menu.
For more information on configuring Split Cells, please see Split Cells.
Turn Off Tracking
To comply with recipient preference and evolving privacy regulations, you can switch off the receipient tracking option in an email or SMS campaign. Please ask your Marigold Representative to get his feature enabled in your Engage+. To ensure complete Data Privacy, once tracking is turned off for a designated campaign, no open or click data will be collected or reported.
Note: You can turn off the tracking, only before the campaign has been sent.
To Turn Recipient Tracking Off in a Campaign:
-
In the Campaign Toolbar, select Options > Turn Tracking Off. A Confirmation Dialogbox is displayed.
-
Click Save & Confirm, to turn the tracking off in the campaign. This will only turn off tracking in a copy of a campaign, which is being sent exclusively to a filtered group of recipients who have asked to not be tracked.
When the Tracking is turned OFF, the Link Tracking settings in the Responses section of the Campaign is not available for editing. For cells and splits or AB Tests, when the tracking is switched off at the parent campaign, it is cascaded to all child cells. You cannot turn it back on once it is turned off.
