
Managing Lists Overview
Lists maintain segments of your user base that you can track and message across all channels. Lists can be used across email, web, SMS, and mobile.
Types of Lists
You can create two types of lists - Natural and Smart Lists:
-
- Smart Lists, with users sourced from your Natural Lists. Smart Lists add/remove users automatically in real-time based on your custom Audience Builder criteria. For example, you could create dynamic lists of:
- high-value users, to send special offers or to regularly push to Facebook to find similar prospects
- users who have not opened email recently, to suppress them from sends and target them through other channels
- users who share a particular interest, location, signup source, or any other data point, to target communications accordingly
A user can exist on any number of lists. Information about each user is stored in their user profile, no matter how many lists the user is on.
- A user can also have no list memberships; though typically, when the user is added to your account for the first time, you have imported the user to a specific list or configured the acquisition method to automatically add the user to an applicable list.
- Your account can maintain up to a maximum of 2000 lists.
Whether a list is a Natural or Smart List, you have the option mark it as either a:
- Primary Listif you would like changes to the list to be tracked for reporting, or
- Secondary List if the list does not require reports, for example, it is for a test or other one-time use.
The Lists Page
Filter, search, and manage your lists from the Lists page.
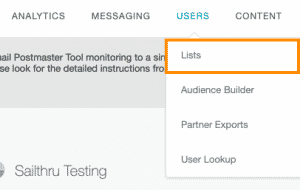
To access the Lists page in the UI, from the Users menu, select Lists.
Filter
Filter lists by labels, list type, or growth. Filter options are available directly above the list table.

Labels
Type a label into the search field or select a label from the list to filter by labels.
Type
Filter to see only Natural Lists or only Smart Lists.
Growth
See only Primary Lists or see only Secondary Lists. For more information on Primary and Secondary lists, see the documentation.
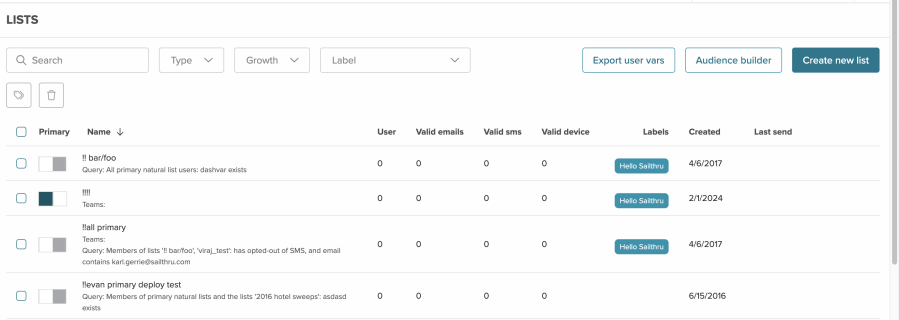
List entries
Each list in your account shows in the sortable list table.

Each entry gives you valuable, at-a-glance information about your lists, from the number of valid emails, sms numbers, and devices to the date it was last used in a send.
Select the column headers to sort by list name, the number of users, valid emails, valid sms numbers, valid devices, created date, or last used date. The Primary and Labels columns are not sortable.
Use the checkboxes at the beginning of each list entry to bulk add or remove labels.
Add labels
- Select one or more lists through the checkbox at the beginning of the row.
- Select the label icon
 above the lists. A searchable text bar opens. If any lists have labels attached, they will show in the text bar.
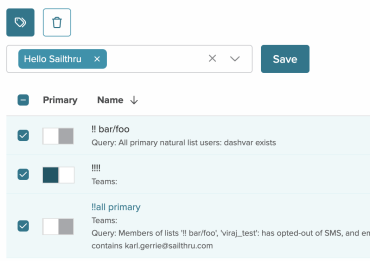
- Search for an existing label or type in a new label.
- Select Save to add the new labels to the lists.
Remove labels
- Select the lists or lists with labels you'd like to remove.
- Select the label icon above the lists.
- Select the x icon on the label entry.

- Select Save to remove the label.
List management options
List management options are at the end of each entry and are indicated by icons. Select the row to see the management options.
|
Icon |
Function |
|---|---|

|
Copy a Smart List |

|
Get Reports on your list |

|
Download your list as a CSV file. Selecting this icon will open a download modal. Select one of the options in the download modal. If you don't select one of them, you will see an "export is required" error. Note: The EXTID and SMS identifiers are included when present on the user profile. |

|
Sync your list to other services and partners |

|
Rename this list |

|
Delete this list. Note that you must be designated as an account admin to delete lists. |
Primary and Secondary Lists
Primary lists are lists in which daily changes in list growth and engagement are tracked in Sailthru's reporting. Secondary lists are not tracked. Toggle Primary status on or off from the list entry. You can have up to 50 Primary Lists.
For full documentation on Primary and Secondary Lists, see Primary and Secondary Lists: What's the Difference?
Create a list
Create a new Natural or Smart list.
Create a Natural List
- Select the Create New List button.
- Enter a Name and choose whether the list will be a Primary or Secondary List.
- You cannot use a dollar sign ($) in list names.
- Click Create List.
- Click on View list at the bottom of the screen to access the list
.
- You can now add users via a CSV upload or using the Job API.
Create a Smart List
To create a Smart List, select the Audience Builder button. For a full discussion of building a Smart List in Audience Builder, see the Using Audience Builder documentation.
- Select an Audience Source and then select Done.
- Add filters to create a specific audience.
- When you've finished adding filters, select Save as Smart List from the actions bar at the bottom of the screen.
- Give your list a name and save it.
Create a List via an API Call
The only parameter required to create a list is a list name. Optionally, you can include the type of list (normal or smart), any variables you wish to include, primary or secondary list status, and a query for a Smart list. For more information, see the list API documentation. . To create a list, make an API call that resembles one of the following examples:Natural List
Example Call:
{
   "list":"natural test list",
   "primary":1,
   "vars":{"color":"blue"},
   "public_name":"natural test list public name",
   "type":"natural"}
Example Response:
{
   "list" : "natural test list",
   "type" : "normal",
   "primary" : 1,
   "public_name" : "natural test list public name",
   "vars" : {
   "color" : "blue"   },
   "list_id" : "5840769f83ba8848008b458e"}
Smart List
Example Call:
{
   "list":"smart test list",
   "primary":1,
   "vars":{"color":"blue"},
   "public_name":"smart test list public name",
   "type":"smart",
   "query":
   {
      "source_list":"main",
      "criteria":["match"],
      "field":["color"],
      "value":["blue"]
   }
}
Example Response:
{
   "list" : "smart test list 1",
   "type" : "smart",
   "description" : "All primary list users: 'color' is 'blue'",
   "primary" : 1,
   "public_name" : "smart test list public name",
   "vars" : {
   "color" : "blue"   },
   "list_id" : "584086cd83ba8845008b458e"}
Delete a list
Only a user with Account Admin permissions can delete a list.
- Locate the list or lists you wish to delete. If you're deleting multiple lists, select all the lists you want to delete.
- Select the delete icon at the end of the list entry if you're deleting a single list. Select the delete icon above the list entries if you're deleting multiple lists.
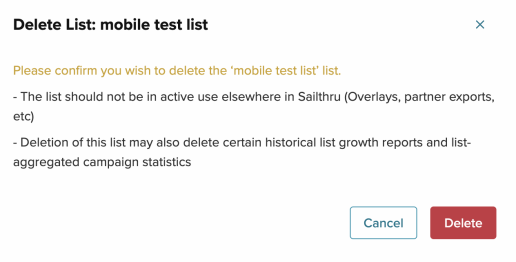
- Depending on how many lists you're deleting and what they're used for in your account, you'll see one of a few different modal windows:
- Delete a single list:
- Delete multiple lists:
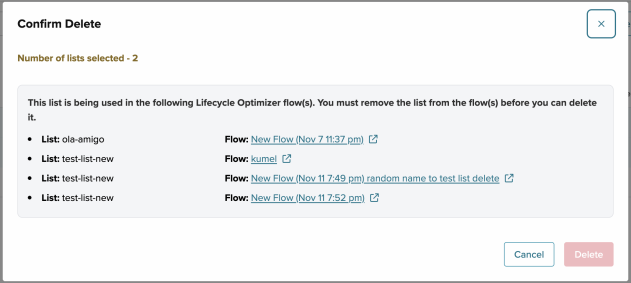
- Delete a single list used in Lifecycle Optimizer:
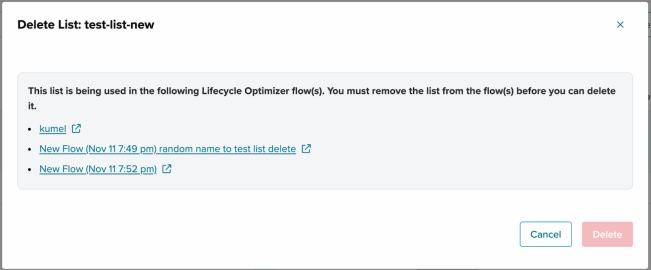
- Delete a single list:
- Select Delete to delete the list or lists.

